
Are you looking for a fun, creative way to mark your place in your favorite books? Origami animal bookmarks are not only adorable and practical but also surprisingly easy to make. These cute paper creatures peek out from between the pages, adding a touch of whimsy to your reading experience. In this guide, I’ll walk you through creating your own adorable origami animal bookmarks in just eight simple steps.
Why Make Origami Animal Bookmarks?
Before we dive into the instructions, let’s talk about why these bookmarks are worth making:
- Budget-friendly: All you need is paper and basic supplies you likely already have at home
- Customizable: Create different animals and color schemes to match your personality
- Perfect for gifts: Handmade bookmarks make thoughtful presents for book lovers
- Kid-friendly craft: A great activity to keep children entertained while developing fine motor skills
- Eco-friendly: Reusable paper bookmarks reduce waste compared to sticky notes or dog-eared pages
Now, let’s get folding!
Materials You’ll Need
- Plain white printer paper (or colored paper if you prefer)
- Scissors
- Printer (to print templates)
- Glue stick or small amount of craft adhesive
- Optional: Markers, colored pencils, or pens for decorating
- Optional: Animal bookmark templates (available online)
8 Easy Steps to Create Your Origami Animal Bookmarks
Step 1: Print bookmark template on plain white printer paper. Trim along lines to cut out the square.
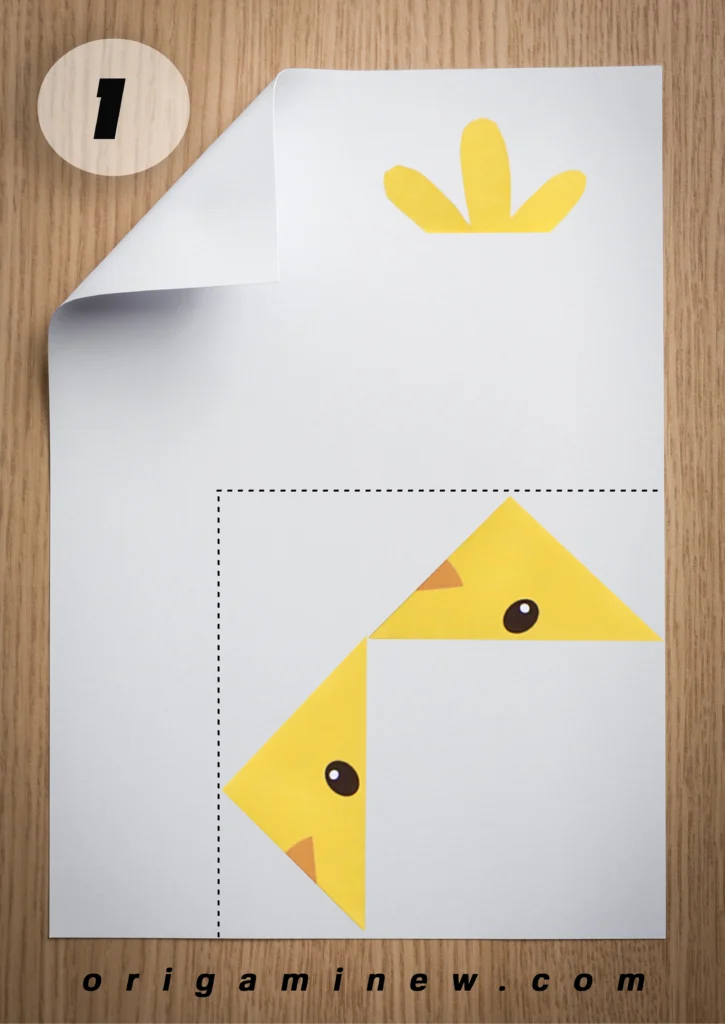
Start by finding or creating a template for your animal bookmark. Many websites offer free printable templates that include guide lines and decorative elements. Print your chosen design on regular printer paper. Using scissors, carefully cut along the outline to create a perfect square.
If you don’t have access to a printer, you can simply measure and cut a square from any paper. The standard size for these bookmarks is usually 6×6 inches, but you can adjust based on your preference and the size of your books.
Pro tip: If you’re using plain paper without a template, consider drawing or coloring your design before folding to create a more personalized bookmark.
Step 2: Fold square in half diagonally to create a triangle. Both colored areas should show on the top of the triangle.
Take your square paper and fold it diagonally from one corner to the opposite corner. Make sure to align the edges perfectly for a clean fold. Press firmly along the fold line to create a sharp crease. If your paper has a printed design or colored areas, ensure these are facing up so they’ll be visible on your finished bookmark.
This triangle forms the foundation of your bookmark, so take your time to get a precise fold.
Step 3: Flip the triangle over.
Simply turn your folded triangle over so that the opposite side is now facing up. This step ensures that your bookmark will have the right orientation when completed.
The previously hidden side will now be visible, and this is where we’ll make our next set of folds to form the animal’s face.
Step 4: Fold each outer corner of the triangle to meet together at the top of the triangle and form a face.
Take the two bottom corners of your triangle (the ones at the wide end) and fold them up to meet at the top point. These folds will create the basic structure of your animal’s face. When doing this, make sure the two sides of the face line up evenly. Press along all the fold lines to create sharp creases.
At this point, your paper should resemble a diamond shape with a small triangle poking out at the top.
Pro tip: When you fold the corners up, they should meet precisely at the top point for a symmetrical face. Take your time with this step as it defines the shape of your animal.
Step 5: Open up the last fold you did so you are back to the original triangle. Fold the top point of the triangle down, using only the top layer of paper.
Carefully unfold the face shape you created in the previous step to return to your basic triangle. Now, focus on only the top layer of paper. Fold the top point down about one-third of the way along the height of the triangle. This fold creates a pocket that will be essential for your bookmark’s structure.
The fold should be parallel to the base of the triangle. Press firmly to create a clean crease.
Step 6: Fold one corner back up and tuck it into the “pocket” created in the last step. Repeat with the other corner.
Now, take one of the bottom corners of your triangle and fold it up, tucking the point into the pocket you created in step 5. Repeat with the other corner, ensuring both sides are symmetrical. These folds will form the muzzle or face of your animal.
When both corners are tucked in, you’ll see the basic shape of your animal’s face taking form. Adjust the tucks as needed for a clean, even look.
Step 7: Cut out the ears and add adhesive along the straight edge.
Depending on which animal you’re creating, you’ll need to cut out appropriately shaped ears. For a cat, triangular ears work well. For a dog, you might want rounder ears. For a bunny, longer ears are perfect.
Cut the ear shapes from scraps of your paper or from colored paper for contrast. Apply a small amount of glue or adhesive along the straight edge of each ear piece. Don’t use too much adhesive, or it will make your paper warp.
Pro tip: For extra durability, consider using slightly thicker paper for the ears, especially if you’re making these bookmarks for children.
Step 8: Tuck the ears inside the pocket to complete the bookmark.
Finally, insert the glued edges of the ears into the top pocket of your bookmark. Position them to achieve the look of your chosen animal. Press gently to secure them in place, and allow the adhesive to dry completely.
Your origami animal bookmark is now complete! Slip the pocket over the page you’re reading, and your cute animal friend will peek out from your book.
Adding Personality to Your Origami Animal Bookmarks
Once you’ve mastered the basic folding technique, there are countless ways to customize your bookmarks:
- Draw facial features: Add eyes, whiskers, and noses with markers or pens
- Try different papers: Patterned scrapbooking paper can create unique animals
- Create a menagerie: Make different animals by changing the ear shapes and decorations
- Add embellishments: Small googly eyes or tiny pom-poms can add dimension
- Color block: Use two-sided paper with different colors for an interesting effect
Ideas for Using Your Origami Animal Bookmarks
- Mark different chapters in textbooks or cookbooks
- Use different animals to track various family members’ places in a shared book
- Include them with books as gifts
- Have a bookmark-making party with friends
- Use them as place cards for a book club meeting
Troubleshooting Common Issues
- Bookmark won’t stay on the page: Make sure your pocket is deep enough to grip the page
- Ears falling off: Allow adhesive to dry completely before using
- Uneven face: Take extra care with symmetry during the folding process
- Paper tearing: Use slightly heavier paper for more durability
Conclusion
Creating origami animal bookmarks is a delightful craft that combines function with fun. Whether you’re making them for yourself, as gifts, or as an activity with children, these charming paper creatures are sure to bring a smile to any reader’s face. With just a few folds and snips, you can transform a simple square of paper into an adorable bookmark that makes reading even more enjoyable.
Have you tried making origami animal bookmarks? What animals did you create? Share your experiences in the comments below!
Happy folding and happy reading!