
Easy Origami Rabbit
Origami, the ancient Japanese art of paper folding, offers endless creative possibilities with just a single sheet of paper. Among the most beloved origami creations is the Easy Origami Rabbit – charming, simple to make, and perfect for any occasion. Whether you’re looking for a fun activity to do with children, a decorative element for Easter celebrations, or simply a mindful craft to enjoy on your own, the Easy Origami Rabbit is an ideal project.
In this comprehensive guide, I’ll walk you through creating an adorable Easy Origami Rabbit head that’s perfect for beginners and experienced folders alike. This particular Easy Origami Rabbit design captures the essence of these delightful creatures with pointed ears and a sweet face, all while requiring just a few minutes and one square piece of paper.
Why Make an Easy Origami Rabbit?
The Easy Origami Rabbit holds special appeal for several reasons:
- Seasonal connections: The Easy Origami Rabbit is especially popular during spring and Easter celebrations
- Cultural significance: Rabbits symbolize luck, fertility, and new beginnings in many cultures
- Creative expression: Each origami rabbit can be personalized with different papers and decorative touches
- Educational value: Creating an Easy Origami Rabbit teaches patience, following instructions, and spatial awareness
- Eco-friendly craft: The origami rabbit requires only paper, making it a sustainable creative option
Beyond these benefits, there’s something simply delightful about transforming a flat sheet of paper into a three-dimensional Easy Origami Rabbit through a series of precise folds. The magic of watching an origami rabbit take shape beneath your fingertips brings joy to crafters of all ages.
Materials Needed for Your Origami Rabbit
Before we begin folding our Easy Origami Rabbit, gather these simple materials:
- Square paper: Traditionalists prefer origami paper for its perfect square shape and ease of folding, but any square paper works for your Easy Origami Rabbit
- Flat surface: A table or desk provides the ideal foundation for creating your origami rabbit
- Patience: The Easy Origami Rabbit isn’t difficult, but precise folds create the best results
- Marker or pen: For adding facial features to your origami rabbit (optional)
If you’re planning to make multiple Easy Origami Rabbit models, consider trying different colors and patterns. White, gray, brown, or pastel papers create realistic-looking origami rabbit creations, while patterned or brightly colored papers produce more whimsical Easy Origami Rabbit figures.
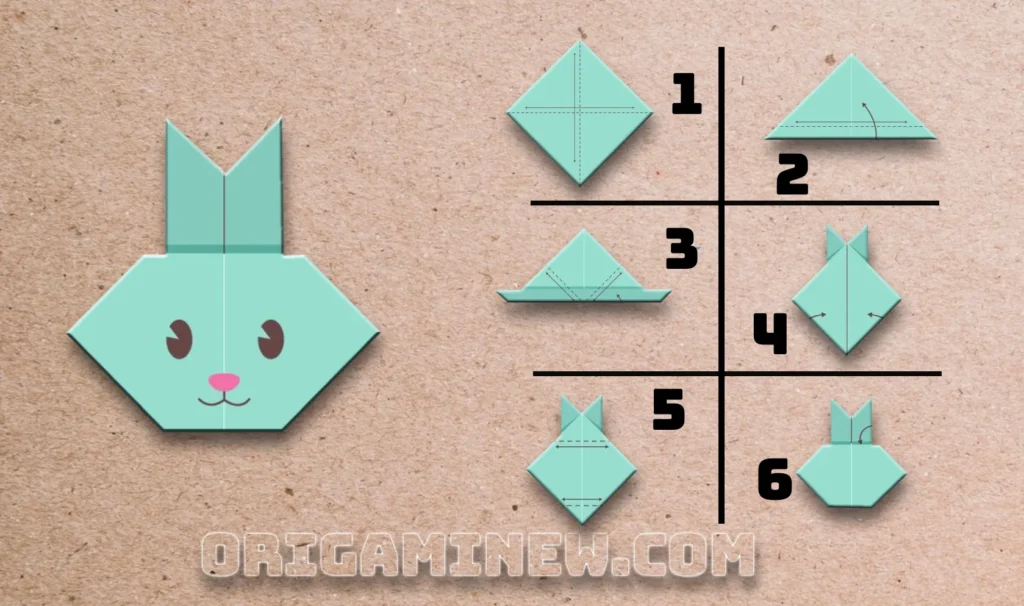
Origami Rabbit Step-by-Step Instructions
Let’s create your adorable Easy Origami Rabbit with these seven simple steps:
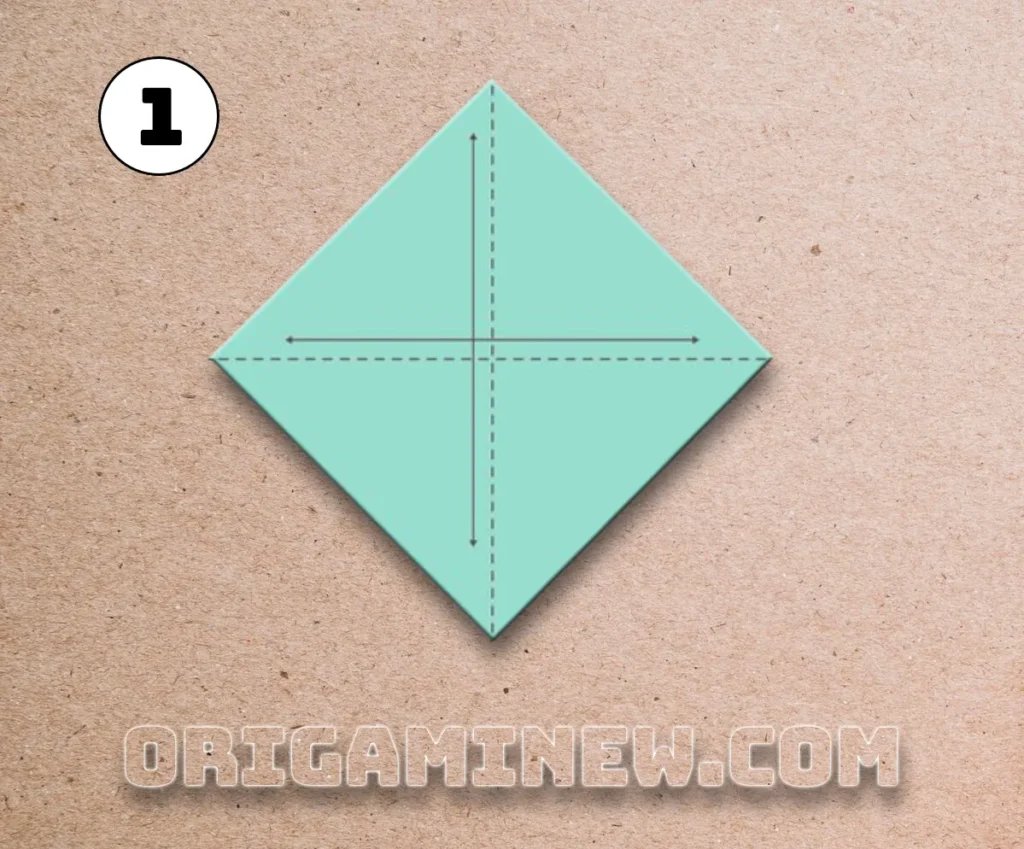
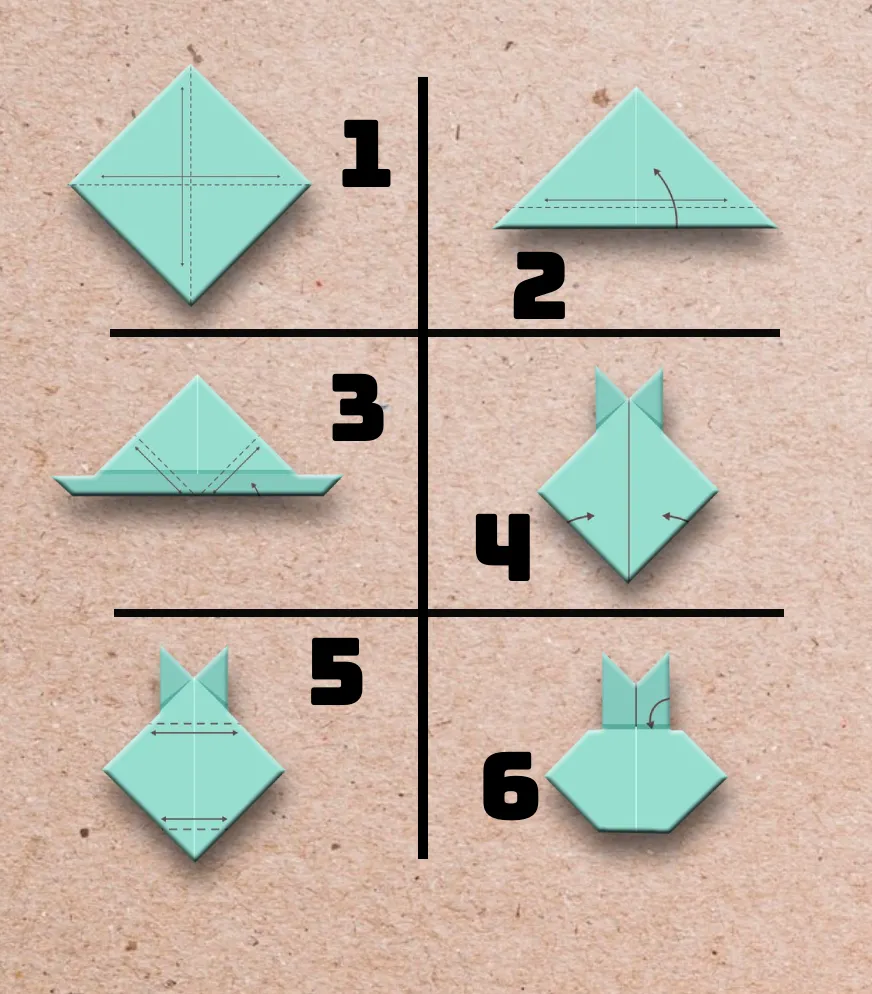
Step 1: Prepare Your Square
Begin your Easy Origami Rabbit with a square piece of paper positioned like a diamond (with corners pointing up, down, left, and right). Create a foundational crease pattern by folding the paper along both diagonals (corner to corner), then horizontally and vertically through the center. Unfold completely after each fold. These creases create a roadmap for your origami rabbit, dividing your paper into four equal sections and establishing important reference points.
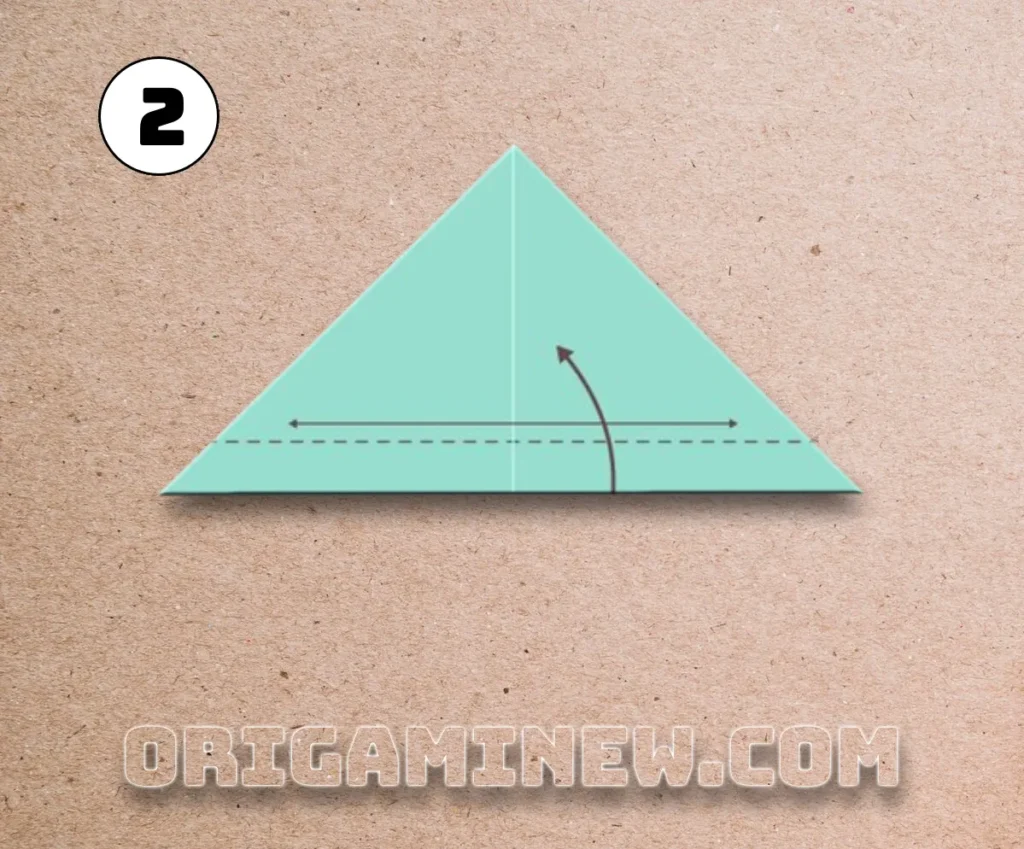
Step 2: Form the Base Triangle
For this crucial origami rabbit foundation, fold the bottom corner of your diamond up to meet the top corner, creating a triangle. Ensure the edges align perfectly and create a sharp crease by running your finger or a bone folder firmly along the fold. This triangle forms the base structure of your origami rabbit head.
Step 3: Create the Ears
The distinctive ears are what make your origami rabbit instantly recognizable. Take the left and right corners of your triangle and fold them inward toward the center point, but stop about halfway between the outer corners and the middle. These two symmetrical folds will become your origami rabbit’s perky ears. Make sure both folds are even for a balanced origami rabbit appearance.

Step 4: Shape the Face Structure
This step begins to transform your flat paper into a three-dimensional origami rabbit. Fold the side flaps (created in the previous step) backward along the center crease. At the same time, fold the bottom corners of these flaps inward toward the center line. This complex fold starts giving your origami rabbit face definition and makes the ears stand upright, creating that characteristic origami rabbit silhouette.

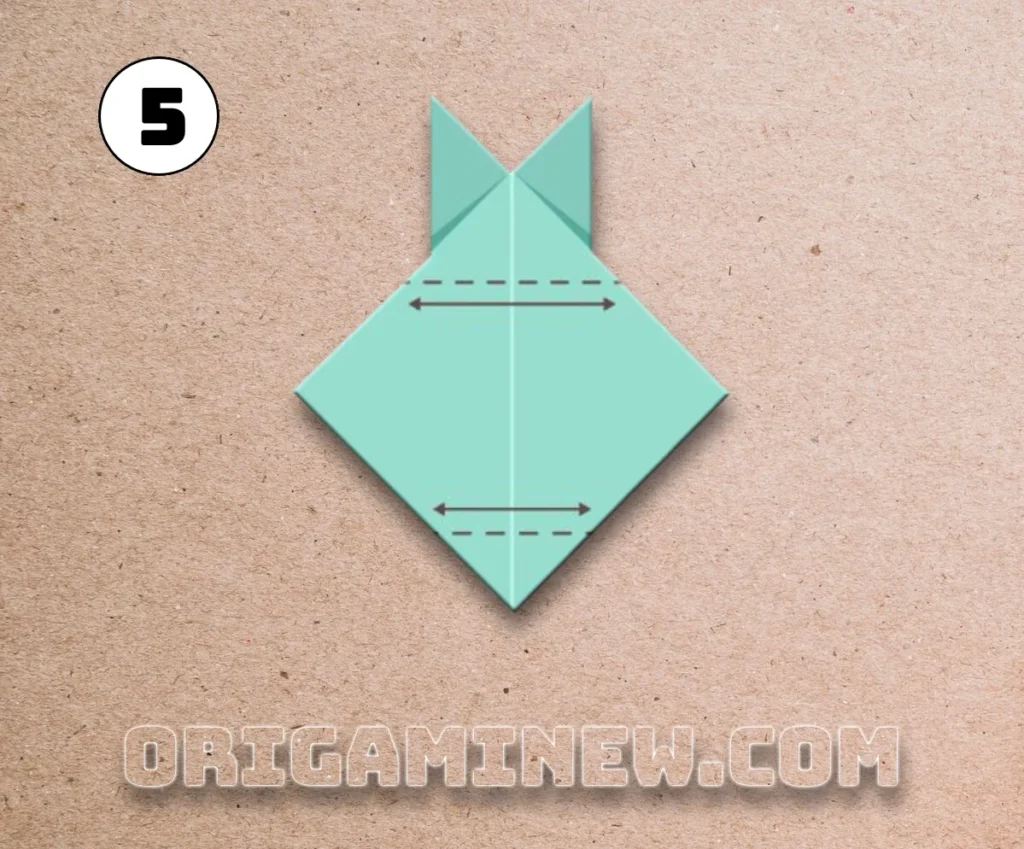
Step 5: Define the Face Width
To give your origami rabbit the perfect face proportion, make two horizontal parallel folds at the bottom section of your model. First, fold the bottom edge up slightly, creating a straight edge. Then, make another fold a short distance above it, parallel to the first fold. These structural folds define the width of your origami rabbit’s face and create a more defined shape that will support the facial features.
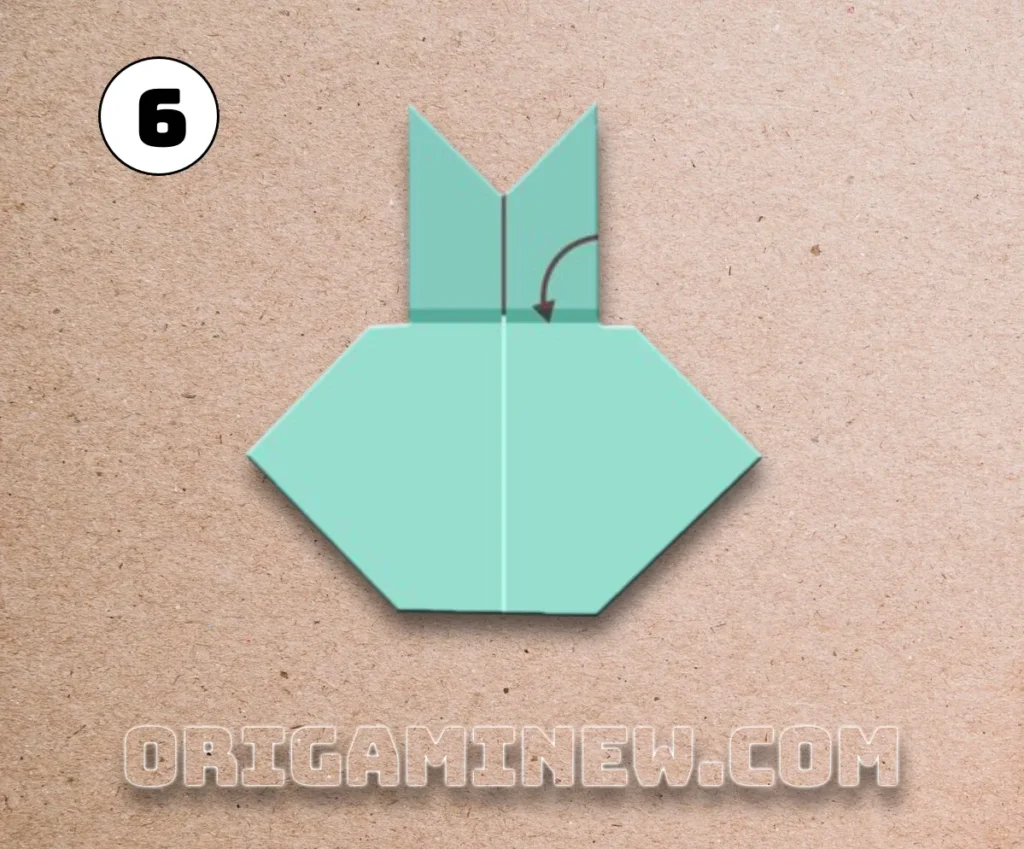
Step 6: Form the Cheeks
The sweet, chubby cheeks are what make your origami rabbit so endearing. Create these by folding the side edges inward at an angle. These angled folds transform the bottom of your model from a square into a slight hexagonal shape, giving your origami rabbit its characteristic facial structure. These gentle curves perfectly capture the rounded face of a real bunny, making your origami rabbit instantly recognizable.
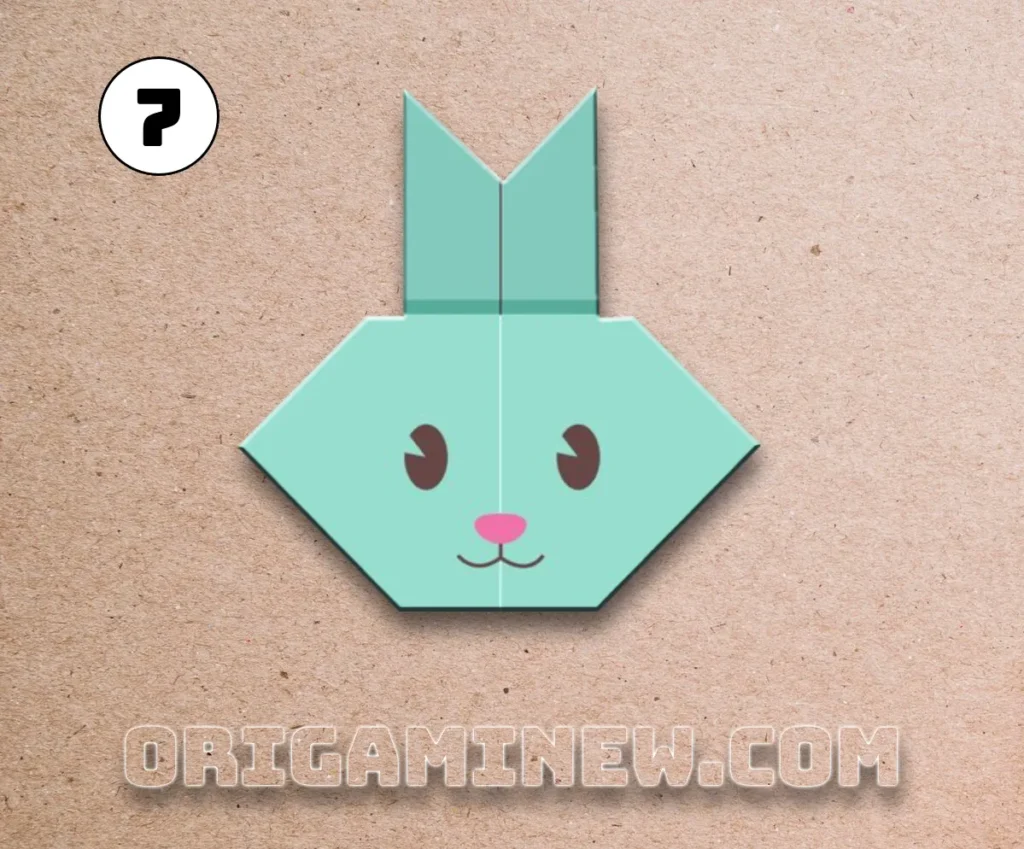
Step 7: Add Final Details
Your origami rabbit structure is now complete! To bring your creation to life, add simple facial features. Draw two oval eyes positioned in the upper portion of the face. Add a small nose at the center bottom of the face (traditionally pink, but any color works for your origami rabbit). You can also add a small mouth line if desired. These minimal details transform your folded paper into an expressive origami rabbit with personality and charm.
Tips for Origami Rabbit Success
Creating the perfect origami rabbit takes practice, but these helpful tips will ensure better results:
- Make precise creases: The secret to a great origami rabbit is sharp, precise folds. Run your fingernail or a bone folder along each crease to make it crisp.
- Work slowly: Rushing through the steps can lead to misaligned folds and an uneven origami rabbit. Take your time with each fold.
- Use the right paper: Thin, crisp paper creates the best origami rabbit results. Paper that’s too thick might not hold the folds properly.
- Follow the sequence exactly: Each origami rabbit fold builds on the previous one, so following the correct order is essential.
- Practice makes perfect: Your first origami rabbit might not be perfect, but each one you make will improve your technique.
Creative Variations of the Origami Rabbit
Once you’ve mastered the basic origami rabbit head, consider these creative variations:
Decorative Origami Rabbit Ideas
- Seasonal origami rabbits: Create origami rabbit models in pastel colors for Easter, orange and black for Halloween, or red and green for Christmas
- Patterned paper origami rabbits: Use floral, polka-dotted, or striped paper for unique origami rabbitvariations
- 3D embellishments: Add googly eyes, pom-pom noses, or pipe cleaner whiskers to your origami rabbit for a mixed-media approach
- Origami rabbit family: Make multiple origami rabbit figures in different sizes by starting with different sized squares
- Origami rabbit scene: Create a meadow scene with multiple origami rabbit figures, origami flowers, and grass
Advanced Origami Rabbit Designs
Once you’ve mastered this basic origami rabbit head, you might want to explore more complex origami rabbitdesigns, including:
- Full-body origami rabbit models with detailed legs and tails
- Hopping origami rabbit designs with movable parts
- 3D origami rabbit sculptures created from multiple sheets
- Modular origami rabbit designs incorporating several units
Uses for Your Origami Rabbit Creations
Your completed origami rabbit can serve many purposes:
Decorative Uses for Origami Rabbits
- Holiday decorations: Origami rabbit figures make perfect Easter or spring decorations
- Greeting card embellishments: Glue your origami rabbit to the front of a handmade card
- Gift toppers: Attach an origami rabbit to wrapped presents instead of a bow
- Table settings: Place an origami rabbit on each plate as a charming dinner party accent
- Mobile decorations: Hang multiple origami rabbit models on strings to create a delightful mobile
Educational Uses for Origami Rabbits
The origami rabbit also serves valuable teaching purposes:
- Fine motor skill development: The precise folding required for an origami rabbit helps children develop dexterity
- Following directions: Creating an origami rabbit teaches the importance of sequential steps
- Geometric concepts: The origami rabbit demonstrates principles of symmetry, angles, and spatial relationships
- Focus and concentration: Completing an origami rabbit requires attention and mindfulness
- Cultural appreciation: Making an origami rabbit introduces children to Japanese cultural traditions
The Cultural Significance of the Origami Rabbit
The origami rabbit holds special meaning in several cultural contexts:
In Japanese culture, rabbits symbolize good fortune and prosperity. The Japanese see a rabbit in the moon pounding mochi (rice cakes) rather than the “man in the moon” seen in Western culture. This connection makes the origami rabbit a symbol of good luck and prosperity in origami traditions.
In Western contexts, the origami rabbit often connects to Easter celebrations and spring festivities, representing renewal and rebirth. The origami rabbit thus bridges Eastern and Western symbolic traditions, making it a universally appealing origami subject.
Frequently Asked Questions About Origami Rabbits
Q: How long does it take to make an origami rabbit?
A: Once you’ve learned the technique, a basic origami rabbit head takes about 5-10 minutes to complete. Your first few origami rabbit attempts may take longer as you learn the folds.
Q: Can children make this origami rabbit design?
A: This origami rabbit design is suitable for children approximately 8 years and older. Younger children may need assistance with some of the more precise folds required for the origami rabbit.
Q: What size paper is best for an origami rabbit?
A: Standard 6-inch (15 cm) square paper works well for your first origami rabbit. Once comfortable with the technique, you can create smaller or larger origami rabbit figures by adjusting your paper size.
Q: Can I use regular printer paper for my origami rabbit?
A: Yes! Simply cut an 8.5 x 11-inch printer paper into a square by folding one corner down to the opposite edge, creating a triangle, and cutting off the excess rectangle. This square will work perfectly for your origami rabbit.
Q: How can I display my origami rabbit creations?
A: Origami rabbit figures can be displayed on shelves, attached to the refrigerator with magnets, strung as garlands, placed in shadow boxes, or used as decorative elements throughout your home.
Conclusion: The Joy of Creating Origami Rabbits
The origami rabbit represents the perfect blend of simplicity and charm. With just one sheet of paper and a few minutes of your time, you can create a delightful paper bunny that brings a smile to everyone who sees it. The origami rabbit has endured as a popular design because it captures the essence of these beloved animals in a few elegant folds.
As you practice creating your origami rabbit models, you’ll find that each one becomes more precise and expressive. The meditative quality of folding an origami rabbit offers a moment of calm creativity in our busy lives, while the finished origami rabbit provides a tangible reminder of your creativity and patience.
Whether you’re making your origami rabbit as a seasonal decoration, a gift for someone special, or simply as a creative outlet, the process itself is rewarding. As your fingers learn the sequence of folds, you connect with generations of paper folders who have created origami rabbit figures throughout history.
So gather your paper, find a quiet moment, and enjoy the simple pleasure of transforming a flat square into an adorable origami rabbit that seems almost ready to hop right off your table!
Have you tried making this origami rabbit? Share your creations in the comments below! I’d love to see how your unique paper bunnies turned out.
