

Origami, the Japanese art of paper folding, offers a perfect blend of creativity, precision, and mindfulness. Among the many delightful origami designs, the dove stands out as a universal symbol of peace and hope. Whether you’re looking to create a meaningful decoration, a thoughtful handmade gift, or simply enjoy a relaxing creative activity, learning how to fold an origami dove is both rewarding and accessible. This comprehensive guide will walk you through nine essential steps to create your own beautiful origami dove that will impress friends and family alike.
The Art and Appeal of Origami Doves
Before diving into the folding process, it’s worth understanding why origami doves have captured the imagination of paper artists worldwide:
- Symbolic meaning: Doves represent peace, love, and hope across many cultures
- Elegant simplicity: The dove design balances simplicity with an instantly recognizable form
- Versatile decoration: Perfect for celebrations, holidays, or everyday display
- Beginner-friendly: More approachable than many bird designs while still impressive
- Satisfaction factor: Creates a three-dimensional bird from a single sheet of paper
Now, let’s gather our materials and begin our origami journey!
Materials You’ll Need
- Square paper (origami paper works best)
- Flat, clean surface for folding
- Patience and attention to detail
- Optional: bone folder or ruler for crisp creases
While colored origami paper can create beautiful effects, beginners might find it helpful to start with plain paper that has different colors on each side. This makes it easier to follow the instructions and see the fold lines clearly.
Step 1: Start with a Square Paper in Diamond Position and Create Basic Fold Lines
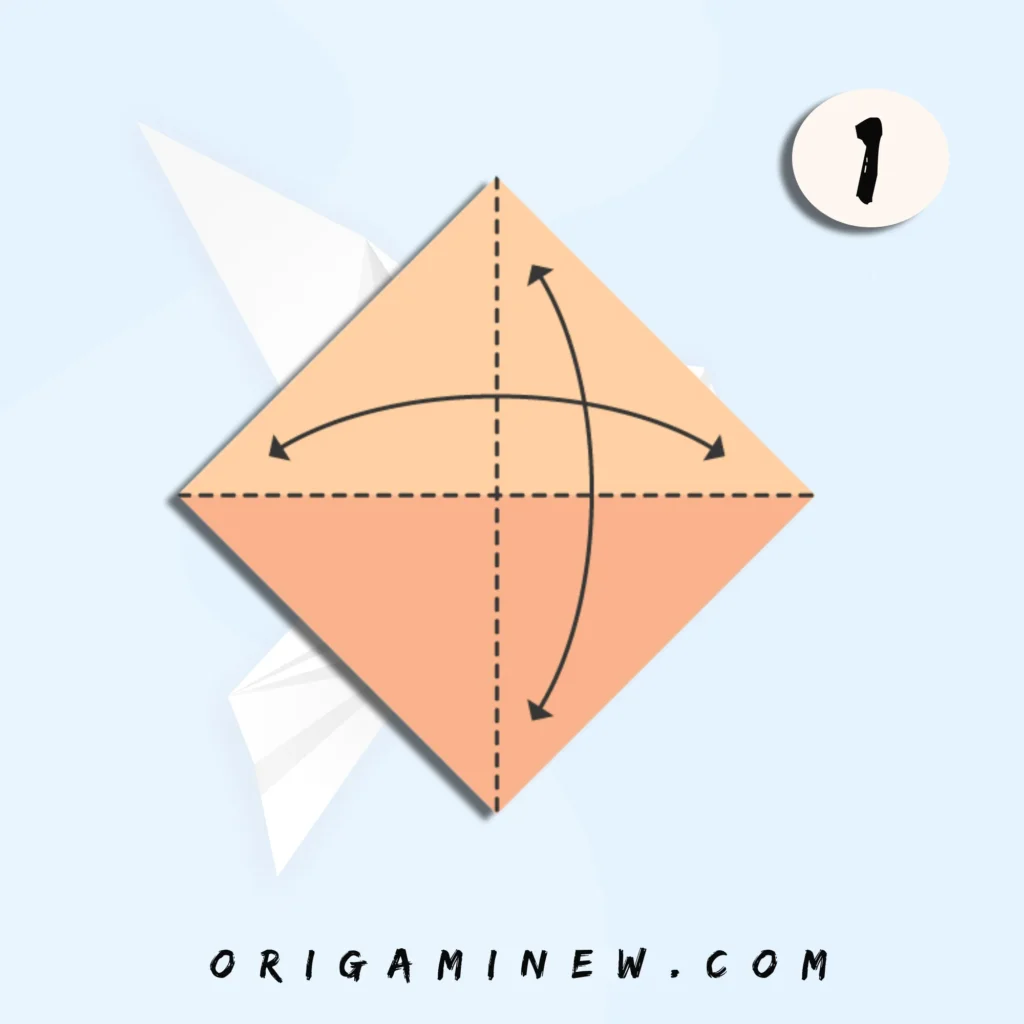
Begin with your square paper positioned like a diamond, with corners pointing up, down, left, and right. This orientation is essential for achieving the correct proportions in your finished dove.
Create the fundamental fold lines that will guide your subsequent folds. Fold the paper in half diagonally by bringing the bottom corner up to meet the top corner, then carefully unfold. Repeat with the left and right corners. These creases will form an X across your diamond-shaped paper.
These initial folds establish the symmetry needed for your dove and create reference lines that will guide you through the more complex steps to come.
Pro tip: Always make sharp, precise creases by running your fingernail or a bone folder along each fold. Clean creases make the final result much more professional-looking and easier to manipulate in later steps.
Step 2: Fold the Top and Bottom Corners Toward the Center
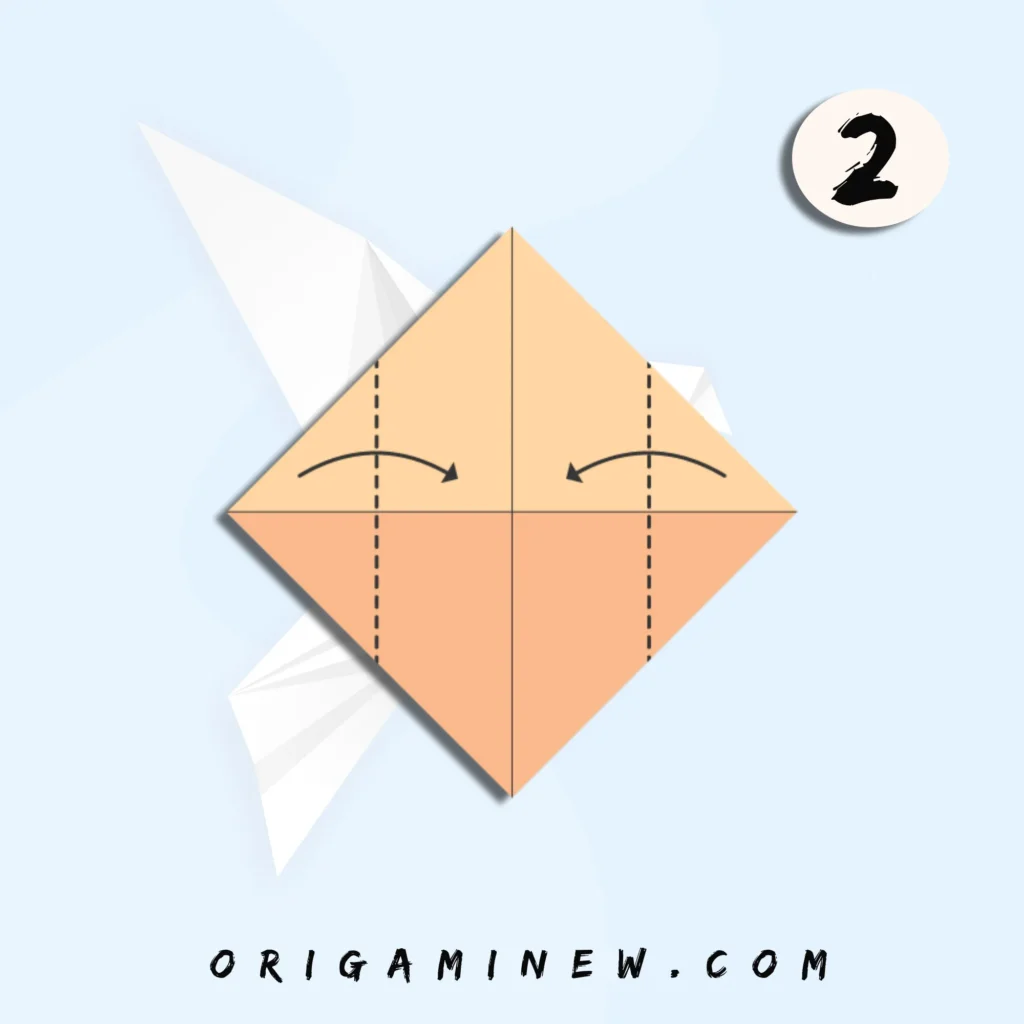
With your diamond-shaped paper in front of you (and the fold lines visible), take the top corner and fold it down toward the center point where your guide lines intersect. The fold should stop precisely at the center point.
Next, fold the bottom corner up to meet the center point as well. When completed correctly, your paper should now resemble a smaller diamond with two triangular flaps meeting in the middle.
The precision of these folds affects the overall symmetry of your final dove, so take your time to ensure the corners meet exactly at the center point.
Pro tip: If you’re working with dual-colored paper, keep track of which side will show on the exterior of your finished dove. These initial folds will determine the color pattern of your bird.
Step 3: Fold the Right Corner Toward the Center Line
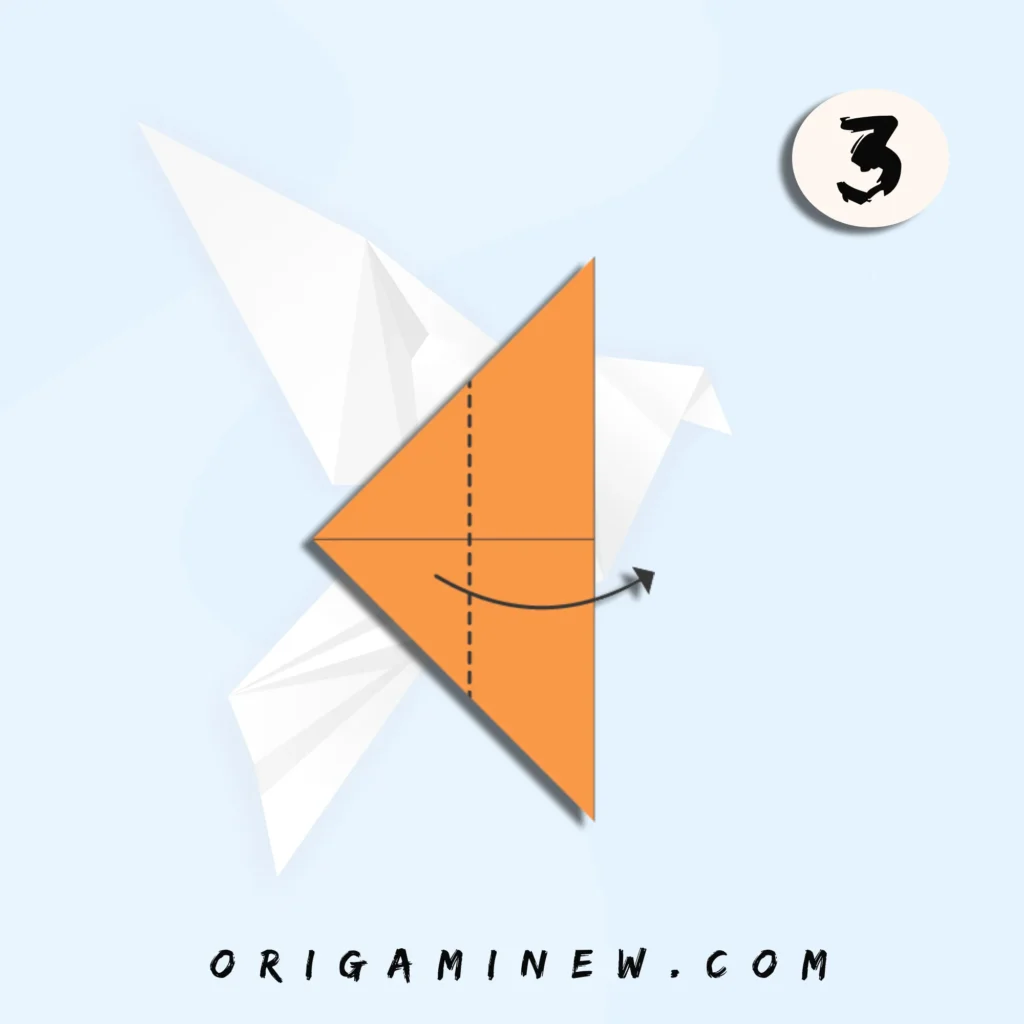
With your paper still positioned as a diamond, focus on the right corner. Fold this corner inward so that its edge aligns with the vertical center crease line you created in step one.
This fold creates what will eventually become part of the dove’s wing structure. The fold should be straight and precise, running from the right corner to the center line.
When folded correctly, your paper should now look asymmetrical, with the right side folded inward while the left side remains extended.
Pro tip: The angle of this fold will affect the final shape of your dove’s wing, so aim for a clean, straight fold that precisely meets the center line.
Step 4: Fold the Model Along the Vertical Center Line
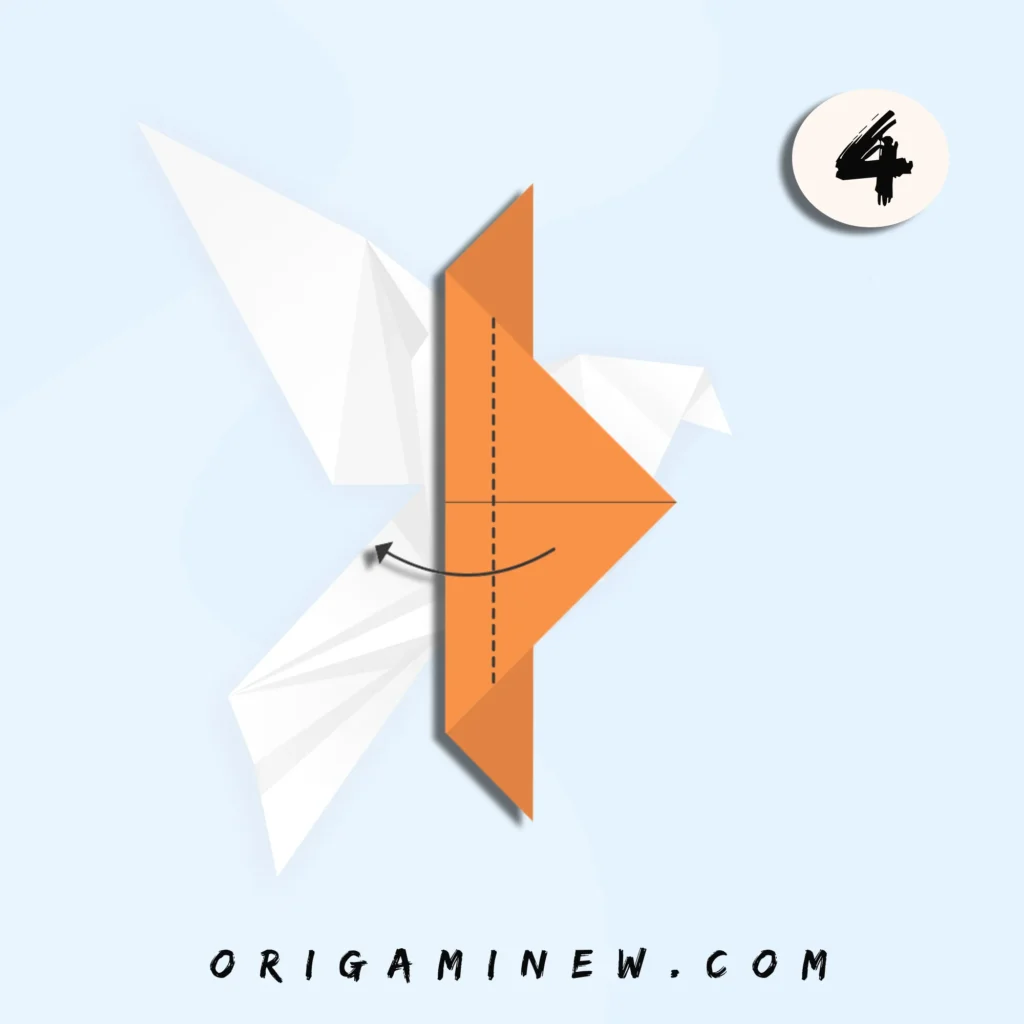
Now, fold your entire model along the vertical center line, bringing the left section over to the right. This fold essentially creates the basic body structure of your dove.
When completed, your model should resemble a narrower asymmetrical shape, with various layers visible on one side. The fold should follow the existing center crease exactly to maintain the integrity of your previous folds.
This step begins to transform your flat paper into a three-dimensional structure that will form the basis of your dove.
Pro tip: Before making a firm crease, ensure all layers are properly aligned. Once you’re satisfied with the positioning, press firmly along the fold line to create a sharp crease.
Step 5: Fold the Top Right Corner Down
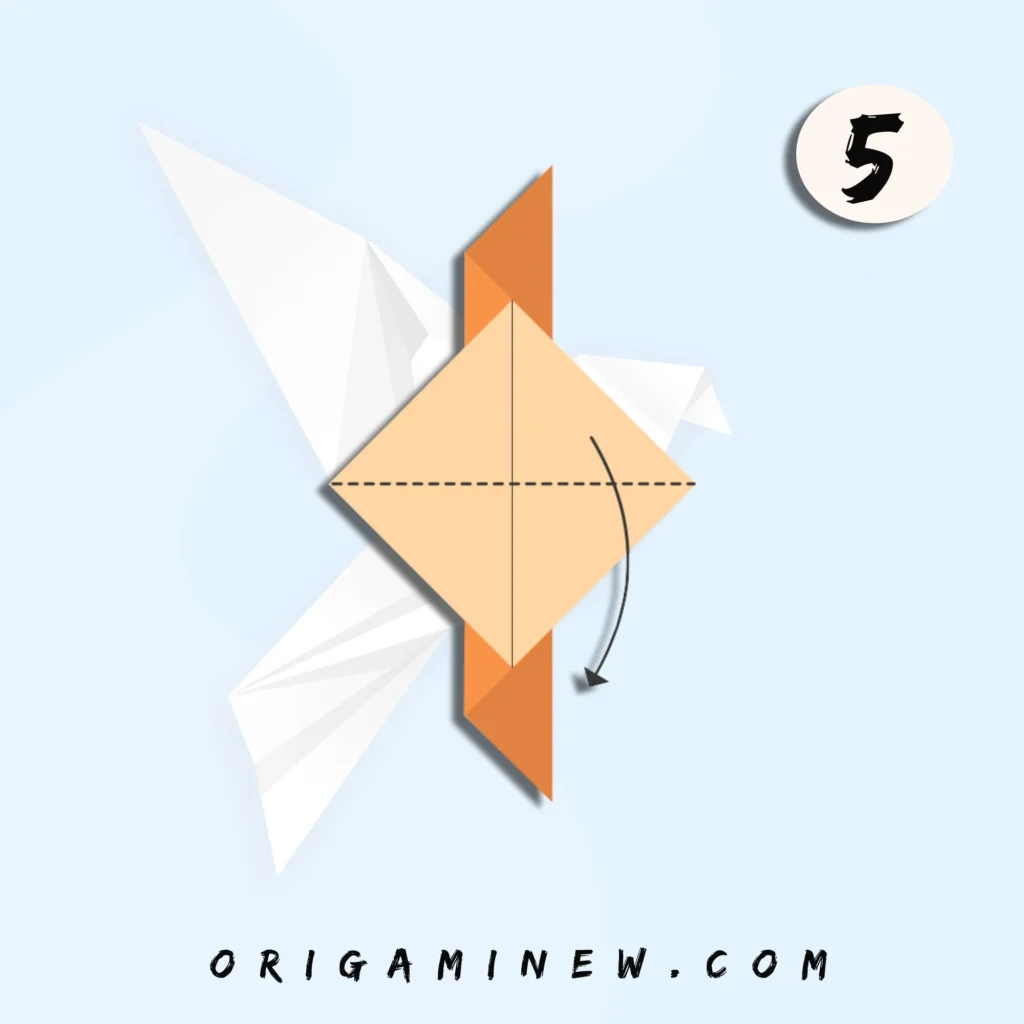
Look at the top right section of your model. You’ll notice a triangular flap that needs to be folded downward at an angle. This fold creates what will become the dove’s head and beak.
The exact angle of this fold determines the final appearance of your dove’s head profile. For a natural-looking dove, fold this corner down at approximately a 45-degree angle. The edge of this fold should create a straight line from the top edge to the right edge of your model.
This is one of the more distinctive folds that gives your origami its dove-like appearance.
Pro tip: The angle of this fold can be adjusted slightly to create different head shapes. A sharper angle creates a more pronounced beak, while a gentler angle results in a rounder head shape.
Step 6: Create the Bird’s Tail by Folding the Left Section
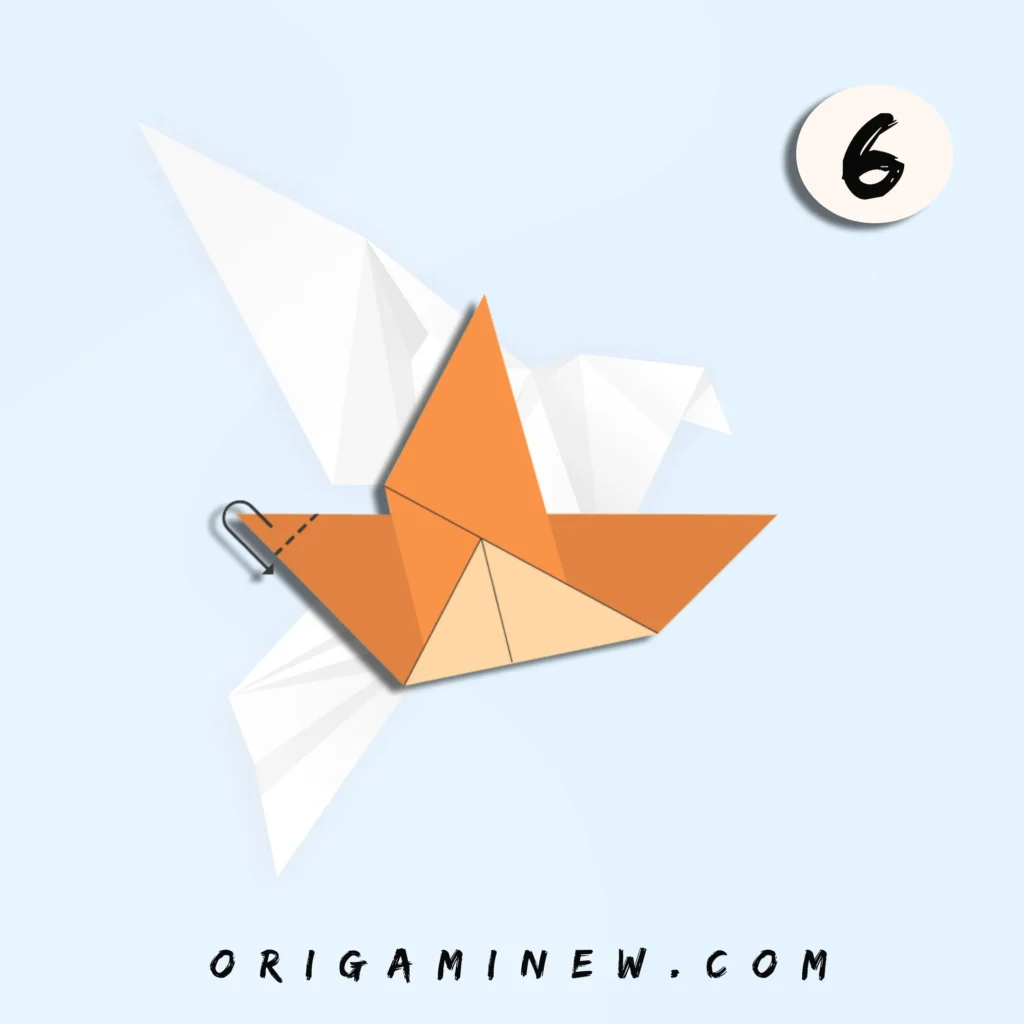
Now focus on the left portion of your model, which will become the tail of your dove. Fold this section upward and slightly to the right, creating what will become the distinctive tail of your bird.
The exact position of this fold can vary slightly based on your aesthetic preference. For a longer tail, fold the section at a steeper angle. For a shorter, more compact tail, use a more horizontal fold.
When correctly positioned, this fold gives your dove its distinctive silhouette with the characteristic extended tail that balances the forward-pointing head.
Pro tip: You may need to adjust the previous folds slightly to accommodate this tail fold. Origami is often about making small adjustments as you progress to achieve the desired final shape.
Step 7: Shape the Wings by Folding the Upper Section
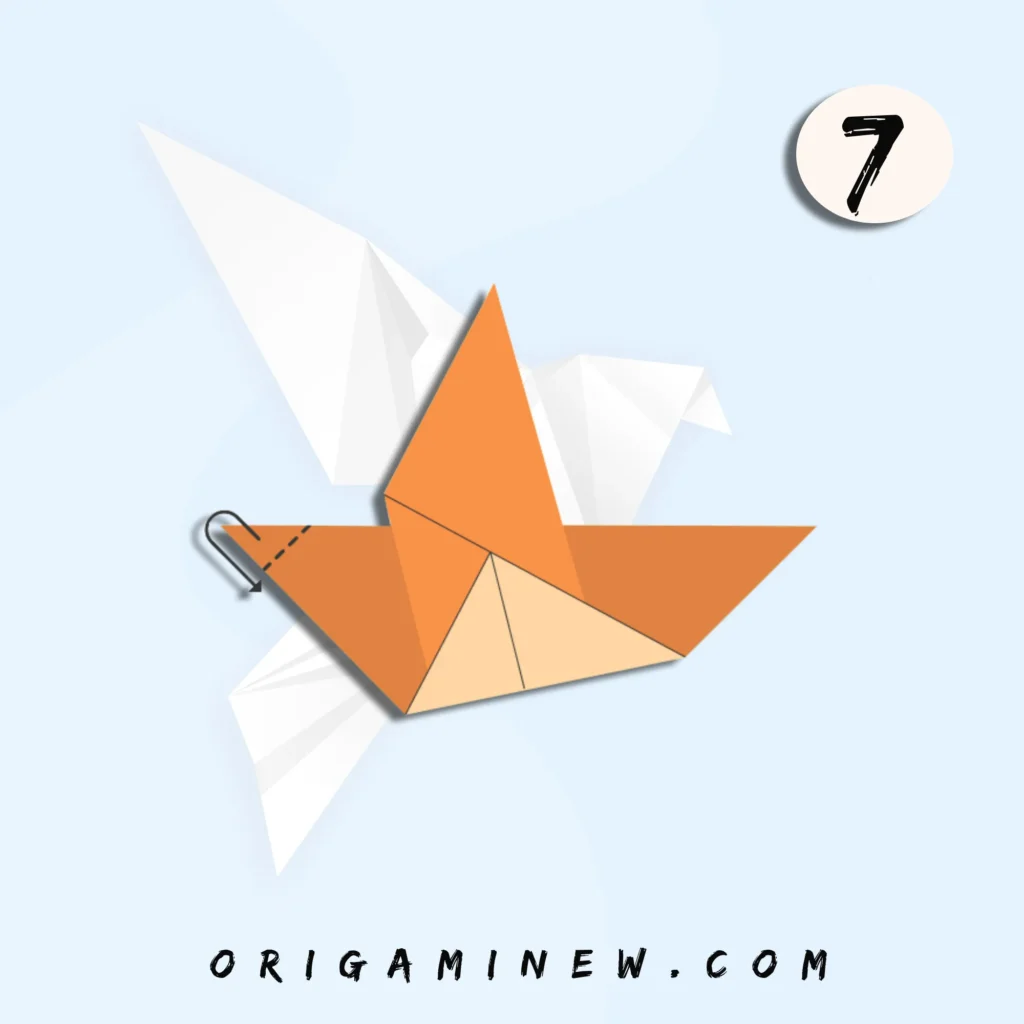
At this stage, your model should be taking on a recognizable bird-like shape. Now it’s time to create the wings that give the dove its elegant appearance.
Identify the upper triangular section of your model. Fold this section outward and slightly downward to create one wing. The fold line should extend diagonally from near the neck area down toward the body.
This fold transforms your flat model into a more three-dimensional bird shape, with the wing extending outward from the body.
Pro tip: The angle of this wing fold determines how “spread” your dove’s wings appear. Experiment with different angles to achieve your preferred look—more horizontal for flying doves or more vertical for perched doves.
Step 8: Refine the Wing Shape with Additional Fold
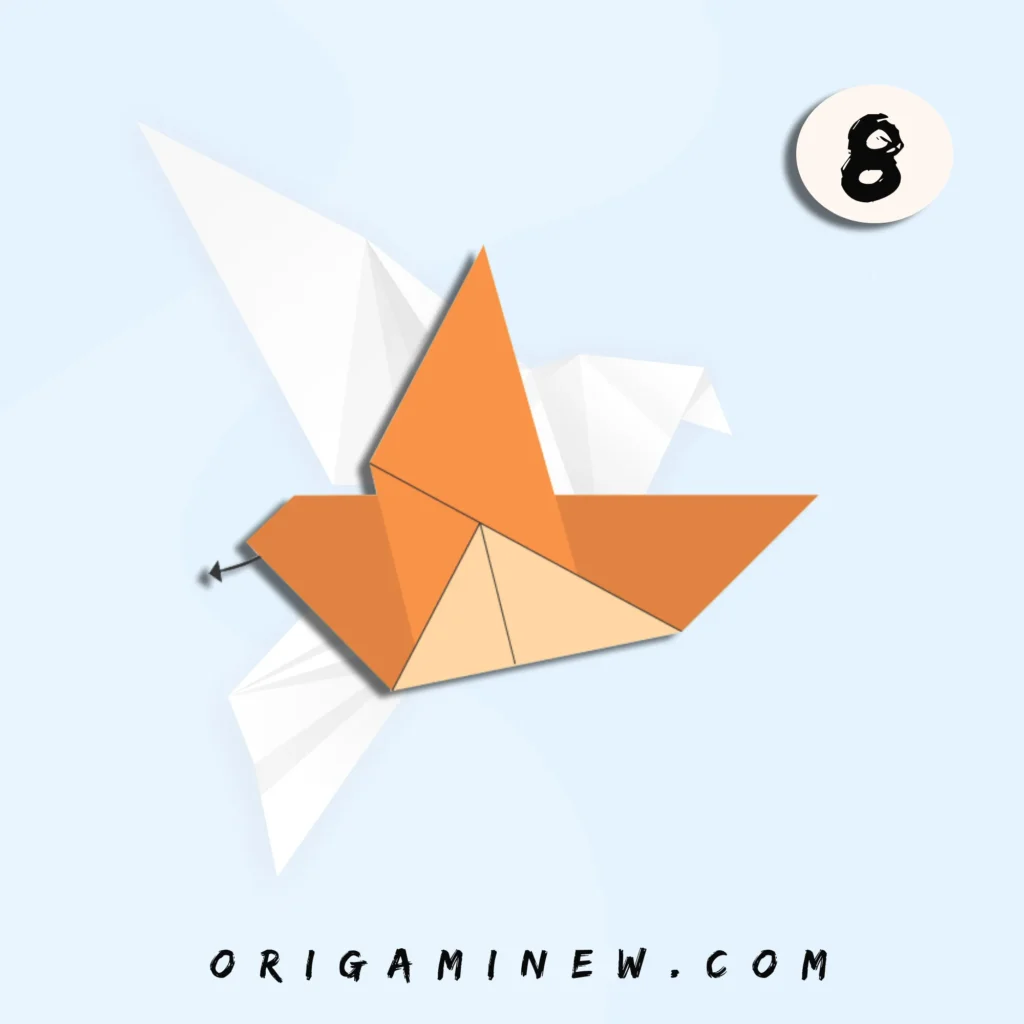
With the basic wing structure created, it’s time to refine the shape to give your dove more dimension and a realistic appearance.
Look at the wing you created in step 7. Fold a portion of this wing back toward the body, creating a layered effect that resembles the natural contour of a bird’s wing. This secondary fold should be roughly parallel to the first wing fold but positioned about halfway along the wing’s width.
When done correctly, this fold adds depth and realism to your dove, giving the impression of feathers and natural wing structure.
Pro tip: The size and angle of this fold significantly impact the final appearance of your dove. A larger fold creates a more dramatic wing shape, while a smaller, subtler fold results in a sleeker profile.
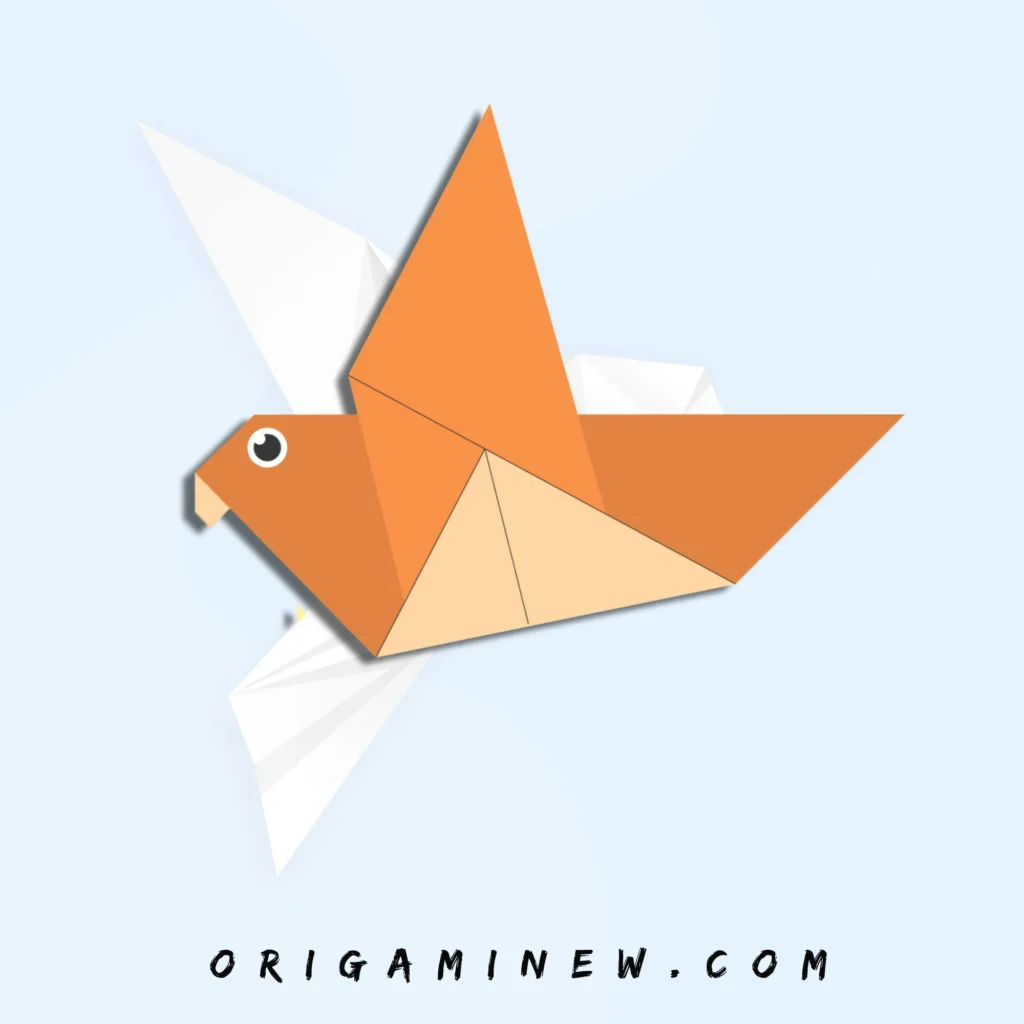
Step 9: Complete the Final Adjustments to Perfect the Pigeon Shape
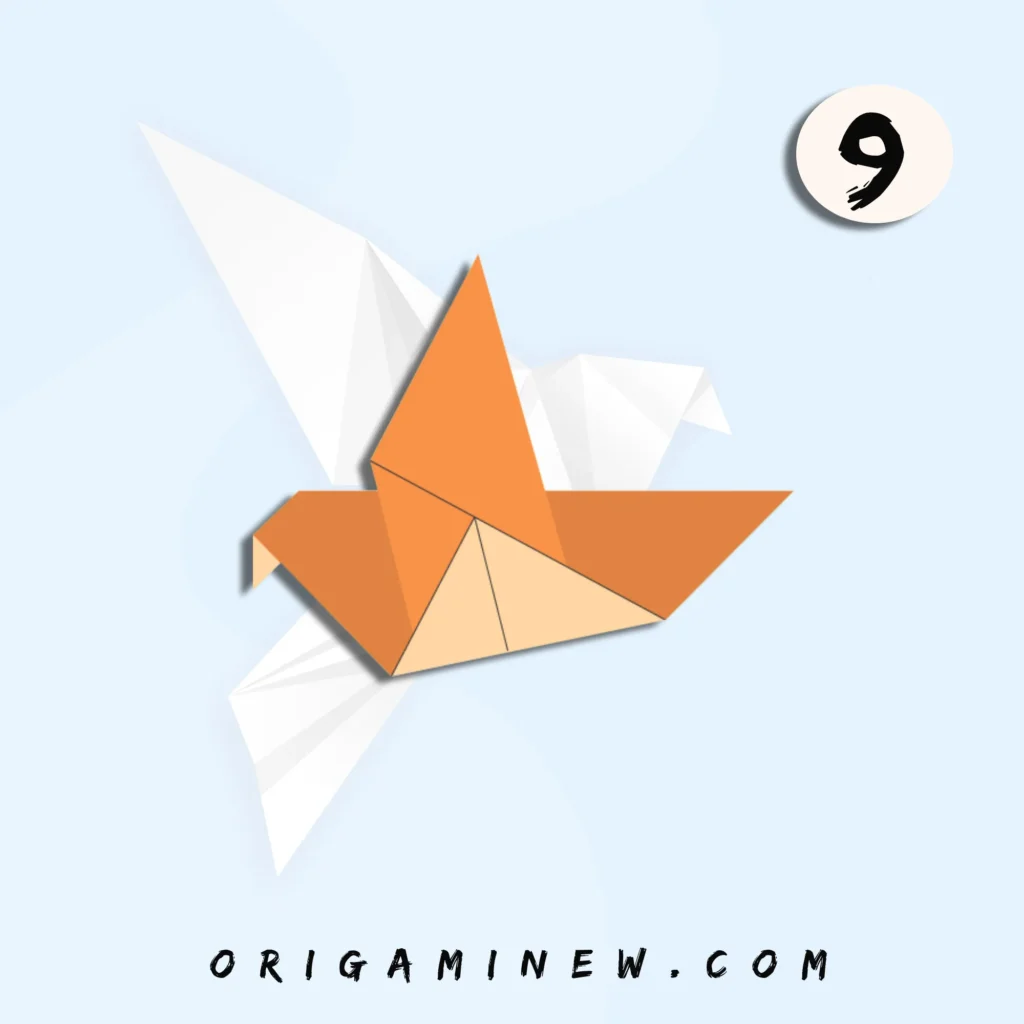
Your origami dove is nearly complete! This final step involves making subtle adjustments to perfect the overall shape and ensure your creation truly resembles a dove.
First, carefully check the symmetry of your model and make minor adjustments as needed. You may need to slightly reshape the head, tail, or wings by gently pinching or smoothing various sections.
To add the final touch, carefully shape the beak by pinching the tip of the head section, and perhaps add a small fold to create the distinct head shape doves are known for.
Pro tip: For a finishing touch, you can gently curve the wings outward to create a more three-dimensional effect, or press the body slightly to help your dove stand stably on a flat surface.
Creative Ways to Display and Use Your Origami Dove
Now that you’ve mastered folding an origami dove, here are some inspiring ways to enjoy your creation:
- String multiple doves together to create a peaceful mobile
- Use them as unique place cards for special dinners
- Incorporate them into greeting cards or gift toppers
- Create a flock of doves in different sizes or papers for a striking display
- Use them as meaningful holiday decorations
- Attach them to branches for a nature-inspired arrangement
- Include a small written message or wish inside the paper before folding
Variations to Try
Once you’ve mastered the basic origami dove, consider these variations:
- Two-toned dove: Use dual-colored paper to create striking color combinations
- Textured paper: Try specialty papers with subtle patterns for unique effects
- Size variations: Scale your dove up or down by starting with different sized squares
- Flapping dove: Learn a modified version that features movable wings
- Peace dove: Add a small origami olive branch for the classic peace symbol
Troubleshooting Common Issues
- Uneven wings: Return to step 7 and ensure your wing folds are symmetrical
- Trouble standing: Adjust the bottom edge slightly to create a flatter base
- Paper too stiff: Use thinner paper or precondition it by gently working it in your hands
- Losing track of steps: Mark the back of your paper with small pencil indicators
- Messy creases: Take time to make each crease sharp and precise before moving on
Further Resources
To continue developing your origami skills, explore these trusted resources:
- Origami USA – America’s premier origami organization with resources and diagrams
- The Origami Resource Center – Comprehensive tutorials and folding techniques
- Robert J. Lang Origami – World-renowned origami artist with beautiful designs
- The Spruce Crafts – Well-regarded crafting website with bird origami tutorials
Conclusion
Creating an origami dove combines technical skill with artistic expression, resulting in a beautiful symbol of peace and hope. By following these nine essential steps, you’ve transformed a simple square of paper into an elegant bird that seems ready to take flight.
Beyond the satisfaction of creating something beautiful with your hands, origami offers benefits including improved concentration, spatial awareness, and fine motor skills. The process of folding a dove can be as rewarding as the finished product itself—a mindful activity that encourages patience and precision.
Whether you’re new to origami or rediscovering a childhood hobby, the dove represents an achievable yet impressive project that yields beautiful results. Display your creation proudly, share it as a meaningful gift, or simply enjoy the peaceful process of bringing paper to life through the ancient art of origami.
What will you create with your origami skills next? Share your creations and experiences in the comments below!
Happy folding!