
Introduction:
Welcome to the ultimate origami dragon tutorial! This comprehensive guide presents one of the most detailed and impressive paper folding projects in the origami world. Creating an origami dragon represents the pinnacle of paper folding artistry, combining advanced techniques, geometric precision, and creative expression into a single magnificent creature. This 75-step journey transforms a simple square of paper into a majestic dragon complete with spreading wings, a distinctive head with teeth and eyes, and a dramatic tail. While this project is designed for experienced folders, intermediate origamists willing to take on a challenge will find the step-by-step instructions accessible with patience and practice. The green paper demonstrated here beautifully captures the essence of a classic dragon, though any color can be used to create your mythical beast. From ancient Eastern mythology to modern fantasy, dragons have captured human imagination for millennia—and now you can bring one to life through the ancient art of origami!
Detailed Step Descriptions:
STEP 1: CREATING THE INITIAL FOLD GRID
Begin your origami dragon by folding and unfolding the paper to create essential reference lines. These preliminary creases form the foundation grid that will guide all subsequent folds in your dragon creation. Professional origami artists emphasize the importance of precise initial folding for complex models like dragons. Use your fingernail or a bone folder to create sharp, clean creases that will serve as guides throughout the project.
STEP 2: ESTABLISHING THE CORNER FOLDS
Fold and unfold just the corners of your paper as indicated by the directional arrows. These strategic corner folds begin establishing the geometric structure necessary for the dragon’s complex form. Advanced origami dragon designs rely on these preliminary markings to ensure proper proportions and symmetry. Take your time with these initial folds, as they directly influence the final appearance of your majestic creature.
STEP 3: REPEATING CORNER FOLDS ON OPPOSITE SIDE
Fold and unfold the opposite corners following the same pattern established in the previous step. This mirrored folding technique creates the balanced foundation essential for a symmetrical origami dragon. Traditional Japanese origami emphasizes this systematic approach to building complex models like mythical creatures. After completing this step, your paper should display a network of creases forming a geometric pattern.
STEP 4: CONTINUING THE FOLD PATTERN
Expand your fold grid by creating additional creases across the paper as shown. These strategic folds continue building the architectural framework necessary for your dragon’s three-dimensional structure. Expert origami tutorials for dragons always emphasize the importance of these foundational folding sequences. Precision at this stage ensures your finished dragon will have the proper proportions and structural integrity.
STEP 5: DEVELOPING THE CENTRAL STRUCTURE
Create another layer of folds to further develop the central framework of your origami dragon. This systematic folding process builds complexity gradually, transforming flat paper into a dimensional creature. Advanced dragon origami patterns utilize these overlapping fold systems to create realistic anatomical features. Maintain consistent pressure and alignment to ensure all folds work together harmoniously in the final model.
STEP 6: FLIPPING THE MODEL FOR CONTINUED WORK
Turn your paper over to access the reverse side for the next sequence of critical folds. This strategic reorientation allows you to build the dragon’s structure from multiple angles. Complex origami tutorials often require working on both sides to achieve the desired three-dimensional effects. Ensure all previous folds remain crisp and well-defined as you continue developing your dragon.
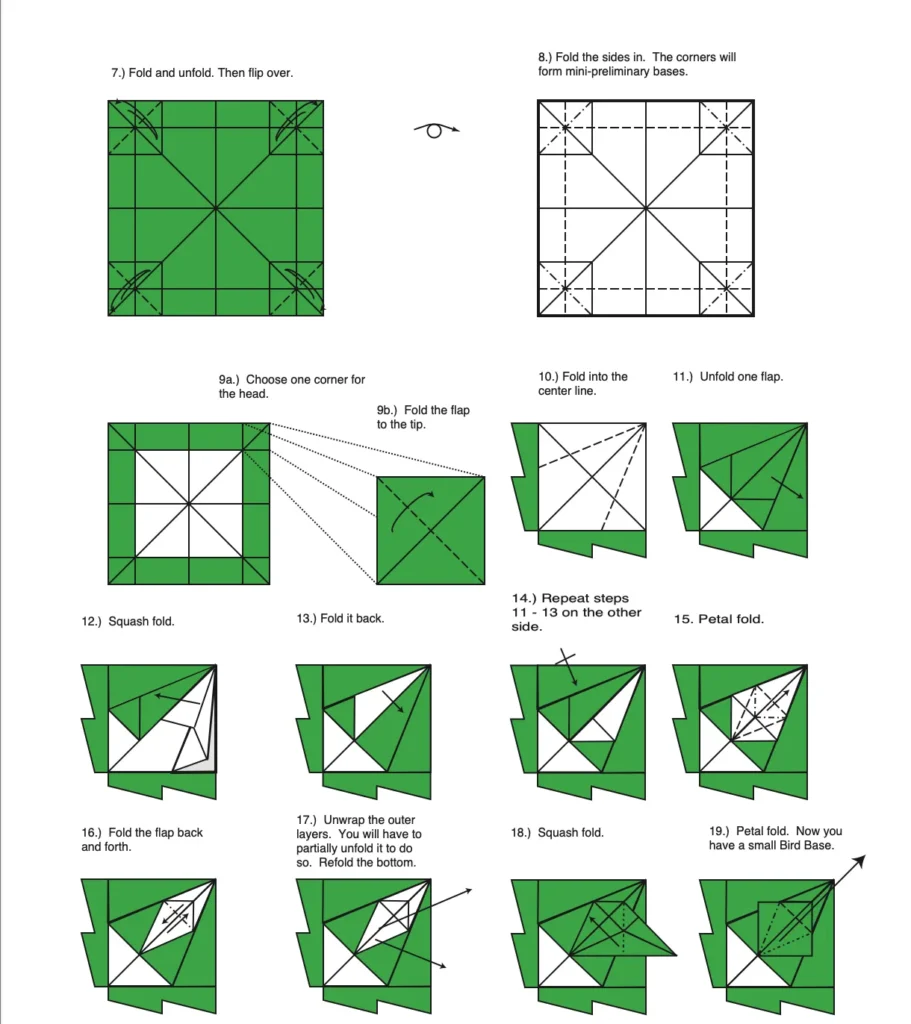
STEP 7-8: CREATING THE CORNER STRUCTURES
Execute careful folds to form mini-preliminary bases in each corner of your paper. These corner structures will eventually become crucial elements of your dragon’s anatomy, including wings and limbs. Professional origami dragon designs utilize these preliminary bases as building blocks for complex features. The systematic transformation of each corner demonstrates the mathematical precision underlying origami art.
STEP 9: SELECTING THE HEAD CORNER
Choose one corner that will become the dragon’s head, a critical decision point in the folding process. This selection determines the orientation and flow of your entire origami dragon design. Traditional origami masters teach that visualizing the final form helps guide these important structural decisions. The chosen corner will undergo specialized folding to create the dragon’s distinctive facial features.
STEPS 10-19: FORMING THE BIRD BASE VARIANT
Transform one section into a modified bird base, a fundamental structure in advanced origami dragon creation. This complex sequence involves multiple petal folds and squash folds to create dimensional layers. The bird base variant provides the foundation for both the dragon’s head structure and wing attachments. Expert origami techniques like unwrapping outer layers create the sophisticated geometry needed for realistic dragons.
STEPS 20-21: FOLDING INTO PRELIMINARY FORM
Complete the formation of all four corners and begin folding the model into a preliminary base structure. This pivotal transformation starts bringing your flat paper closer to the recognizable form of a dragon. Watching the “X” pattern guide your folds helps maintain proper alignment during this complex sequence. Traditional origami dragons often utilize this preliminary base as the foundation for intricate detailing.
STEPS 22-25: CREATING THE DIAMOND FORM
Fold the pointed sections to create a distinctive diamond shape that forms the dragon’s core body structure. This strategic shaping creates the tapered form characteristic of mythical dragon anatomy. Sinking the tip partially helps establish proper proportions between the dragon’s body and extremities. Opening the sides reveals the emerging three-dimensional quality of your origami creation.
STEPS 26-28: DEVELOPING WING STRUCTURE
Execute a series of petal folds to begin forming the dragon’s magnificent wing structure. These complex folds create the layered effect that gives origami dragon wings their impressive appearance. Repeating the process on the back ensures symmetrical wings essential for a balanced mythical creature. The careful manipulation of paper layers demonstrates advanced origami folding techniques at their finest.
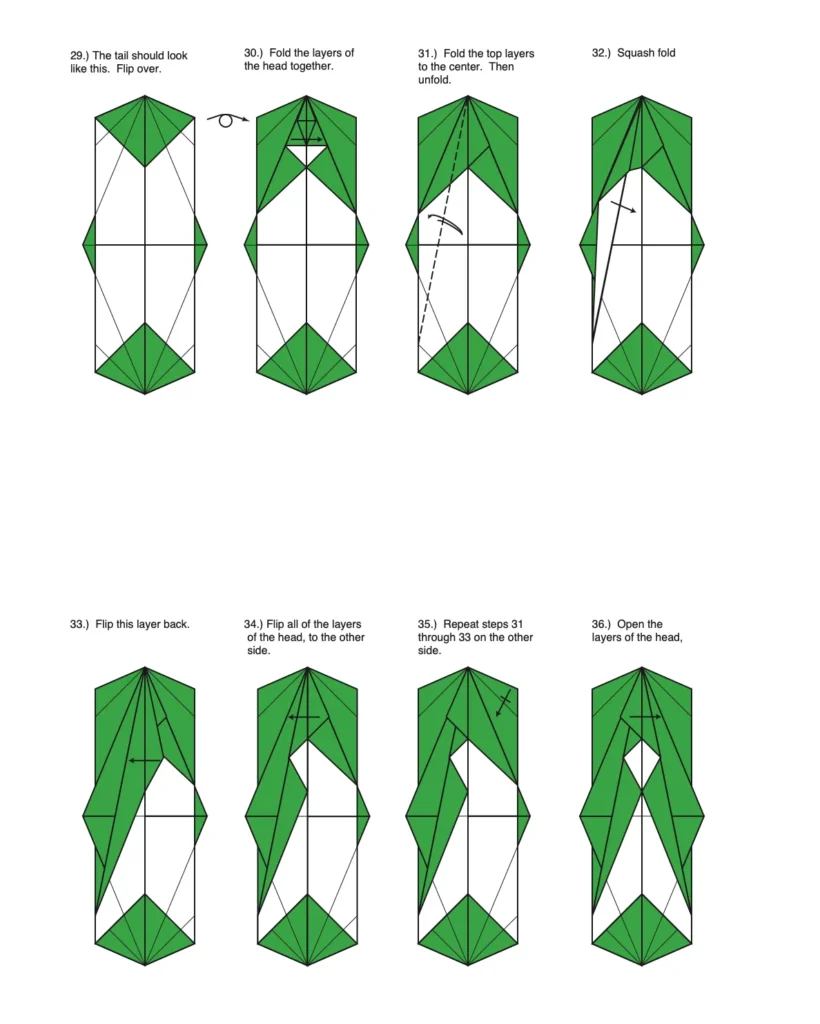
STEPS 29-36: REFINING THE BODY AND HEAD
Work through a detailed sequence to refine the dragon’s body shape and develop the head structure. The combination of squash folds and layer manipulation creates realistic anatomical proportions. Opening specific layers while keeping others flat requires patience and precision typical of complex origami models. These steps transform the basic form into a recognizable dragon with distinct head and body sections.

STEPS 37-40: CREATING THE RABBIT EAR DETAIL
Fold the edges into rabbit ears and develop the tail section using specialized petal fold techniques. These advanced origami methods add dimensional detail that brings your dragon to life. The rabbit ear folds create texture and structure in areas that will become visible features. Completing the tail formation establishes the dragon’s characteristic long, tapering silhouette.
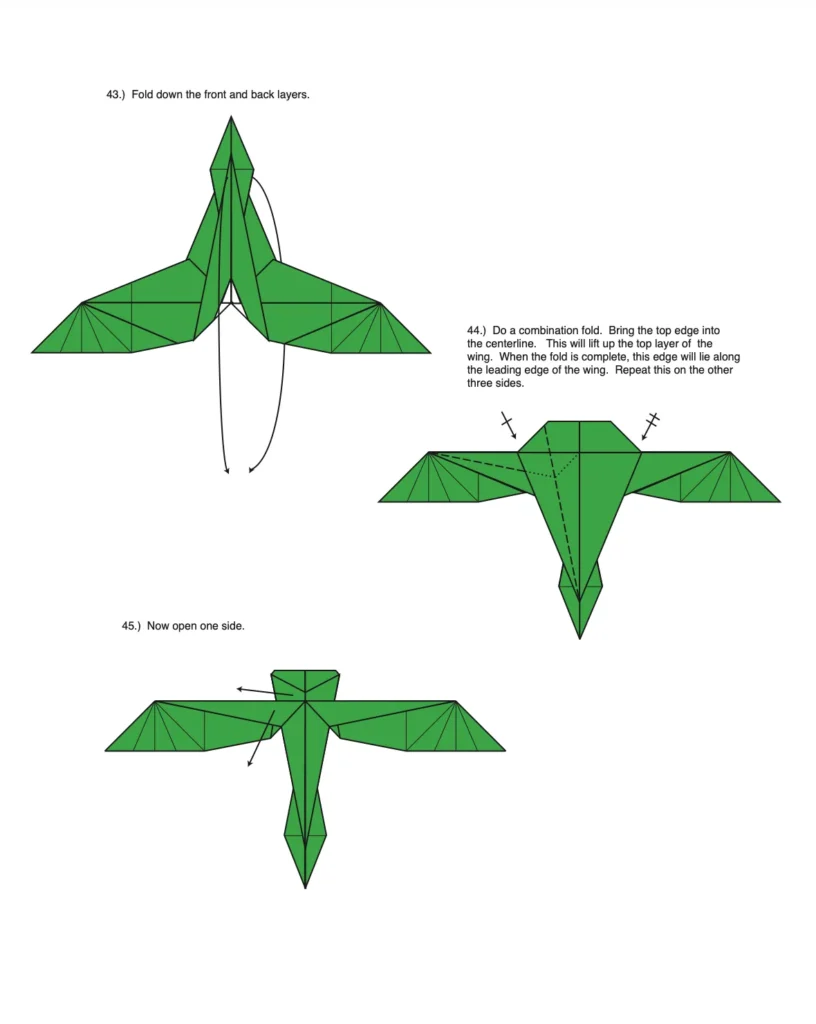
STEPS 41-45: WING DEVELOPMENT AND POSITIONING
Inside reverse fold the wings outward and shape them to create the dramatic wingspan dragons are known for. This crucial sequence transforms flat panels into dimensional wings with realistic leading edges. Folding the inner layers creates wing structure while the outer layers provide the sweeping wing membranes. Proper execution of these steps results in wings that can be positioned for dynamic flying or resting poses.
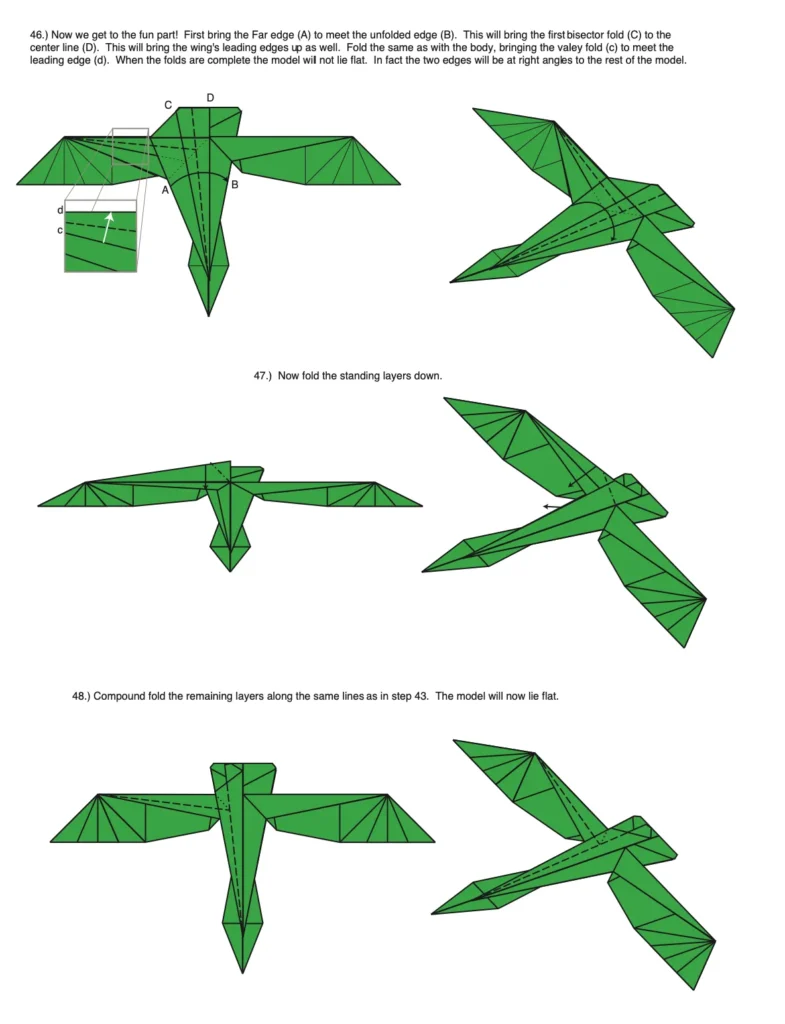
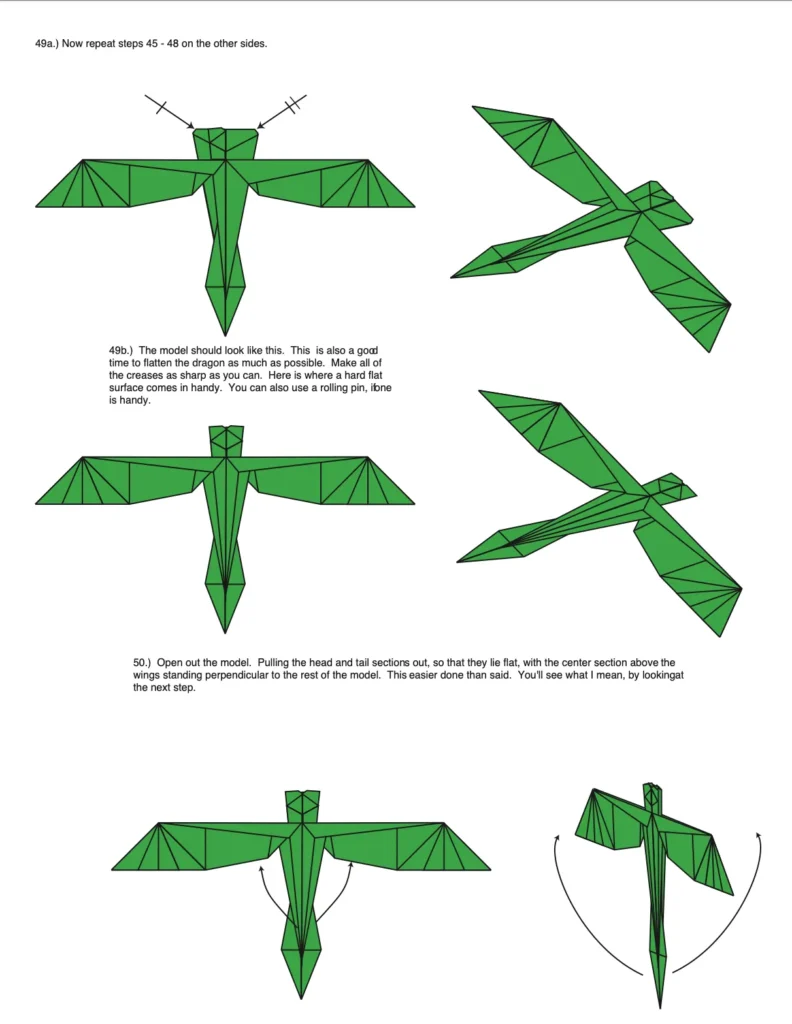
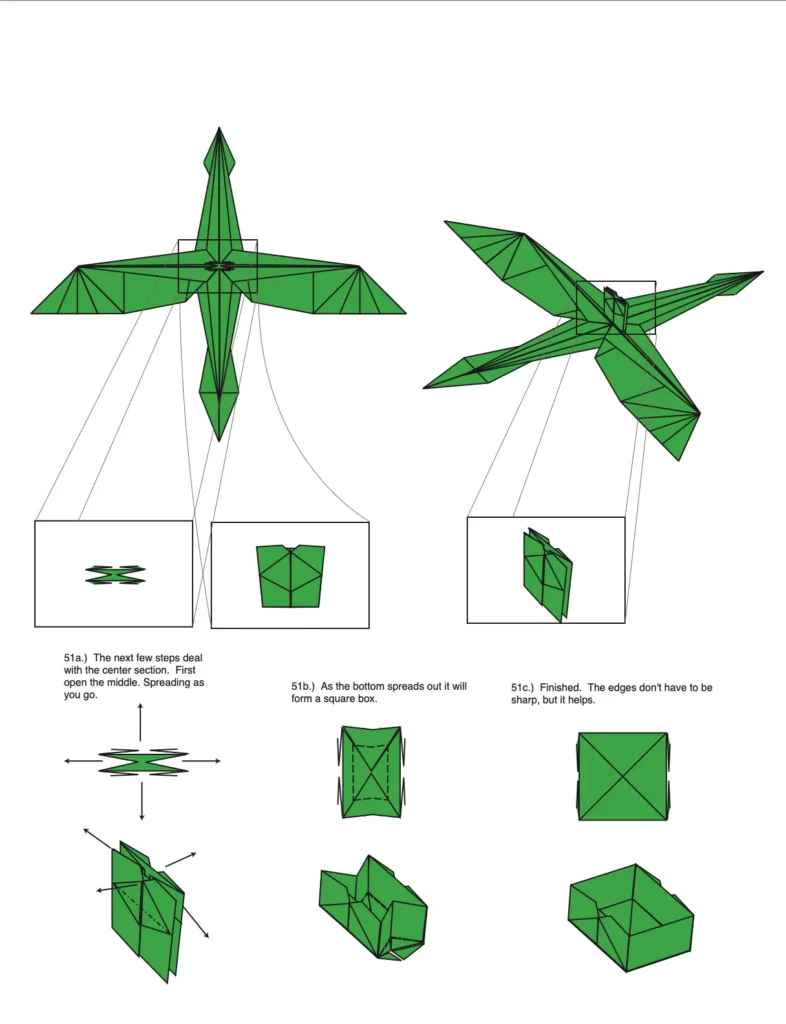
STEPS 46-53: ACHIEVING THE FINAL FORM
Complete a series of complex folds including a combination fold that brings all elements together. This sophisticated sequence requires carefully managing multiple layers while maintaining structural integrity. Opening the model strategically while keeping certain sections flat creates the dragon’s distinctive profile. The transformation reveals how methodical folding creates a cohesive, three-dimensional mythical creature.
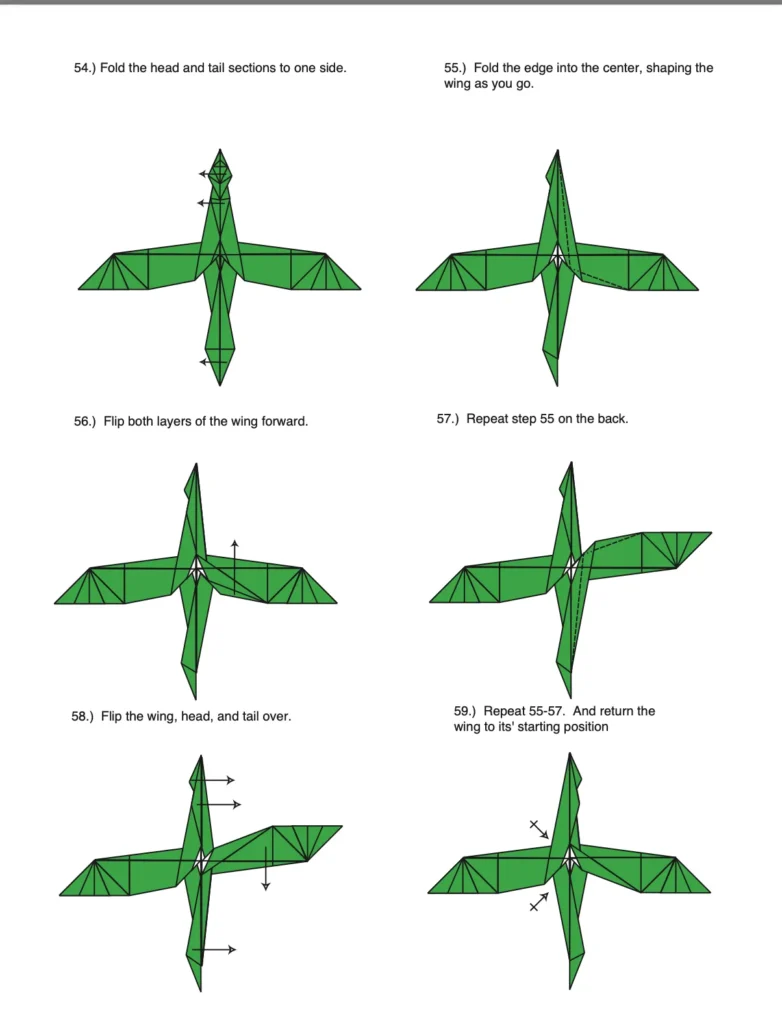
STEPS 54-59: POSITIONING AND WING REFINEMENT
Fold the head and tail sections to one side while shaping the wings for optimal presentation. These positioning adjustments allow your origami dragon to achieve its most dramatic and balanced pose. Flipping wing layers forward creates the illusion of movement and adds dynamic energy to your creation. Repeating these adjustments on both sides ensures your dragon displays perfect symmetry.
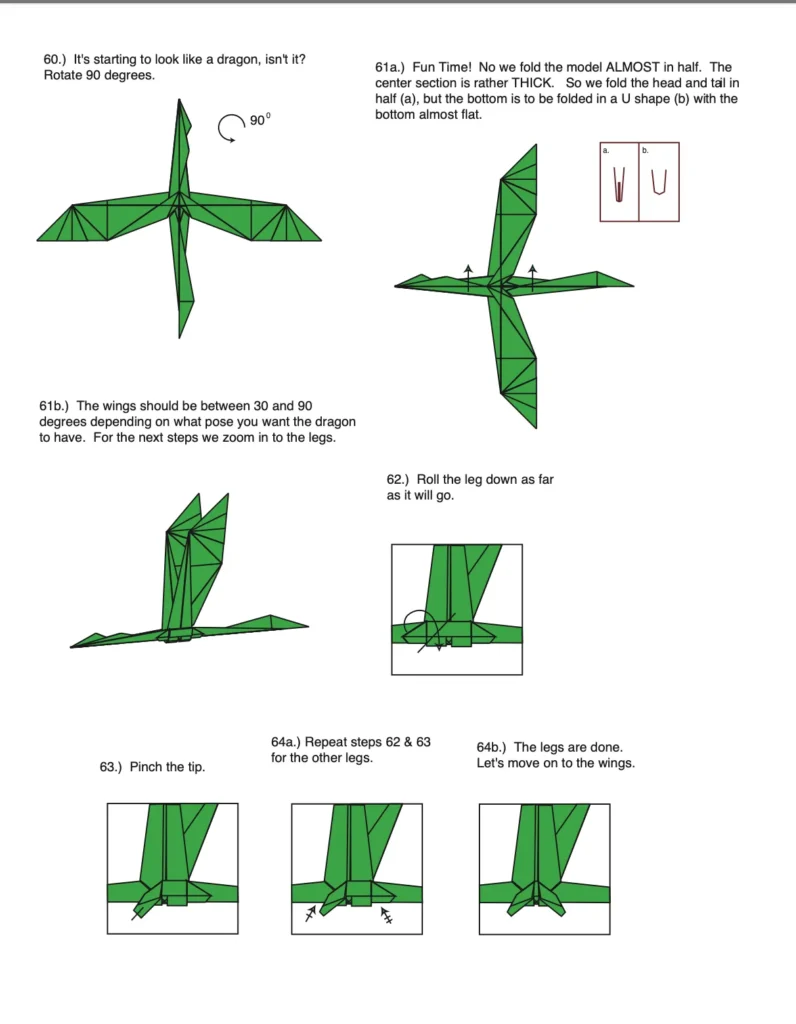
STEPS 60-64: CREATING THE DRAGON POSE
Rotate the model 90 degrees to reveal the emerging dragon form and begin final shaping sequences. The distinctive U-shaped fold creates natural leg positioning that grounds your mythical creature. Wing angles between 30-90 degrees allow customization based on whether you want a soaring or perched dragon. These adjustments transform your origami from a geometric construct into a lifelike mythical beast.

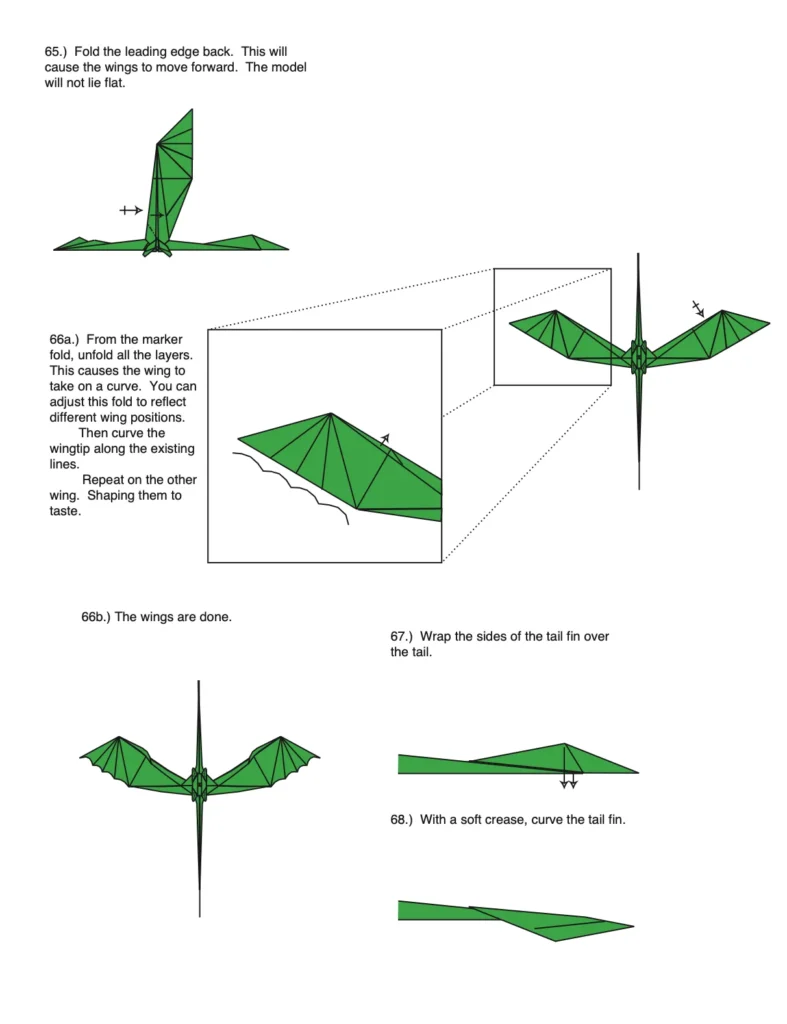
STEPS 65-68: FINALIZING THE WINGS
Complete the wing formation by folding leading edges and adding curved details for realistic appearance. These subtle adjustments create the aerodynamic wing shape that suggests your dragon’s ability to fly. Wrapping tail fin edges provides structural stability while maintaining the sleek profile dragons require. Soft creases and gentle curves transform angular folds into organic, natural-looking features.
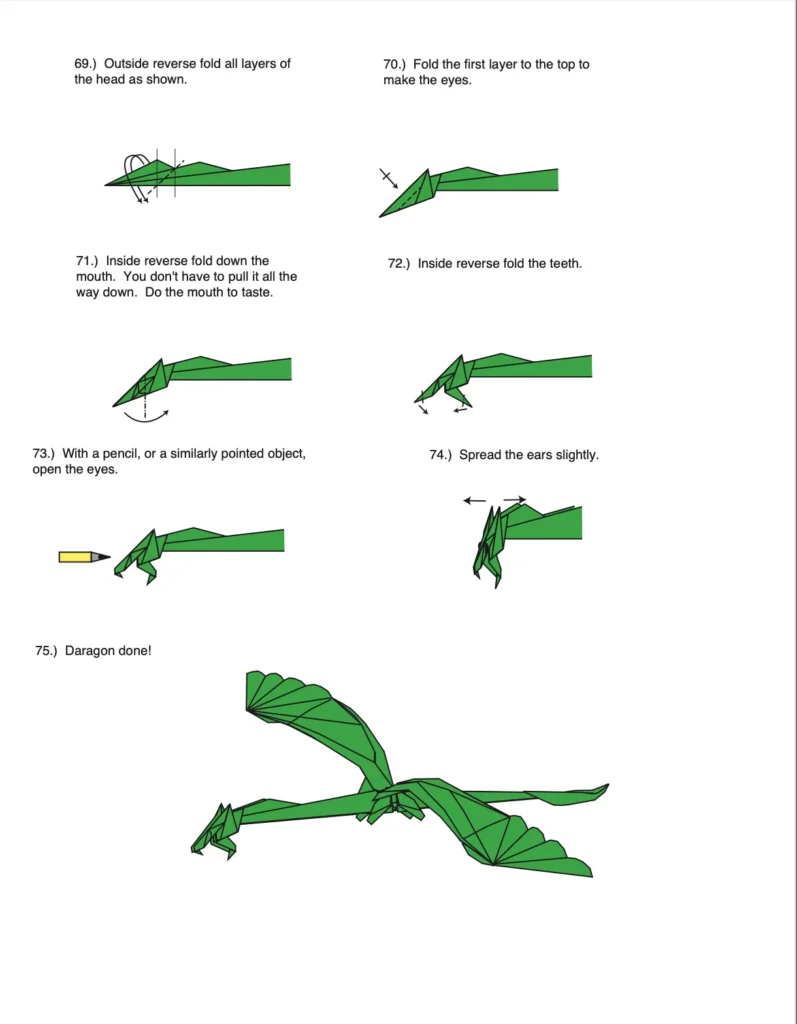
STEPS 69-75: ADDING FACIAL FEATURES
Execute the final detail work including outside reverse folds to create the dragon’s expressive face. Creating eyes through strategic folding brings personality and life to your paper creature. Inside reverse folds form fearsome teeth, completing the dragon’s intimidating appearance. The finished origami dragon displays all the classic features: spread wings, detailed head, and elegant proportions.
Conclusion:
Congratulations on completing your magnificent origami dragon! This extraordinary achievement represents mastery of advanced paper folding techniques and demonstrates the heights of origami artistry. Through 75 precise steps, you’ve transformed a simple square into a complex, three-dimensional creature that captures the majesty and mystery of these legendary beings. Your finished dragon showcases sophisticated techniques including preliminary bases, petal folds, rabbit ears, and inside reverse folds—all harmoniously combined to create a stunning mythical creature. Whether displayed as a centerpiece, given as an impressive gift, or added to your origami collection, this dragon represents hours of dedicated folding and the satisfaction of conquering one of origami’s most challenging projects. The skills you’ve developed through this tutorial—patience, precision, and spatial visualization—will serve you well in future origami endeavors. We hope this dragon brings you pride in your accomplishment and inspires you to continue exploring the limitless possibilities of paper folding art!
- Explore more advanced origami creatures → Discover other complex models including phoenixes, griffins, and multi-headed dragons for experienced folders.
- Master essential origami techniques for complex models → Learn the specialized folding methods used in this dragon tutorial, including combination folds and complex bases.
- Best papers for origami dragons → Find out which papers create the most impressive dragons, with tips on weight, size, and color selection.
- Create a complete origami fantasy collection → Complement your dragon with other mythical creatures to build an impressive fantasy-themed display.
- Dragon variations and customization → Explore different dragon styles, poses, and modifications to personalize your origami creation.
