
Introduction
Origami, the ancient Japanese art of paper folding, offers endless possibilities for creating intricate and meaningful objects from simple sheets of paper. Among the most fascinating modern origami designs is the paper camera—a clever representation of the photography devices we use to capture life’s precious moments. This origami camera tutorial brings together the traditional craft of paper folding with contemporary subject matter, making it an excellent project for both beginners seeking practical folding experience and photography enthusiasts looking for a creative paper representation of their passion. Unlike many origami models that require complex techniques, this camera design achieves an impressive resemblance to a real camera while using straightforward folds that most people can master with a bit of patience. The completed model features recognizable camera elements, including the body, lens area, and even suggests the dimensional aspects of a real camera. Whether you’re decorating a photography-themed event, creating a thoughtful gift for a camera buff, or simply enjoying the meditative aspects of paper folding, this step-by-step guide will walk you through creating your own origami camera in just 11 manageable steps.
Step-by-Step Instructions
Step 1: Create the Foundation Grid For Origami Camera
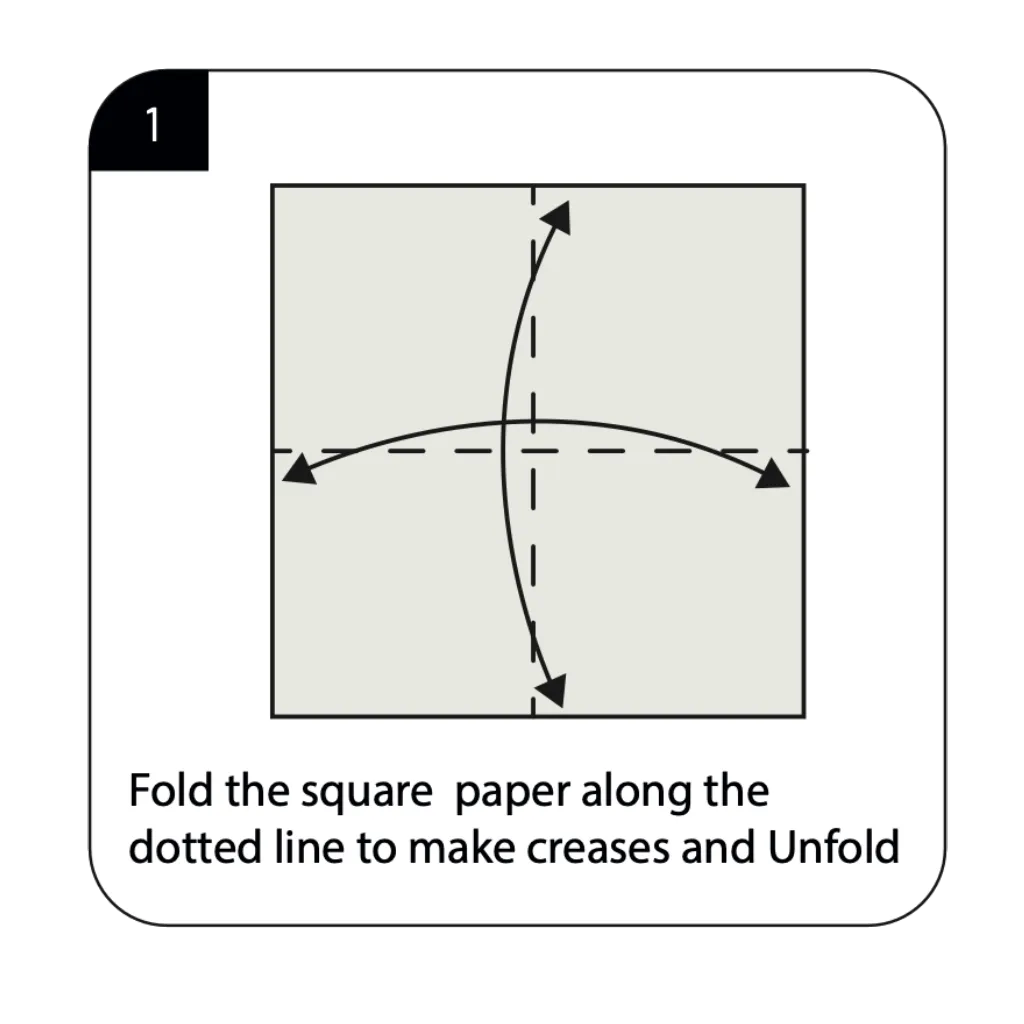
Begin with a square sheet of paper, preferably light blue or black for a realistic camera look. Fold the paper in half horizontally and vertically, making sharp creases, then unfold completely. These initial folds establish the critical reference lines that will guide all subsequent folds in your origami camera. The precision of these first creases is crucial, as they create the framework and symmetry for your entire model. Take care to align the edges perfectly and press firmly along each fold line to create clean, well-defined creases that will support later structural folds.
Step 2: Form the Preliminary Base
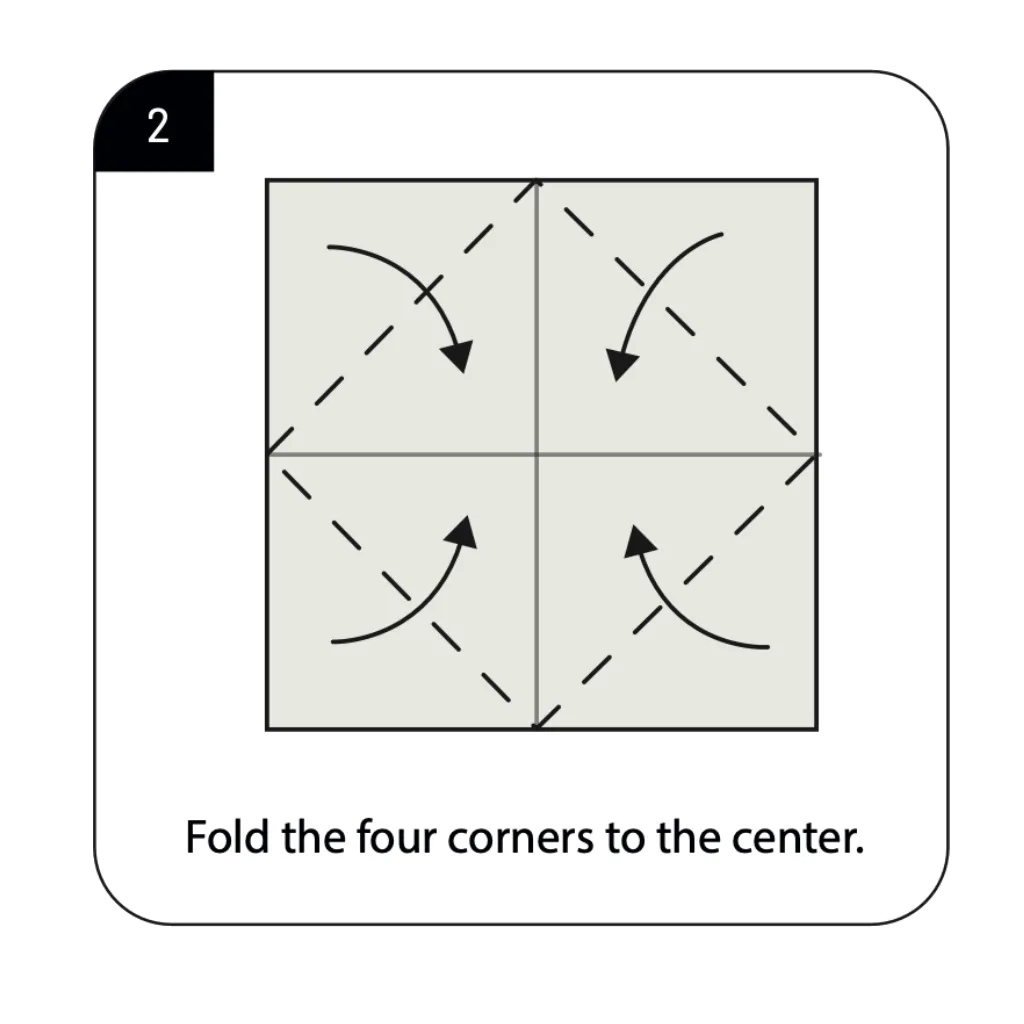
Fold all four corners of the square inward to meet at the center point created by the intersecting creases from Step 1. This important fold, known as the “blintz fold” in origami terminology, creates the preliminary base structure for your camera model. Ensure each corner reaches precisely to the center point for symmetrical results in your finished camera. This fold effectively reduces the size of your working surface while creating new edges and corners that will define your camera’s structure and proportions.
Step 3: Create the First Dimensional Elements For Origami Camera
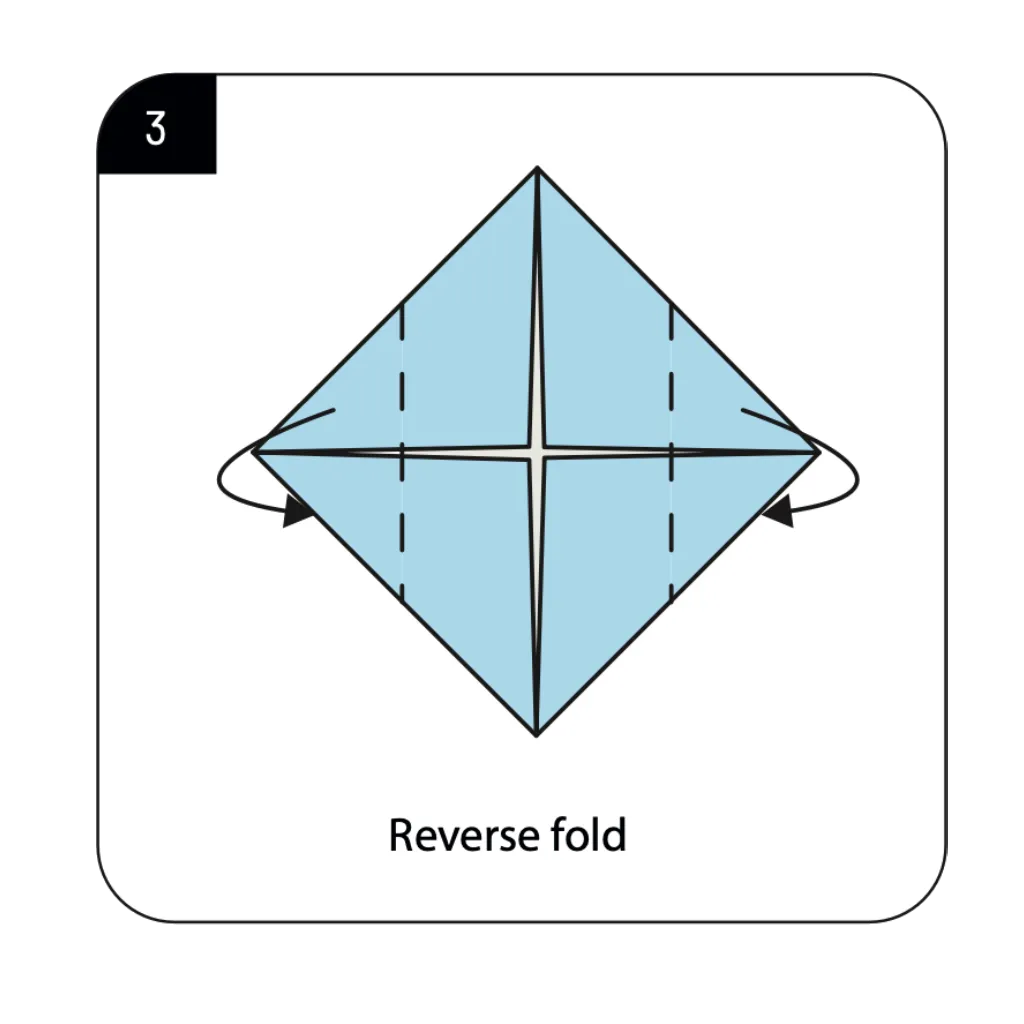
Perform reverse folds on all four corners as shown in the diagram, tucking each corner under to create dimension in your model. This technique begins transforming the flat paper into a more three-dimensional form that will eventually represent your camera. The reverse folds require carefully opening each corner and folding it back underneath along existing crease lines. These folds establish the initial depth and structure that distinguish your camera from simpler flat origami designs.
Step 4: Form the Elongated Shape
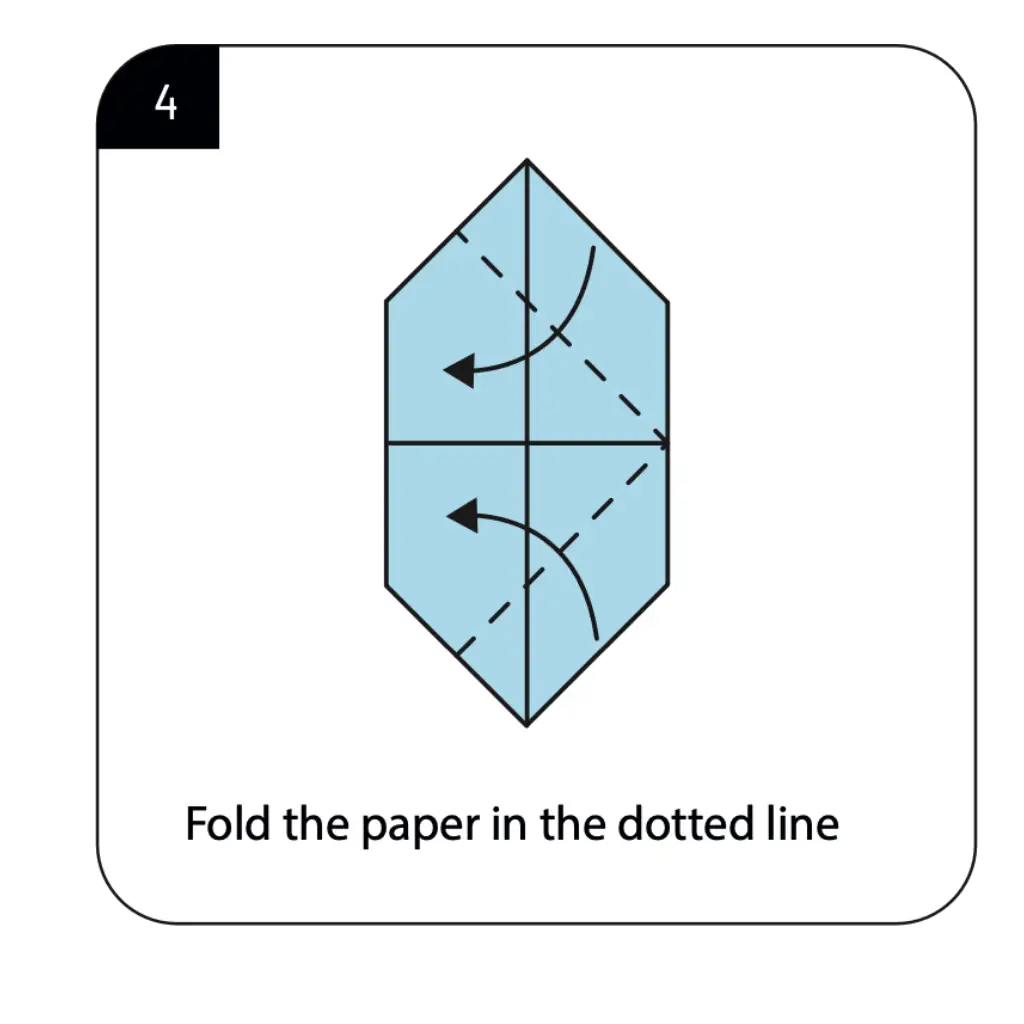
Fold the paper along the dotted lines as indicated, bringing the sides inward to create an elongated hexagonal shape. This important fold begins defining the rectangular body shape characteristic of cameras. The precision of these parallel folds affects the symmetry and proportions of your finished origami camera. Make sure the folds on both sides are identical in position and angle for a balanced, professional-looking result that properly represents a camera’s rectangular form.
Step 5: Create Angled Camera Edges For Origami Camera
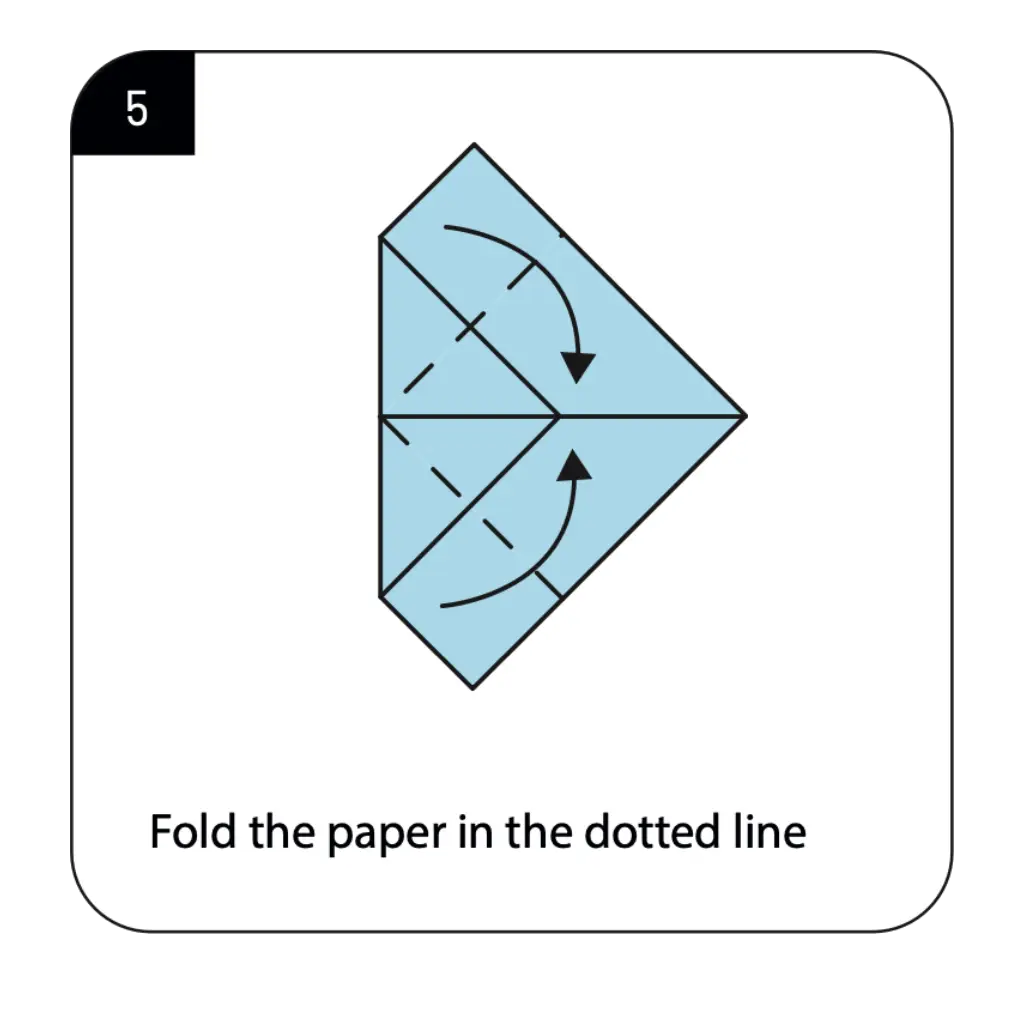
Fold the paper along the indicated dotted lines to create angled edges that further define your camera’s shape. These diagonal folds add complexity and dimension to your model, enhancing its resemblance to a real camera’s contours. Work carefully to ensure these folds align with the existing crease pattern established in previous steps. These strategic folds transform the simple geometric shape into the more complex form necessary for recognizing the model as a camera.
Step 6: Open and Create Dimension

Open and flatten the pocket as shown in the diagram, using the small circular inset as a guide for this more complex maneuver. This critical step dramatically alters the shape, adding significant three-dimensional quality to your origami camera. This technique requires gently manipulating multiple layers of paper simultaneously while maintaining the integrity of previous folds. The pocket-flattening technique creates the depth needed to represent the camera’s protruding lens area and body structure.
Step 7: Reorient Your Model For Origami Camera
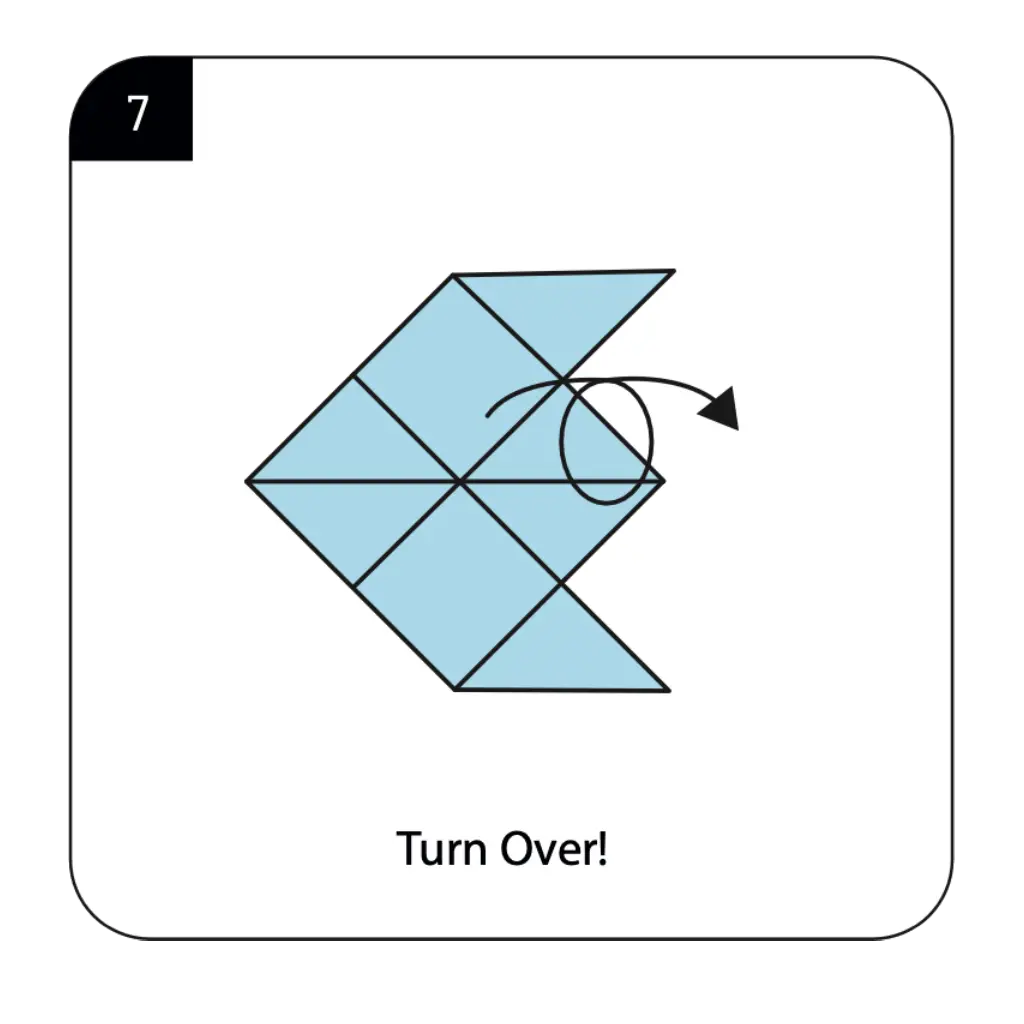
Turn over your folded paper as indicated to prepare for the next series of transformative folds. This reorientation ensures the proper development of your camera’s structural elements and features. Handle the model carefully during this transition to preserve the integrity of your previous folds. Proper positioning at this stage is crucial for the correct application of subsequent folds that will define your camera’s recognizable shape and proportions.
Step 8: Create the Camera Body Structure
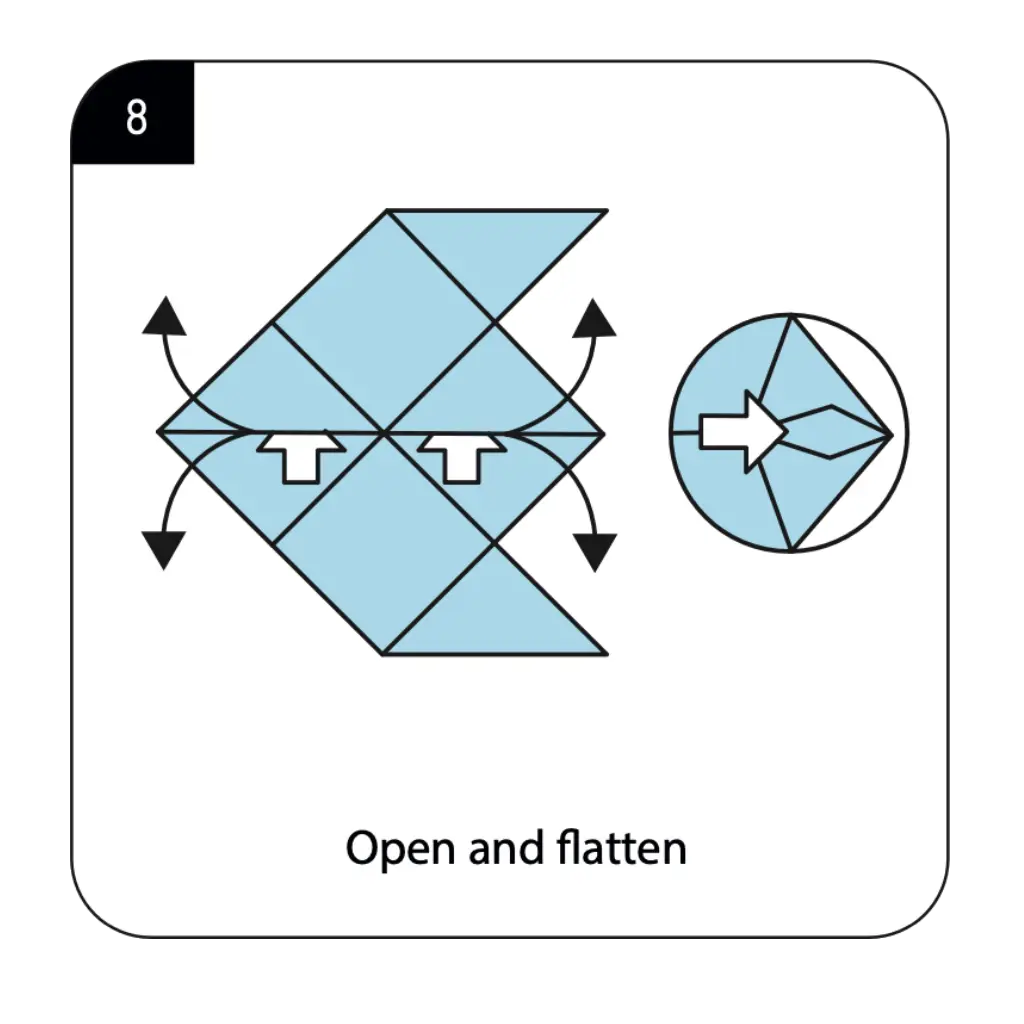
Open and flatten the model as shown, using the small circular inset as a reference for this complex manipulation. This step significantly enhances the three-dimensional structure of your origami camera, creating distinct sections that represent the camera body. This technique requires carefully working with multiple paper layers simultaneously while maintaining clean, precise fold lines. The resulting shape begins to clearly resemble a camera with its characteristic rectangular body and distinct front face.
Step 9: Reorient for Final Shaping
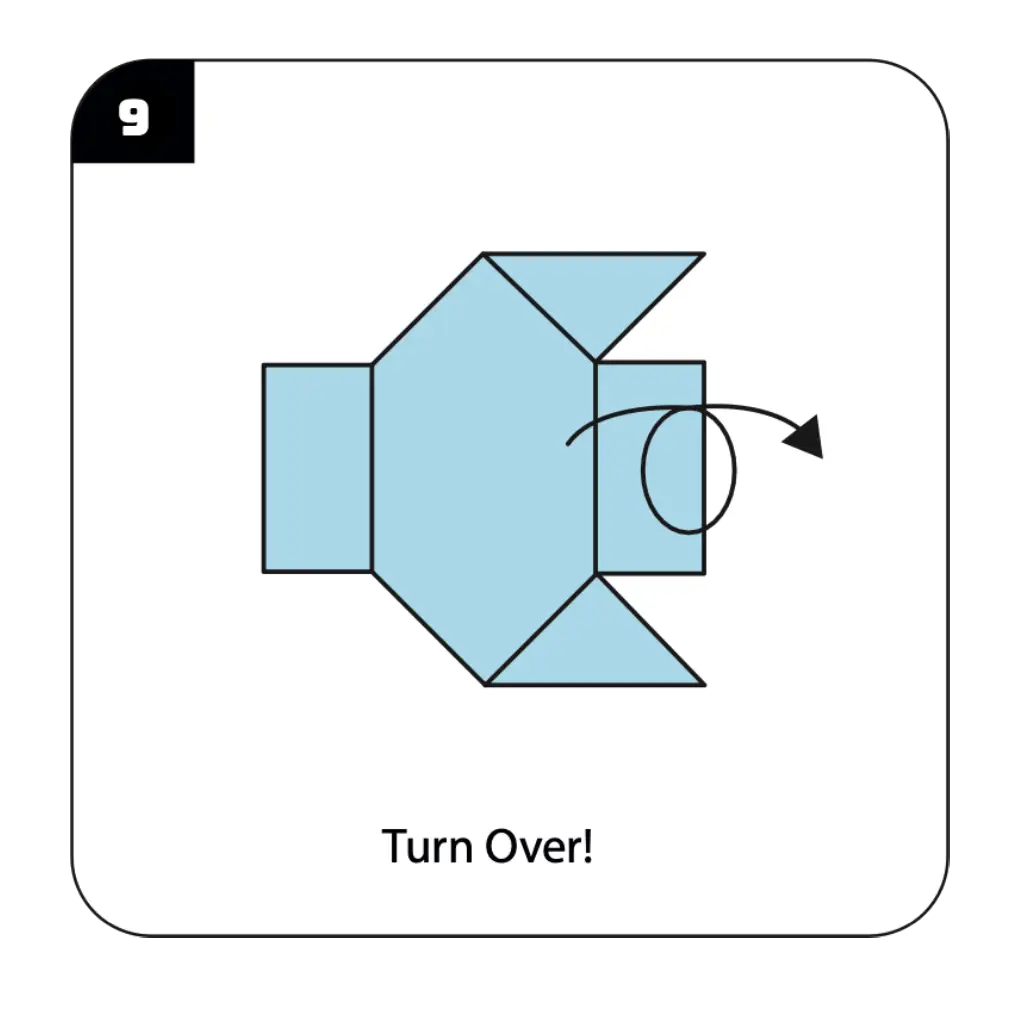
Turn over your model again as shown to position it correctly for the final shaping steps. This reorientation prepares your origami camera for the finishing touches that will complete its distinctive appearance. Careful handling during this transition preserves the structural integrity developed through previous folding steps. This proper positioning ensures that your final folds will create a recognizable camera form with appropriate dimensionality and proportions.
Step 10: Define the Front and Back Sections
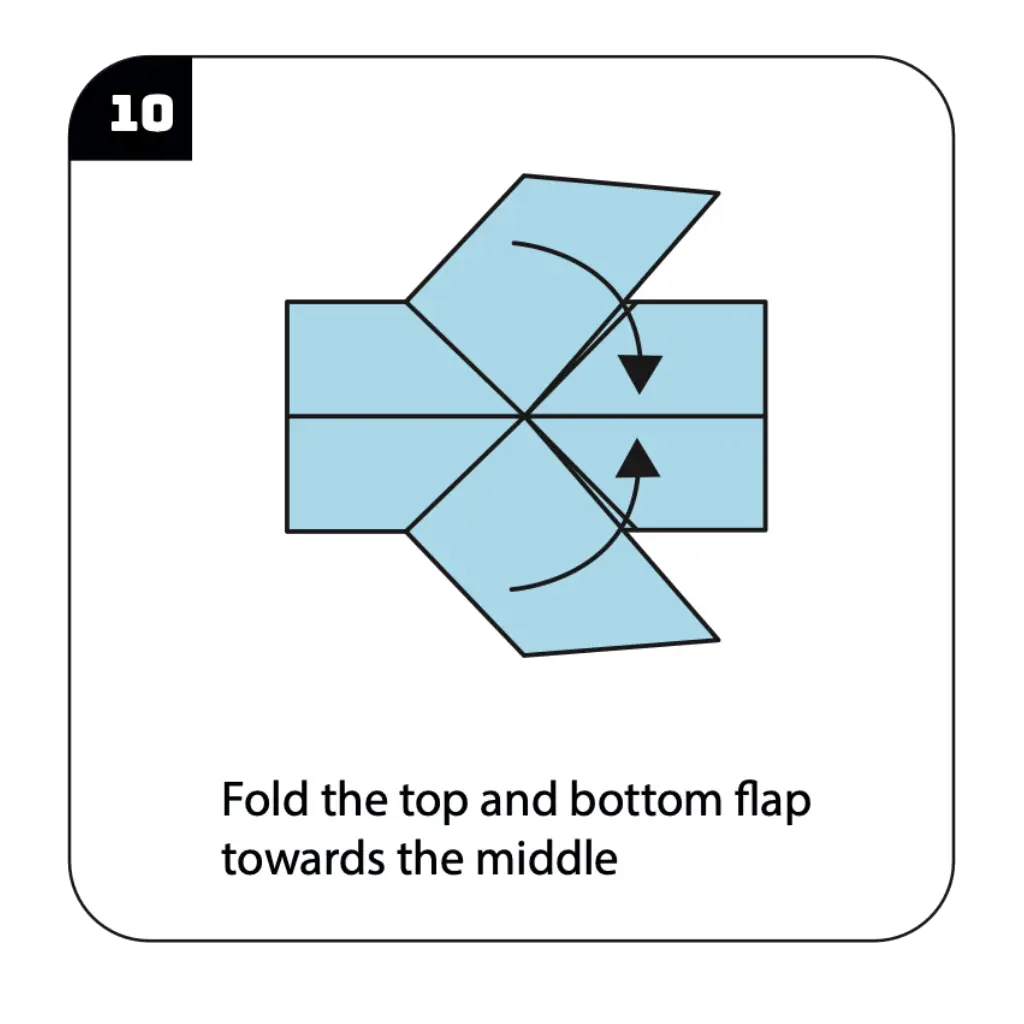
Fold the top and bottom flaps toward the middle as indicated to create definition between the camera’s body sections. These precise folds enhance the three-dimensional structure and establish the proper proportions of your paper camera. Ensure these folds are parallel and symmetrical for a balanced, professional-looking origami model. These strategic folds help define the front face where the lens would be and create the distinct body shape characteristic of handheld cameras.
Step 11: Complete Your Origami Camera
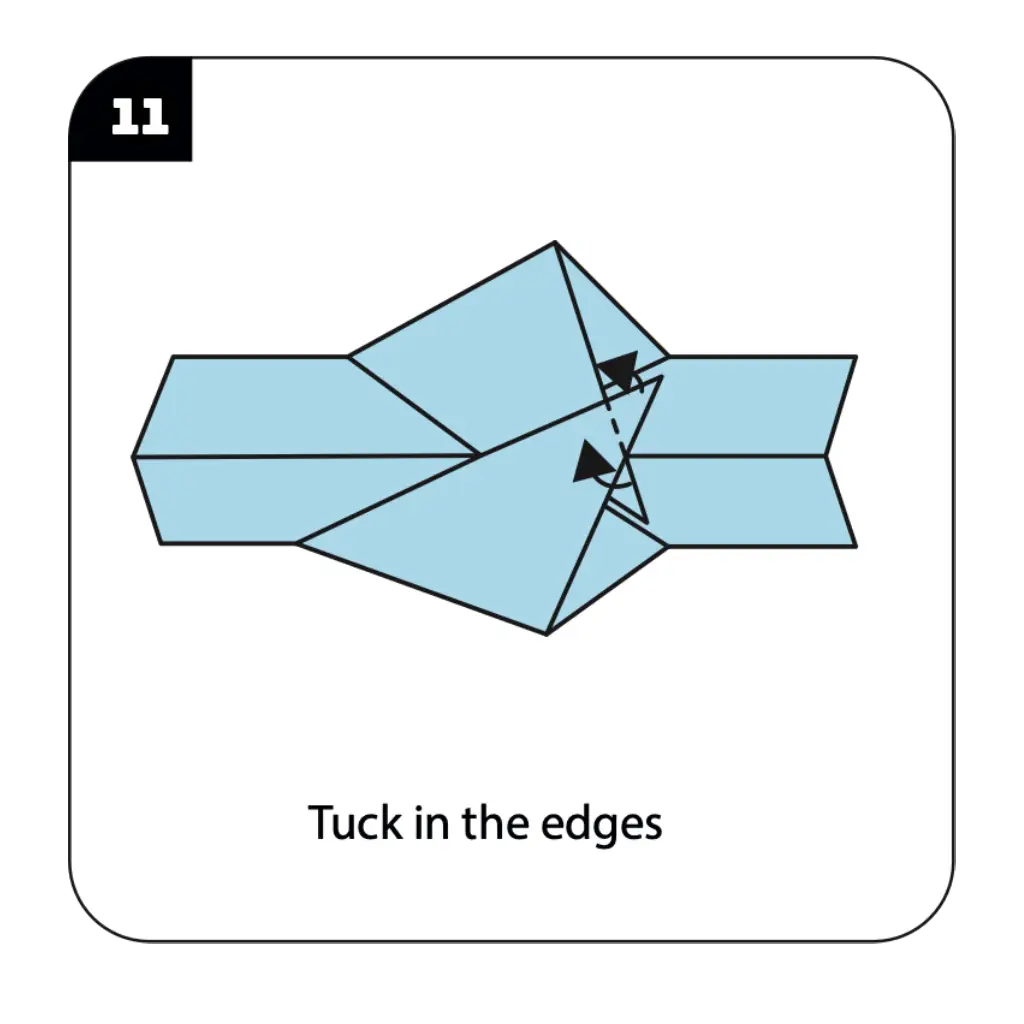
Tuck in the edges as shown in the diagram to finalize your origami camera and create a clean, finished appearance. This last step adds stability to your model while enhancing its three-dimensional quality and realistic camera appearance. Work carefully with these small, precise tucks to avoid tearing the paper while securing the camera’s final form. Your completed origami camera now displays the recognizable shape and proportions of a real camera, ready for display or play.
Conclusion
Congratulations on creating your origami camera! This delightful paper model represents a perfect blend of traditional paper folding techniques and modern subject matter. From a simple square sheet, you’ve fashioned a three-dimensional representation that captures the distinctive features of a real camera. The origami camera showcases how thoughtful folding techniques can translate complex objects into elegant paper interpretations, combining geometric precision with creative representation. Your completed model makes a charming decoration for photography enthusiasts, a perfect accent for scrapbooking projects, or an engaging demonstration of paper engineering principles. The techniques you’ve learned—including reverse folds, pocket folds, and three-dimensional shaping—build valuable skills that transfer to many other origami designs. We hope this tutorial has sparked your interest in both paper folding and creative object representation. Remember that practice enhances precision—each camera you fold will be more refined than the last, allowing you to perfect this engaging paper model that celebrates both the art of origami and the technology of photography.
- “Before starting your origami camera, learn essential paper folding techniques in our Origami Basics for Beginners guide.”
- “Looking for more object-based origami? Explore our Creative Origami Collection featuring everyday items and technological designs.”
- “Create a complete desk scene by combining your camera with origami Animals and other decorative elements.”
- “Discover beautiful ways to display your finished camera with our Decorative Origami Ideas for home and office.”
- “Enhance your paper photography theme by adding Origami Flowers as photo subjects for your camera.”
- “Take your paper camera skills to the next level with our Modular Origami Projects for more complex designs.”
