
Introduction
Origami, the ancient Japanese art of paper folding, offers a wonderful way to create charming objects from simple materials. Among the most beloved origami designs is the sail boat—a classic model that combines simplicity with nautical charm. This traditional origami sail boat tutorial demonstrates how to transform an ordinary square sheet of paper into a delightful miniature vessel complete with hull and sails. Perfect for beginners, children, and anyone looking to explore paper folding, this design requires no special tools or materials beyond a single square piece of paper. What makes the origami sail boat particularly appealing is its excellent balance between ease of creation and visual impact—the finished model clearly resembles a real sailboat while requiring only basic folding techniques. Whether you’re planning a rainy day activity with kids, creating decorations for a nautical-themed party, or simply looking to experience the mindful joy of paper folding, this step-by-step guide will help you navigate the creation of your own paper sail boat. Best of all, unlike more complex origami models, this sailboat can be completed in just nine straightforward steps, making it accessible even to those new to the art of origami.
Step-by-Step Instructions
Step 1: Create the Foundation Creases
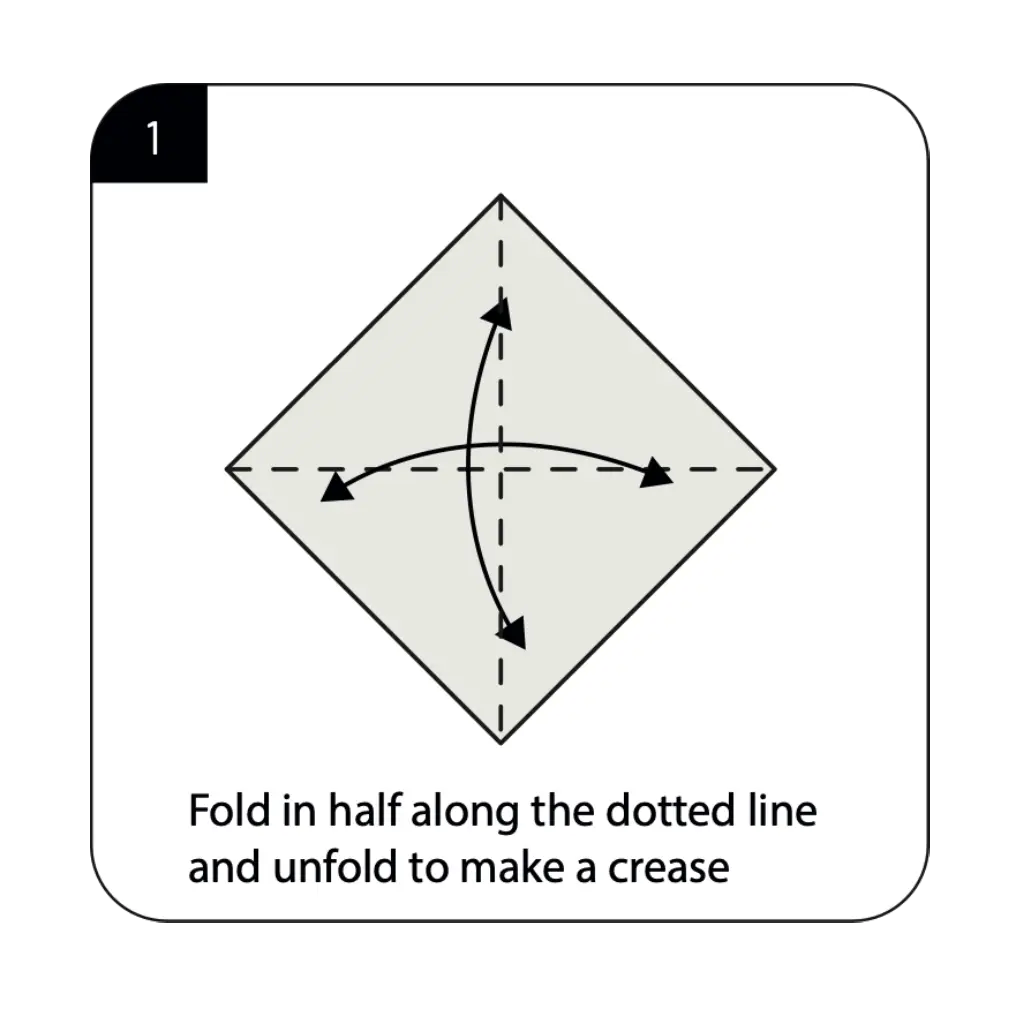
Begin with a square sheet of paper, preferably with white on one side and blue on the other for a realistic sail boat appearance. Fold the paper in half diagonally from corner to corner, creating a strong crease, then carefully unfold to restore the square. This initial fold establishes an important reference line that will guide all subsequent folds in your origami sail boat. The precision of this first crease is crucial, as it affects the symmetry and stability of your finished model. Take care to align the corners exactly and press firmly along the fold line to create a sharp, well-defined crease.
Step 2: Form the Initial Structure
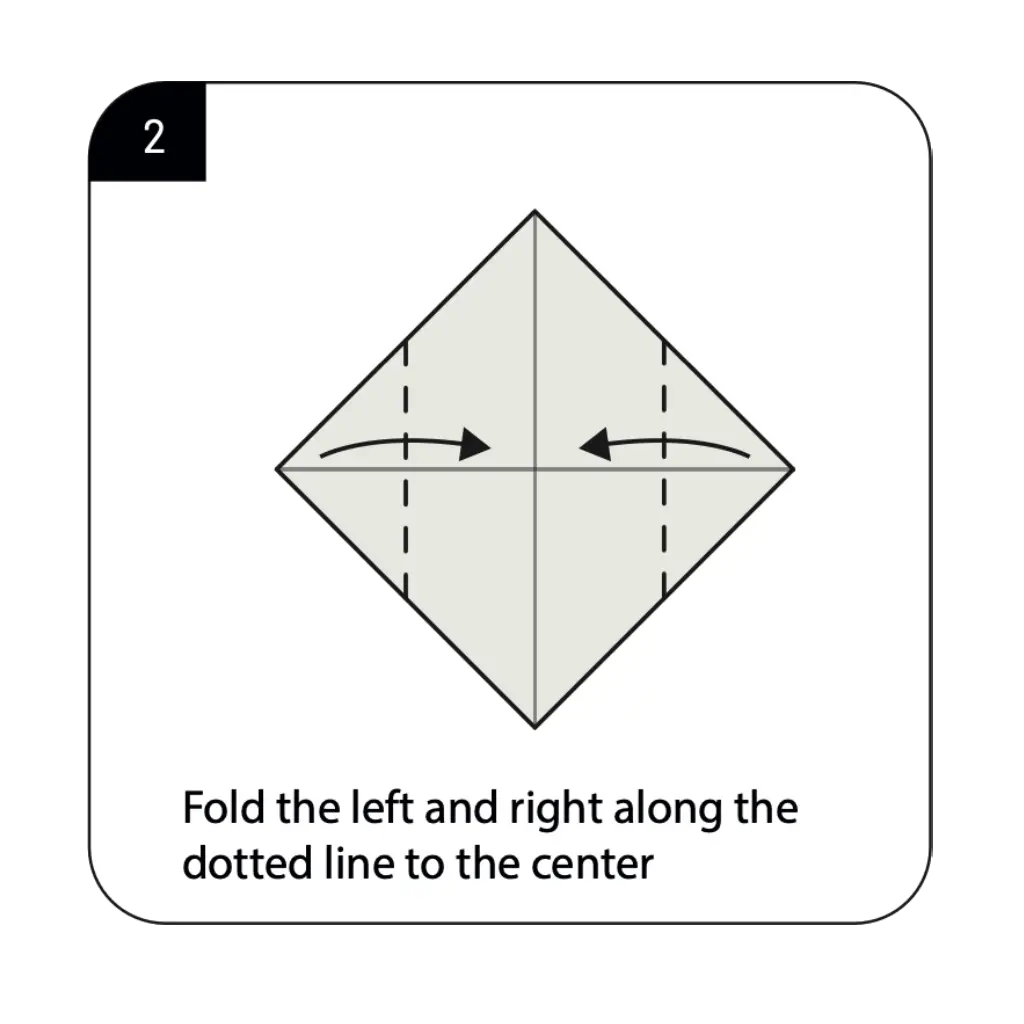
Fold both the left and right edges toward the center along the dotted lines as shown in the diagram. These parallel folds create the foundation for your sail boat’s structure and begin defining its proportions. The accuracy of these folds directly impacts the symmetry and balance of your finished origami sail boat. Ensure both sides are folded at equal distances from the center for a balanced appearance. This step creates a rectangular shape with a central crease that will develop into the distinctive sail boat form in subsequent steps.
Step 3: Reorient Your Model
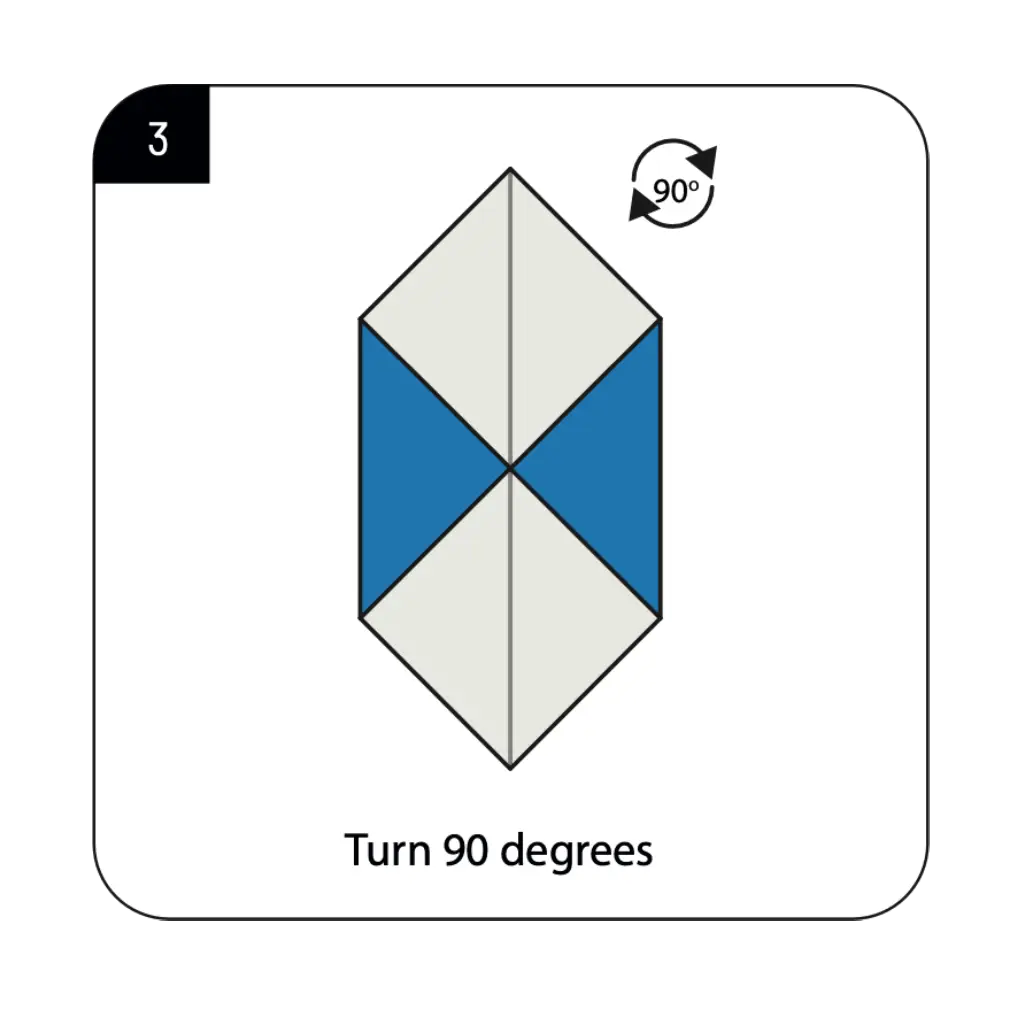
Turn your folded paper 90 degrees as shown in the diagram, repositioning it for the next series of folds. This reorientation is crucial for developing the proper sail boat structure in subsequent steps. The colored sections (blue in the illustration) will eventually form part of the boat’s hull, while the white sections will become the sails. This simple rotation prepares your model for the three-dimensional transformations that will create your origami sail boat’s distinctive shape and features.
Step 4: Create the Initial Hull Structure

Pull the left and right tips upward while keeping the center point below as indicated in the diagram. This important manipulation begins transforming the flat form into a more three-dimensional structure that will become your sail boat. The movement should be gentle but deliberate, ensuring the center point stays secure while the side points rise upward. This step begins creating the depth necessary for your origami sail boat’s hull and establishes the foundation for the distinctive triangular sail shapes.
Step 5: Form the Sail Configuration

Bring the right and left tips together to align with each other as shown in the diagram. This critical fold creates the characteristic triangular sail formation of your origami boat. Work carefully to ensure both sides meet evenly at the center for a symmetrical appearance. This step dramatically transforms your model from a flat shape into a recognizable boat form with distinct sail and hull sections. The precision of this alignment significantly impacts the finished appearance of your origami sail boat.
Step 6: Create the Three-Dimensional Structure
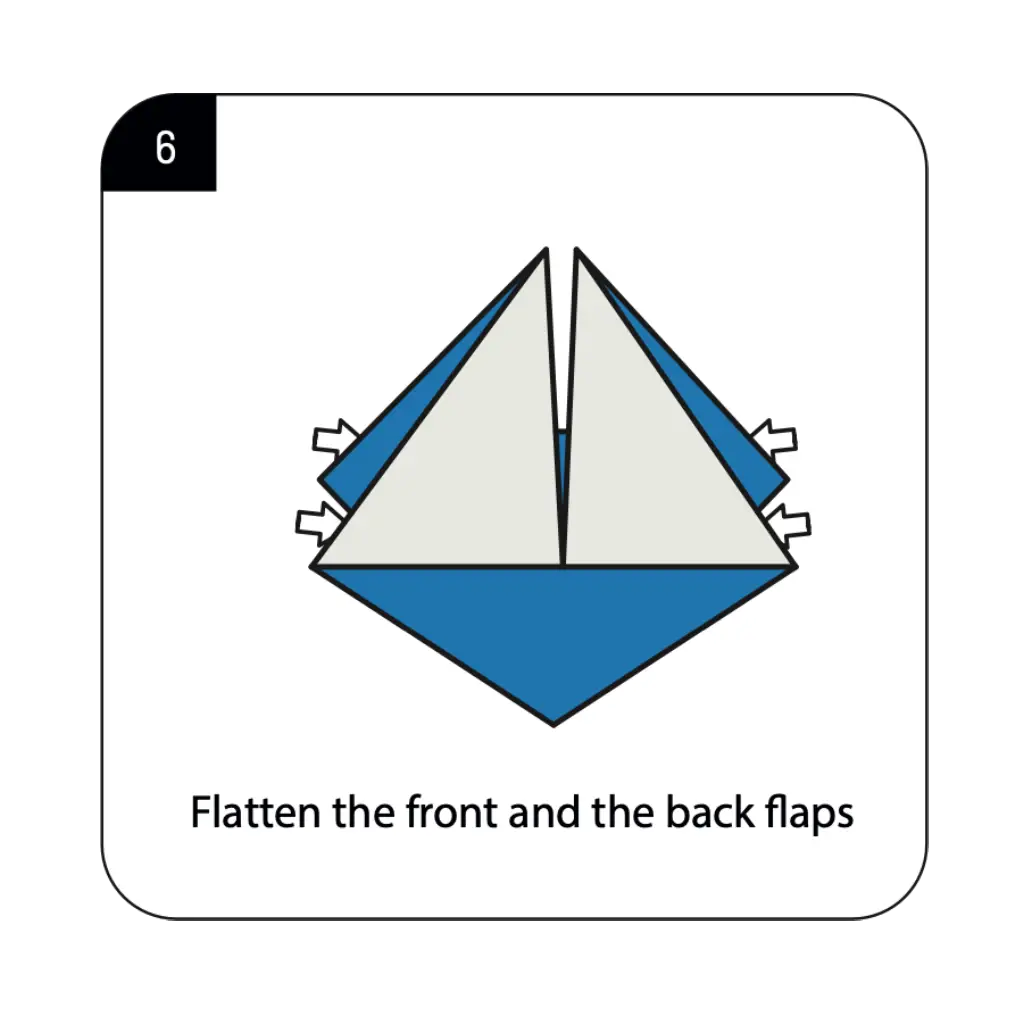
Flatten the front and back flaps as indicated in the diagram to establish the three-dimensional form of your sail boat. This important step stabilizes the structure and defines the sail and hull sections clearly. Press firmly but gently to create sharp, clean creases while maintaining the boat’s shape. This flattening process transforms the folded paper into a recognizable boat silhouette with upright sails and a solid hull base, creating the characteristic sail boat profile.
Step 7: Define the Sail Shape
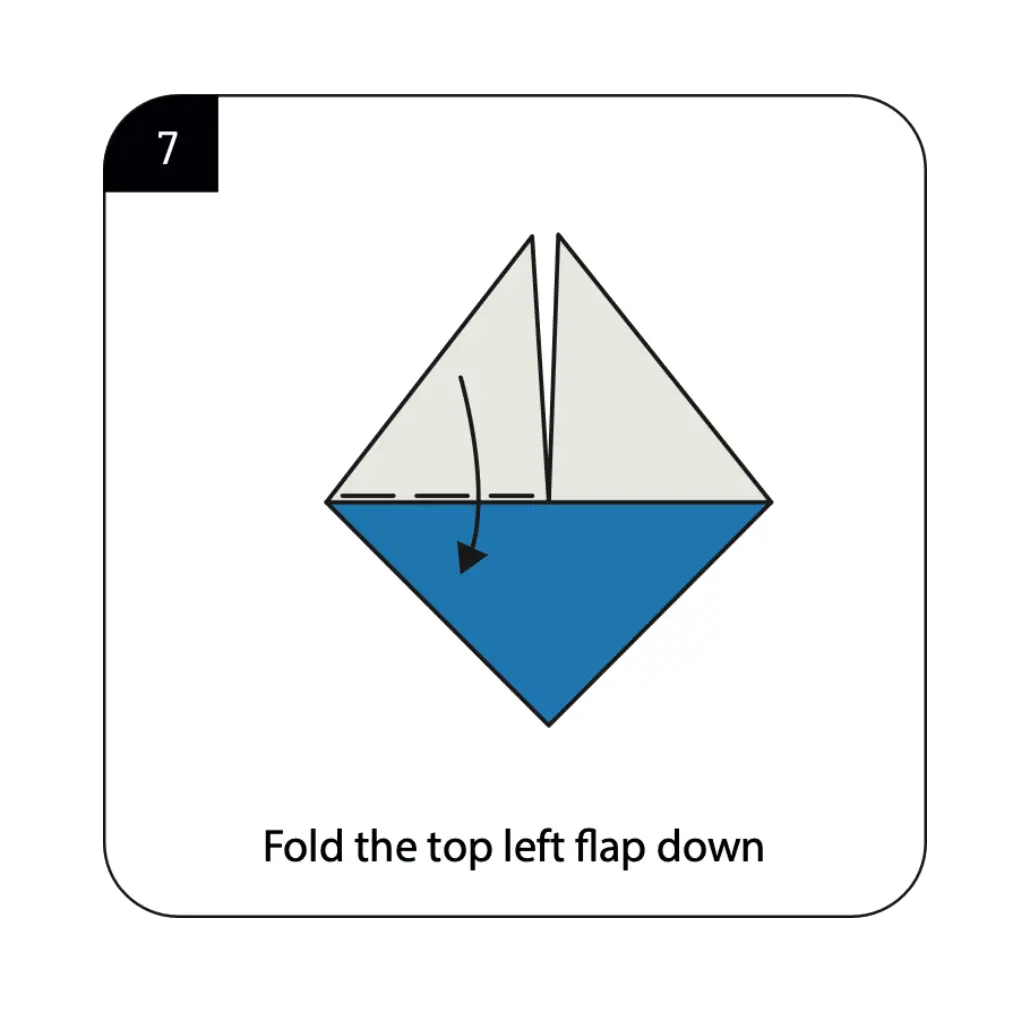
Fold the top left flap downward along the dotted line as shown in the diagram. This precise fold refines the sail shape of your origami boat, creating more definition and stability in the sail structure. The angle and position of this fold significantly impact the final appearance of your sail boat’s profile. This step enhances the realistic appearance of your origami sail boat by creating a more defined sail shape that mimics the triangular sails of real boats.
Step 8: Refine the Boat Structure
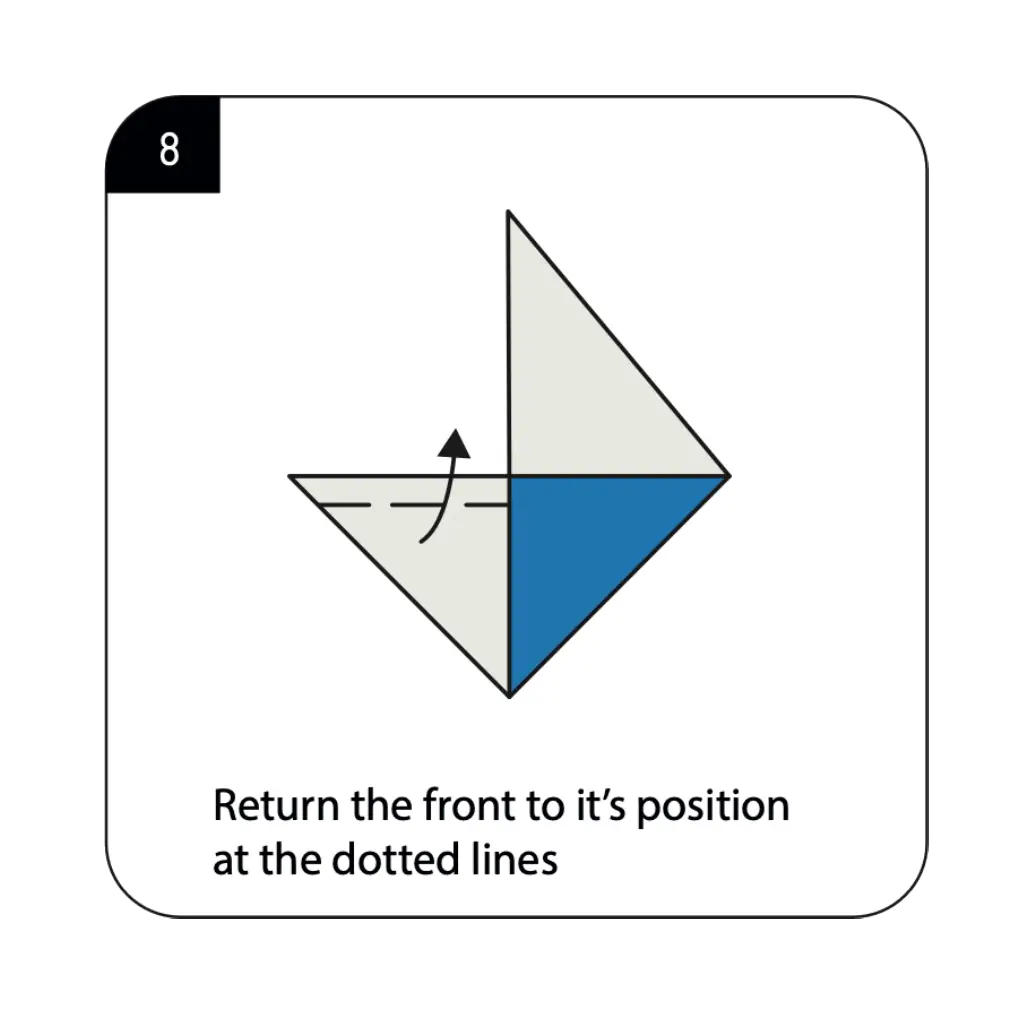
Return the front section to its original position along the dotted lines as shown in the diagram. This adjustment helps define the final shape and proportions of your origami sail boat. The precision of this repositioning affects the overall silhouette and stability of your paper boat. This step refines the three-dimensional quality of your origami creation, enhancing its realistic appearance and ensuring the proper relationship between the sail and hull sections.
Step 9: Complete Your Origami Sail Boat
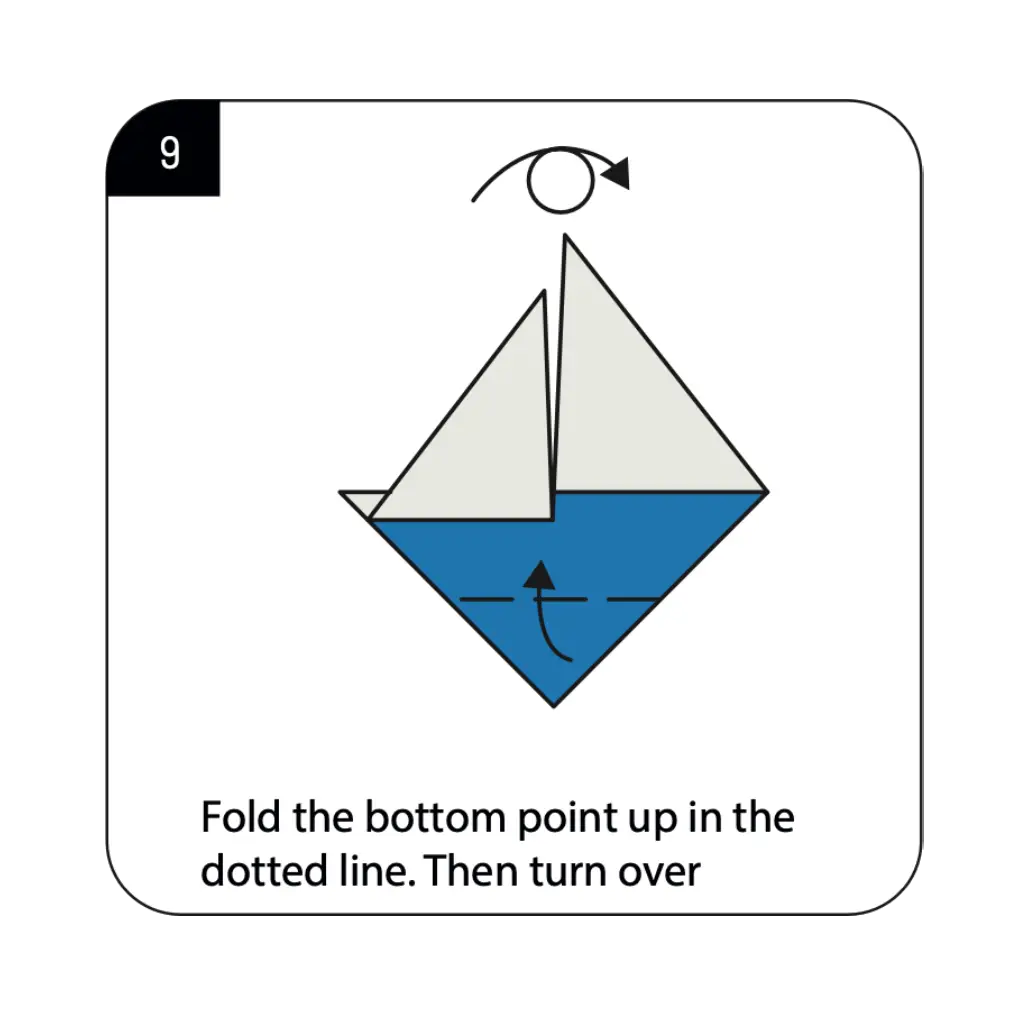
Fold the bottom point upward along the dotted line as indicated, then turn the model over to reveal your completed origami sail boat. This final fold creates additional definition in the hull section and completes the characteristic sail boat silhouette. Take a moment to make any small adjustments to ensure your boat sits properly and displays its sail and hull sections clearly. Your origami sail boat is now complete, ready to display or even float gently on water if you’ve used paper with sufficient weight and water resistance.
Conclusion
Congratulations on creating your origami sail boat! This charming paper vessel represents the perfect blend of simplicity and nautical charm that makes origami such a rewarding craft. From a simple square sheet, you’ve fashioned a three-dimensional boat complete with hull and sails—a testament to how basic folding techniques can transform ordinary paper into something magical. The origami sail boat showcases how thoughtful folding can create recognizable real-world objects through geometric precision and careful technique. Your completed model makes a delightful decoration for maritime-themed displays, a perfect addition to bathroom decor, or a wonderful handmade toy that actually floats on water (if made with appropriate paper). The techniques you’ve learned—including precise creasing, three-dimensional shaping, and symmetrical folding—build valuable skills that transfer to many other origami designs. We hope this tutorial has sparked your interest in both paper folding and nautical-inspired creations. Remember that practice enhances precision—each sail boat you fold will be more refined than the last, allowing you to perfect this classic origami design that has delighted paper folders for generations.
- “Before starting your origami sail boat, learn essential paper folding techniques in our Origami Basics for Beginners guide.”
- “Create a complete paper ocean scene by adding Origami Animals like fish, dolphins, or seagulls to accompany your sail boat.”
- “Looking for more nautical designs? Explore our Creative Origami Collection featuring additional boat and ship models.”
- “Discover beautiful ways to display your sail boat with our Decorative Origami Ideas for home and parties.”
- “Enhance your maritime scene by adding Origami Flowers to create a complete waterside display.”
- “Create an impressive fleet of different sized boats using techniques from our Modular Origami Projects guide.”
