
Introduction
Origami, the ancient Japanese art of paper folding, offers countless possibilities for creating both decorative and functional objects from simple sheets of paper. Among the most practical and elegant origami designs is the paper vase—a three-dimensional container that can actually hold small flowers or serve as a striking standalone decoration. Unlike many origami models that are purely ornamental, this vase combines aesthetic appeal with functionality, making it perfect for special occasions, home decor, or as a thoughtful handmade gift. What makes the origami vase particularly appealing is its impressive appearance despite requiring only intermediate-level folding techniques. The completed model features a sturdy base, elegant sides with decorative pleats, and an open top that can accommodate small flower stems or dried arrangements. This comprehensive tutorial breaks down the process into 11 manageable steps, guiding you through each fold with clear instructions. Whether you’re looking to create unique table centerpieces, decorative accents for your home, or simply want to explore the more practical applications of paper folding, this origami vase tutorial provides the perfect balance of challenge and reward.
Step-by-Step Instructions
Step 1: Create the Horizontal and Vertical Creases
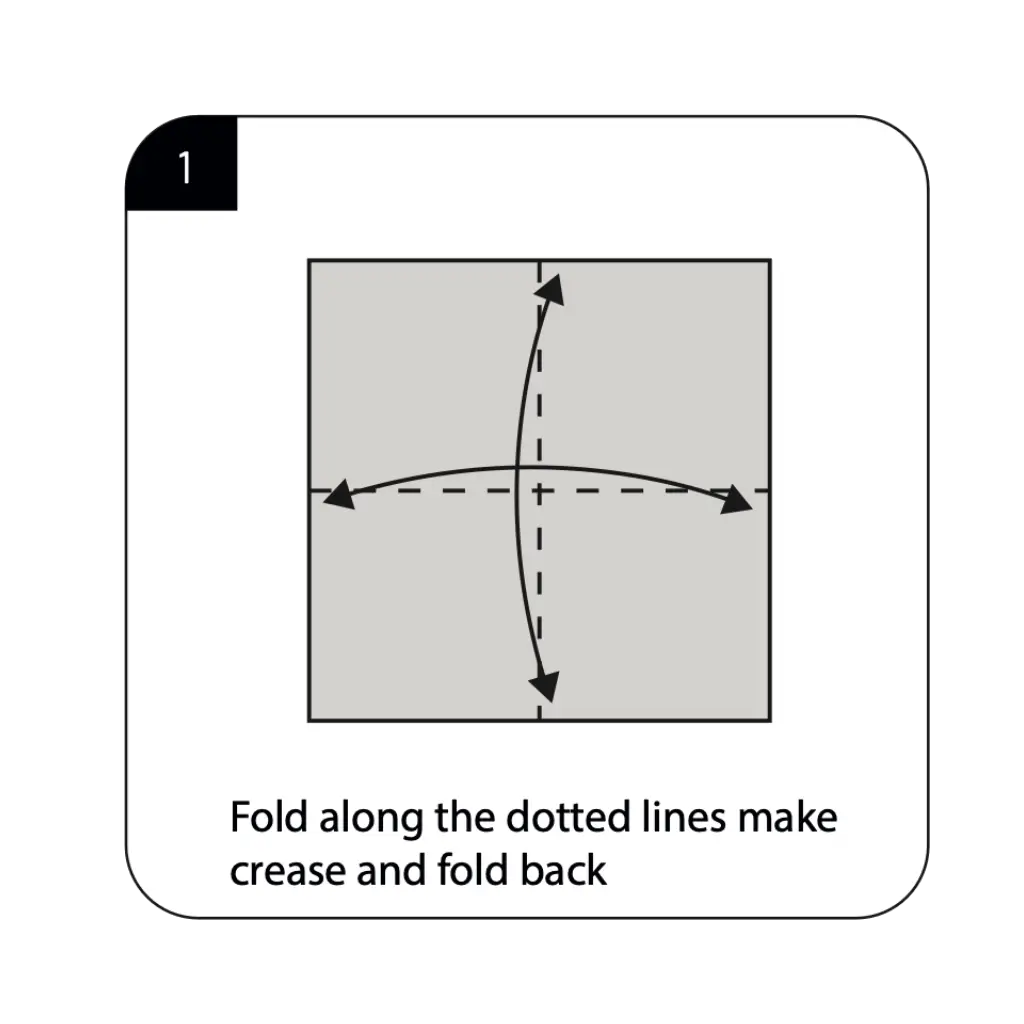
Begin with a square sheet of paper, preferably with color on one side (blue works well for this vase). Fold the paper in half horizontally and then vertically, making sharp creases each time, then unfold completely. These initial folds establish crucial reference lines that will guide all subsequent folds in your origami vase. The precision of these first creases is essential, as they create the framework and symmetry for your entire model. Take care to align the edges perfectly and press firmly along each fold line to create clean, well-defined creases that will support later structural folds.
Step 2: Form the Diagonal Creases
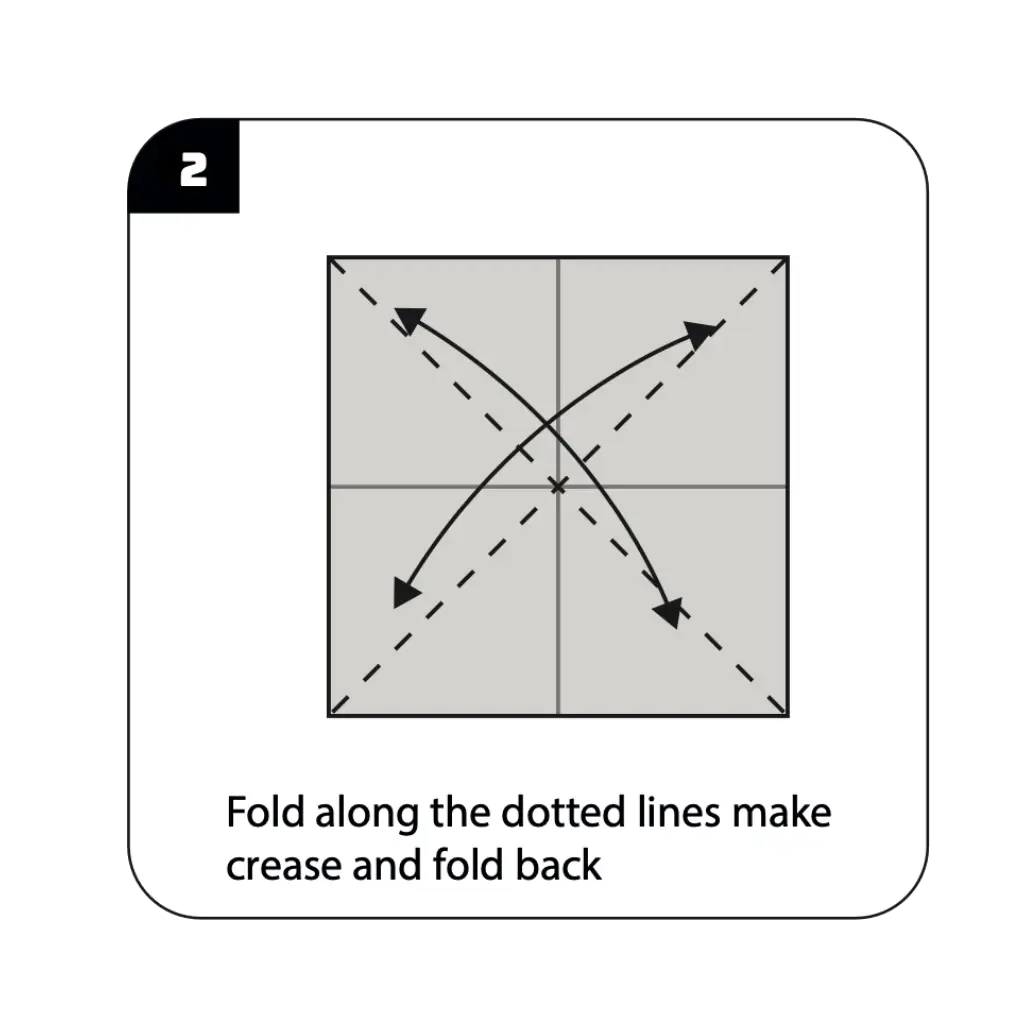
Fold the paper diagonally in both directions, corner to corner, creating an X-shaped crease pattern, then unfold. These diagonal folds, combined with the creases from Step 1, establish a comprehensive grid pattern with a clear center point. The accuracy of these diagonal folds directly impacts the symmetry and balance of your finished origami vase. Ensure each corner reaches precisely to the opposite corner for perfect diagonal creases. This complete grid of fold lines creates the foundation for the three-dimensional transformation that will occur in subsequent steps.
Step 3: Perform the Squash Fold

Using all the crease lines you’ve established, perform a squash fold by pushing the paper inward from all sides toward the center. This complex folding technique collapses the square into a smaller, layered triangular shape. The squash fold requires gentle manipulation as multiple fold lines work together simultaneously. This transformative step dramatically changes the paper’s structure from a flat square to a more dimensional form, creating the base from which your vase will develop. Work slowly and use the existing crease lines as guides to achieve a clean, symmetrical result.
Step 4: Create the Vase Foundation
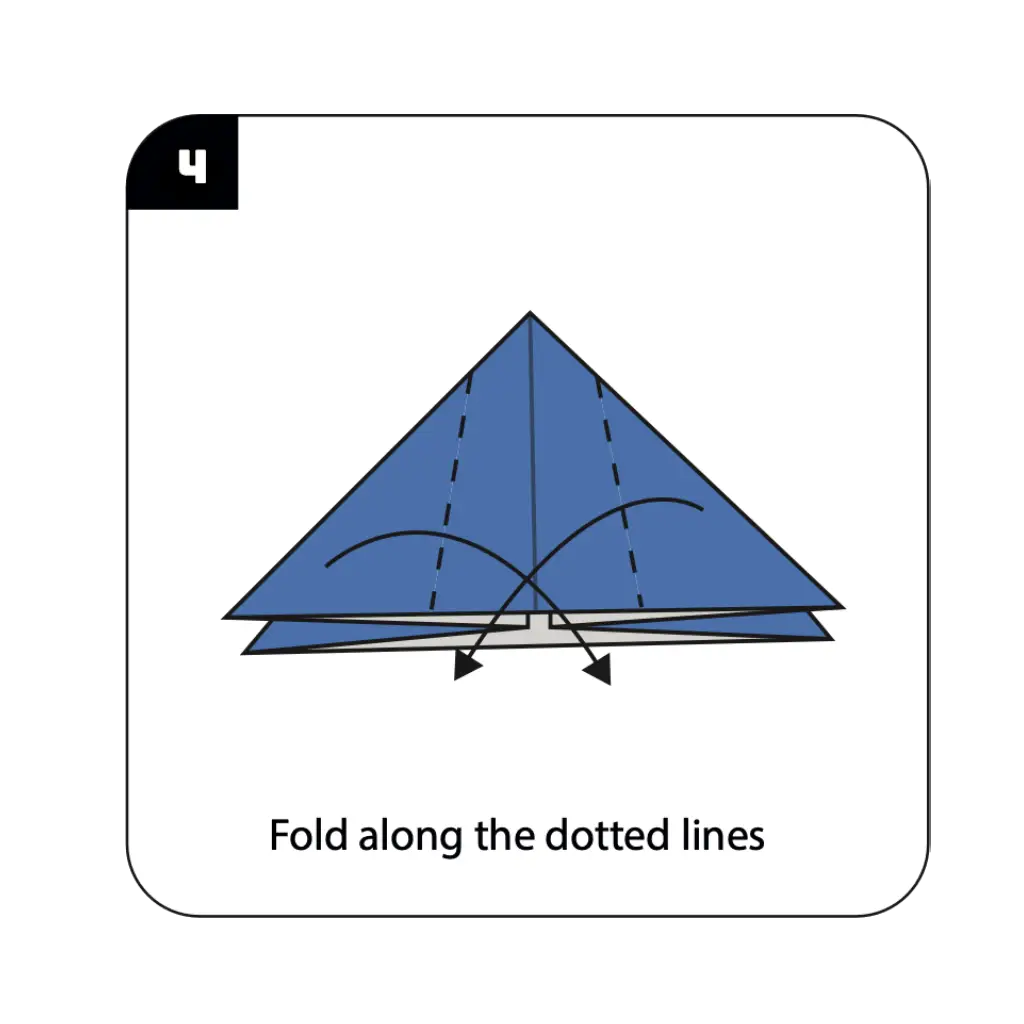
Fold along the dotted lines as shown in the diagram, bringing the edges inward to create a more defined triangular shape. These folds begin establishing the three-dimensional structure that will become your vase. The precision of these folds affects the symmetry and stability of your finished origami vase. Make sure all folds are crisp and well-defined, as they create the fundamental shape from which your vase will develop. This step begins transforming the flat collapsed form into a more recognizable vase silhouette.
Step 5: Form the Side Structures
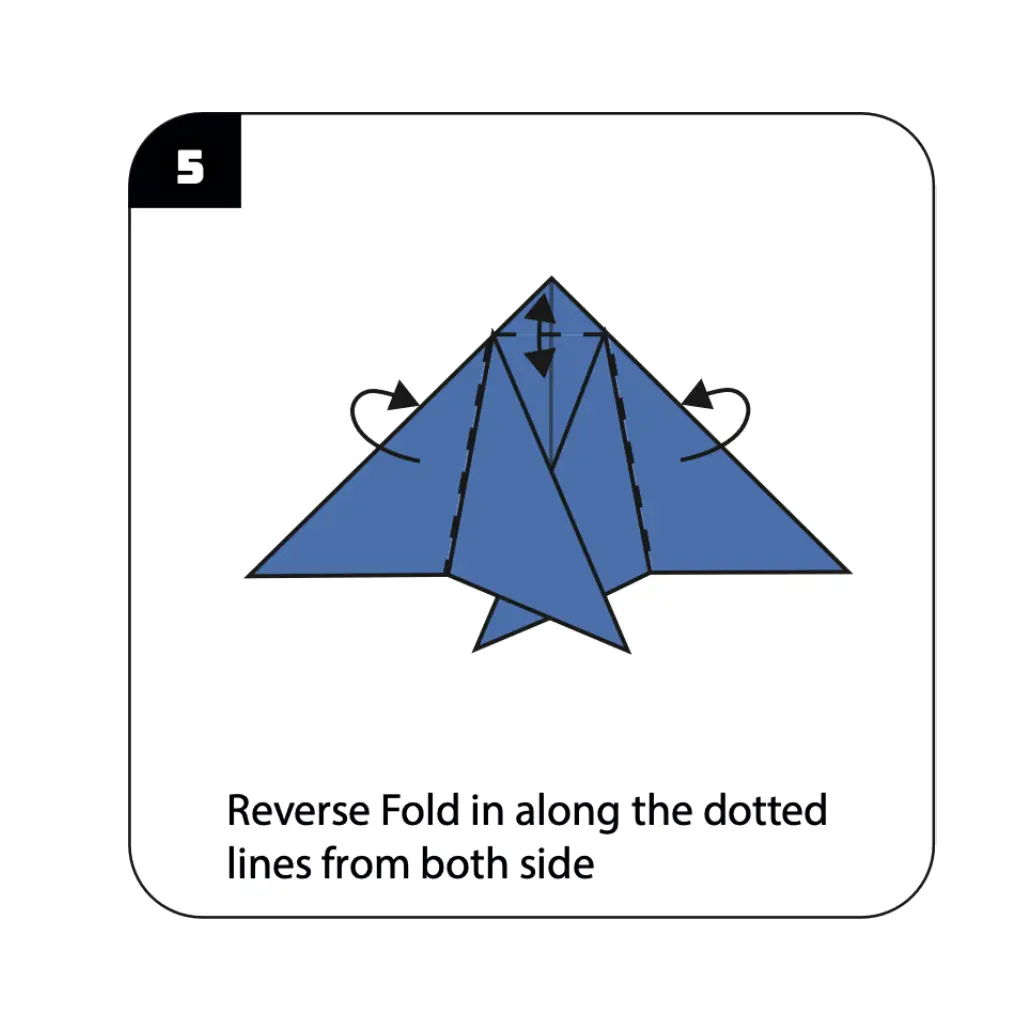
Perform reverse folds along the dotted lines on both sides as shown in the diagram. These important technical folds create dimension and begin defining the distinctive pleated sides of your origami vase. Reverse folds require carefully folding the paper inward along existing crease lines, creating new angles and dimension. These folds are crucial for establishing the characteristic flared shape of the vase and require attention to detail to ensure symmetry on both sides. The precision of these reverse folds significantly impacts the elegant appearance of your finished vase.
Step 6: Create the Back Flap Detail
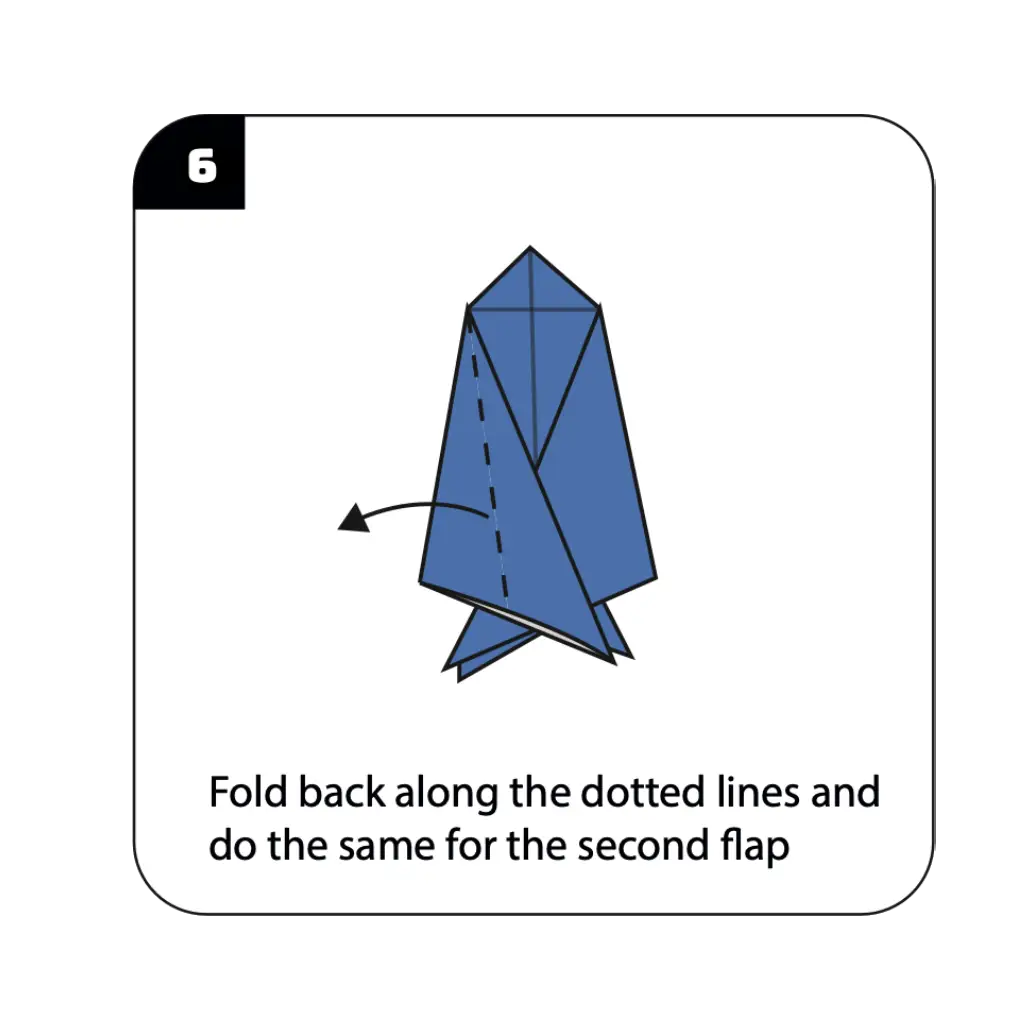
Fold back along the dotted lines as shown and repeat for the second flap. This step continues defining the dimensional structure of your origami vase through precise parallel folds. The consistency and symmetry of these folds directly affect the balanced appearance of your finished model. Work methodically to ensure both flaps are folded identically for a professional-looking result. These folds enhance the three-dimensional quality of your vase and begin establishing its characteristic flared shape.
Step 7: Form the Back Structure
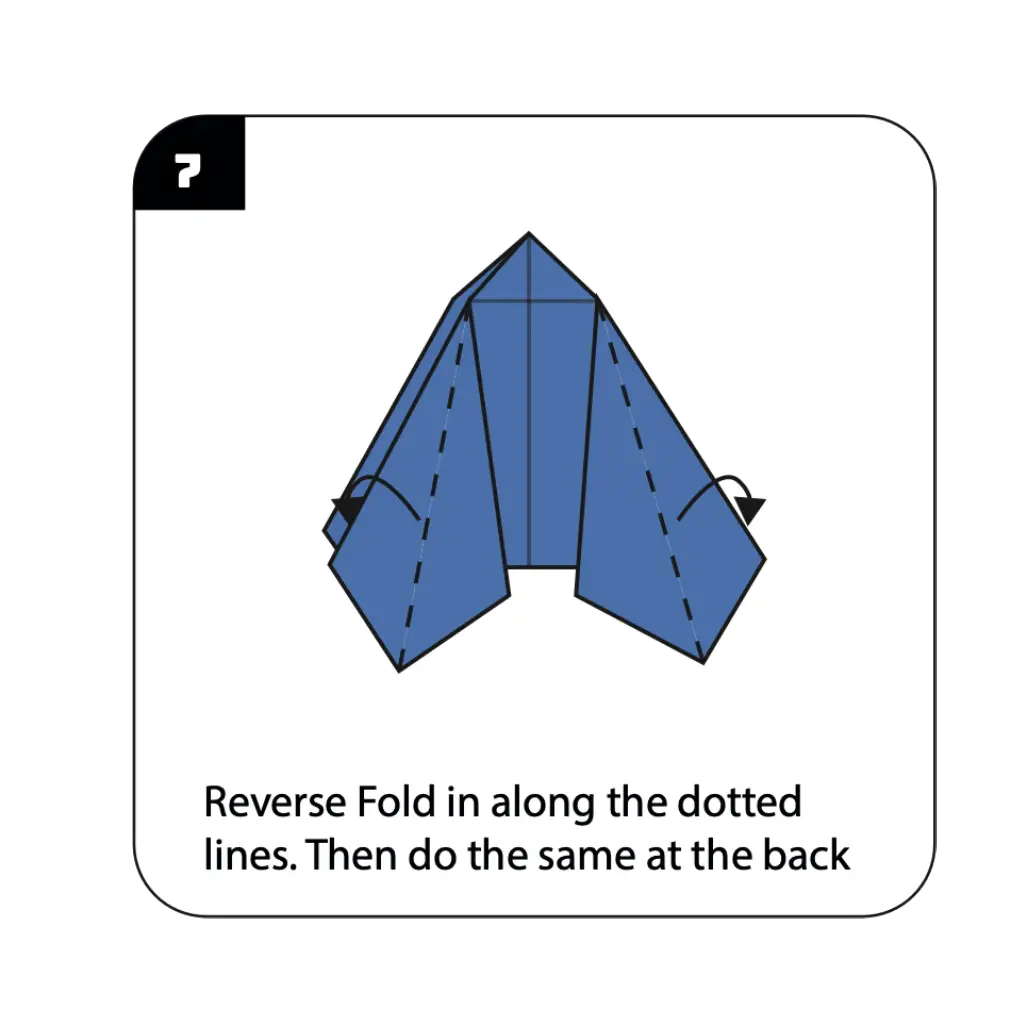
Perform reverse folds along the dotted lines as shown, then repeat the same technique at the back of the model. These technical folds further develop the three-dimensional structure of your origami vase, creating more definition in its shape. The reverse folding technique requires carefully manipulating the paper while maintaining previously established folds. These strategic folds are essential for creating the distinctive pleated appearance that characterizes this origami vase design. Ensure all reverse folds are clean and symmetrical for a balanced, professional-looking result.
Step 8: Create the Inner Structure
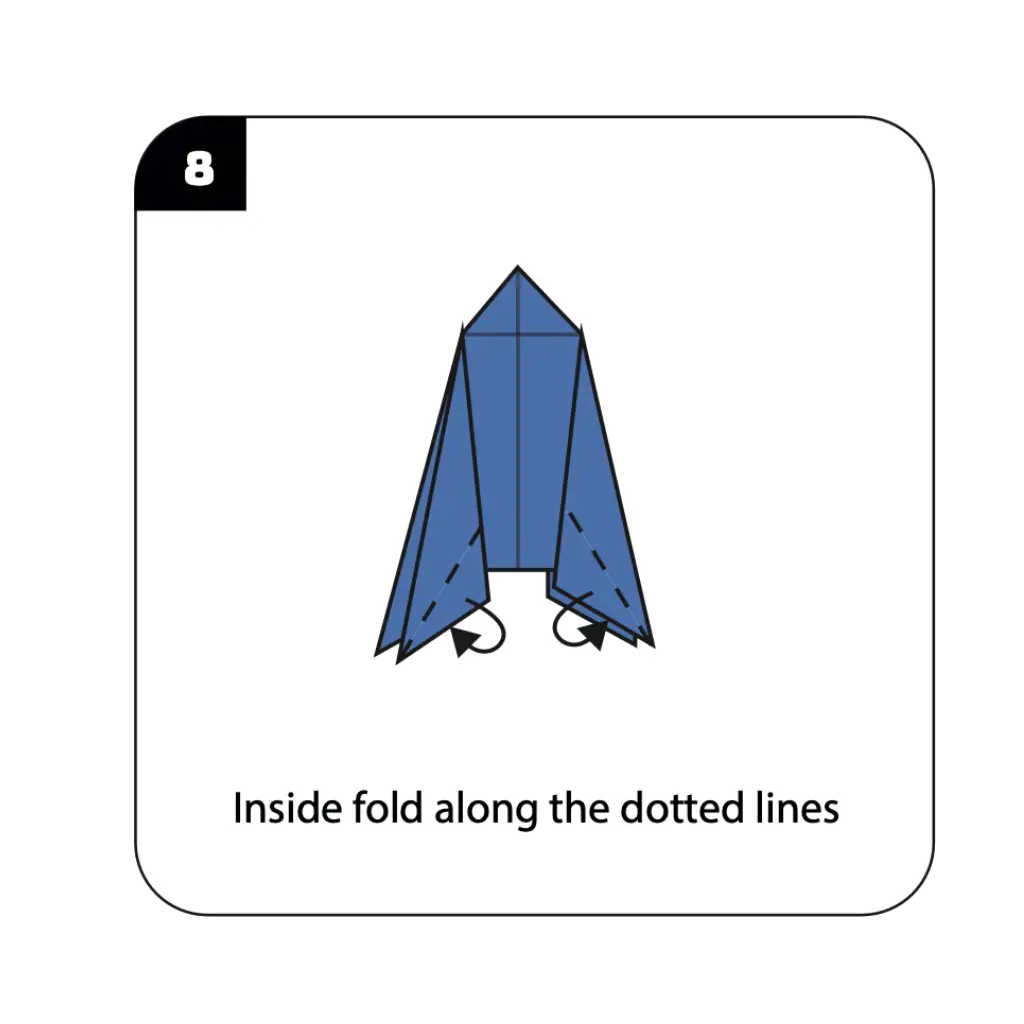
Perform inside folds along the dotted lines as indicated in the diagram. These precise folds develop the interior structure of your vase, establishing its capacity to hold small items. Inside folds require careful manipulation of the paper’s inner layers while maintaining the exterior structure. The accuracy of these folds affects both the appearance and functionality of your origami vase. These internal structural folds transform your model from a decorative form into a functional container with a defined interior space.
Step 9: Open and Shape the Vase
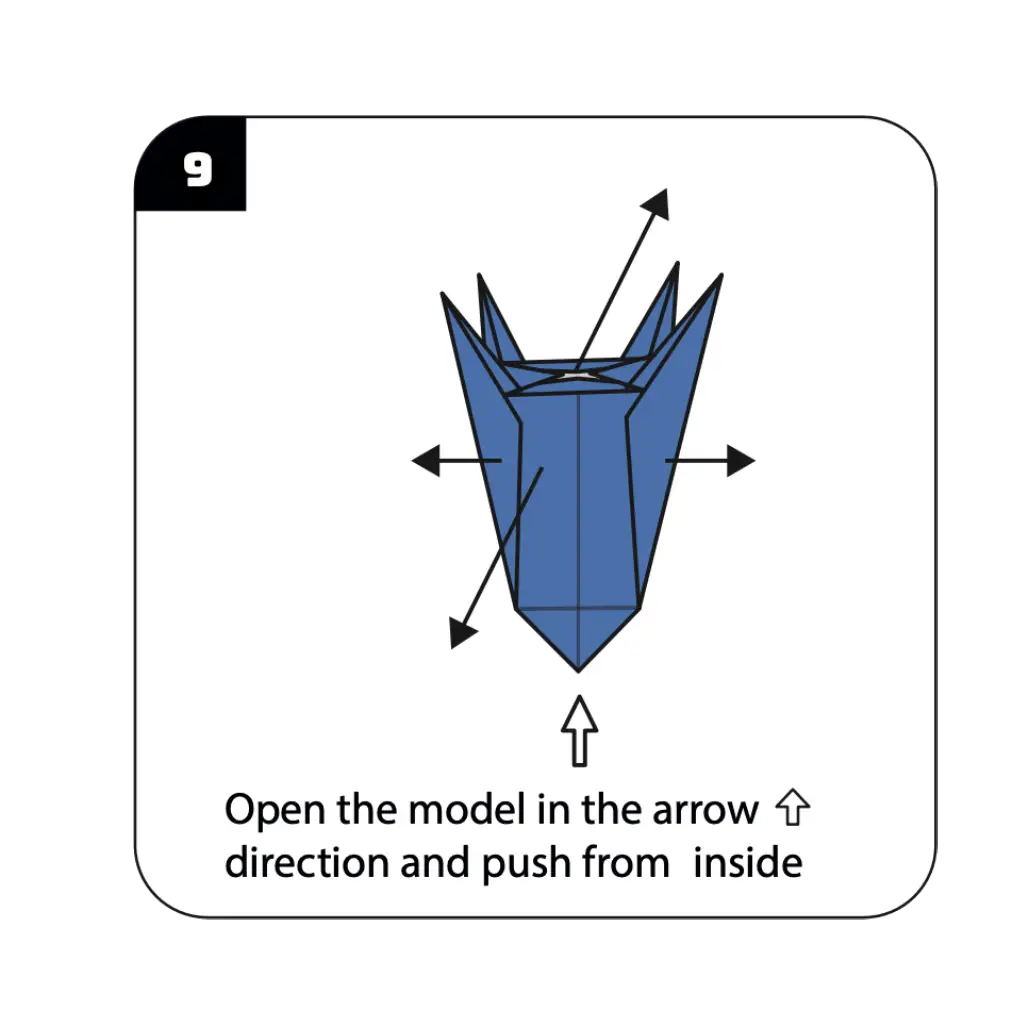
Open the model in the direction of the arrows and gently push from inside to create the vase’s three-dimensional form. This critical step transforms your folded paper into the characteristic vase shape with a stable base and open top. Work carefully during this transformation to avoid tearing the paper while creating the vase’s hollow center. This shaping process requires gentle but firm pressure to establish the vase’s final form and proportions. The way you open and shape the model significantly impacts how well your finished vase will stand and hold its form.
Step 10: Refine the Top Edge
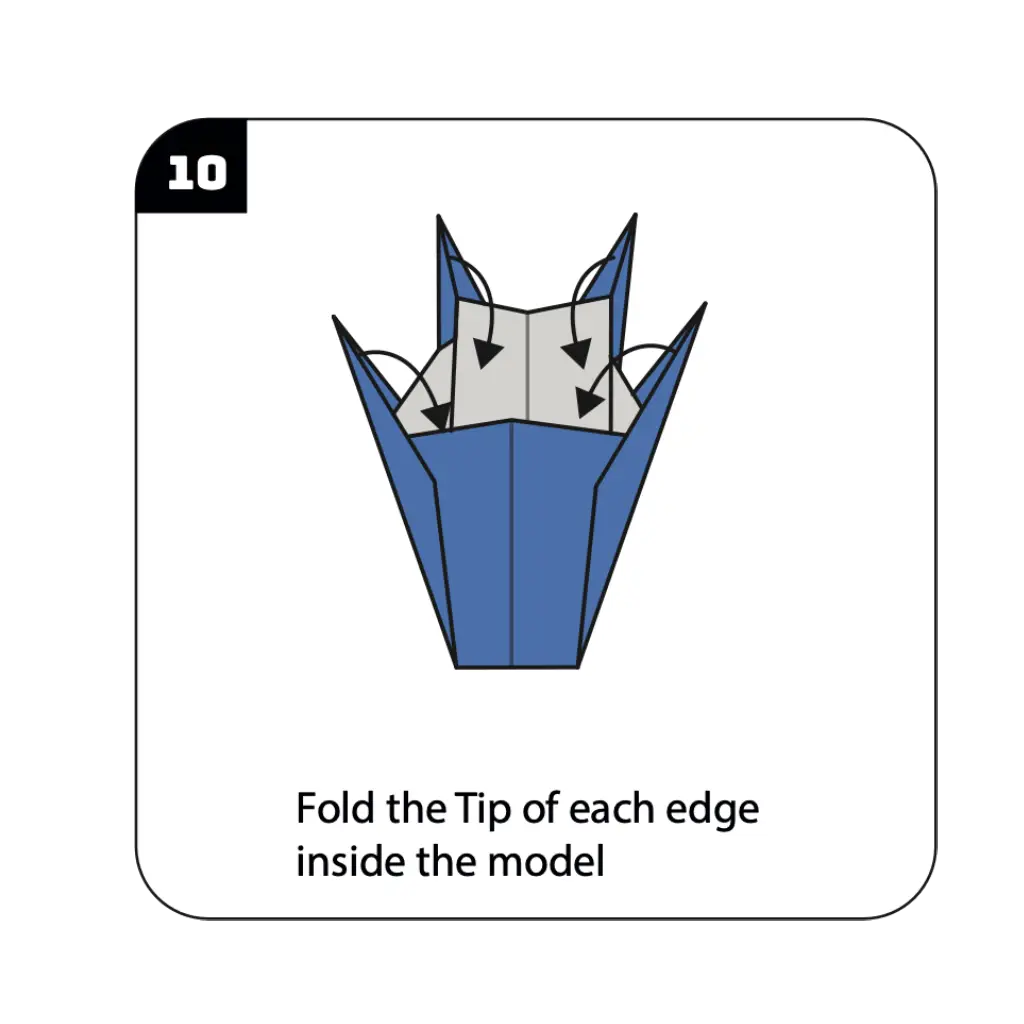
Fold the tip of each edge inside the model as shown to create a finished edge along the vase’s opening. These finishing folds add stability to the upper rim while creating a more polished, professional appearance. The precision of these folds affects both the aesthetics and structural integrity of your paper vase. Work methodically around the entire opening, ensuring each fold is consistent for a neat, even rim. These finishing details transform your model from a simple folded form into an elegant origami vase with refined edges.
Step 11: Complete Your Origami Vase
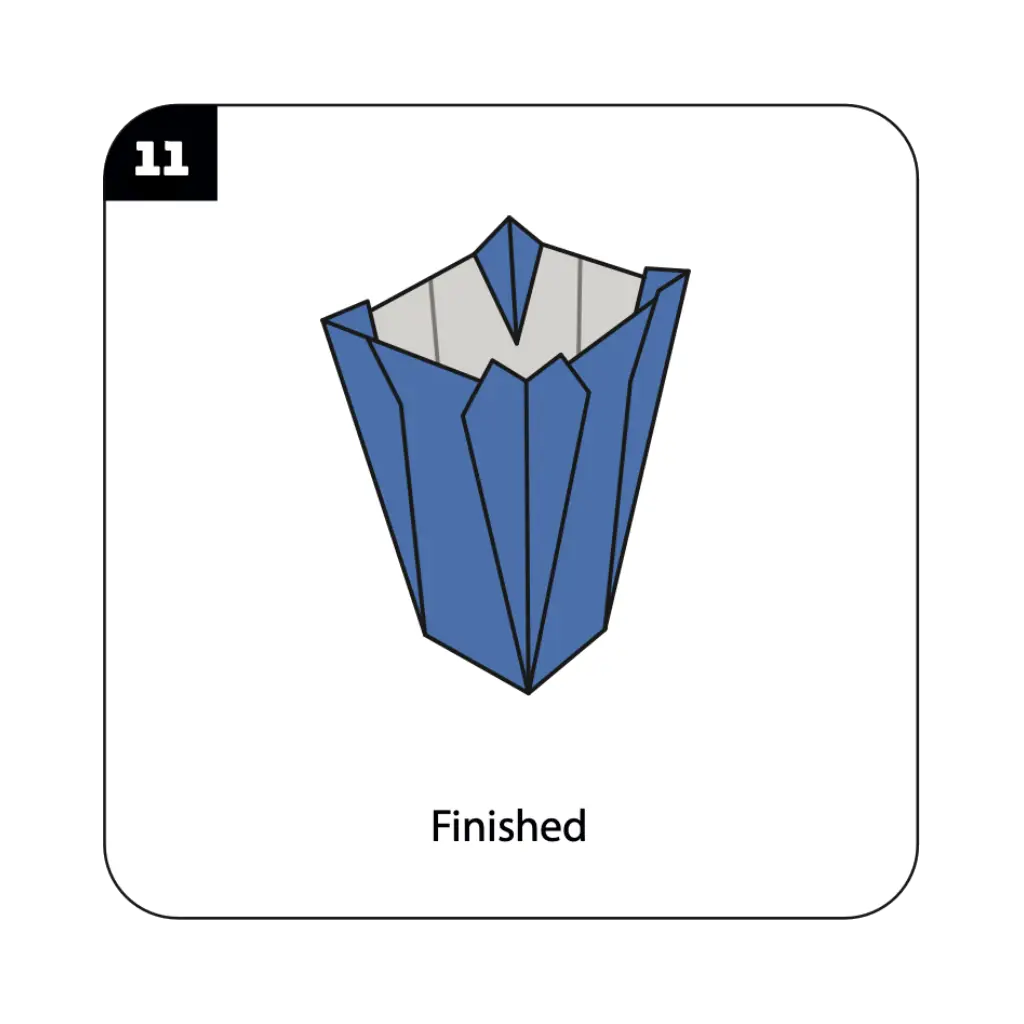
Your origami vase is now complete! Make any final adjustments to ensure it stands properly and maintains its shape. The finished vase features a stable base, elegantly pleated sides, and an open top perfect for holding small flower stems or serving as a decorative piece. Take a moment to gently adjust the shape if needed, opening the top slightly wider or ensuring the base sits flat. Your handcrafted paper vase showcases both the practical and artistic aspects of origami, creating a functional container through the transformative art of paper folding.
Conclusion
Congratulations on creating your origami vase! This elegant paper container demonstrates the perfect balance between decorative art and practical functionality that makes origami such a versatile craft. From a simple square sheet, you’ve fashioned a three-dimensional vessel with structural integrity and aesthetic appeal—a testament to the transformative power of thoughtful folding techniques. The origami vase showcases how strategic creases and folds can create not just visual interest but also practical utility, allowing your paper creation to hold small flowers, dried arrangements, or serve as a striking standalone decoration. Your completed vase makes a perfect accent for home decor, a unique handmade gift, or an elegant table centerpiece for special occasions. The techniques you’ve learned—including reverse folds, squash folds, and three-dimensional shaping—build valuable skills that transfer to many other advanced origami designs. We hope this tutorial has sparked your interest in both decorative and functional paper folding applications. Remember that practice enhances precision—each vase you fold will be more refined than the last, allowing you to perfect this elegant and practical origami design.
- “Before starting your origami vase, learn essential paper folding techniques in our Origami Basics for Beginnersguide.”
- “Create paper flowers to display in your vase with our beautiful Origami Flowers Collection, featuring roses, tulips, and more.”
- “Discover more home decoration ideas in our Decorative Origami Gallery featuring practical and beautiful paper creations.”
- “Looking for more creative paper projects? Explore our Creative Origami Collection for unique and innovative designs.”
- “Complete your origami nature scene by adding Origami Animals to complement your flower-filled vase.”
- “Create an impressive set of matching vases in different sizes using techniques from our Modular Origami Projects guide.”
