
Introduction
Origami, the ancient Japanese art of paper folding, provides endless opportunities to create delightful wearable crafts that spark imagination and creativity. The origami hare mask stands out as one of the most charming and versatile projects, perfect for Easter celebrations, springtime activities, or any occasion where children want to transform into adorable woodland creatures. This beginner-friendly tutorial demonstrates how to fold a recognizable rabbit face complete with the characteristic long ears that make hares instantly identifiable. Unlike more complex origami models, this hare mask achieves maximum visual impact through just eight straightforward steps, making it accessible to crafters of all ages and skill levels. What makes this origami hare mask particularly special is its perfect balance of simplicity and character—the finished model captures the essence of a gentle hare while remaining easy enough for children to create independently. The completed mask features the distinctive upright ears, gentle facial proportions, and innocent expression that make rabbits such beloved animals in children’s stories and celebrations. Whether you’re preparing for Easter festivities, planning animal-themed party activities, or simply looking for an engaging craft that combines learning with play, this hare mask tutorial offers the perfect introduction to both origami basics and imaginative costume creation.
Step-by-Step Instructions
Step 1: Create the Foundation Diagonal Fold For Origami Hare Mask
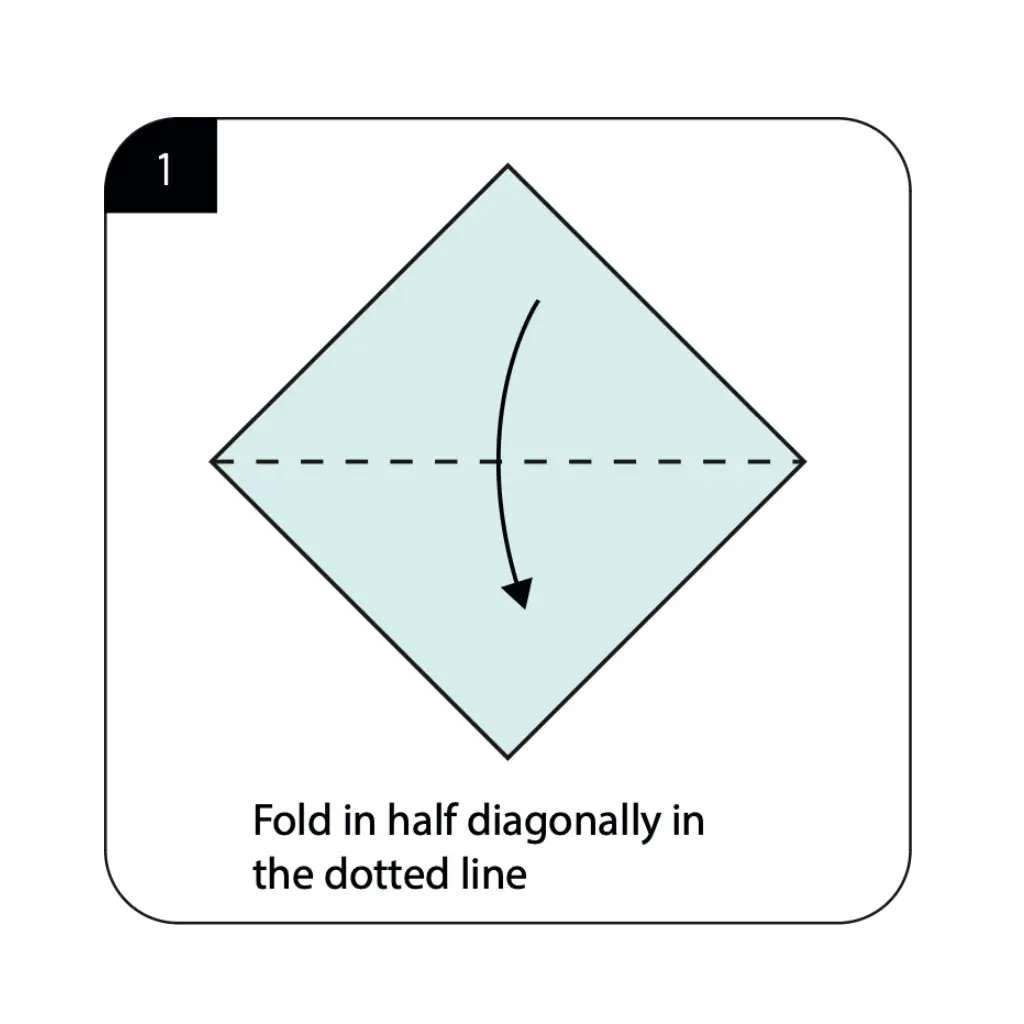
Begin with a square sheet of paper, preferably with light blue or white on one side and a darker color on the other for contrast. Fold the paper in half diagonally along the dotted line as shown, bringing one corner to meet the opposite corner to create a triangle. This fundamental fold establishes the primary structure for your hare mask and creates the foundation upon which all subsequent folds will build. The precision of this initial diagonal fold is crucial for ensuring proper symmetry in your finished mask, so take care to align the corners exactly and press firmly along the fold line. This first step transforms your square into the triangular base that will eventually become your adorable hare face.
Step 2: Form the Vertical Center Crease For Origami Hare Mask
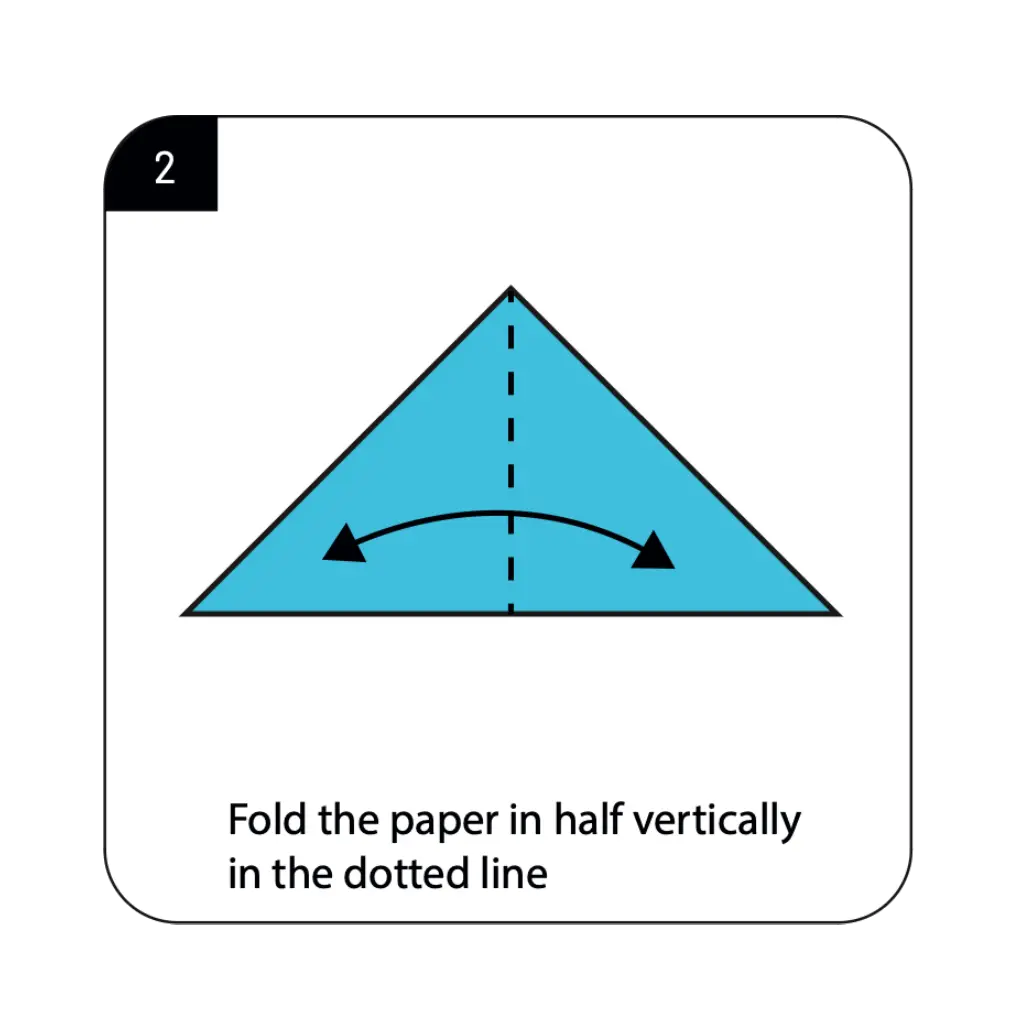
Fold the triangular paper in half vertically along the dotted line as indicated in the diagram, bringing the left point to meet the right point, then unfold. This important fold creates a vertical reference line down the center of your triangle that will guide the positioning of the hare’s ears and facial features. The center crease ensures perfect symmetry between the left and right sides of your mask, which is essential for creating a balanced, professional-looking hare face. Though you unfold this step, the crease remains as a crucial guideline that will help you position subsequent folds with precision and maintain the hare’s characteristic symmetrical appearance.
Step 3: Begin the Ear Formation For Origami Hare Mask
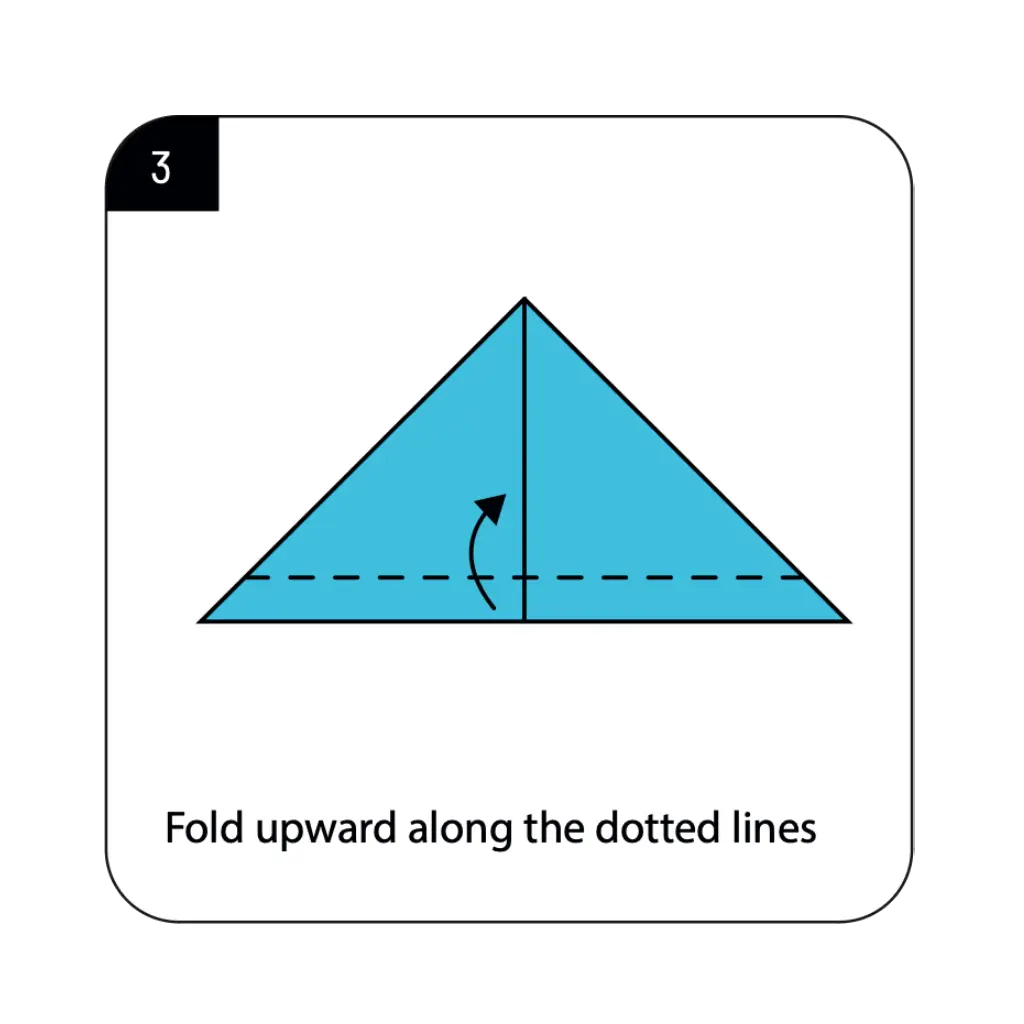
Fold upward along the dotted lines as shown in the diagram, creating the initial structure for the hare’s distinctive long ears. These upward folds begin transforming the flat triangle into the three-dimensional elements that will become the characteristic rabbit ears. The angle and position of these folds directly affect how recognizable your mask will be as a hare, so work carefully to ensure both sides are folded symmetrically. These folds create the foundation for the prominent upright ears that distinguish hares and rabbits from other animals, establishing the most iconic feature of your paper mask.
Step 4: Create the Advanced Ear Structure For Origami Hare Mask

Fold diagonally in both directions as shown, working with the ear sections created in the previous step. These diagonal folds refine the shape and positioning of the hare’s ears, giving them more realistic proportions and angles. The precision of these diagonal folds affects how naturally the ears will stand and how convincing your hare mask will appear. Work methodically on both sides to maintain symmetry, as the ears are the most prominent feature of your origami hare and require careful attention to detail for the best visual impact.
Step 5: Refine the Ear Details For Origami Hare Mask
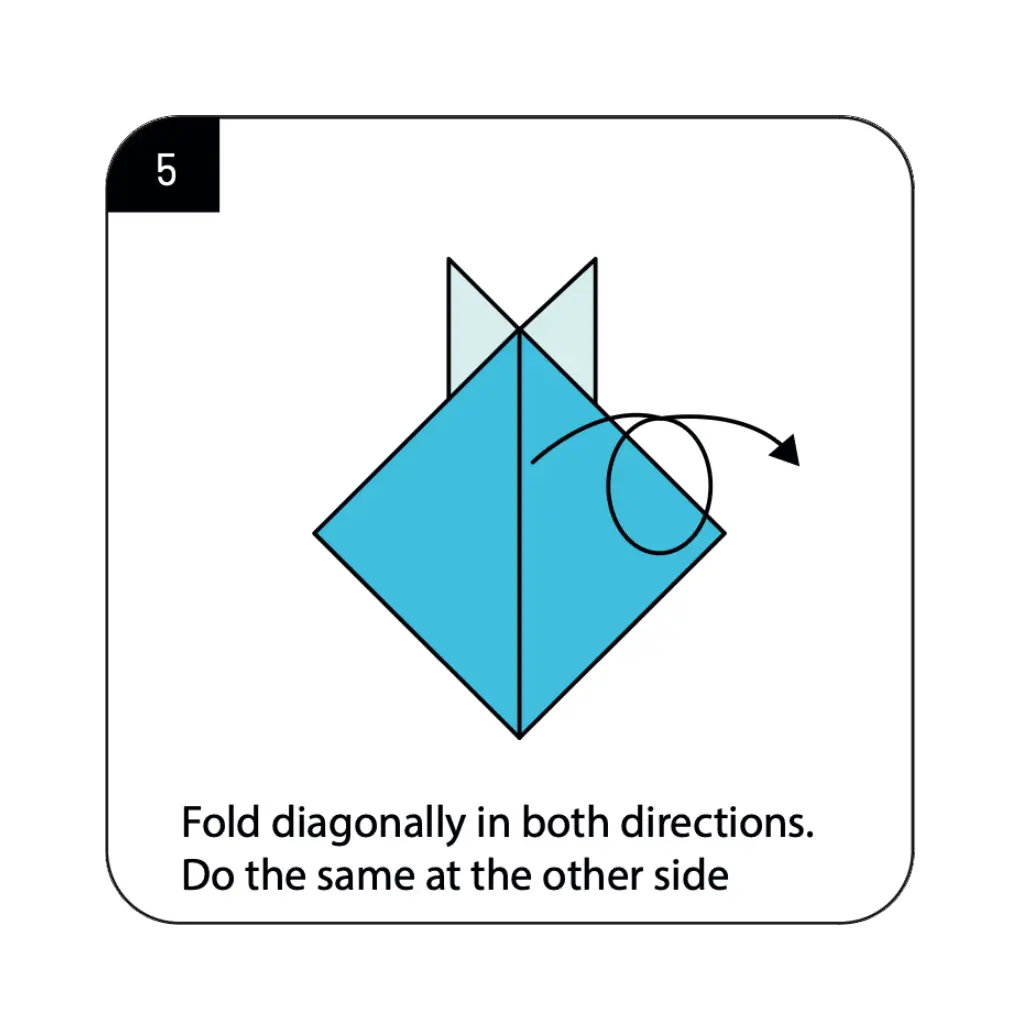
Fold diagonally in both directions as indicated, then repeat the same technique on the other side of your model. These additional diagonal folds continue developing the realistic ear structure and add dimension to your hare mask. The careful execution of these folds creates the proper angles and proportions that make the ears look natural and lifelike. These refinements are crucial for achieving the characteristic alert, upright ear position that makes hares instantly recognizable and gives your mask its distinctive woodland creature appearance.
Step 6: Shape the Face Structure For Origami Hare Mask
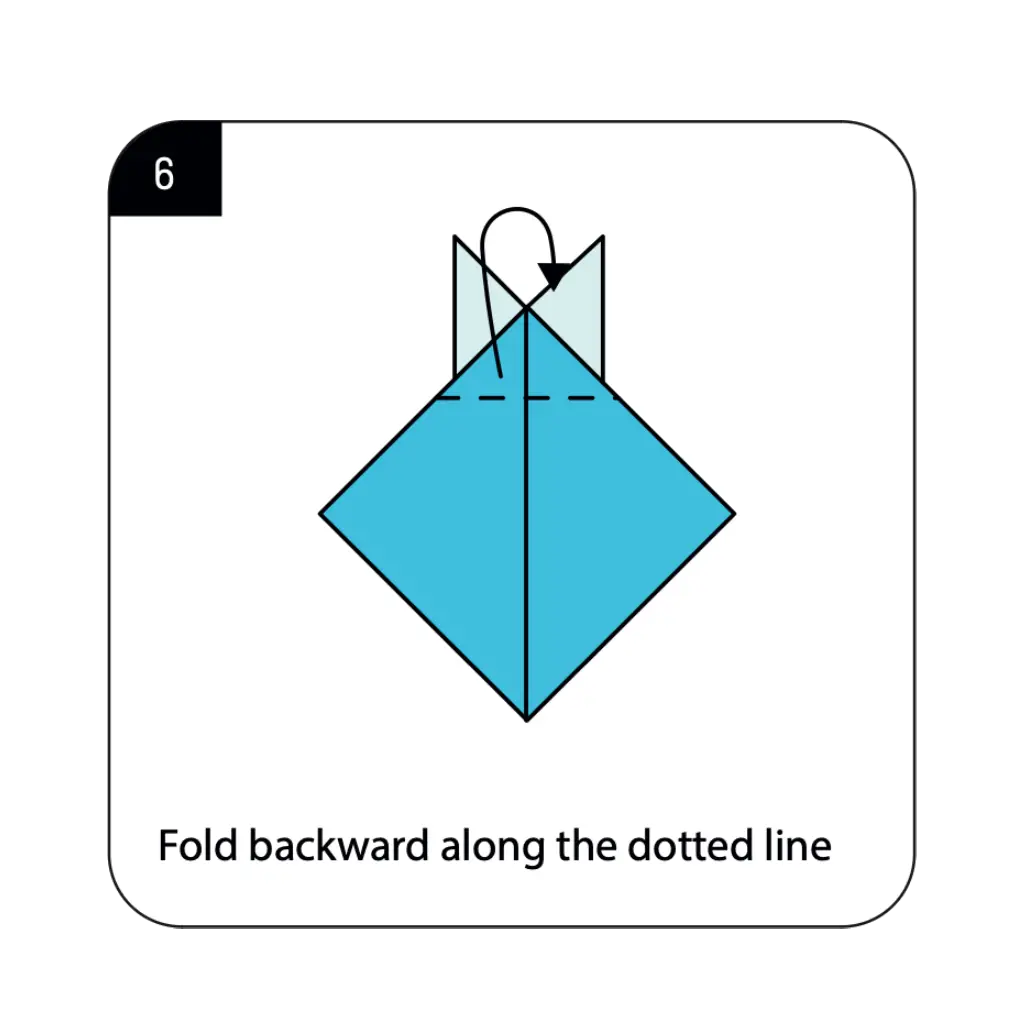
Fold backward along the dotted line as shown in the diagram to begin defining the hare’s facial structure and head shape. This backward fold helps establish the proper proportions between the ears and face, creating a more realistic hare silhouette. The position of this fold affects the overall balance of your mask and contributes to the gentle, rounded appearance characteristic of rabbit faces. This shaping step begins transforming your geometric folded form into a recognizable animal character with proper facial proportions.
Step 7: Complete the Face Formation
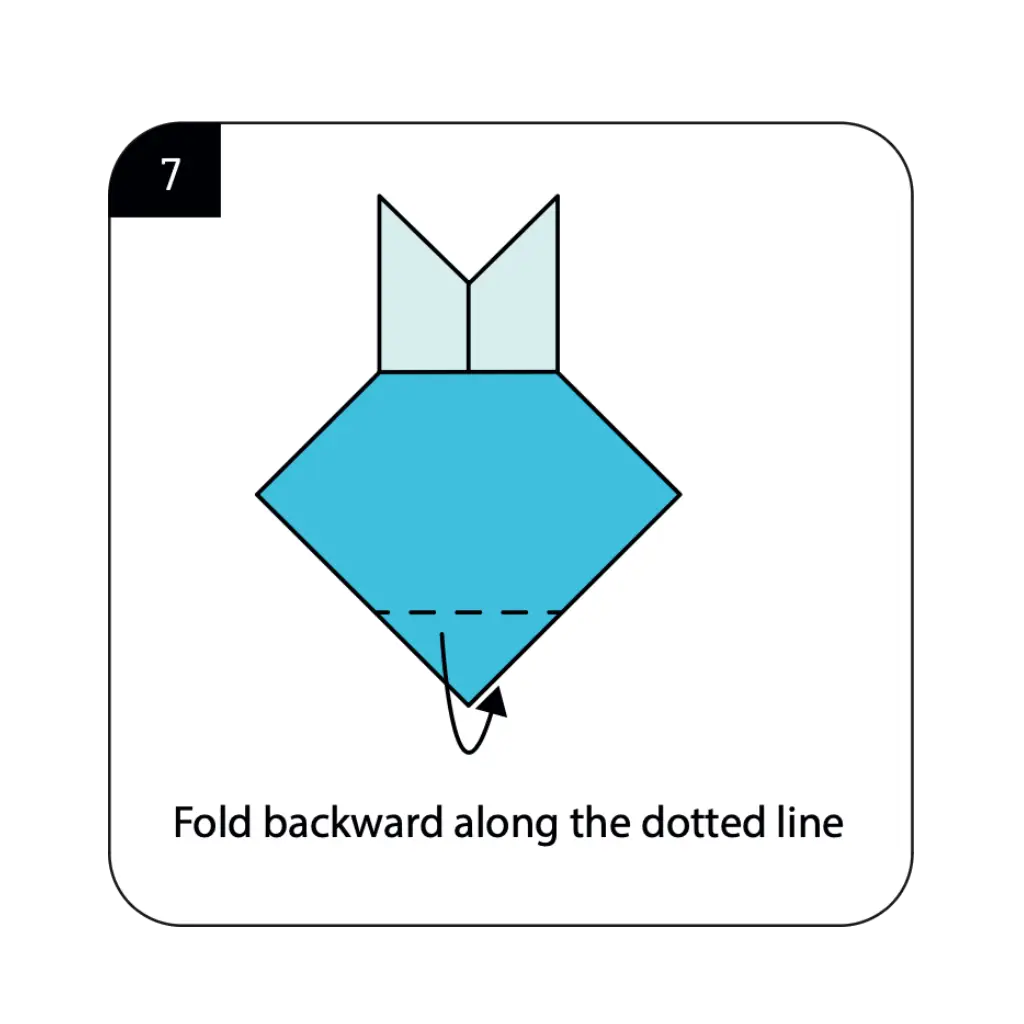
Fold backward along the dotted line as indicated to finalize the facial structure of your origami hare mask. This final shaping fold completes the transformation from abstract geometric form to recognizable animal face. The careful execution of this fold ensures that your hare mask displays the proper head-to-ear proportions that make it instantly identifiable as a rabbit character. This step brings together all the previous folds into a cohesive, charming hare face ready for the finishing touches that will bring it to life.
Step 8: Finalize Your Origami Hare Mask
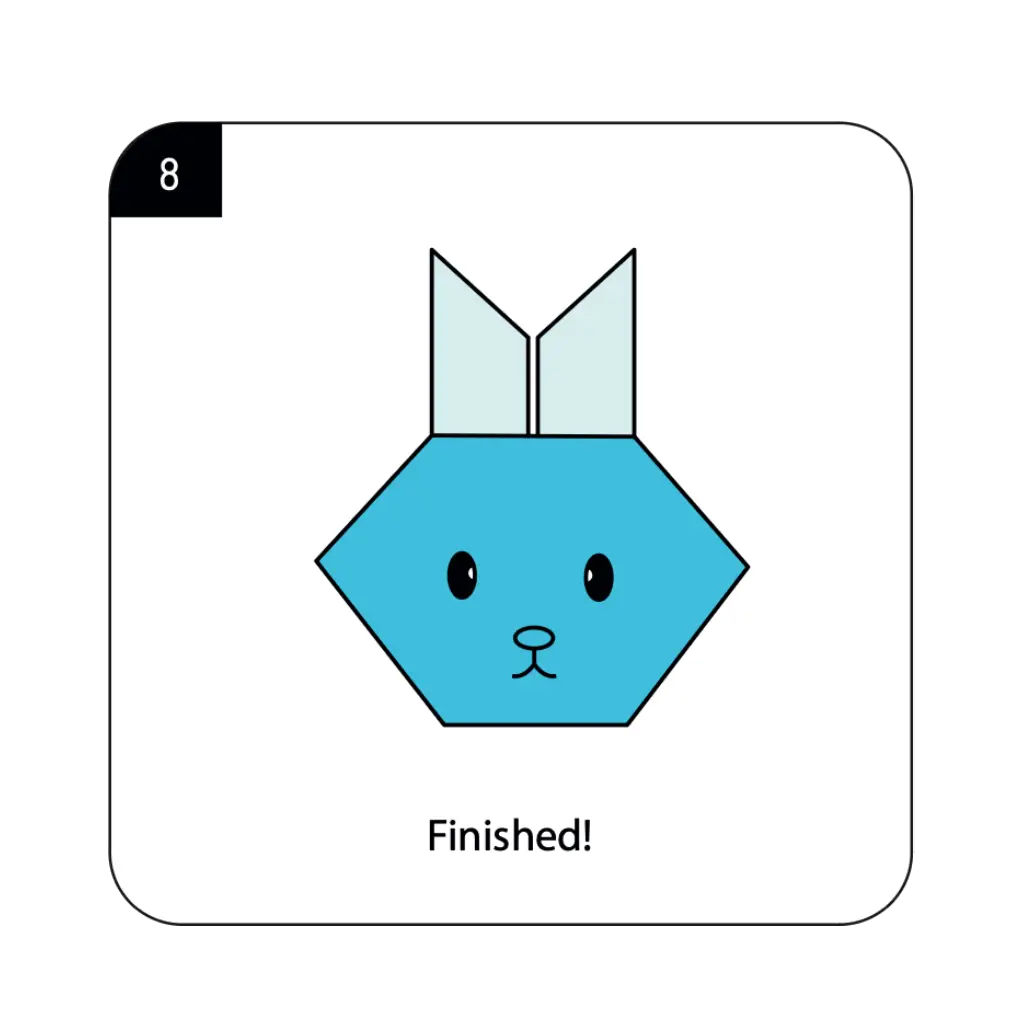
Your origami hare mask is now structurally complete! Add simple drawn features like eyes, nose, and whiskers to bring personality to your paper creation, as shown in the finished example. The completed mask displays the characteristic upright ears, gentle facial curves, and innocent expression that make hares such beloved characters. Your handcrafted mask is now ready for imaginative play, costume parties, or display as a charming example of functional origami art that successfully captures the essence of this gentle woodland creature.
Conclusion
Congratulations on creating your origami hare mask! This delightful paper creation demonstrates how simple folding techniques can transform an ordinary square sheet into a charming wearable animal character. From the initial diagonal fold to the final facial details, you’ve mastered the essential steps needed to create a recognizable hare that captures the gentle, alert nature of these beloved woodland creatures. The origami hare mask showcases the perfect marriage of functionality and artistry that makes paper folding such an engaging craft for all ages. Your completed mask serves multiple purposes—as an introduction to origami fundamentals, an engaging craft project, and a functional costume piece that sparks imagination and creative play. The techniques you’ve learned, including precise creasing, symmetrical folding, and three-dimensional shaping, provide a solid foundation for exploring more complex origami animal designs. We hope this tutorial has inspired your interest in both paper folding and animal-themed crafts. Remember that each mask you create offers opportunities to practice precision and explore creative variations—experiment with different colors, add unique decorative elements, or modify proportions to create your own distinctive hare characters for any occasion.
- “Before starting your hare mask, master fundamental techniques in our Origami Basics for Beginners guide.”
- “Explore more animal mask designs in our Origami Animals Collection, featuring woodland creatures, farm animals, and pets.”
- “Discover more mask-making and costume projects in our Creative Origami Gallery section.”
- “Find beautiful ways to display and decorate your animal masks with our Decorative Origami Ideas guide.”
- “Create a complete Easter scene by adding Origami Flowers like tulips and daffodils to complement your hare mask.”
- “Learn how to make multiple matching masks for group activities using techniques from our Modular Origami Projects collection.”
