
Introduction
Origami Magic Ring, the ancient Japanese art of paper folding, reaches new heights of creativity when it produces wearable art that combines traditional techniques with interactive functionality. The origami magic ring stands out as one of the most engaging and practical projects, described as “easy and interactive” for crafters who want to create something both beautiful and genuinely wearable. This beginner-friendly tutorial demonstrates how to transform a simple rectangular sheet of paper into a functional ring that can actually be worn on your finger, making it perfect for costume jewelry, theatrical props, or simply as a fun demonstration of how origami can create functional accessories. What makes this origami magic ring particularly captivating is its combination of simplicity and surprise—the clean construction process results in a sturdy, wearable piece of jewelry that showcases how paper folding can produce objects that serve real purposes in our daily lives. Unlike purely decorative origami models, this ring project delivers immediate practical satisfaction while teaching valuable folding techniques including pocket formation, structural reinforcement, and the use of basic materials like tape to enhance durability. The completed model demonstrates how origami can bridge the gap between traditional craft and modern functionality, creating wearable art that sparks conversations and demonstrates the versatile applications of paper engineering in contemporary creative expression.
Step-by-Step Instructions
Step 1: Create the Foundation Crease For Origami Magic Ring
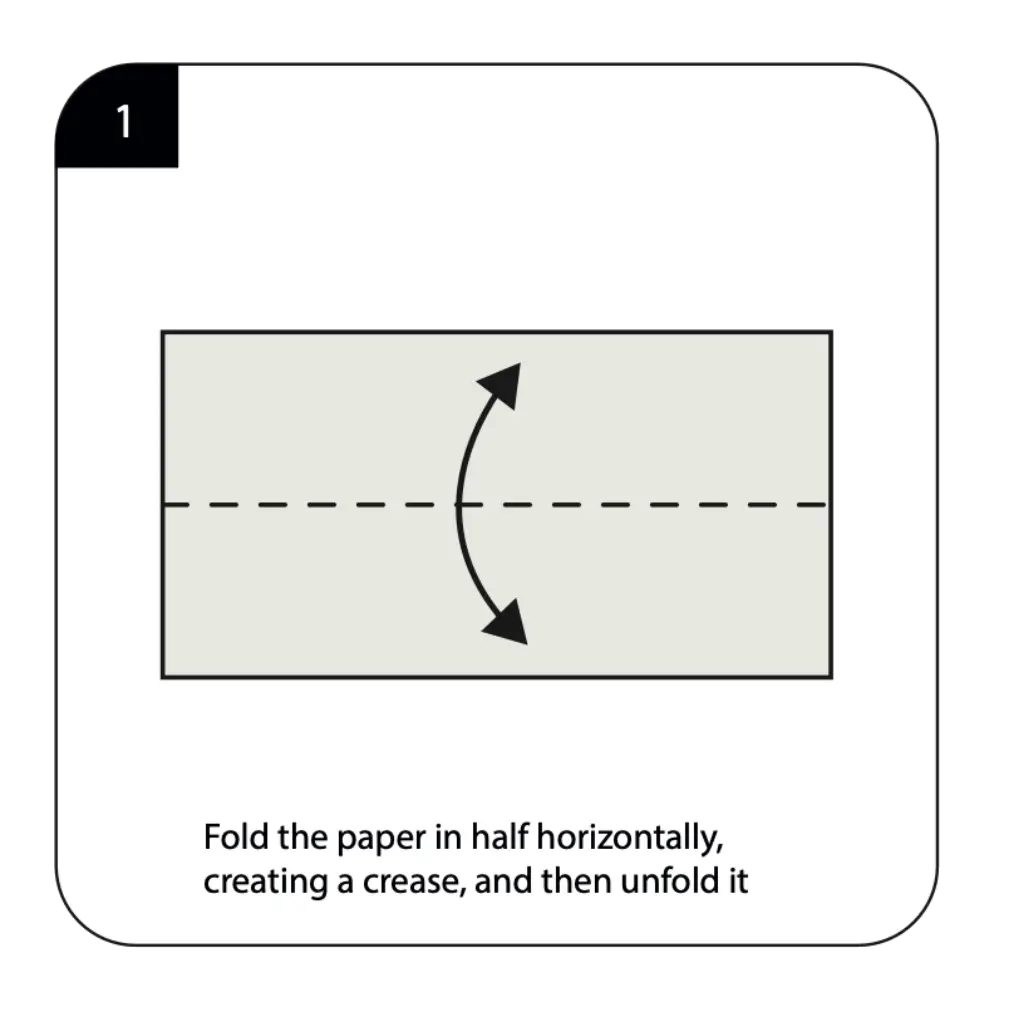
Start with a rectangular sheet of origami paper with the width longer than the height and the non-colored side facing up as specified in the instructions. Fold the paper in half horizontally, creating a strong central crease, then unfold it completely to establish the reference line for your ring construction. This initial fold creates the fundamental guideline that ensures proper symmetry and proportions throughout the magic ring folding process. The precision of this foundation crease is crucial for achieving a well-balanced ring that will fit comfortably and maintain its structural integrity when worn. Take care to align the edges perfectly and create a sharp, clean fold that will serve as the backbone for all subsequent construction steps.
Step 2: Form the Central Band Structure For Origami Magic Ring
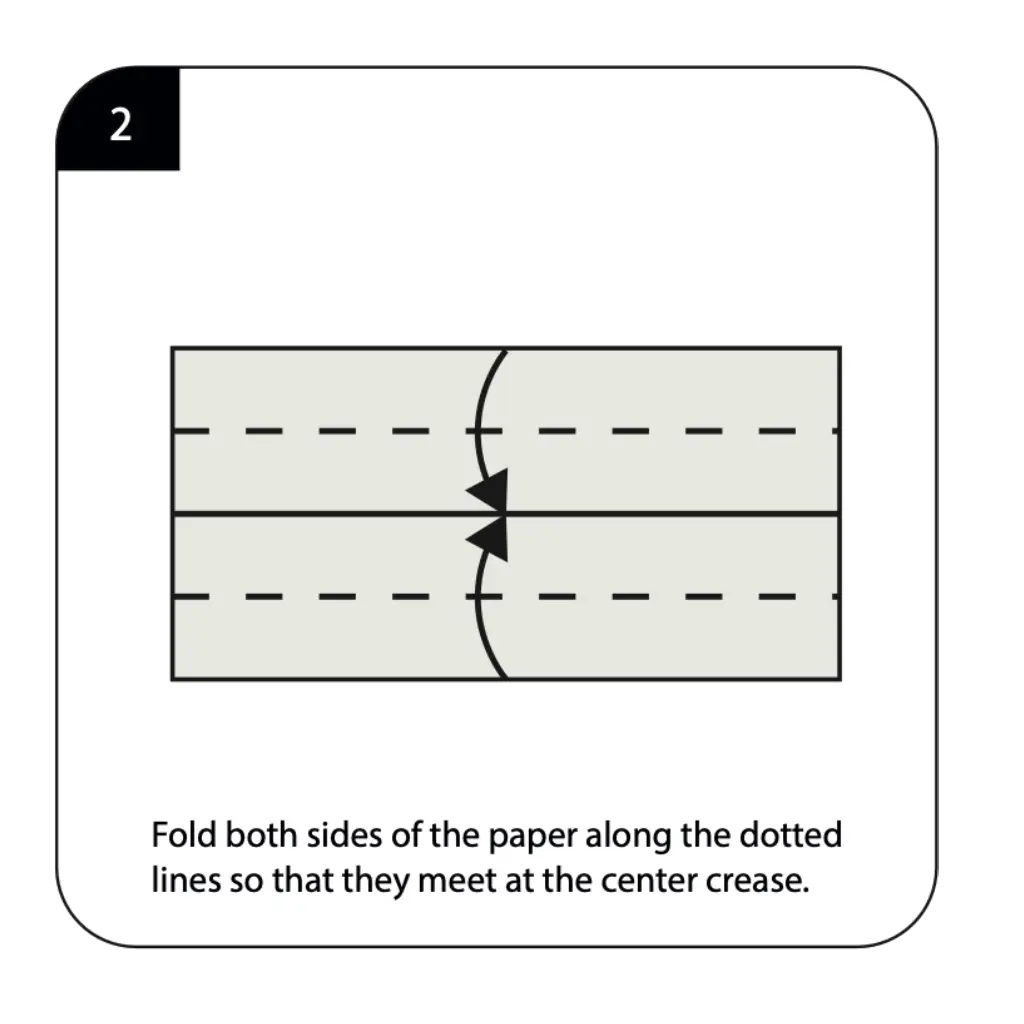
Fold both sides of the paper along the dotted lines so that they meet precisely at the center crease created in Step 1. These parallel folds establish the width of your ring band and create the layered structure that will provide strength and stability to your wearable jewelry. The accuracy of these edge-to-center folds directly affects both the appearance and functionality of your finished magic ring. Work carefully to ensure both sides are folded at identical distances from the center line, creating the balanced proportions that will make your ring comfortable to wear and visually appealing when complete.
Step 3: Create the Lengthwise Structure For Origami Magic Ring
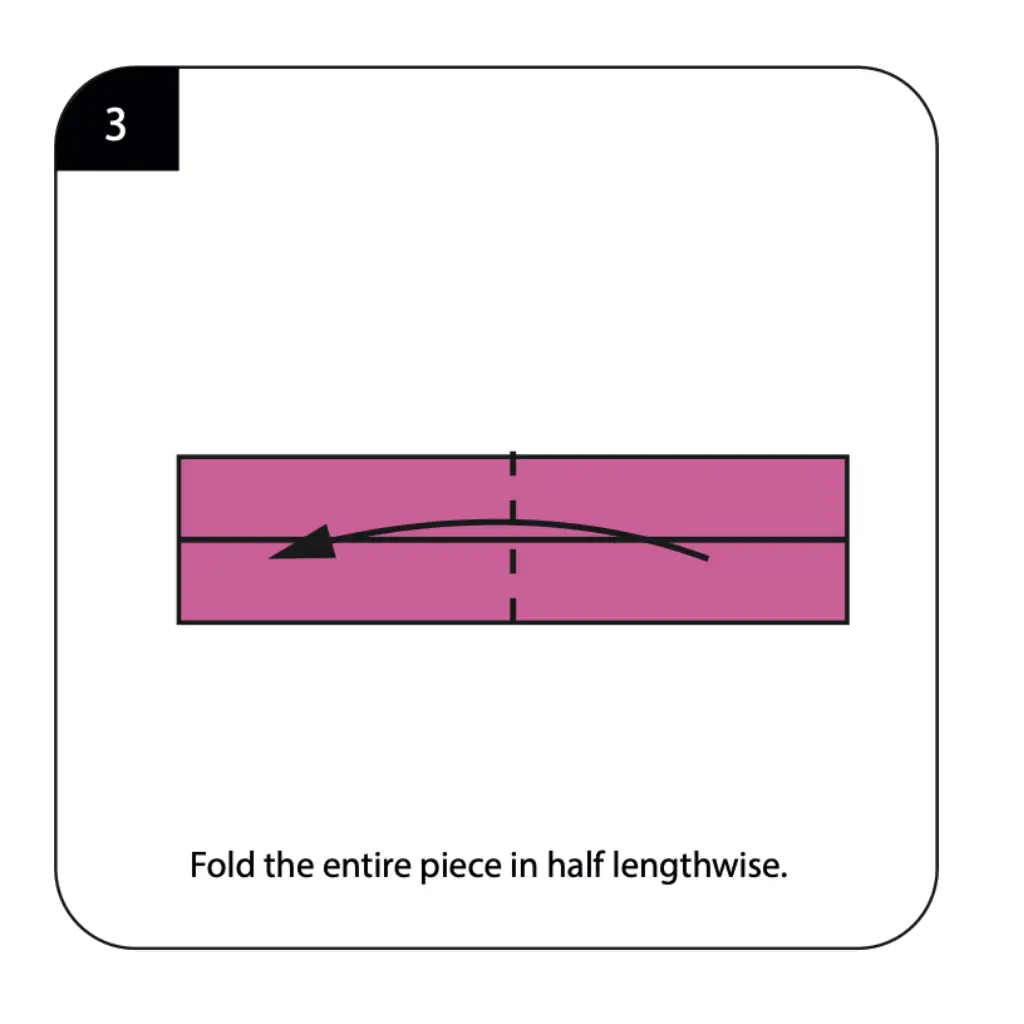
Fold the entire piece in half lengthwise as shown in the diagram, consolidating the previous folds into a more compact, manageable form. This fold transforms your flat rectangular construction into the elongated shape that will eventually wrap around your finger to form the circular ring structure. The precision of this lengthwise fold affects the overall stability and wearability of your finished magic ring. This step begins the transformation from flat paper strip to the three-dimensional band that will serve as the foundation for your interactive paper jewelry piece.
Step 4: Begin the End Shaping For Origami Magic Ring
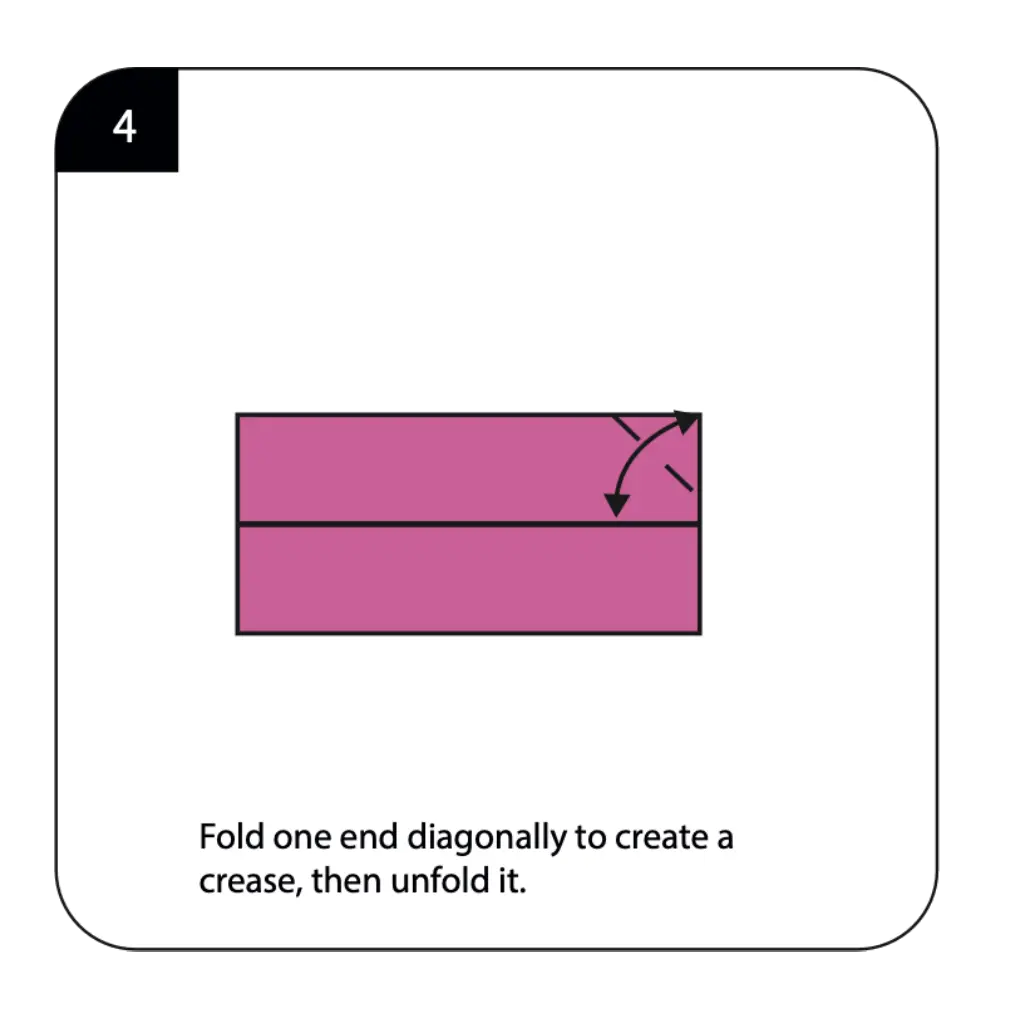
Fold one end diagonally to create a distinctive triangular shape, then unfold it to establish a permanent crease that will guide the pocket formation in subsequent steps. This diagonal fold begins the process of creating the interlocking mechanism that will allow your ring to maintain its circular shape when worn. The angle and position of this diagonal fold are crucial for ensuring proper fit and structural integrity in your finished magic ring. This step introduces the geometric elements that will transform your straight paper band into a curved, wearable piece of jewelry.
Step 5: Form the First Pocket For Origami Magic Ring
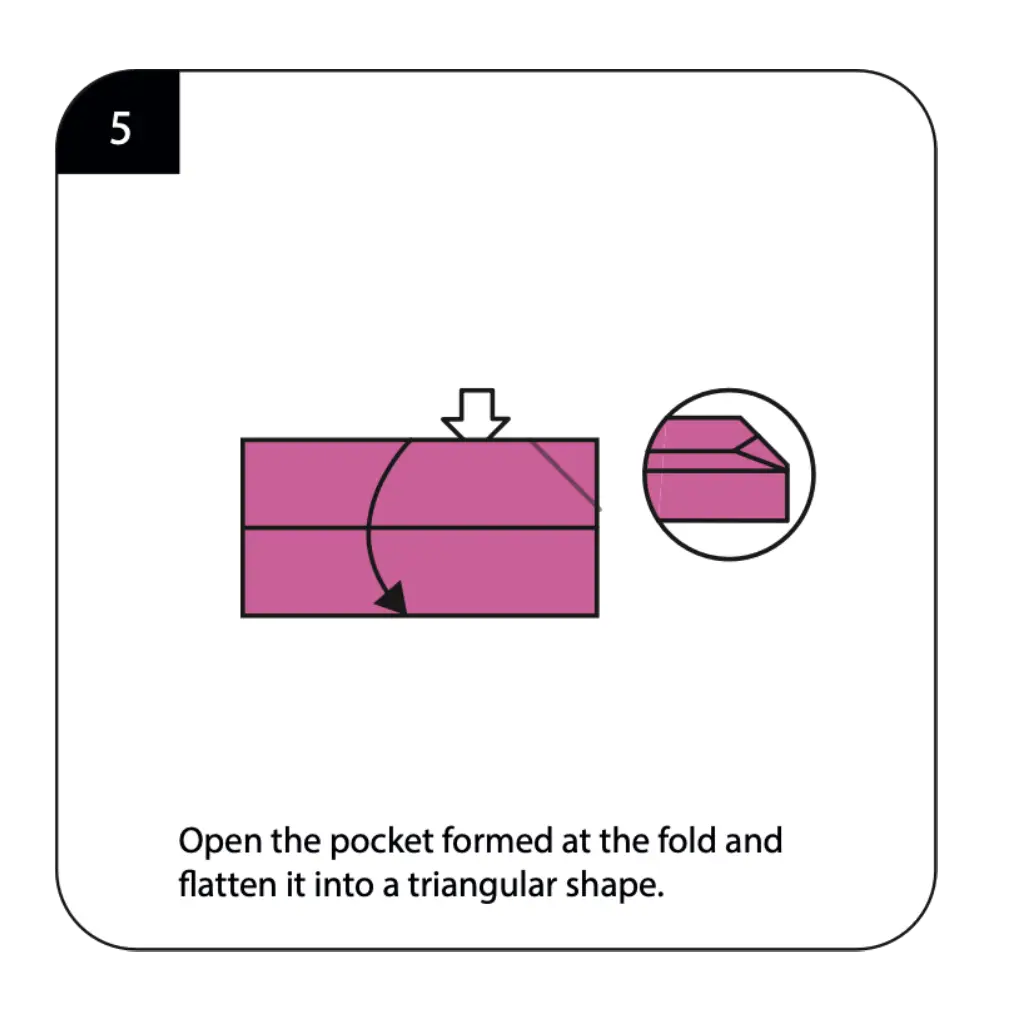
Open the pocket formed at the diagonal fold and flatten it into a triangular shape as indicated in the diagram. This pocket-forming technique is essential for creating the interlocking mechanism that will hold your ring together without requiring permanent adhesives. The careful execution of this pocket formation determines how securely your ring will maintain its shape during wear. Work gently but firmly to create a well-defined triangular pocket that will accept the corresponding end of your ring band, demonstrating how origami techniques can create functional mechanical connections in wearable objects.
Step 6: Refine the First End For Origami Magic Ring
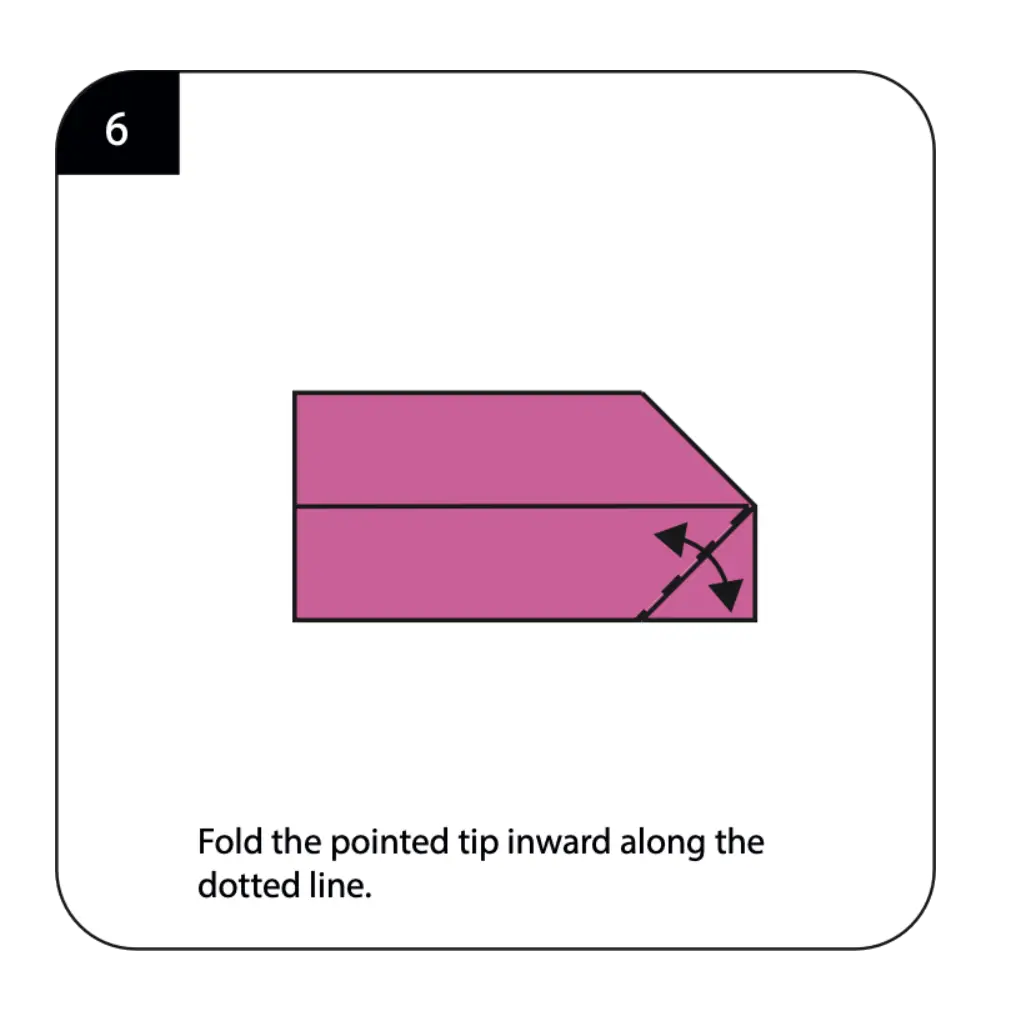
Fold the pointed tip inward along the dotted line to create a cleaner, more finished appearance for the first end of your ring band. This refinement fold enhances both the aesthetic appeal and the structural stability of your magic ring by eliminating sharp points that might be uncomfortable when worn. The precision of this tip-folding step affects how smoothly your ring will fit together and how comfortable it will be during extended wear. This detail work demonstrates how small finishing touches can significantly improve the functionality and appearance of origami jewelry pieces.
Step 7: Create the Second Pocket For Origami Magic Ring
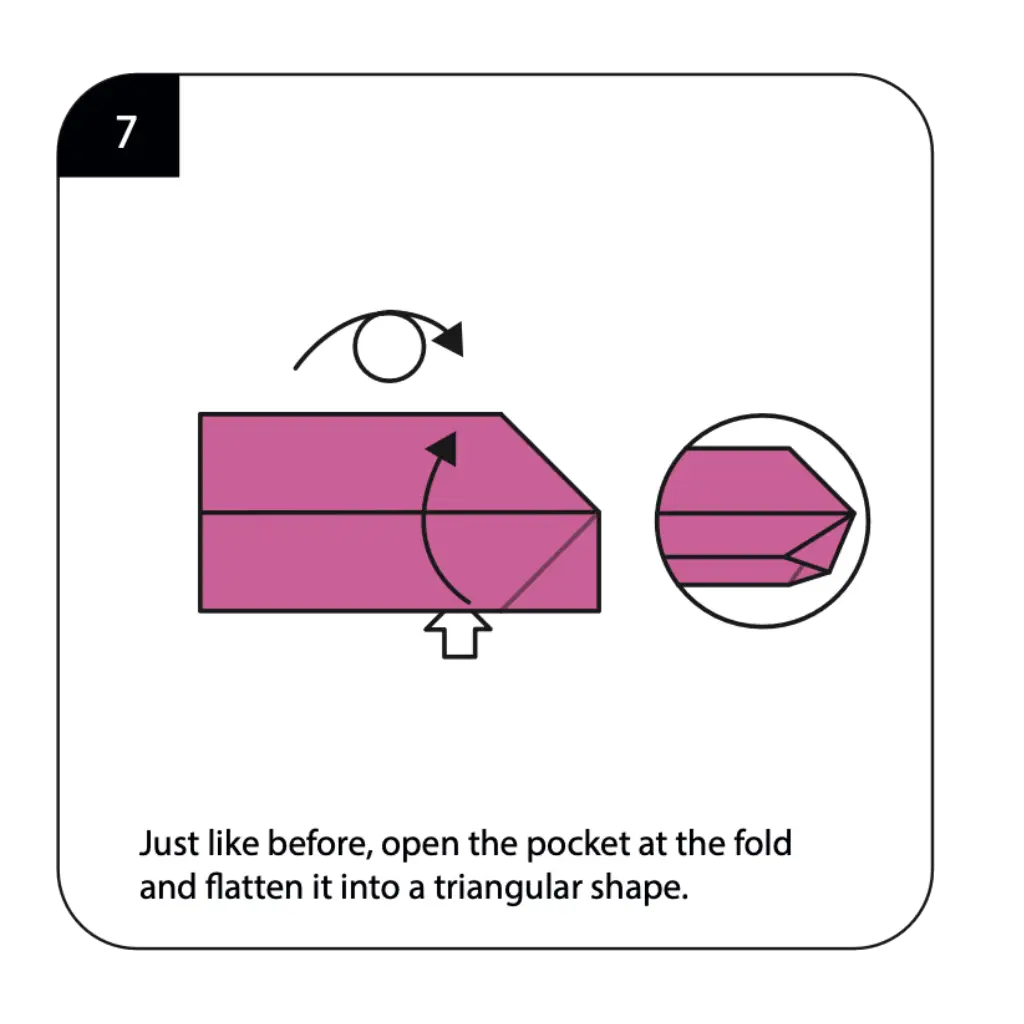
Just like before, open the pocket at the opposite fold and flatten it into a triangular shape, creating the matching interlocking element for your ring assembly. This second pocket formation must be executed with the same precision as the first to ensure proper alignment and secure connection when the ring is assembled. The symmetry between both pocket formations is crucial for achieving a balanced, professional-looking magic ring that functions reliably as wearable jewelry. This step completes the mechanical elements needed for your ring to transform from a straight band into a circular, functional piece of jewelry.
Step 8: Shape the Ring Band For Origami Magic Ring
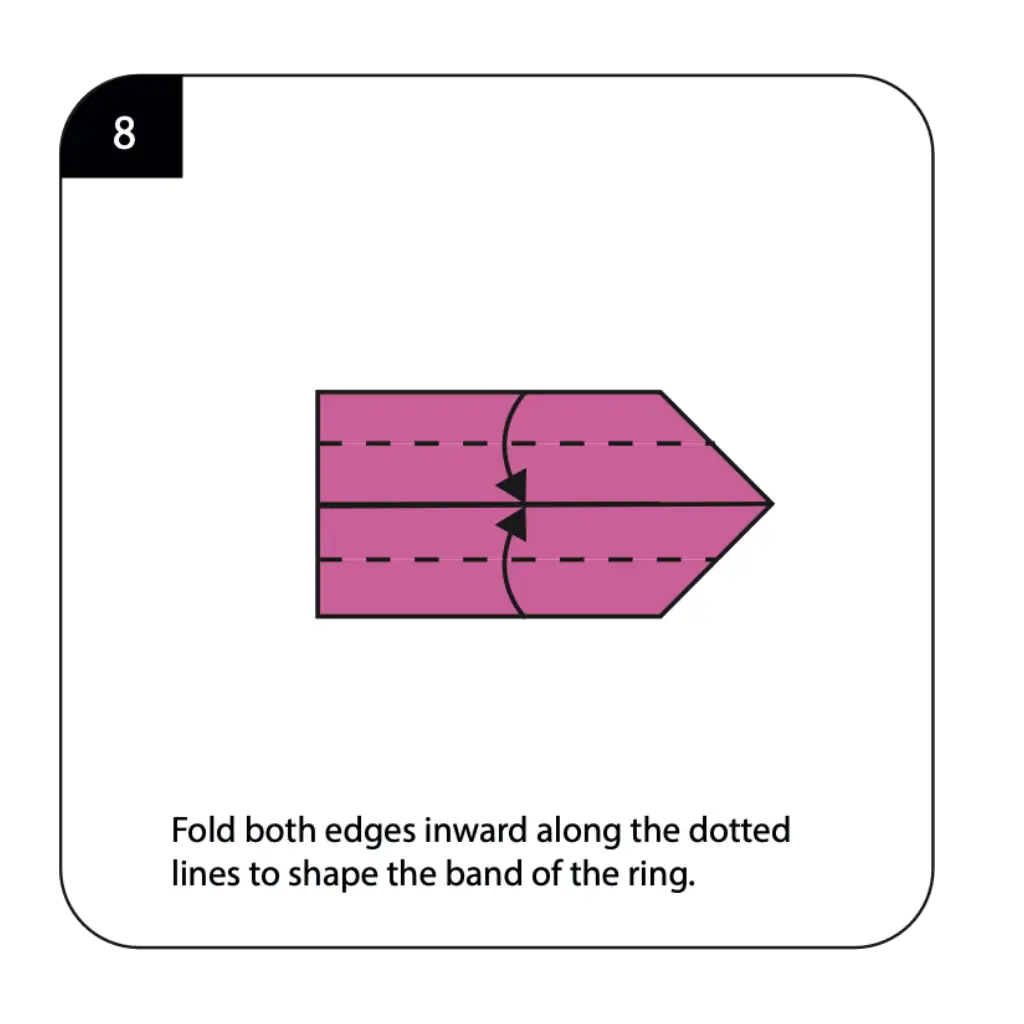
Fold both edges inward along the dotted lines to shape the band of the ring, creating the curved profile that will make your jewelry comfortable to wear on your finger. These shaping folds transform the flat construction into the dimensional form characteristic of real jewelry while maintaining the structural integrity needed for regular wear. The careful execution of these band-shaping folds determines how well your ring will conform to the natural curve of your finger. This step demonstrates how origami can create ergonomic designs that consider both aesthetic appeal and practical comfort in wearable applications.
Step 9: Allow Ring Formation For Origami Magic Ring
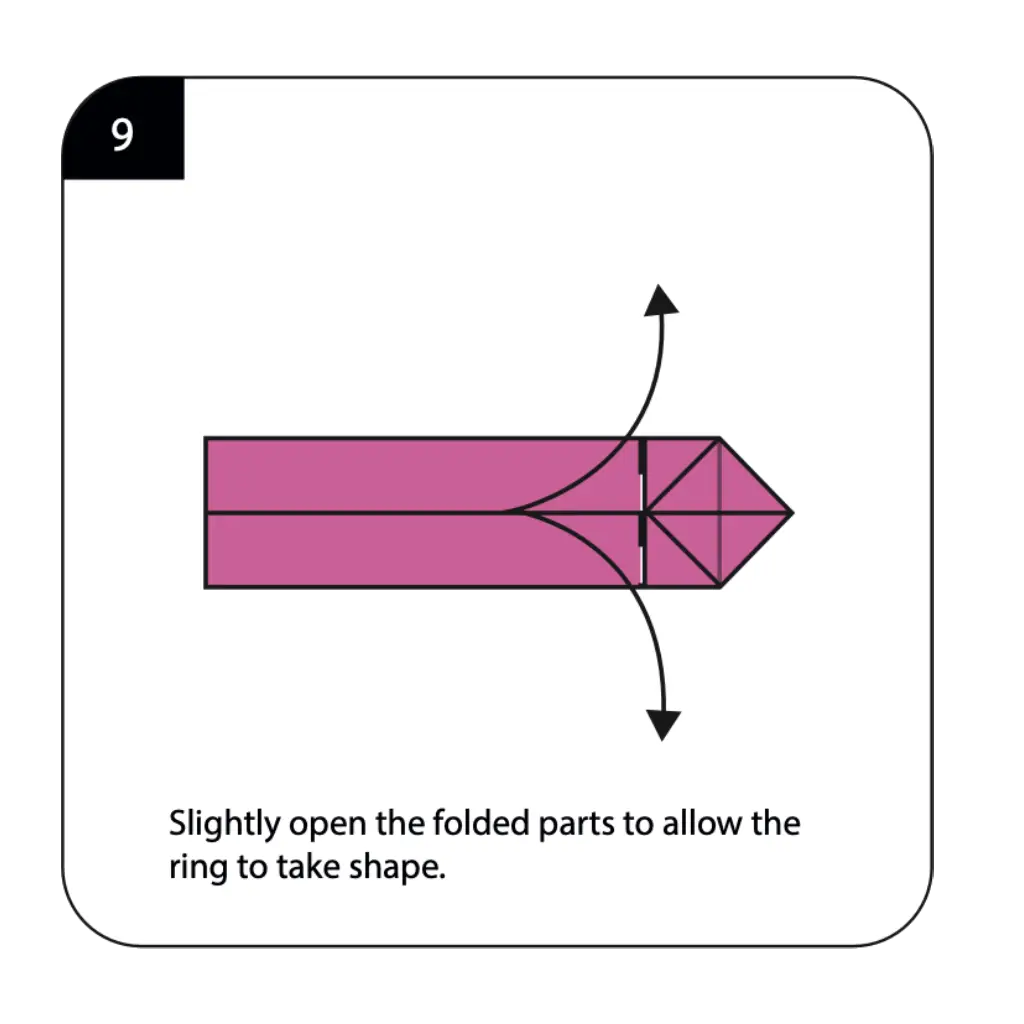
Slightly open the folded parts to allow the ring to take its natural circular shape, preparing it for the final assembly that will complete your wearable magic ring. This gentle opening technique helps the paper band find its optimal curvature while maintaining the structural elements created in previous steps. The careful manipulation during this shaping phase ensures that your ring will maintain its form without excessive stress on the paper fibers. This step prepares your construction for the final assembly that will transform it into a fully functional piece of origami jewelry.
Step 10: Secure the Structure For Origami Magic Ring
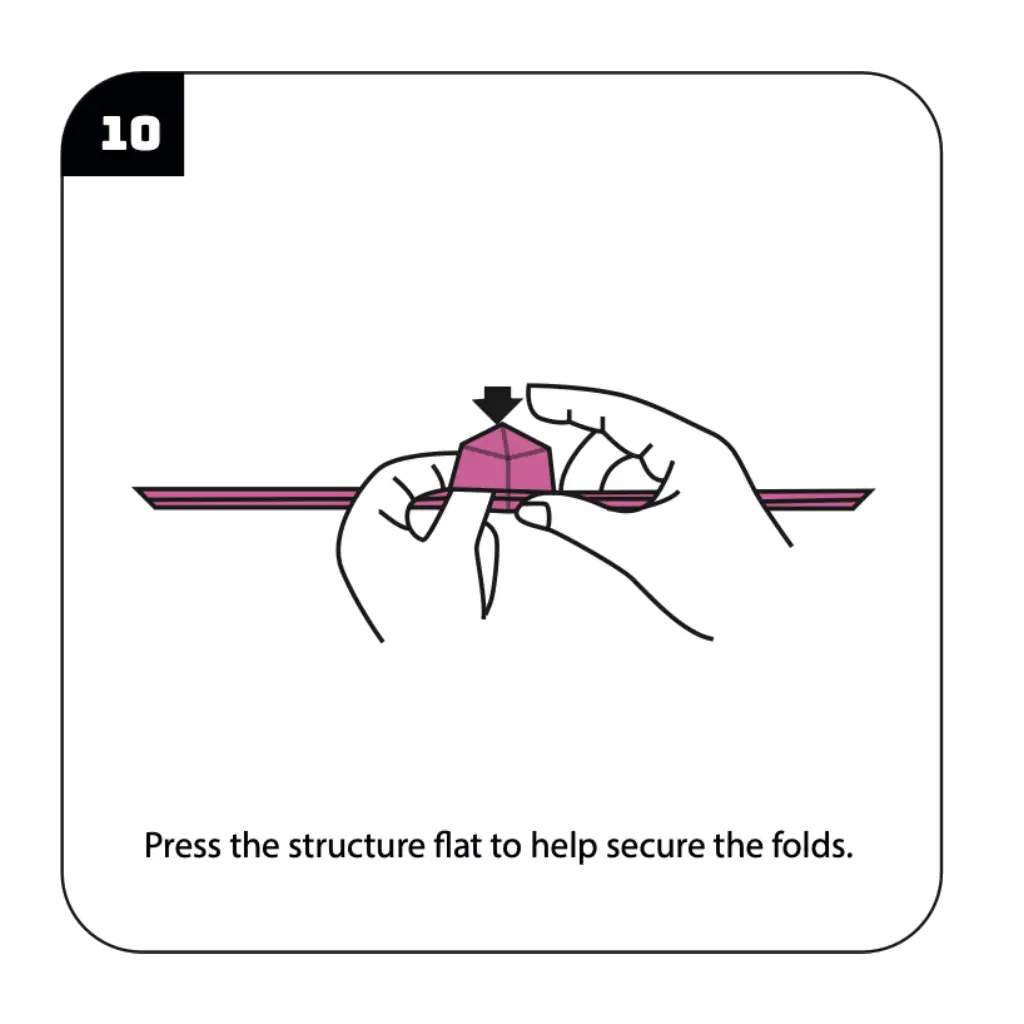
Press the structure flat to help secure all the folds and ensure stability in your magic ring construction before final assembly. This consolidation step reinforces all the previous folding work and creates a stable foundation for the ring’s final form. The proper execution of this securing step affects the longevity and reliability of your finished magic ring during wear and handling. This demonstrates how traditional origami techniques can be enhanced with practical considerations for creating durable, functional objects.
Step 11: Complete Your Origami Magic Ring
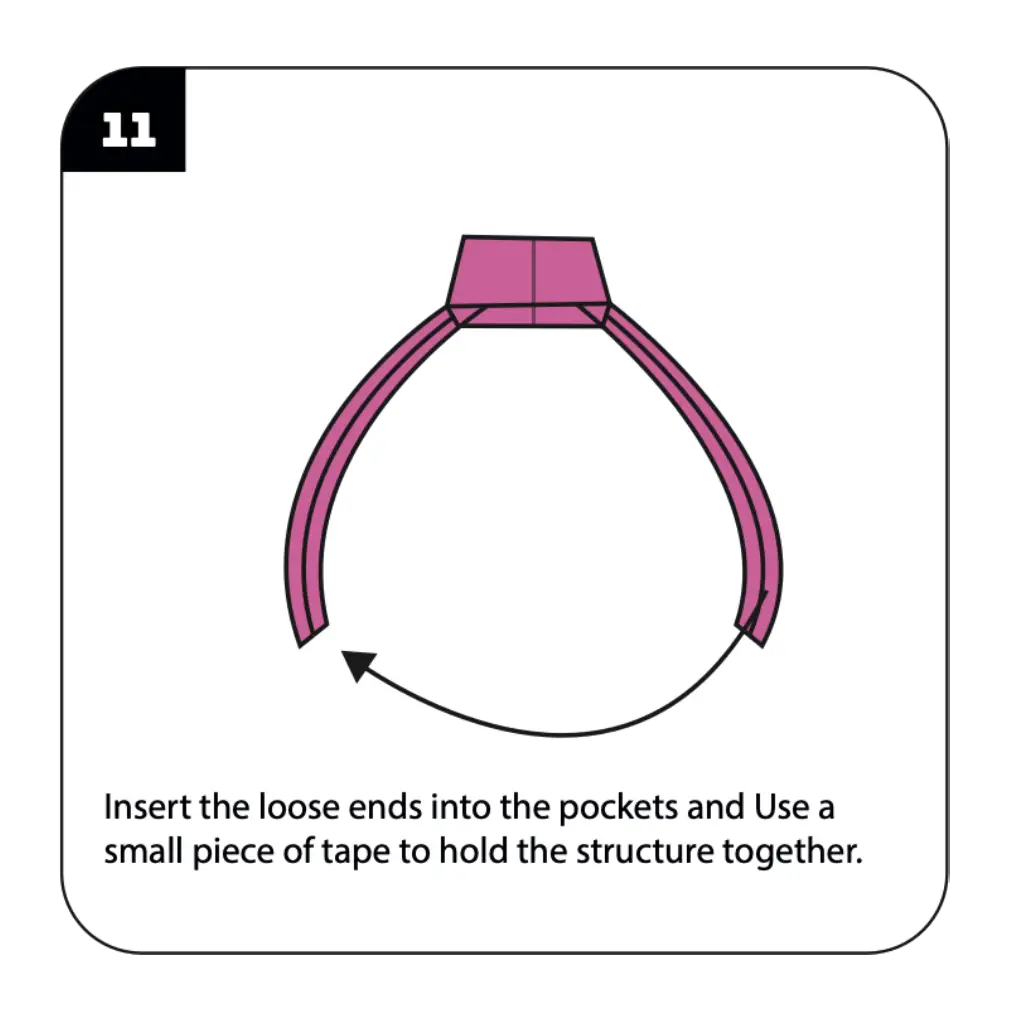
Insert the loose ends into the pockets and use a small piece of tape to hold the structure together, completing your wearable origami magic ring. This final assembly step transforms your folded construction into a fully functional piece of jewelry that can be worn and enjoyed. The strategic use of tape enhances the durability of your paper ring while maintaining its origami character and handmade charm. Your completed magic ring now demonstrates how traditional paper folding can create modern, wearable art that serves both aesthetic and functional purposes, ready to be worn as a unique piece of handcrafted jewelry that showcases your origami skills.
Conclusion
Congratulations on creating your origami magic ring! This innovative paper creation demonstrates how traditional folding techniques can be adapted to produce genuinely functional wearable art that serves real purposes in contemporary life. From a simple rectangular sheet, you’ve crafted a piece of jewelry that combines the elegance of origami with the practicality of modern accessories, proving that paper folding can extend far beyond decorative objects into the realm of functional design. The origami magic ring showcases the perfect balance between traditional craft techniques and contemporary applications, creating something that’s both aesthetically pleasing and genuinely useful as wearable art. Your completed ring serves multiple purposes—as an impressive demonstration of origami versatility, a unique piece of handmade jewelry, a conversation starter that showcases creative problem-solving, or simply as a fun project that bridges the gap between art and utility. The techniques you’ve learned, including pocket formation, structural reinforcement, and the integration of additional materials for enhanced durability, represent valuable skills that can be applied to many other functional origami projects. We hope this tutorial has opened your eyes to the possibilities of wearable origami and inspired you to explore other ways that traditional paper folding can address contemporary needs through creative adaptation and innovative thinking. Remember that each magic ring you create offers opportunities to experiment with different papers, sizes, and decorative elements, allowing you to develop a collection of unique handcrafted jewelry that reflects your personal style and origami expertise.
“Before starting your magic ring, learn fundamental folding techniques in our Origami Basics for Beginners guide.”
“Create matching origami accessories by exploring our Creative Origami Collection featuring jewelry and wearable art projects.”
“Discover more interactive and functional designs in our Decorative Origami Gallery for practical paper crafts.”
“Add tiny origami animals from our Origami Animals Collection as charms for your ring or jewelry collection.”
“Create coordinating floral accessories with projects from our Origami Flowers Section for complete themed jewelry sets.”
“Learn advanced techniques for creating jewelry sets and matching accessories in our Modular Origami Projects guide.”
