
Introduction
Origami lucky stars represent one of the most beloved and meaningful projects in paper folding, traditionally believed to bring good fortune and happiness to those who make and receive them. This charming tutorial transforms simple paper strips into delightful three-dimensional stars that puff up into adorable, chubby shapes perfect for gifts, decorations, or personal keepsakes. With ten detailed steps using an innovative strip-folding technique rather than traditional square paper, you’ll create magical little stars that can be collected in jars, strung as garlands, or given as tokens of friendship. Whether for expressing good wishes, creating romantic gifts, or simply enjoying the meditative process of repetitive folding, origami lucky stars offer both cultural significance and endless creative possibilities.
Step-by-Step Instructions
Step 1: Prepare the Paper Strips For Origami Lucky Stars
Join three strips measuring 3 by 30 cm together vertically with the aid of adhesive to create one long continuous strip for your lucky star construction. This extended length provides sufficient material for the multiple wrapping and folding required to create the characteristic puffy star shape. The adhesive connection should be smooth and flat to ensure consistent folding throughout the star-making process. The use of three connected strips demonstrates how traditional origami lucky stars techniques can be adapted to work with non-square materials while maintaining the integrity and beauty of the final result.
Step 2: Create the Initial Knot For Origami Lucky Stars
Loosely fold the strip into a knot in the direction of the arrow as shown in the diagram, creating the pentagonal foundation that will become your lucky star’s basic structure. This knotting technique establishes the five-pointed framework essential for creating authentic lucky stars with proper proportions and symmetry. The looseness of this initial knot is crucial for allowing subsequent wrapping and manipulation without tearing the paper strip. This unique starting method distinguishes lucky star folding from traditional origami lucky stars techniques while creating the mathematical foundation needed for the star’s geometric perfection.
Step 3: Shape the Pentagon Foundation For Origami Lucky Stars
Softly press the corners to flatten them, creating a neat pentagonal shape that will serve as the base for your lucky star construction. This gentle pressing technique transforms the loose knot into a structured geometric foundation while maintaining the flexibility needed for subsequent wrapping steps. The precision of this pentagon formation directly affects the symmetry and final appearance of your completed lucky star. This step demonstrates how careful manipulation can transform an informal knot into a precise geometric shape that serves as the foundation for complex three-dimensional construction.
Step 4: Begin the Flattening Process For Origami Lucky Stars
Flatten the structure to create a square-like shape as indicated, preparing your pentagon foundation for the systematic wrapping that will build your star’s dimensional form. This flattening step consolidates the foundation while creating the working surface needed for the methodical strip wrapping that follows. The controlled flattening maintains the pentagon’s structural integrity while providing the stability needed for consistent wrapping tension. This transformation from three-dimensional knot to flat working surface illustrates how origami lucky stars techniques can be adapted to work with strip materials rather than traditional square papers.
Step 5: Secure the Strip End For Origami Lucky Stars

Insert the end of the strip into the shape and turn over as shown, beginning the systematic wrapping process that will build your star’s three-dimensional form. This insertion technique secures the strip end while establishing the direction and pattern for the continuous wrapping that creates the star’s bulk. The careful insertion prevents unraveling while maintaining the pentagon’s structural integrity throughout the construction process. This securing method demonstrates how functional engineering principles can be integrated into artistic paper folding to create both beauty and structural stability.
Step 6: Continue the Wrapping Pattern For Origami Lucky Stars
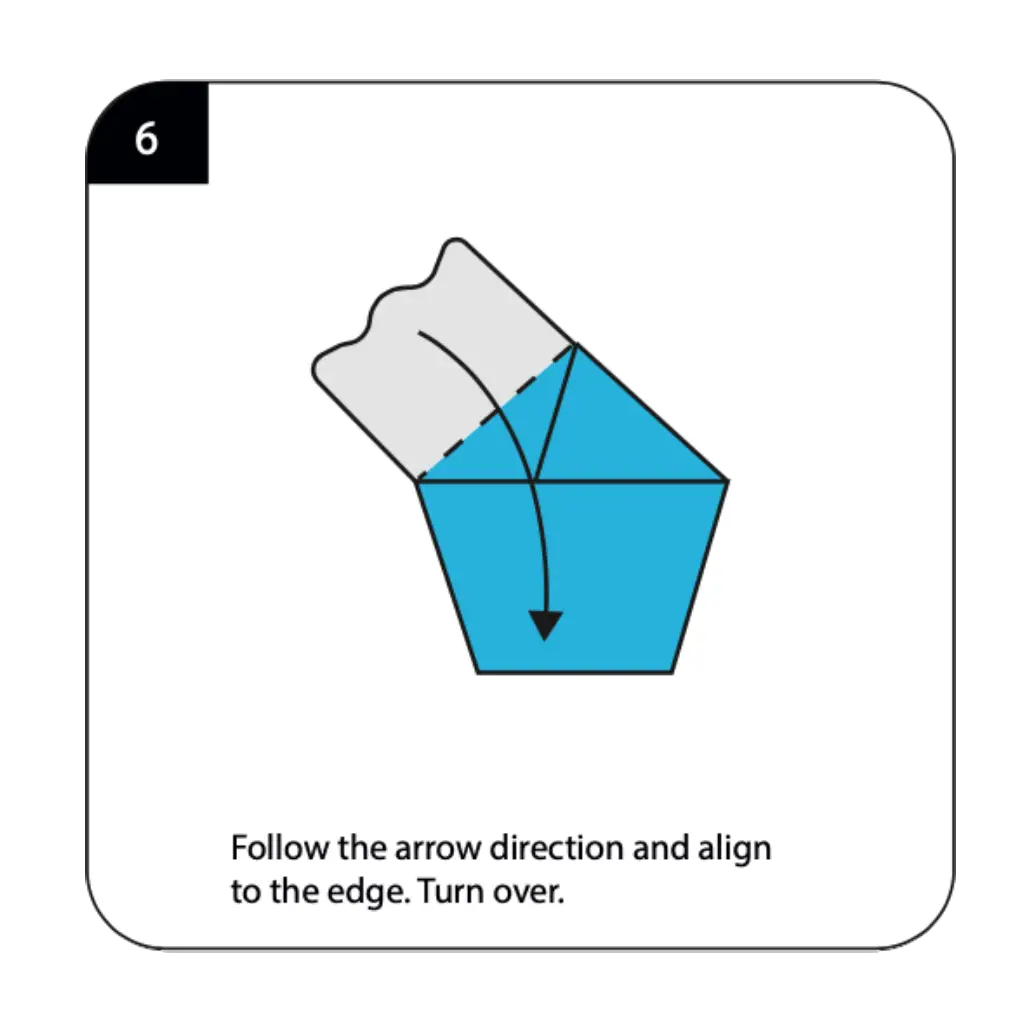
Follow the arrow direction and align the strip to the edge, then turn over to continue the systematic wrapping pattern. This methodical wrapping builds the layers needed to create the star’s characteristic puffy, three-dimensional appearance when completed. The alignment with edges ensures consistent wrapping tension and maintains the pentagon’s geometric precision throughout the construction process. Each wrap adds bulk and structural stability while preserving the mathematical proportions that make lucky stars so geometrically satisfying and visually appealing.
Step 7: Maintain the Pentagon Shape For Origami Lucky Stars
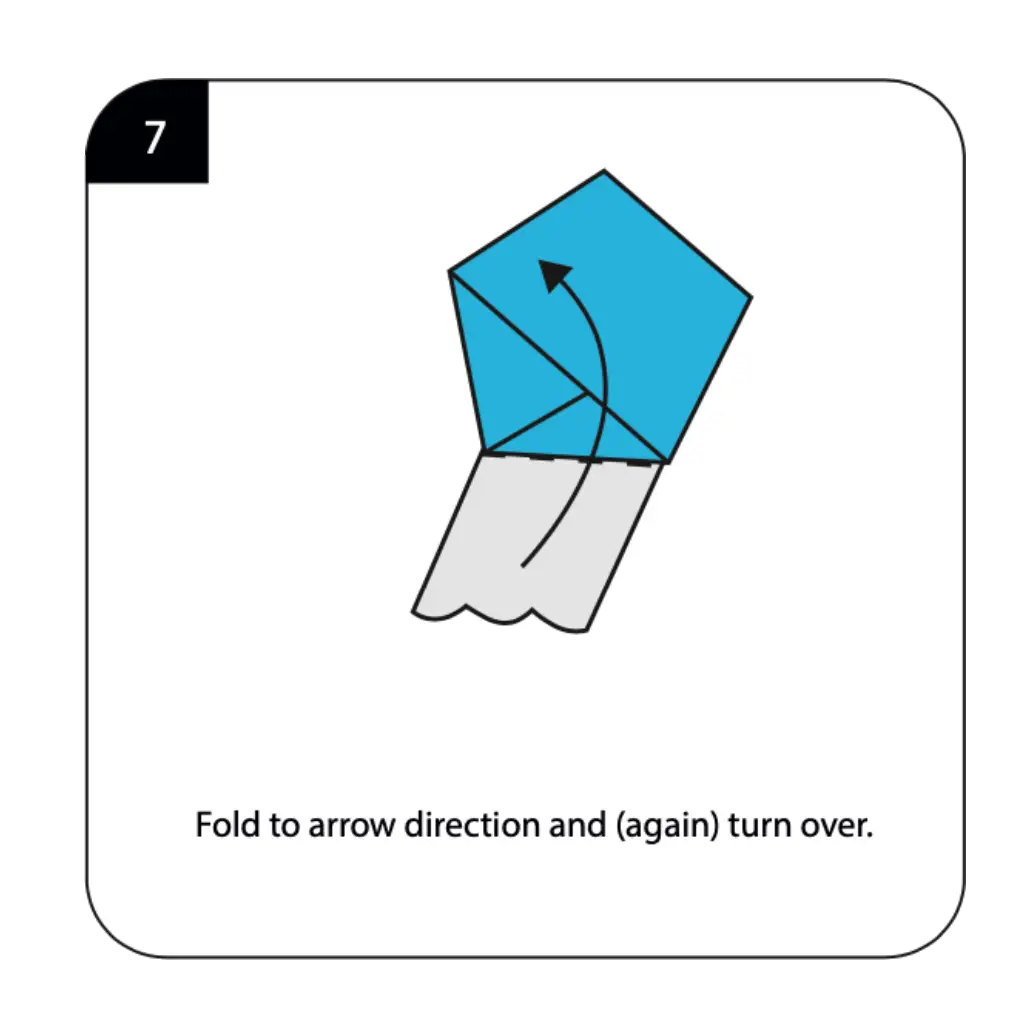
Fold to the arrow direction and turn over again, making sure to maintain the pentagon’s structural integrity throughout the wrapping process. This continued wrapping builds the dimensional bulk needed for the star’s final puffy appearance while preserving the geometric precision essential for proper star formation. The attention to pentagon maintenance ensures that your finished star will display the mathematical perfection that makes these creations so visually satisfying. This step emphasizes how consistent technique and geometric awareness combine to create the foundation for the star’s three-dimensional transformation.
Step 8: Complete Additional Wrapping
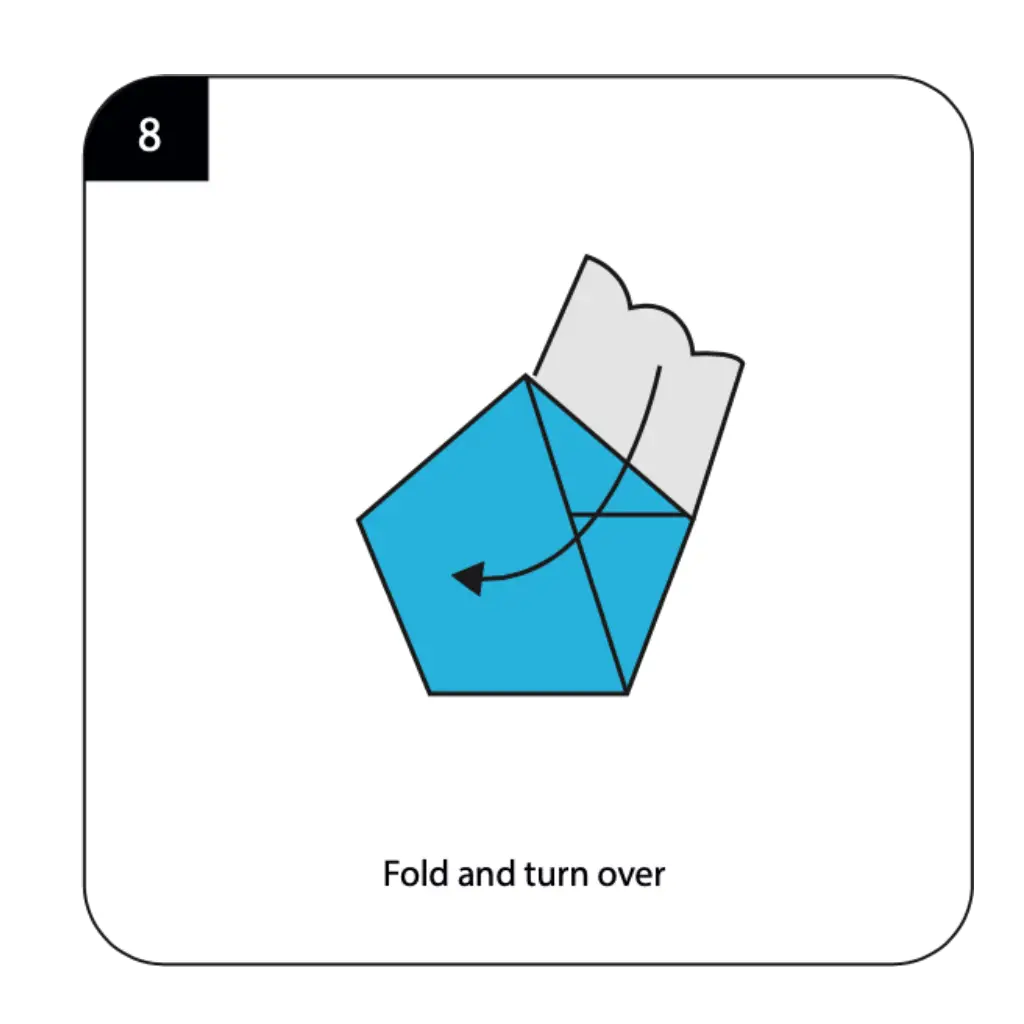
Fold and turn over as indicated, continuing the systematic wrapping pattern that builds the layers necessary for your star’s final three-dimensional form. This repetitive wrapping creates the dense, layered structure that will support the star’s transformation from flat pentagon to puffy, dimensional star. The consistency of this wrapping technique determines the evenness and symmetry of your finished lucky star’s appearance. Each additional wrap contributes to the structural foundation that enables the dramatic three-dimensional transformation that occurs in the final shaping step.
Step 9: Finalize the Pentagon Structure
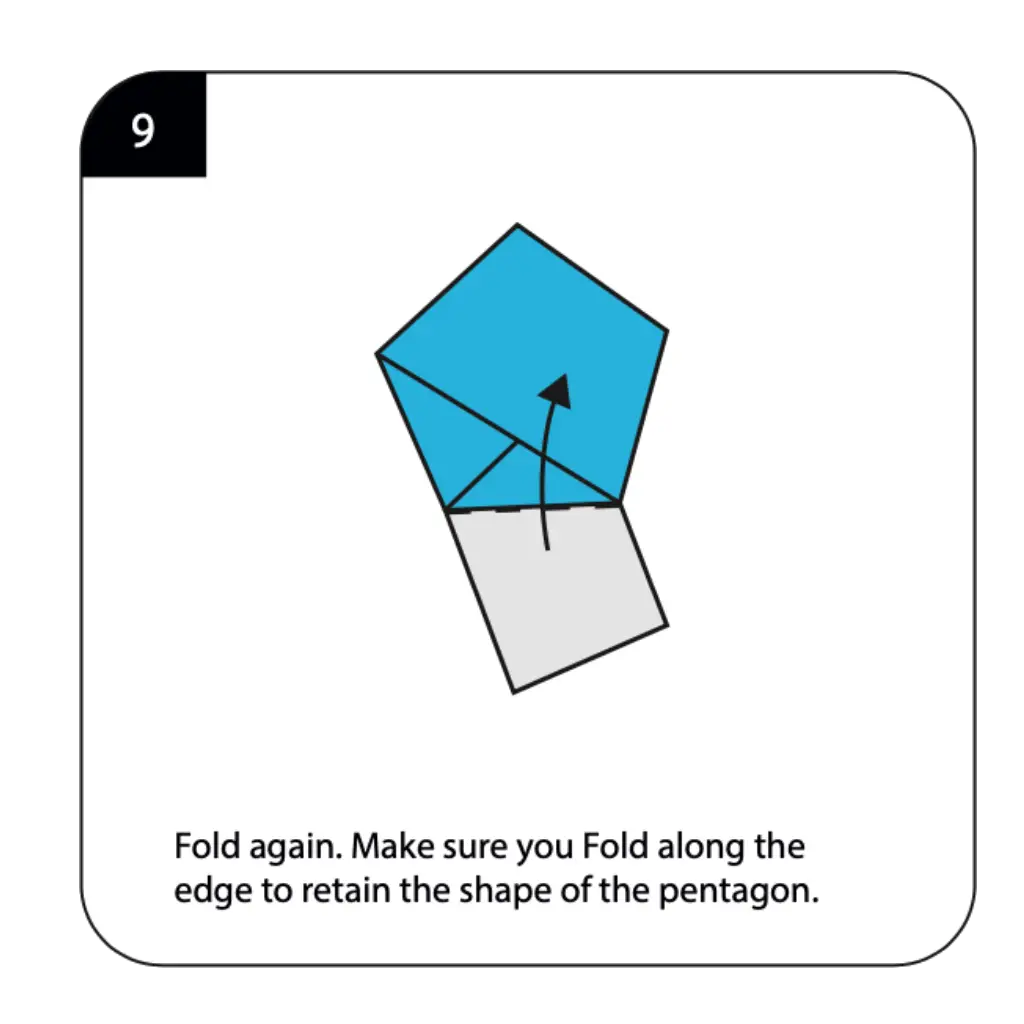
Fold again, ensuring you fold along the edge to retain the pentagon’s shape throughout the final wrapping stages. This careful edge alignment maintains the geometric precision essential for proper star formation while completing the layered structure needed for dimensional transformation. The preservation of the pentagon’s mathematical proportions ensures that your star will display perfect five-fold symmetry when completed. This final structural step prepares your wrapped pentagon for the magical transformation that converts the flat, layered construction into a three-dimensional lucky star.
Step 10: Transform Into Three-Dimensional Star
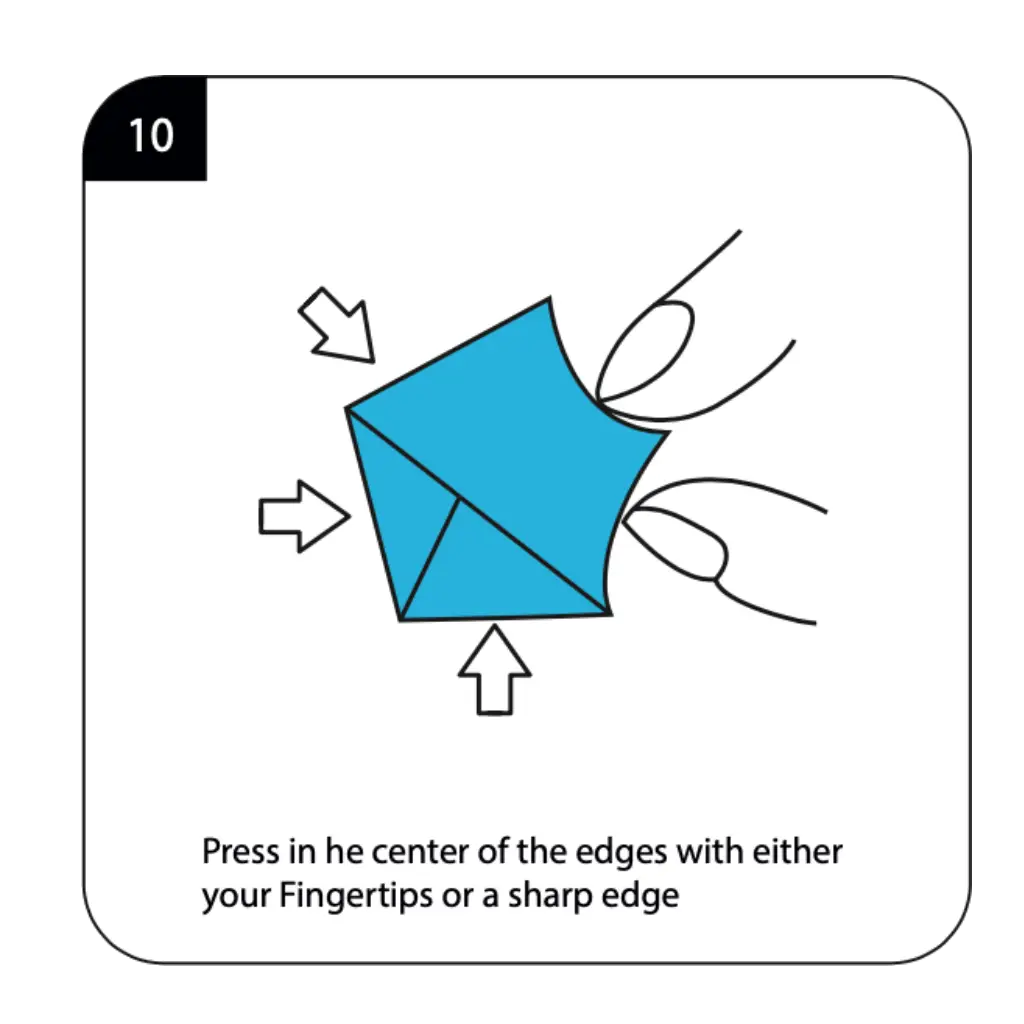
Press in the center of each pentagon edge with either your fingertips or a sharp edge to create the final puffy, three-dimensional lucky star shape. This pressing technique causes the layered pentagon to expand into its characteristic star form with five pointed arms and a dimensional center. The gentle but firm pressure transforms the flat construction into the beloved puffy shape that makes lucky stars so appealing and collectible. Your completed origami lucky stars now displays the mathematical beauty and three-dimensional charm that has made these creations symbols of good fortune and friendship across cultures, ready to bring luck, serve as decorative accents, or demonstrate the remarkable transformation possible through patient, methodical paper folding techniques.
Conclusion
Your origami lucky stars demonstrates how innovative paper folding techniques can create meaningful symbols that transcend simple craft projects to become tokens of friendship and good fortune. This delightful three-dimensional creation combines the meditative benefits of repetitive folding with the satisfaction of mathematical precision and cultural tradition. The unique strip-folding method you’ve mastered opens doors to countless variations in size, color, and decorative applications while building patience and attention to detail. Whether collected in memory jars, shared as gifts, or used as decorative elements, your handcrafted lucky stars represent the perfect fusion of artistic skill, cultural meaning, and personal expression.
- “Master paper manipulation techniques in our Origami Basics for Beginners before creating lucky star collections.”
- “Combine your stars with origami animals from our Origami Animals Collection for complete good luck displays.”
- “Explore more unique folding projects in our Creative Origami Gallery for innovative techniques.”
- “Create stunning arrangements with ideas from our Decorative Origami Guide for special occasions.”
- “Complement your stars with matching Origami Flowers for complete gift presentations.”
- “Learn advanced star variations using techniques from our Modular Origami Projects collection.”
