
Entering the captivating world of paper folding begins with understanding the fundamental techniques that serve as building blocks for countless creations. Basic origami folds explained simply means breaking down the essential folding methods that transform a flat piece of paper into three-dimensional art. Whether you’re just starting your origami journey or looking to refine your technique, mastering these basic origami folds explained in detail will significantly enhance your paper-folding skills and open up a world of creative possibilities.
In this comprehensive guide, we’ll explore the six most important basic origami folds explained step-by-step, with clear instructions and practical applications for each technique. These fundamental folding methods form the foundation of virtually every origami model, from the simplest designs to the most complex masterpieces. By understanding these basic origami folds explained thoroughly, you’ll develop the confidence and skill to tackle increasingly sophisticated origami challenges.
The Importance of Mastering Basic Origami Techniques
Before diving into specific folding techniques, it’s worth understanding why these basic origami folds explainedmatter so much. Origami combines artistic expression with mathematical precision, creating a unique craft that exercises both creativity and logical thinking. The basic origami folds explained in this guide represent the vocabulary of paper folding—the essential “words” that, when combined in different sequences, create the “language” of origami designs.
At origaminew.com, you can explore how these fundamental techniques have evolved over centuries of origami practice. What makes these basic origami folds explained so valuable is their versatility—once mastered, they can be applied to create thousands of different models, from simple decorations to complex artistic expressions.
Now, let’s examine each fundamental fold in detail, understanding not just how to execute them, but also when and why they’re used in various origami creations.
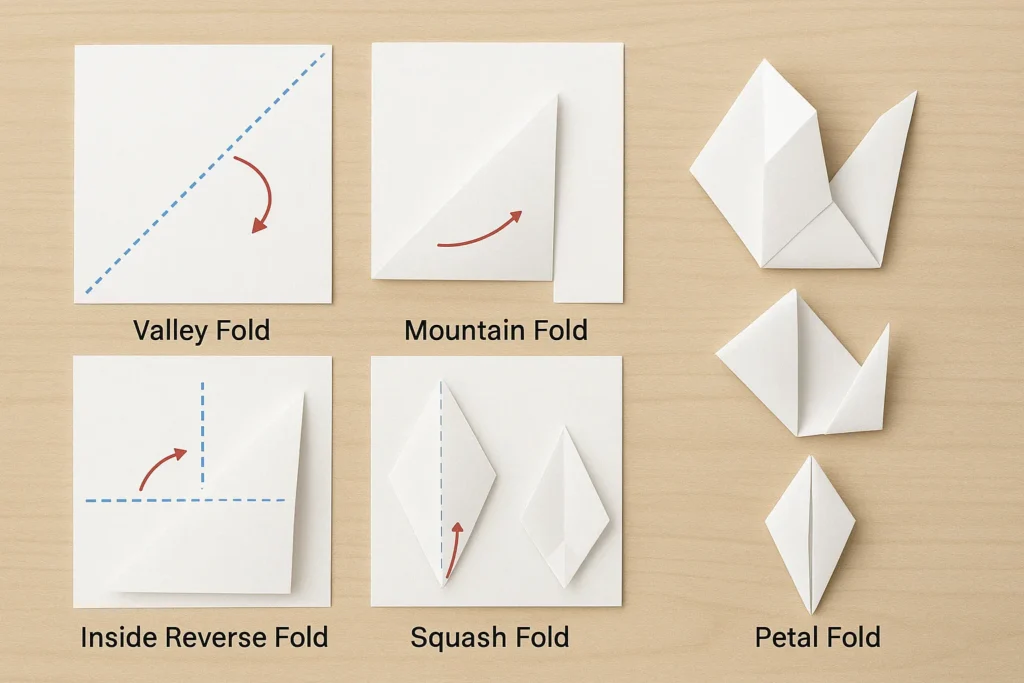
The Valley Fold: Foundation of Origami Techniques
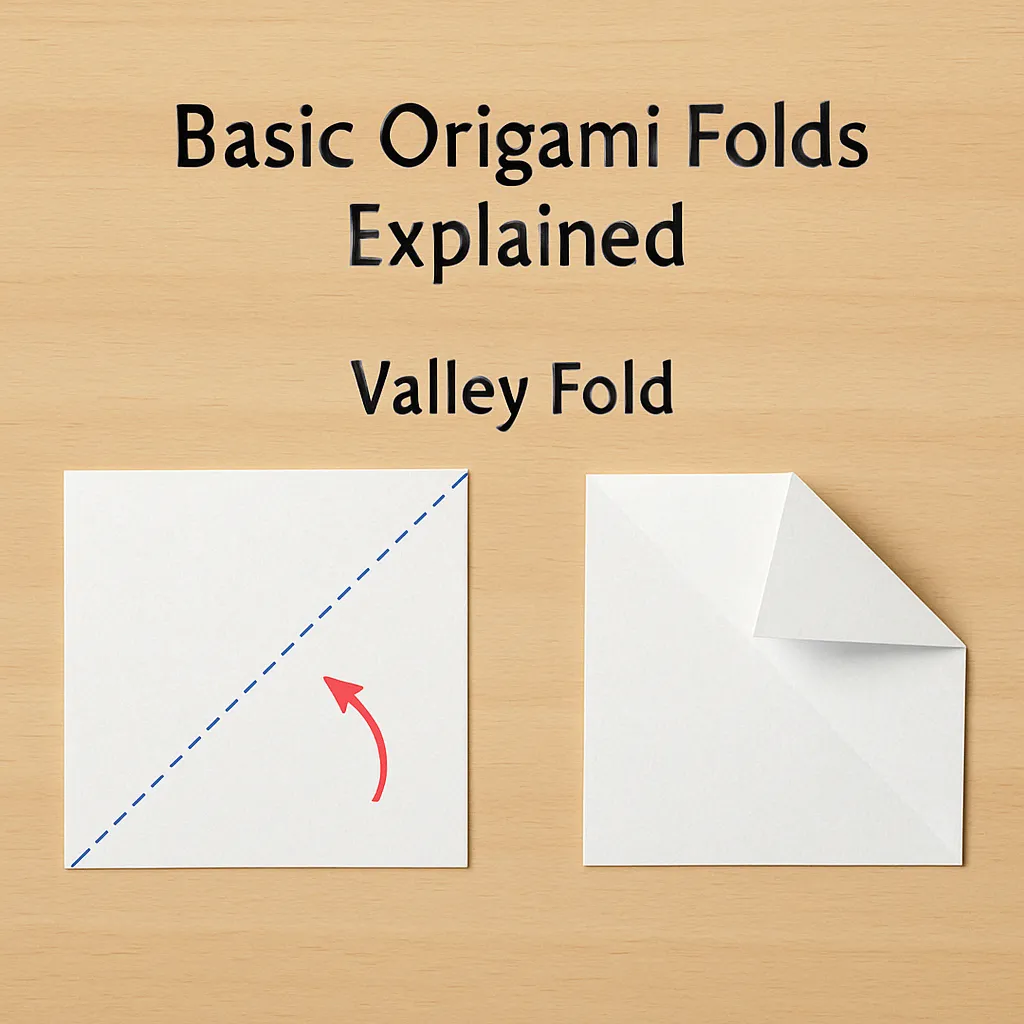
The valley fold is perhaps the most elemental of all the basic origami folds explained in this guide. It’s named for the valley-like shape it creates when viewed from the side—a downward indentation similar to a valley between mountains. This fold serves as the foundation for countless origami models and is often the first technique beginners learn.
How to Execute a Perfect Valley Fold
- Begin with preparation: Start with your paper on a flat surface. The quality of your valley fold affects everything that follows, so take your time with this basic origami fold explained in detail.
- Identify your fold line: Visualize or lightly mark where you want your fold to be. In standard origami notation, valley folds are typically represented by dashed lines.
- Initiate the fold: Gently bend the paper along your intended fold line, bringing one portion of the paper toward you and down.
- Align the edges: If folding in half, ensure the edges align perfectly. Precision in this basic origami fold explained technique is crucial for more complex models.
- Create a sharp crease: Once aligned, run your finger firmly along the fold line from the center outward to both edges. For a particularly crisp fold, use a bone folder or the edge of a ruler.
- Inspect your work: A perfect valley fold should create a straight, clean line with no wavering or bubbling along the crease.
The valley fold may seem simple among the basic origami folds explained here, but mastering it with precision sets the foundation for successful origami of all levels.
The Mountain Fold: Essential Counterpart in Basic Techniques
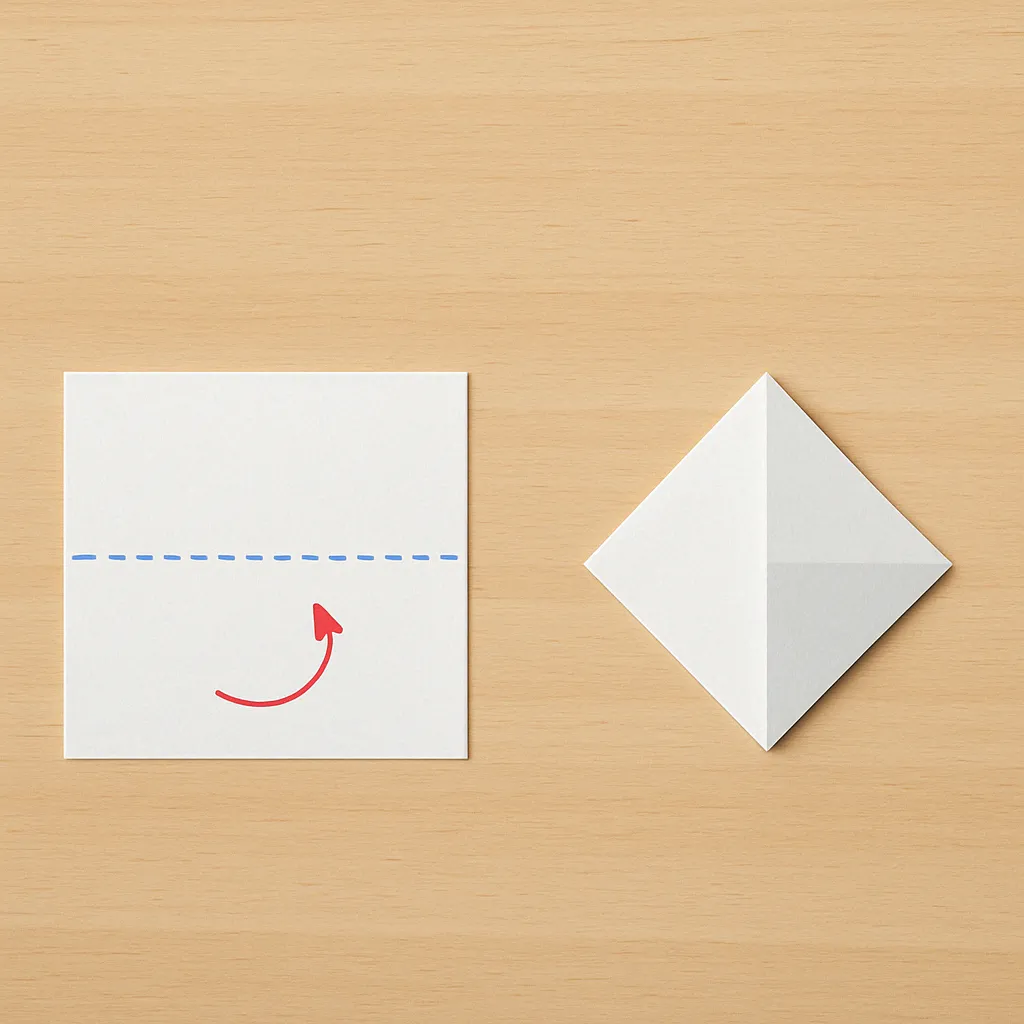
The mountain fold is the conceptual opposite of the valley fold and equally important in the basic origami folds explained in this guide. While a valley fold creates a downward crease, a mountain fold creates an upward one, resembling a mountain peak when viewed from the side. This fundamental technique appears in virtually every origami model beyond the most basic.
Creating Perfect Mountain Folds
- Position your paper: Begin with your paper flat on your work surface. In the hierarchy of basic origami folds explained, the mountain fold often works in concert with valley folds.
- Mark your fold line: In origami diagrams, mountain folds are typically indicated by dash-dot lines or solid lines. Visualize or lightly mark this line on your paper.
- Initiate the fold: Unlike the valley fold, you’ll bend the paper away from you and up, creating a ridge or “mountain” that rises above the paper plane.
- Form the crease: Once the paper is positioned correctly, firmly press along the fold line to create a sharp crease. For this basic origami fold explained technique, pressing from both sides of the paper often helps create cleaner lines.
- Check your mountain ridge: When done correctly, your mountain fold should create a clear ridge that rises above the paper surface when the model is partially opened.
Mountain folds often present more challenges for beginners than valley folds, as they require folding in a less intuitive direction. Practicing this essential basic origami fold explained separately before attempting models that combine multiple fold types will improve your results significantly.
The Inside Reverse Fold: Advancing Beyond Basic Techniques
The inside reverse fold represents a step up in complexity among the basic origami folds explained in this guide. This technique is crucial for creating points, appendages, and directional changes in your models—think of crane heads, animal legs, or flower stems. Mastering this fold opens up significantly more complex origami possibilities.
Mastering the Inside Reverse Fold Technique
- Start with a prepared edge: Inside reverse folds are typically performed on a portion of your model that already has a folded edge. Among the basic origami folds explained, this one builds upon previous folds rather than starting from flat paper.
- Identify the reverse fold line: These are usually diagonal lines extending from the edge to an interior point on your model.
- Open the structure: Gently separate the layers at the edge where you’ll be making the fold.
- Push inward: The key action in this basic origami fold explained is pushing the point inward between the layers, essentially reversing the direction of the existing fold.
- Flatten the new configuration: Once the point is pushed inside, flatten the structure along the new fold lines, creating clean creases.
- Verify the positioning: The reversed section should now point inward rather than outward, with clean fold lines along the sides.
The inside reverse fold is particularly important for animal models where you need to create heads, tails, or limbs that point in different directions. This basic origami fold explained in detail helps create three-dimensionality and character in your models.
The Outside Reverse Fold: Creating Outward Projections
The outside reverse fold is the conceptual counterpart to the inside reverse fold in our basic origami folds explainedguide. While the inside reverse fold directs a point inward, the outside reverse fold creates a point that projects outward from the model. This technique is essential for creating outward-facing features like animal ears, wings, or decorative elements.
Executing a Perfect Outside Reverse Fold
- Begin with a prepared edge: Like the inside reverse fold, this basic origami fold explained technique starts with an already folded edge.
- Locate your fold lines: Identify the diagonal lines that will guide this reverse fold, typically extending from an edge to an interior point.
- Open the layers: Gently separate the layers at the folded edge where you’ll be creating the outside reverse fold.
- Fold outward: Unlike the inside reverse fold, you’ll pull the point outward and away from the interior of the model—a key distinction in these basic origami folds explained.
- Create clean creases: Once the point is positioned correctly, flatten along the new fold lines to create sharp, defined creases.
- Check your work: The newly formed point should project outward from the model, changing the direction of the original fold.
Outside reverse folds often create more dramatic visual effects than inside reverse folds, making them crucial for expressive features in your origami. This basic origami fold explained technique adds character and dimension to your creations.
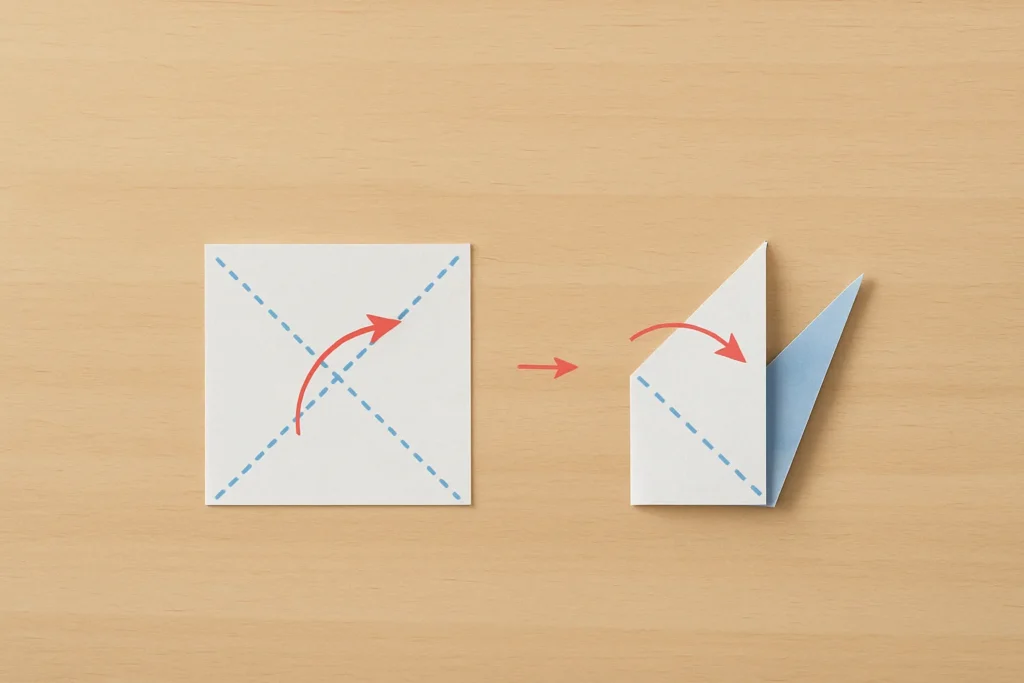
The Squash Fold: Creating Flattened Structures
The squash fold is one of the more complex techniques in our basic origami folds explained guide, but it’s incredibly useful for creating flat, symmetrical structures. This fold essentially collapses a three-dimensional pocket into a flat shape, often creating new points or edges in the process. The squash fold is frequently used in bases that will develop into elaborate models.
The Step-by-Step Squash Fold Process
- Start with a pocket: Squash folds typically begin with a pocket or flap that has an opening. In the sequence of basic origami folds explained, this technique usually comes after several preliminary folds.
- Open the pocket: Gently pull apart the layers to open the pocket, creating space for the squash manipulation.
- Locate the center point: Identify the central point where the fold lines intersect, as this will be the focus of your squash fold.
- Apply gentle pressure: Press down on the top of the pocket toward that center point, allowing the sides to naturally spread outward. This is the defining action in this basic origami fold explained technique.
- Flatten completely: As the structure collapses, guide it into a symmetrical flat shape, ensuring all edges align properly.
- Create sharp creases: Once flattened, reinforce all new crease lines for a clean, defined shape.
The squash fold often creates new flaps or points that become critical elements in your final model. Of all the basic origami folds explained here, this one most dramatically transforms the structure of your paper in a single step.
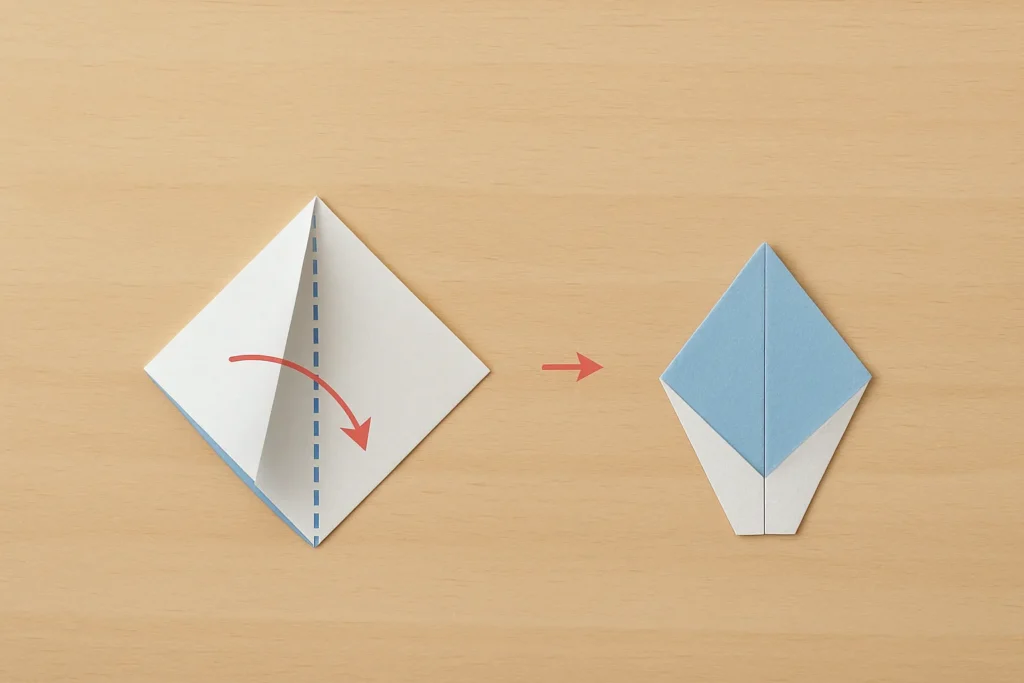
The Petal Fold: Creating Elegant Pointed Structures
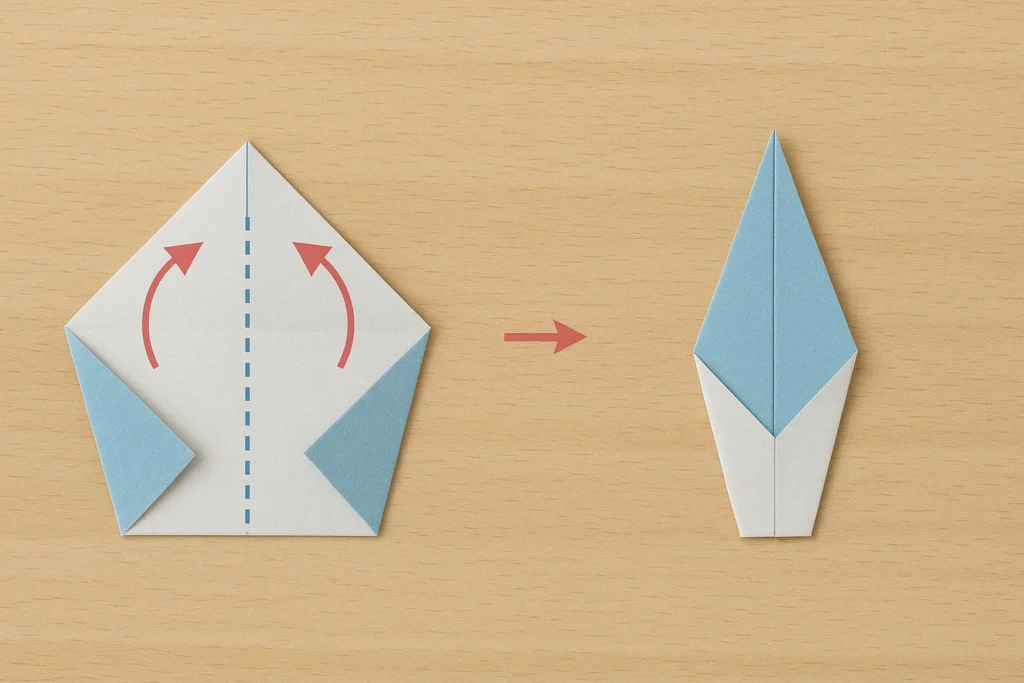
The petal fold ranks among the more elegant techniques in our basic origami folds explained collection. This fold creates pointed, symmetrical shapes reminiscent of flower petals—hence its name. The petal fold is essential for creating decorative elements, flower models, and the refined points seen in advanced geometric designs.
Creating Beautiful Petal Folds
- Begin with a prepared base: Petal folds typically start with a preliminary folded base, often a triangle or diamond shape. In the progression of basic origami folds explained, this technique builds upon simpler folds.
- Identify the fold lines: Locate the central axis and the diagonal fold lines that will guide your petal fold.
- Open the layers: Gently separate the top layer from the base along the central axis.
- Bring side points to center: The key action in this basic origami fold explained technique is bringing the side points of your shape inward to meet at the center line.
- Flatten the structure: As you bring the points inward, the paper will naturally form a petal shape that you’ll flatten along the new fold lines.
- Reinforce the creases: Once the petal shape is formed, firmly crease all fold lines for a clean, defined structure.
Petal folds create elegant pointed structures that add refinement to your origami models. Among the basic origami folds explained in this guide, the petal fold most directly contributes to creating realistic flower forms.
Combining Basic Folds: The Path to Advanced Origami
Now that we’ve explored each of the basic origami folds explained individually, it’s important to understand how they work together. Nearly all origami models, from intermediate to advanced, combine these fundamental techniques in various sequences. The art of origami lies not just in executing individual folds perfectly, but in understanding how they interact to create complex structures.
Consider the classic origami crane, which incorporates virtually all of the basic origami folds explained in this guide:
- Valley and mountain folds create the preliminary base
- Squash folds transform the base into the bird base
- Inside reverse folds create the head and tail
- Petal fold principles help shape the wings
By mastering these fundamental techniques and understanding their relationships, you’ll develop the skill to read and interpret more complex origami diagrams. The basic origami folds explained here provide the vocabulary you need to “read” the language of origami instructions for models of any complexity.
Practical Tips for Perfecting Basic Origami Folds
As you practice the basic origami folds explained in this guide, keep these helpful tips in mind:
- Start with quality paper: The right paper makes a tremendous difference in executing basic folds cleanly. For beginners practicing these basic origami folds explained techniques, standard origami paper (kami) offers an ideal balance of flexibility and structure.
- Focus on precision: Alignment is crucial in origami. Take your time to ensure corners and edges match exactly when folding.
- Create sharp creases: For all the basic origami folds explained here, the sharpness of your creases determines the quality of your final model. Use a bone folder or simply your fingernail to reinforce each crease.
- Practice isolated techniques: Before attempting complex models, practice each of these basic origami folds explained techniques individually on scrap paper.
- Learn to read diagrams: Familiarize yourself with standard origami notation, which uses different line styles to indicate different fold types explained in this guide.
- Be patient with yourself: Some of these basic origami folds explained techniques, particularly the reverse folds and squash folds, take practice to master. Persistence pays off in origami.
Beyond the Basics: Where to Go Next
Now that you understand the basic origami folds explained in this guide, you have a solid foundation for exploring more complex origami. Here are some suggested next steps:
- Practice classic models: Try creating traditional designs that incorporate all of these basic techniques, such as the crane, frog, or iris flower.
- Learn intermediate folds: Explore sunk folds, crimp folds, and rabbit ear folds that build upon the basic origami folds explained here.
- Study origami bases: Discover how these fundamental techniques combine to create standard bases like the bird base, frog base, and water bomb base.
- Join the community: Connect with other origami enthusiasts who are also learning these basic origami folds explained techniques through online forums or local groups.
- Develop your own designs: Once comfortable with these techniques, try creating your own simple origami designs by combining basic folds in new ways.
Frequently Asked Questions About Basic Origami Folds
Q: How long does it take to master the basic origami folds explained in this guide?
A: Most beginners can become comfortable with valley and mountain folds in a single practice session. The more complex basic origami folds explained here, like squash folds and reverse folds, typically take several practice sessions to master.
Q: Which paper is best for practicing basic origami folds?
A: For beginners learning the basic origami folds explained techniques, standard origami paper (15cm x 15cm, 70gsm) offers the ideal balance of flexibility and structure. As you advance, you might explore specialty papers.
Q: Do I need special tools to create these basic folds?
A: No special tools are required for the basic origami folds explained in this guide. While a bone folder can help create sharper creases, your fingers are sufficient for learning purposes.
Q: Why do my squash folds look uneven?
A: Squash folds require precise alignment of the center point. Among the basic origami folds explained here, squash folds are particularly sensitive to misalignment in previous steps.
Q: How can I fix mistakes in my folds?
A: For minor misalignments in these basic origami folds explained techniques, carefully unfold and try again. For major creases in the wrong place, it’s often better to start with a fresh sheet of paper.
For more FAQs about origami basics, visit origaminew.com/.
Conclusion: The Foundation of Origami Mastery
The basic origami folds explained in this guide—valley, mountain, inside reverse, outside reverse, squash, and petal folds—form the essential foundation of origami practice. By mastering these fundamental techniques, you’ve taken the first important steps on your origami journey. What makes these basic origami folds explained techniques so valuable is their universal application across thousands of different origami models.
Remember that origami is both an art and a practice—improvement comes with patience and persistence. Each time you execute these basic origami folds explained methods, you’ll gain greater precision and confidence. The beauty of origami lies not just in the finished creation, but in the meditative process of folding itself.
Whether you’re folding for relaxation, education, or artistic expression, the basic origami folds explained here will serve you well in all your paper-folding endeavors. The journey from beginner to experienced folder begins with these fundamental techniques, and there’s always something new to learn and create in the wonderful world of origami.
For a printable PDF version of these basic origami folds explained with additional practice exercises, visit origaminew.com
Happy folding!
Looking to expand your origami knowledge? Explore our complete collection of beginner tutorials at origaminew.com or share your progress in the comments below!
