
Introduction:
Welcome to the divine world of origami angels! This comprehensive tutorial will guide you through creating beautiful paper angels using traditional Japanese folding techniques. Origami angels are among the most popular seasonal paper projects, beloved for their elegant wings, graceful silhouettes, and symbolic meaning. Whether you’re preparing for Christmas decorations, seeking mindful crafting activities, or looking to create meaningful handmade gifts, this step-by-step guide makes crafting paper angels accessible to folders of all experience levels. Our design features a classic angel with dramatic wings and a defined head and body, creating a recognizable figure that can be customized with different paper colors and sizes. While the blue paper demonstrated here creates a striking celestial angel, white or metallic papers are excellent alternatives for traditional holiday decorations. Grab your origami paper, and let’s begin transforming simple squares into heavenly messengers that bring beauty and serenity to any space!
Detailed Step Descriptions:
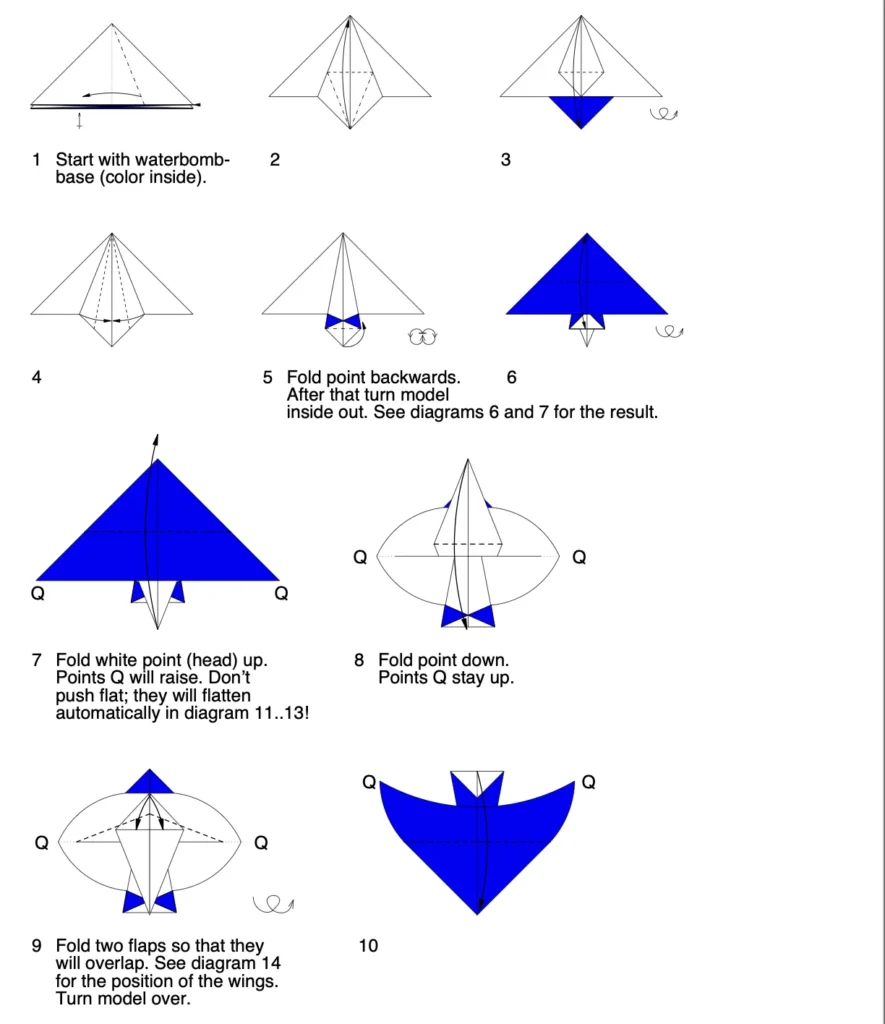
STEP 1: STARTING WITH THE WATERBOMB BASE
Begin with a square sheet of origami paper, positioning it with the colored side facing inward. This strategic color placement ensures your finished angel will display the vibrant blue on the wings while maintaining a white or light-colored body. The waterbomb base is a fundamental origami structure used in many advanced designs, including this elegant angel. Professional origami artists recommend using crisp, new paper for this model to achieve clean folds and dramatic wing definition.
STEP 2: CREATING THE INITIAL FOLDS
Fold the paper to create the essential structural lines that will form the foundation of your origami angel. These preliminary creases establish the symmetry necessary for the angel’s balanced wings and proportional body. Expert folders emphasize making these foundational folds precise and sharp, as they influence the entire angel’s appearance. After completing this step, your paper should display the characteristic waterbomb base shape that will evolve into your angel.
STEP 3: FORMING THE TRIANGULAR STRUCTURE
Fold the blue section upward to create the distinctive triangular form that will become the angel’s dramatic wings. This pivotal fold establishes the three-dimensional quality that makes origami angels stand out as decorative pieces. Popular Christmas origami tutorials highlight this step as essential for creating the recognizable angelic silhouette. The contrast between the white and blue sections begins to define the angel’s body and wings more clearly.
STEP 4: DEFINING THE CENTRAL STRUCTURE
Create the central folds that establish the angel’s body structure and wing positioning. These precise creases determine how prominently the wings will display and how balanced your origami angel will appear. Traditional origami angel designs rely on these structural folds to create the impression of a figure with outspread wings. Apply even pressure when making these folds to ensure symmetrical wings that will give your angel a harmonious appearance.
STEP 5: FOLDING THE POINT BACKWARDS
Fold the bottom point backwards and turn the model inside out as indicated to begin defining the angel’s form. This transformative step dramatically changes the origami structure from flat to three-dimensional, bringing your angel to life. Holiday origami instructions often emphasize this step as the moment when the angel form begins to become recognizable. Follow the directional arrows carefully to ensure proper execution of this somewhat complex but essential fold.
STEP 6: REVEALING THE ANGEL SILHOUETTE
The inside-out folding reveals the emerging angel shape with its distinctive winged silhouette clearly visible. This stage showcases the beauty of origami transformation—how geometric folds create recognizable figurative forms. Christmas angel origami designs highlight this step where the figure’s characteristic shape becomes apparent. The blue wings now stand in dramatic contrast to the white body, creating the visual impact that makes origami angels popular decorations.
STEP 7: SHAPING THE HEAD AND UPPER BODY
Fold the white point (head) upward while allowing the points marked Q to rise naturally. This critical fold establishes the angel’s head in proportion to its wings and body for a balanced figure. Expert origami designers note that this proportion is key to creating a recognizable and aesthetically pleasing angel form. The points will flatten automatically in subsequent steps, so don’t worry about forcing them at this stage.
STEP 8: DEFINING THE LOWER STRUCTURE
Fold the point downward while maintaining the upward position of the points marked Q. This fold helps establish the lower portion of the angel’s form while preserving the wing structure. Traditional Christmas origami angels feature this distinctive silhouette with clearly defined head and wing sections. The geometric precision of these folds creates the elegant, sacred geometry associated with angel representations.
STEP 9: CREATING WING OVERLAP
Fold the two flaps so they overlap to create more definition in the angel’s wing structure. This technique adds dimension and realism to your origami angel’s wings, making them appear more dynamic. Popular holiday origami models use this overlapping method to create depth in otherwise flat paper designs. After completing this fold, turn the model over to continue with the next sequence of important details.
STEP 10: REVEALING THE FRONT VIEW
The completed front view now displays the angel’s distinctive silhouette with dramatic blue wings. This perspective showcases the balanced proportions and geometric harmony achieved through the previous folding steps. Christmas origami enthusiasts appreciate this stage where the recognizable angel form becomes fully apparent. The contrast between the blue wings and white body creates a striking visual effect perfect for holiday decorations.
STEP 11: FOLDING POINTS R TO K
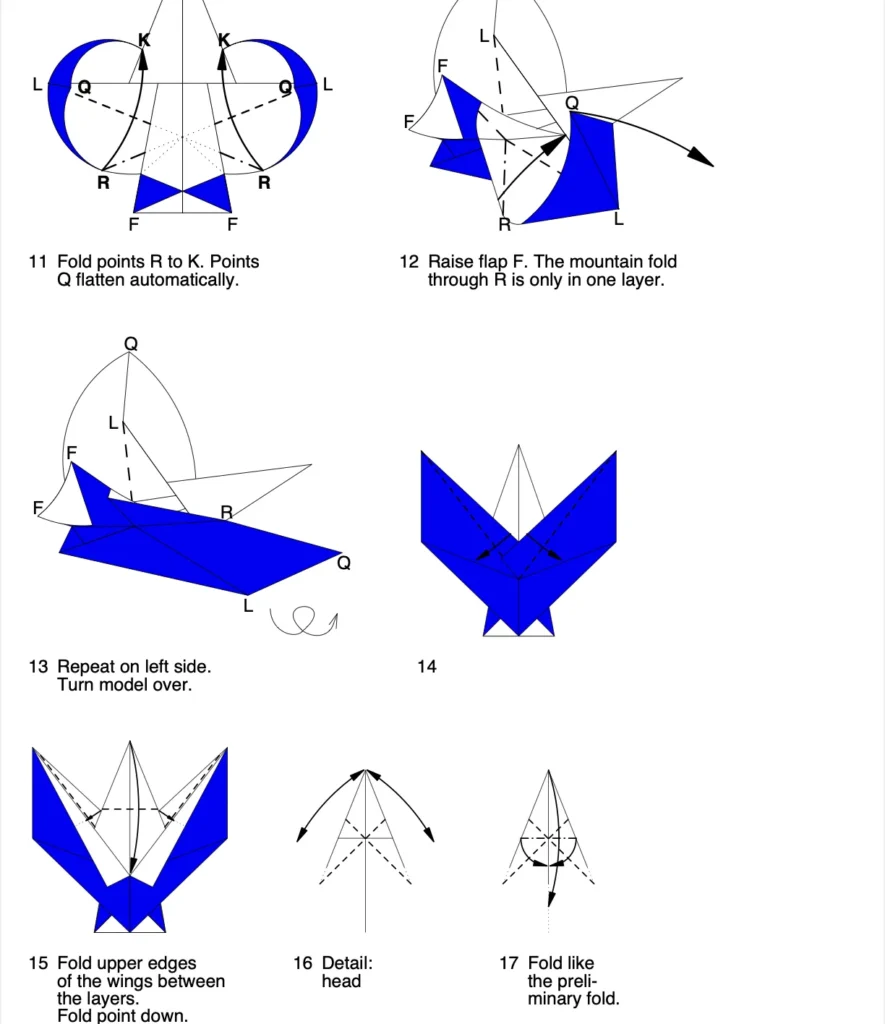
Fold points R upward to points K while allowing points Q to flatten naturally as part of the process. This precise fold further defines the angel’s wing structure and creates more dimensional definition. Advanced origami techniques like these transform flat shapes into the sculptural quality that makes origami angels so appealing. The clear contrast between the blue wings and white body enhances the angel’s visual impact as a decorative piece.
STEP 12: RAISING THE WINGS
Raise flap F while maintaining the mountain fold through point R in a single layer. This critical step creates the three-dimensional quality that makes your origami angel appear to be in flight. Holiday origami decorations often feature these elevated wings that capture the dynamic movement of traditional angel imagery. The careful manipulation of these folds brings your paper angel to life with realistic wing positioning.
STEP 13: REPEATING ON THE OPPOSITE SIDE
Repeat the same folding technique on the left side to ensure your angel has symmetrical wings. This balanced approach creates the harmonious proportions that make origami angels such elegant decorative pieces. Traditional Christmas origami designs emphasize this symmetry as essential to the angel’s sacred geometry. After completing both sides, turn the model over to proceed with the final structural details.
STEP 14: VIEWING THE ANGEL’S FORM
The angel’s distinctive form is now clearly visible with its dramatic wings and proportional body. This stage showcases the elegant silhouette that makes origami angels popular as Christmas ornaments and decorations. Professional origami artists consider this balanced form the hallmark of a well-designed paper angel. The geometric precision and clean lines demonstrate why origami angels have become classic holiday crafts.
STEP 15: REFINING THE WING EDGES
Fold the upper edges of the wings between the layers to create more definition and refinement. This detailed fold adds sophistication to your origami angel’s wings, making them appear more graceful and dynamic. Holiday paper craft enthusiasts appreciate these finishing touches that elevate simple origami to artistic decorations. Complete this step by folding the point downward to maintain the angel’s proportional balance.
STEPS 16-17: DETAILING THE HEAD
Create detailed folds in the head section to add character and dimension to your origami angel. These precise creases define the angel’s face and head structure, bringing personality to your paper creation. Christmas origami tutorials emphasize these details that transform geometric shapes into recognizable figures. The preliminary fold technique mentioned creates the foundation for the angel’s distinctive facial features.
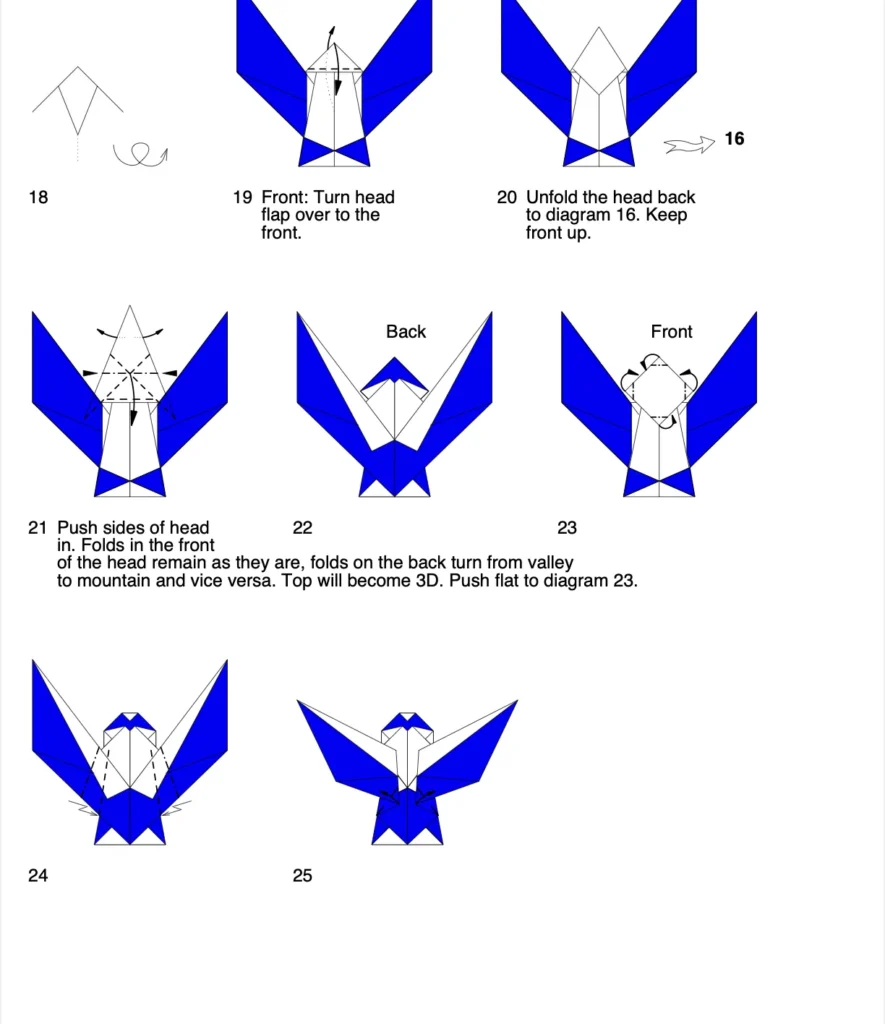
STEPS 18-20: FORMING THE HEAD STRUCTURE
Turn and fold the head flap to create more definition in your origami angel’s face. This sequence of folds transforms the simple point into a more structured head with dimensional qualities. Traditional angel origami designs focus on these details that give the figure a more lifelike appearance. Carefully unfold and refold as directed to achieve the proper structure while keeping the front section upright.
STEPS 21-23: CREATING THREE-DIMENSIONAL FEATURES
Push the sides of the head inward to create three-dimensional structure in your origami angel’s face. This advanced technique transforms flat folds into sculptural elements that enhance your angel’s realistic appearance. Expert holiday origami instructions include these three-dimensional manipulations that elevate basic models. Note how the folds on the front remain as they are while back folds transform from valley to mountain and vice versa.
STEPS 24-25: REFINING THE ANGEL’S FORM
Continue refining your origami angel by adjusting and setting the folds to enhance its three-dimensional quality. These final structural adjustments bring all previous folding work together into a cohesive, balanced figure. Christmas origami enthusiasts appreciate these refinements that create a polished, display-worthy angel. The distinctive wings and proportional body now clearly present the classic angel silhouette perfect for holiday decorations.

STEPS 26-27: COMPLETING YOUR ORIGAMI ANGEL
Make the final adjustments to your angel, including gently curving the wings for a more natural appearance. This last touch adds grace and movement to your origami angel, making it appear as if in gentle flight. Traditional Christmas angel decorations feature these curved wings that suggest heavenly movement and presence. Your completed origami angel is now ready to display as a beautiful holiday decoration, ornament, or thoughtful handmade gift.
Conclusion:
Congratulations on creating your beautiful origami angel! Through a sequence of precise folds and careful shaping, you’ve transformed a simple square of paper into a heavenly messenger that captures the grace and symbolism of traditional angel imagery. Your finished creation embodies both the geometric precision of origami art and the spiritual significance angels hold in holiday traditions. Whether you display your paper angel as a Christmas tree ornament, incorporate it into seasonal decorations, or give it as a meaningful handmade gift, it carries with it the care and intention of your creative process. The techniques you’ve learned—from foundational bases to three-dimensional shaping—provide excellent skills that transfer to many other origami models. We hope this tutorial has brought you both joy in the creative process and satisfaction in your beautiful finished angel. As these messengers traditionally bring blessings, may your origami angels bring beauty and serenity to your space this holiday season and beyond!
- Explore our complete Christmas origami collection → Discover more holiday designs including origami stars, Santas, Christmas trees, and other seasonal decorations.
- Master essential origami techniques for angels → Learn specialized folding methods used in this angel tutorial, including wing formation and three-dimensional shaping.
- Best papers for origami angels → Find out which papers create the most beautiful and durable origami angels, with tips on color selection for different effects.
- Create a complete origami nativity scene → Learn how to complement your angel with other origami figures to create a complete holiday nativity display.
- Origami angel variations and adaptations → Discover different styles of origami angels, from simple designs for beginners to complex models with additional details.
