
Introduction:
Welcome to our delightful origami giraffe tutorial! This charming paper folding project brings the tallest land animal to life through simple yet effective folding techniques. Perfect for beginners, children, and animal enthusiasts, this origami giraffe captures the distinctive long neck and elegant proportions that make these safari animals so fascinating. What makes this design special is its recognizable silhouette achieved through straightforward folds, with only one simple cut to create the distinctive legs. The warm orange-yellow paper shown creates a perfect giraffe coloration, though patterned paper with spots would add another layer of realism to your creation. Whether you’re crafting for a zoo-themed party, creating an African safari animal collection, teaching children about wildlife, or simply enjoying a relaxing origami session, this giraffe model offers both simplicity and charm. In just eight steps, you’ll transform a square piece of paper into a recognizable giraffe that stands proudly on its own. Let’s embark on this paper safari adventure and create your very own miniature giraffe!
Detailed Step Descriptions:
STEP 1: CREATING THE INITIAL FOLD FOR ORIGAMI GIRAFFE

Begin your origami giraffe by folding the square paper in half along the dotted line and then unfolding to create a central crease. This foundational fold establishes the vertical axis that will define the symmetry of your giraffe’s body and neck. Simple origami animals for beginners always start with these fundamental reference lines for proper structure. After unfolding, the visible crease serves as an essential guideline for all subsequent folding steps.
STEP 2: FOLDING THE FLAP FOR ORIGAMI GIRAFFE

Fold the flap inward along the indicated lines to create the initial triangular structure. This strategic fold begins narrowing the paper into a form that will eventually become your giraffe’s elongated shape. African animal origami designs often use these preliminary folds to establish the characteristic proportions of safari creatures. The precision of this fold directly influences how well your finished giraffe will capture the animal’s unique silhouette.
STEP 3: CREATING THE NARROW FORM FOR ORIGAMI GIRAFFE

Fold the model in half along the vertical line to create a narrower triangular shape. This important fold substantially reduces the width, beginning to establish the slender proportions characteristic of giraffes. Zoo animal origami tutorials emphasize this narrowing step as crucial for distinguishing different animal species. Press firmly along the entire fold to ensure the two sides align perfectly for proper balance in your paper giraffe.
STEP 4: ROTATING THE MODEL FOR ORIGAMI GIRAFFE
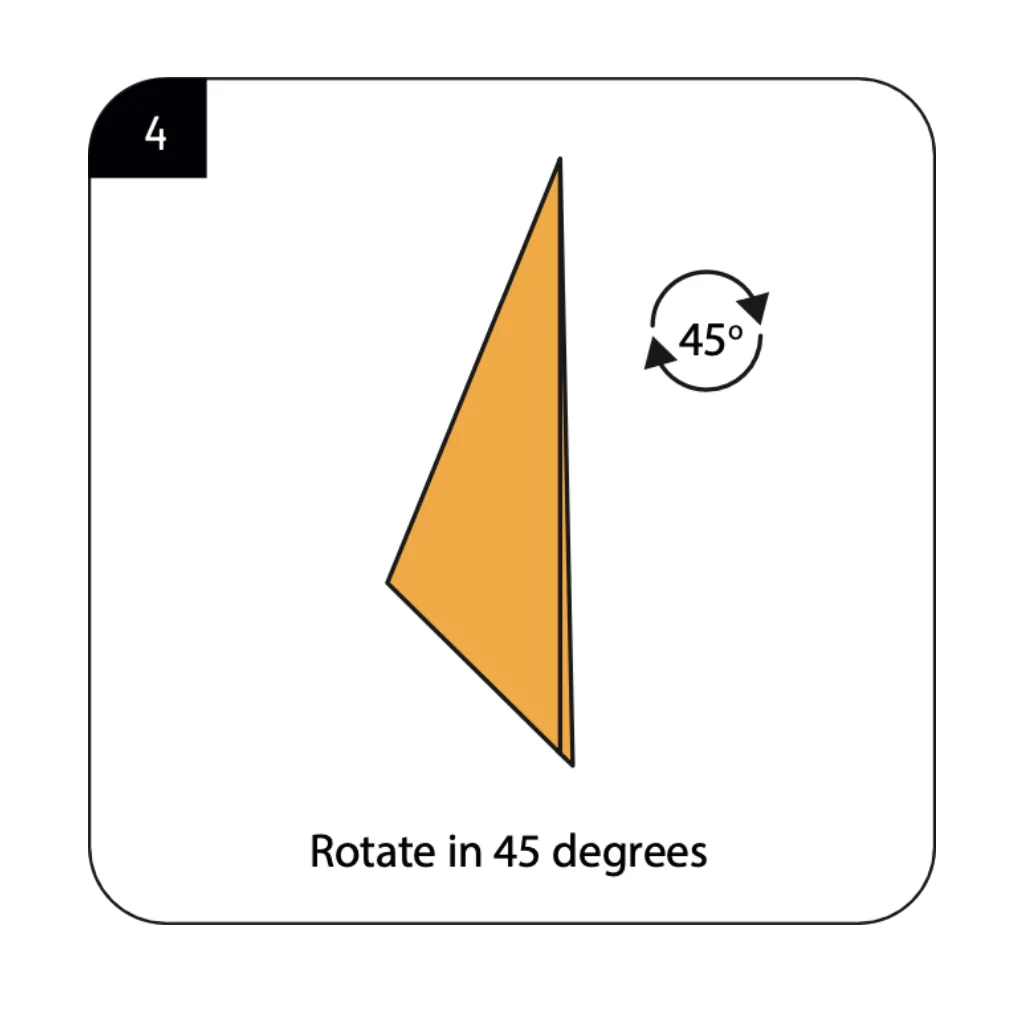
Rotate the entire model 45 degrees as indicated to reorient it for the neck-forming steps. This pivotal rotation positions the paper at the optimal angle for creating the giraffe’s distinctive long neck. Safari animal paper crafts often include this reorientation to facilitate easier access to critical folding areas. The diagonal positioning prepares your model for the defining features that distinguish giraffes from other origami animals.
STEP 5: FORMING THE NECK FOR ORIGAMI GIRAFFE

Execute a reverse fold inside along the dotted lines to begin creating the giraffe’s characteristically long neck. This sophisticated folding technique transforms the pointed corner into the elegant neck that makes giraffes instantly recognizable. Wildlife origami designs rely on reverse folds to create the anatomical features that define different animal species. The careful positioning of this fold determines how elongated and graceful your giraffe’s neck will appear.
STEP 6: DEFINING THE HEAD

Create another reverse fold inside along the dotted lines to form the giraffe’s head and refine its neck shape. This secondary reverse fold adds definition to the upper neck and creates the small, proportional head typical of giraffes. Animal origami tutorials highlight the importance of these detail folds for capturing species-specific characteristics. The angle and length of this fold directly influence how realistic your paper giraffe’s profile will appear.
STEP 7: CREATING THE LEGS
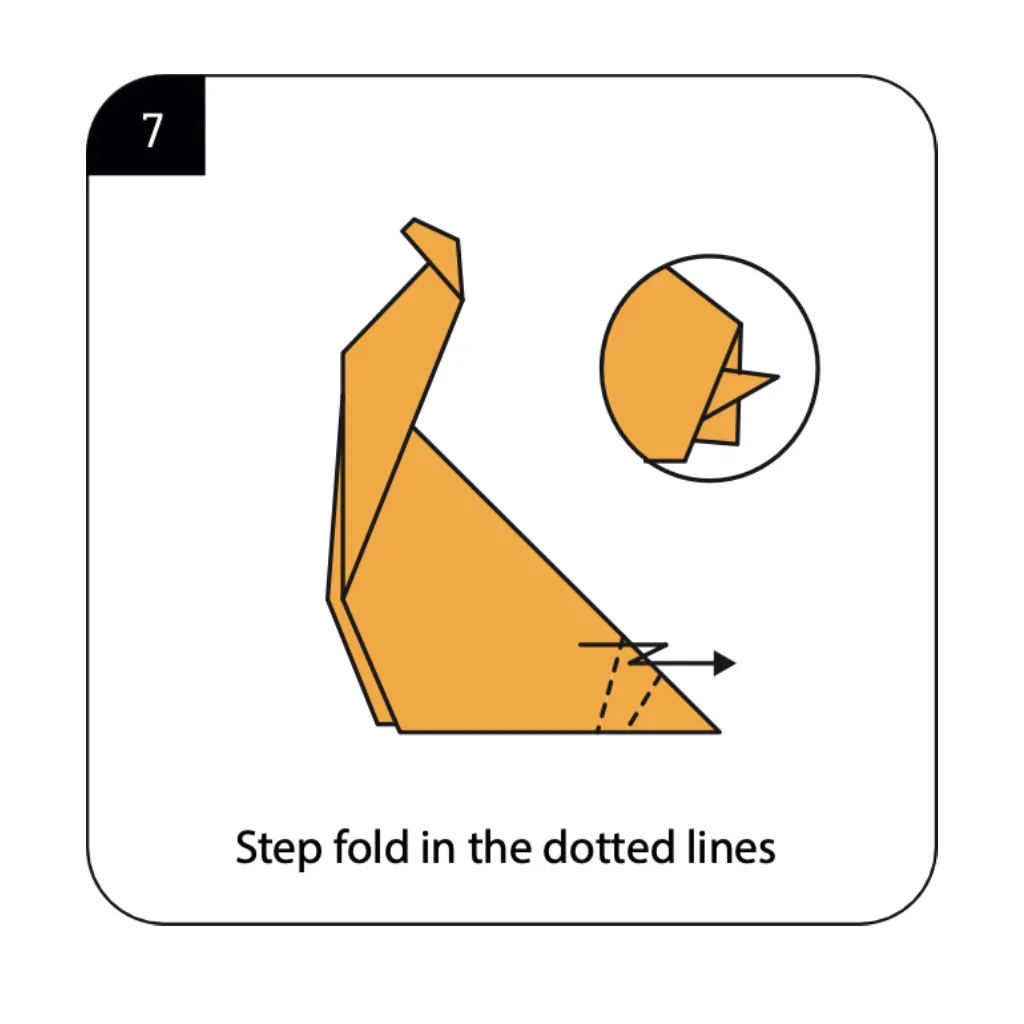
Implement step folds along the dotted lines to begin forming the structure of your giraffe’s front legs. Step folding is an advanced origami technique that creates multiple layers and dimensional leg features. Easy animal origami for kids often simplifies this step while still achieving recognizable quadruped features. The detailed view shows how these precise folds create the impression of legs while maintaining structural stability.
STEP 8: FINALIZING THE LEGS

Cut along the dotted lines as shown to create the separation between the legs, then finish shaping your giraffe. This rare cutting step in origami is essential for achieving the realistic four-legged stance of your paper giraffe. While traditional origami avoids cutting, mixed-technique models sometimes incorporate strategic cuts for enhanced realism. The completed cuts transform your origami creation into a free-standing giraffe with its distinctive tall profile.
STEP 9: COMPLETING YOUR ORIGAMI GIRAFFE

Your origami giraffe is now finished and ready to stand proudly on its four legs! The completed model beautifully captures the distinctive silhouette of a giraffe with its long neck and proportional body. Safari animal origami enthusiasts will appreciate how this simple design effectively represents the world’s tallest land mammal. You can enhance your giraffe by adding small pencil dots to create the characteristic spotted pattern, or simply enjoy its elegant form as is.
Conclusion:
Congratulations on creating your adorable origami giraffe! Through eight carefully designed steps, you’ve transformed a simple square of paper into a recognizable safari animal that captures the unique charm of the world’s tallest land mammal. Your completed giraffe showcases essential features—the characteristically long neck, proportional body, and stable legs that allow it to stand independently. This paper creation makes a wonderful addition to any zoo animal collection, safari-themed displays, or as a unique bookmark or desk decoration. The techniques you’ve learned—reverse folds, strategic rotation, and even the careful cutting step—build valuable skills that transfer to other origami animal projects. We hope this tutorial has sparked your interest in paper wildlife and inspired you to continue exploring the fascinating world of origami animals. Whether you display your giraffe alone or create an entire paper safari, this charming creature brings a touch of African wildlife to any space!
- Explore our complete safari animals collection → Discover more African wildlife origami including elephants, lions, zebras, and other exciting safari creatures.
- Zoo animal origami projects → Find paper folding tutorials for creating a diverse menagerie of wild and exotic animals for kids and adults.
- Master the reverse fold technique → Learn the essential origami method used in this giraffe tutorial for creating dimensionality in animal models.
- Origami for kids: Animal kingdom → Browse child-friendly animal folding projects that help develop fine motor skills while learning about wildlife.
- Creating an origami African safari scene → Combine multiple animal models with landscape elements to create a complete African safari diorama.
