
How to Make an Origami Dog Face
Are you struggling to create that perfect origami dog face? You’re not alone! Origami, the Japanese art of paper folding, can be both rewarding and challenging. While folding an adorable dog face might seem straightforward, there are several pitfalls that can turn your canine creation into an unrecognizable paper mess.
In this guide, we’ll walk through the complete process of making an origami dog face while highlighting the three most common mistakes beginners make—and how you can avoid them. By the end, you’ll have the skills to create a charming paper pooch that will impress your friends and family.
What You’ll Need for Your Origami Dog Face

Before diving into the folding process, let’s ensure you have the right materials:
- Paper: A 15×15 cm origami paper with brown on one side and white on the other is ideal. This will produce a dog face approximately 7.8×14 cm in size.
- Flat surface: A clean table or desk where you can work comfortably.
- Patience: Perhaps the most important ingredient!
Pro Tip: While the traditional size works best for beginners, you can experiment with other colors to create different dog breeds. Just remember that whatever size or color you choose, you must start with a square piece of paper.
Mistake #1: Using the Wrong Type of Paper
One of the biggest mistakes beginners make is using regular printer paper or paper that’s too thick or too thin. Standard origami paper has the perfect weight and texture for crisp folds.
If your paper is too thick, your creases won’t hold well. If it’s too thin, your dog face might look flimsy. Most importantly, regular rectangular paper won’t work—you need a perfect square for proper proportions.
Now, let’s begin the folding process while avoiding this first critical mistake:
Step 1: Create the Base Fold

Start with the white side of your square paper facing up. Fold the paper in half diagonally to create a triangle. Make sure the corners align perfectly—precision matters in origami dog face!
Run your finger firmly along the fold to create a sharp crease. This diagonal fold will serve as the foundation for your dog face.
Step 2: Create the Center Crease

Take one point of your triangle and bring it over to the opposite side. This isn’t a permanent fold—you’re just creating a center crease for reference. Once you’ve made the crease, unfold it.
Common Error: Many beginners press too lightly when making creases. Remember, sharp creases are essential for a well-defined origami dog face figure.
Mistake #2: Rushing Through the Ear Folds
The dog’s ears give your origami dog face creation its characteristic look. Many beginners rush this part or make uneven folds, resulting in asymmetrical ears that throw off the entire appearance.
Step 3: Form the Dog’s Ears

Take the right point of your triangle and fold it down diagonally. This forms one of the dog’s ears. The angle of this fold will determine how perky or droopy your dog’s ears appear.
Now, repeat the same fold on the left side. Take your time to ensure both ears are symmetrical—this is where many beginners go wrong!
Pro Tip: Hold your origami up to the light or against a window to check if both ear folds are at the same angle. Symmetry makes a huge difference in the final appearance.
Step 4: Create the Mouth Area
Fold the bottom top layer up slightly. This small fold creates the mouth area of your dog face. The size of this fold is adjustable—a larger fold will give your dog a bigger mouth, while a smaller one creates a more subtle expression.
Remember that this fold only affects the top layer of paper—don’t fold all layers together.
Mistake #3: Mishandling the Tongue and Nose Details
The final major mistake beginners make is rushing through the detailed parts that give the dog face character. The tongue and nose require precision and patience.
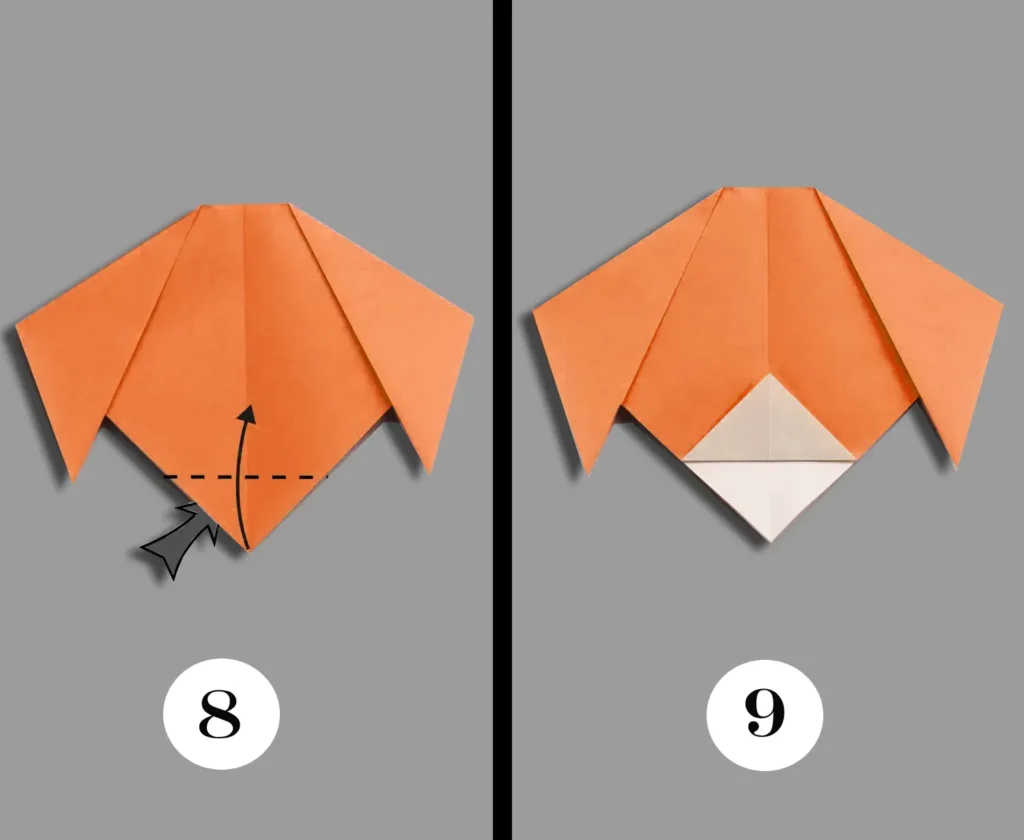
Step 5: Form the Dog’s Tongue

Fold the top point of the small brown triangle down to form a small triangle. This will be the base of the dog’s tongue.
Common Error: Many people fold the tongue too large or too small, which affects the overall balance of the face. Aim for a tongue that’s proportional to the mouth area you created in Step 4.
Step 6: Position the Tongue

Carefully lift the white triangle below and place the small brown tongue underneath it. This creates the illusion that the tongue is coming out of the dog’s mouth.
This step requires delicate handling—another area where beginners often make mistakes by creasing the paper in the wrong places.
Step 7: Create the Dog’s Nose
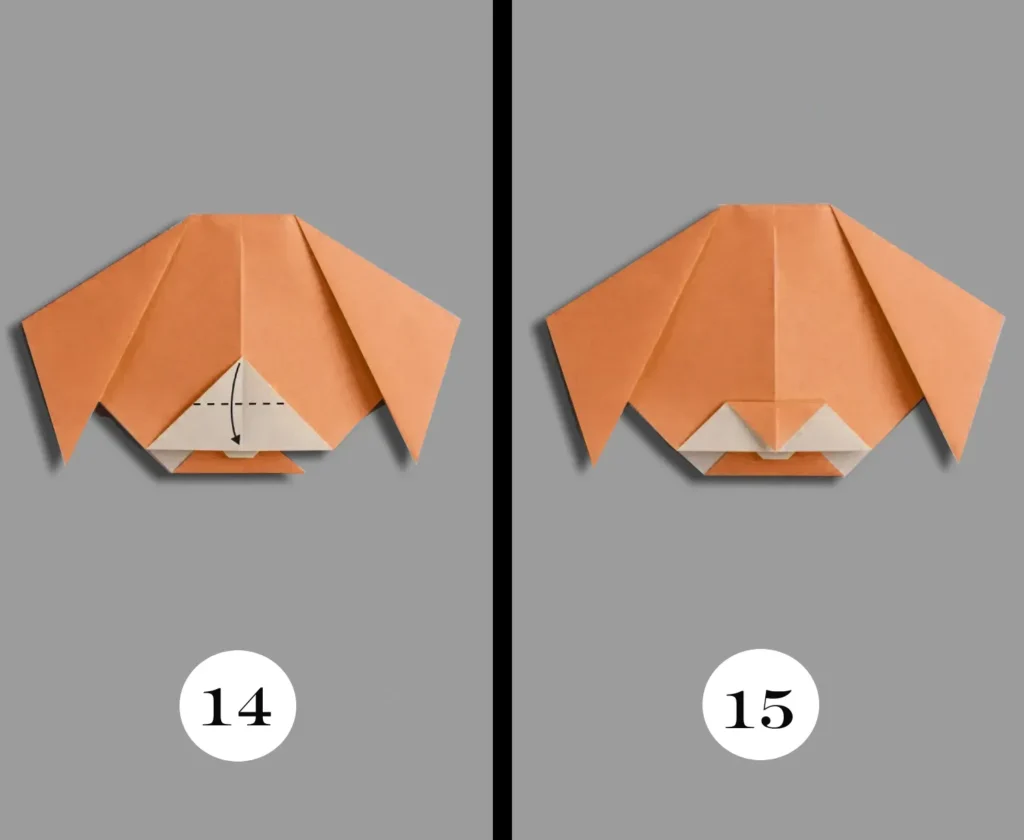
Fold the top point of the white triangle down to form the dog’s nose. The size of this fold determines how prominent your dog’s snout will be.
Pro Tip: For a more three-dimensional effect, you can slightly curve this fold outward instead of making it completely flat.
Step 8: Refine the Face Structure

Flip the paper over. At this point, you should start seeing your dog face taking shape, with the basic features in place.
Step 9: Shape the Cheeks

Fold both the left edge and right edge up slightly to slim the dog’s cheeks. This subtle detail adds character to your origami dog face creation and makes it look more dog-like.
Common Error: Folding the cheeks too much or too little can dramatically change your dog’s appearance. Start with small folds and adjust as needed.
Step 10: Final Positioning

Flip your creation over again. Your cute dog face is almost complete! Take a moment to make any minor adjustments to ensure symmetry.
Step 11: Add Facial Features

Now for the fun part—giving your dog some personality! Use a pen or marker to draw eyes, a nose, and details on the mouth. You can make your dog look happy, curious, or playful through these simple additions.
Pro Tip: Practice drawing the features on a separate piece of paper first if you’re worried about making mistakes.
Step 12: The Final Touch

For an extra cute effect, fold the top of the dog’s head and both ears backward slightly. This creates a more three-dimensional look with a larger-appearing head that many find adorable.
Bringing It All Together: Your Perfect Origami Dog Face
By avoiding these three common mistakes—using the wrong paper, rushing through the ear folds, and mishandling the detailed features—you’ll create a charming origami dog face that looks professional and polished.
Remember that origami dog face is an art that improves with practice. Don’t be discouraged if your first attempt isn’t perfect! Each fold teaches you something new about technique and precision.
Beyond the Basics: Creative Variations
Once you’ve mastered the basic dog face, consider these creative variations:
- Different colors: Try red paper for a fox-like appearance or brown for a more traditional dog look.
- Size variations: Smaller papers create tiny, cute versions perfect for greeting cards.
- Textured paper: Specialty origami paper with patterns can create unique effects.
- Multiple dogs: Create a family of dogs in different sizes and colors!
Origami Benefits: More Than Just a Craft
Did you know that practicing origami dog face offers numerous benefits? Studies have shown that paper folding improves:
- Fine motor skills
- Concentration and focus
- Spatial awareness
- Following sequential instructions
- Patience and perseverance
The Japanese have embraced origami not just as an art form but as a meditative practice that promotes mindfulness and precision.
Conclusion: Your Origami Journey
Learning how to make an origami dog face is just the beginning of what could become a fulfilling hobby. By understanding and avoiding the three common mistakes we’ve discussed—using incorrect materials, rushing through critical folds, and neglecting the details—you’re setting yourself up for success in this ancient art form.
Remember that each fold should be deliberate and precise. Take your time, enjoy the process, and soon you’ll have an adorable paper pooch staring back at you!
Whether you’re creating origami figures to decorate your home, impress friends, or simply enjoy a relaxing activity, this dog face design is a perfect addition to your repertoire. Happy folding!