
Introduction
Origami, the ancient Japanese art of paper folding, offers a delightful way to create charming animal figures from simple sheets of paper. Among the most beloved origami designs is the cat—a perfect project for beginners and experienced folders alike. This origami Basic cat tutorial presents a friendly feline design that captures the playful essence of our furry companions while using straightforward folding techniques accessible to all skill levels. Unlike more complex animal models, this cat design achieves an impressive resemblance to a real cat while requiring only basic folds that anyone can master with a bit of patience. The completed model features recognizable cat elements including triangular ears, a distinctive face, and a proportional body with tail. Whether you’re crafting with children, decorating for cat lovers, or simply enjoying the meditative aspects of paper folding, this step-by-step guide will walk you through creating your own origami Basic cat in just 12 manageable steps. Perfect for classroom activities, rainy day crafts, or as an introduction to the wonderful world of origami animals, this paper cat model demonstrates how simple folds can bring a square sheet of paper to life as an adorable feline friend.
Step-by-Step Instructions
Step 1: Create the Initial Diagonal Crease
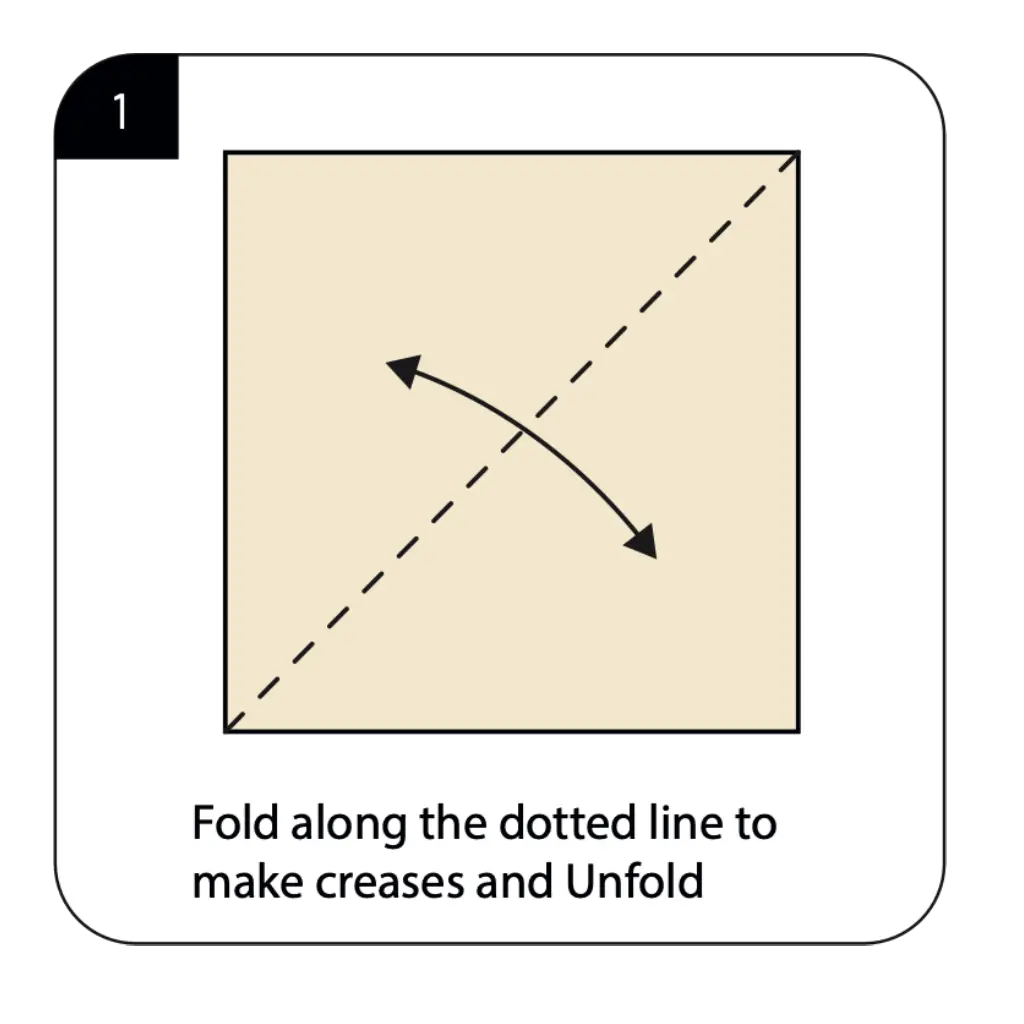
Begin with a square sheet of paper, preferably with color on one side (yellow or tan works well for a golden cat). Fold the paper diagonally from corner to corner, creating a strong crease, then carefully unfold. This initial fold establishes a reference line that will guide all subsequent folds in your origami Basic cat. The precision of this diagonal crease is crucial, as it affects the symmetry and balance of your finished model. Make sure the corners align perfectly and press firmly along the fold line to create a sharp, well-defined crease that will serve as the backbone for your cat structure.
Step 2: Form the Basic Triangle Structure
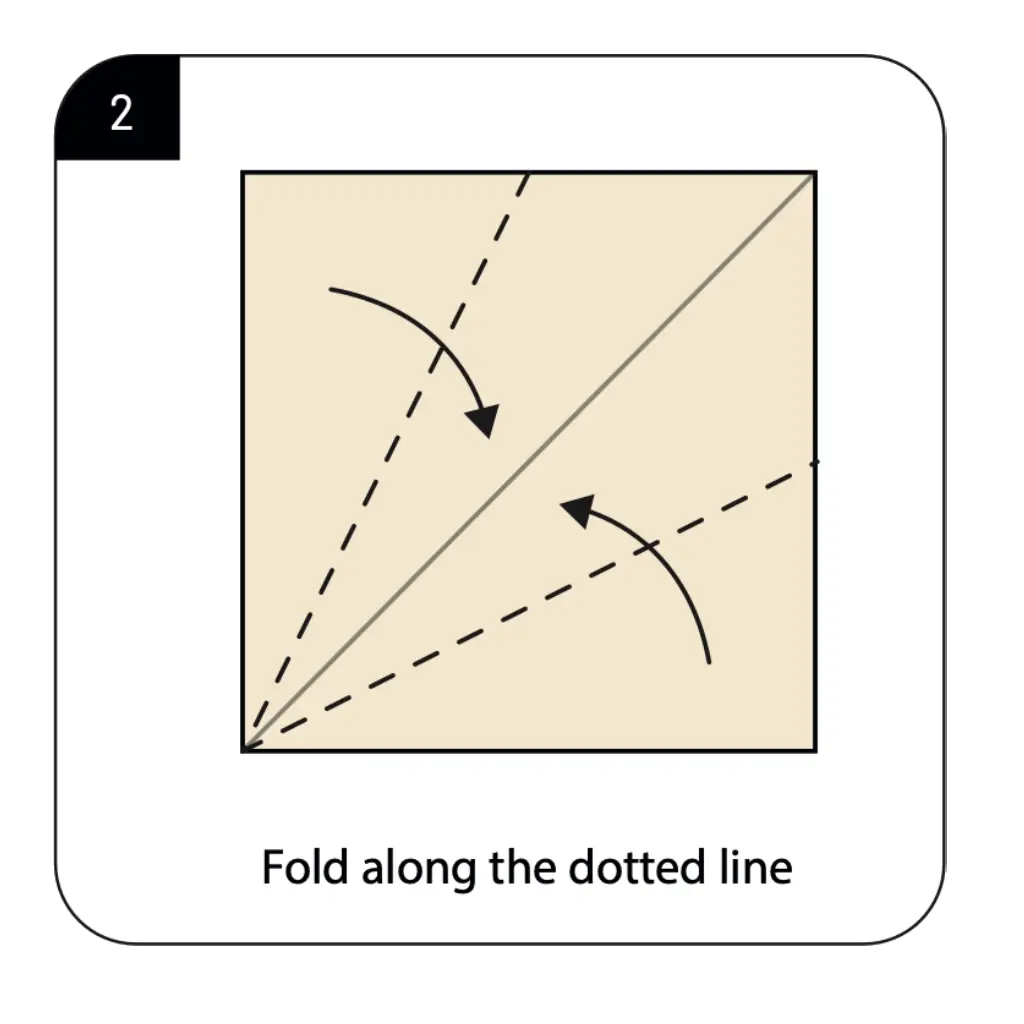
Fold along the dotted lines as shown in the diagram, bringing the corners toward the center to create diagonal folds. This important step begins transforming the square into the foundation shape for your cat model. The accuracy of these diagonal folds directly impacts the proportions and symmetry of your finished cat. Ensure the folds are precise and well-creased, as they establish the framework for your origami Basic cat’s head and body structure. These diagonal folds create the triangular formations that will eventually develop into recognizable feline features.
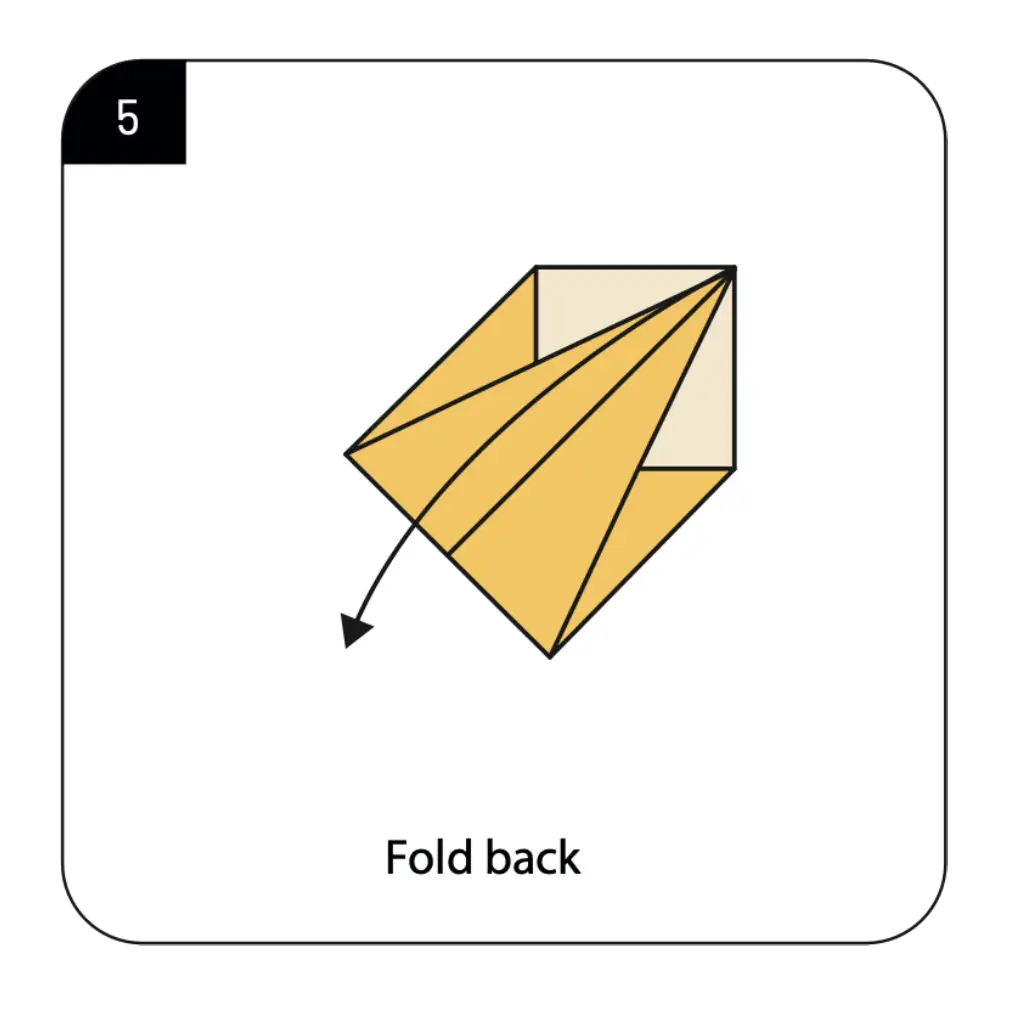
Step 3: Create the First Dimensional Element
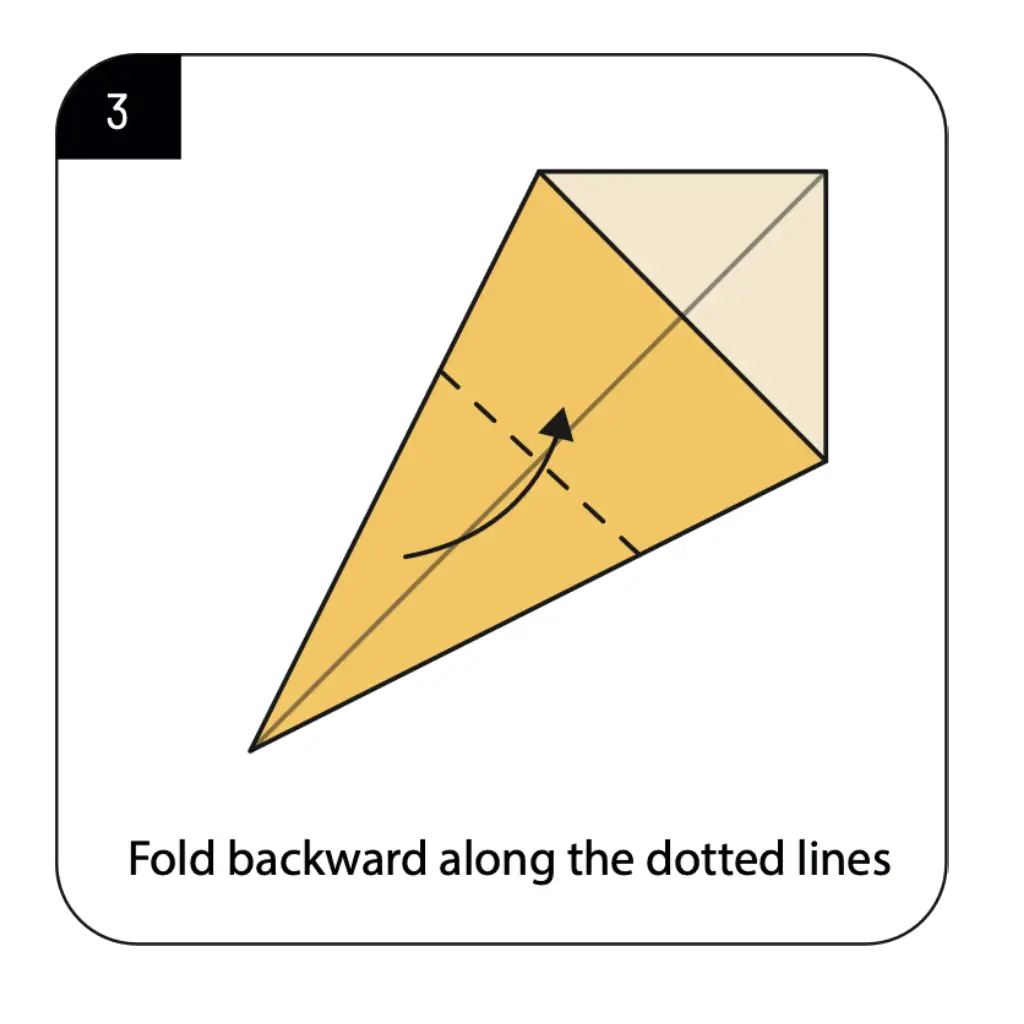
Fold backward along the dotted lines as indicated, creating a three-dimensional component that will become part of your cat’s structure. This fold begins adding depth to your model, moving beyond the flat paper toward a more realistic representation. The direction and angle of this fold are important, as they establish how your cat will take shape in subsequent steps. This backward fold creates a crucial structural element that distinguishes your origami from simpler flat designs and begins defining your cat’s form.
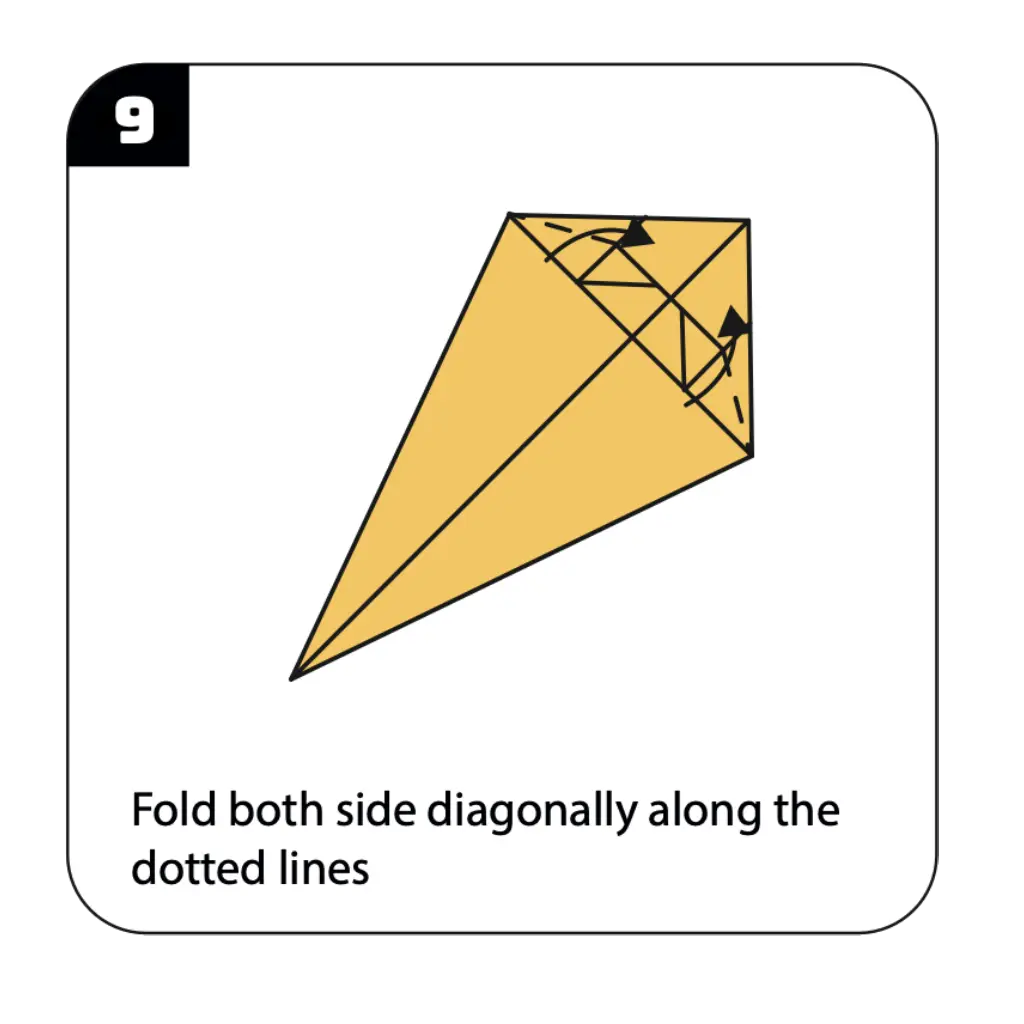
Step 4: Form the Side Flaps
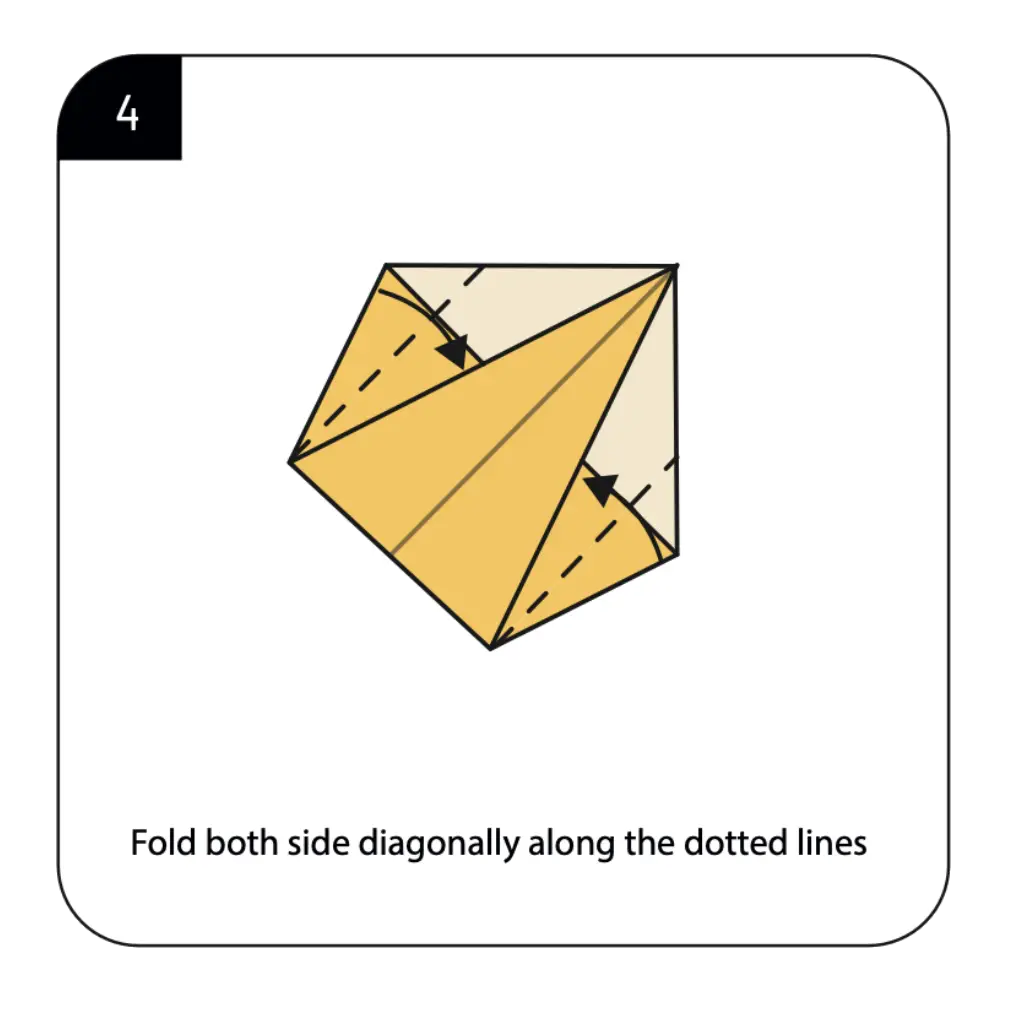
Fold both sides diagonally along the dotted lines as shown, creating angular flaps that will later become part of your cat’s features. This step continues shaping the distinctive elements of your origami Basic cat through precise, symmetrical folds. The accuracy of these diagonal folds affects the balance and proportions of your finished model. Working carefully on both sides ensures matching angles and clean lines that enhance the professional appearance of your paper cat and properly define its emerging structure.
Step 5: Create the Basic Body Structure
Fold back as indicated in the diagram to establish the fundamental body shape of your cat model. This fold helps define the overall silhouette and proportions of your origami Basic cat. The position and angle of this fold significantly impact the three-dimensional quality of your paper creation. This step transforms your folded paper from an abstract shape into a more recognizable animal form by establishing the basic body structure that will develop into your cat’s distinctive shape.
Step 6: Define the Head and Body Sections
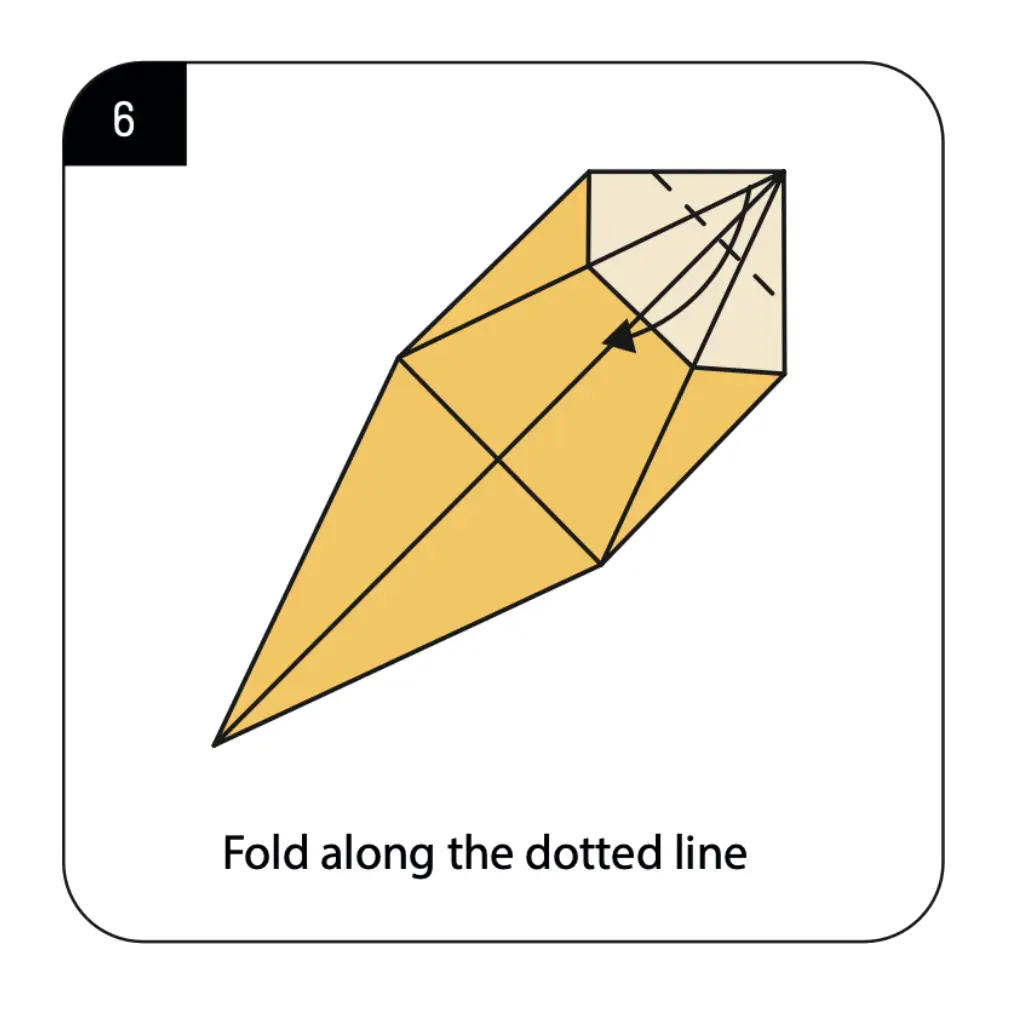
Fold along the dotted line as shown to create definition between the head and body portions of your origami Basic cat. This crucial fold establishes the proportional relationship between these important sections of your paper animal. The precision of this fold directly affects how recognizable your cat will be, as it creates the typical feline body shape. This step brings your origami closer to resembling a cat by establishing the characteristic head-to-body ratio that distinguishes cats from other four-legged animals.
Step 7: Create Angular Body Definition
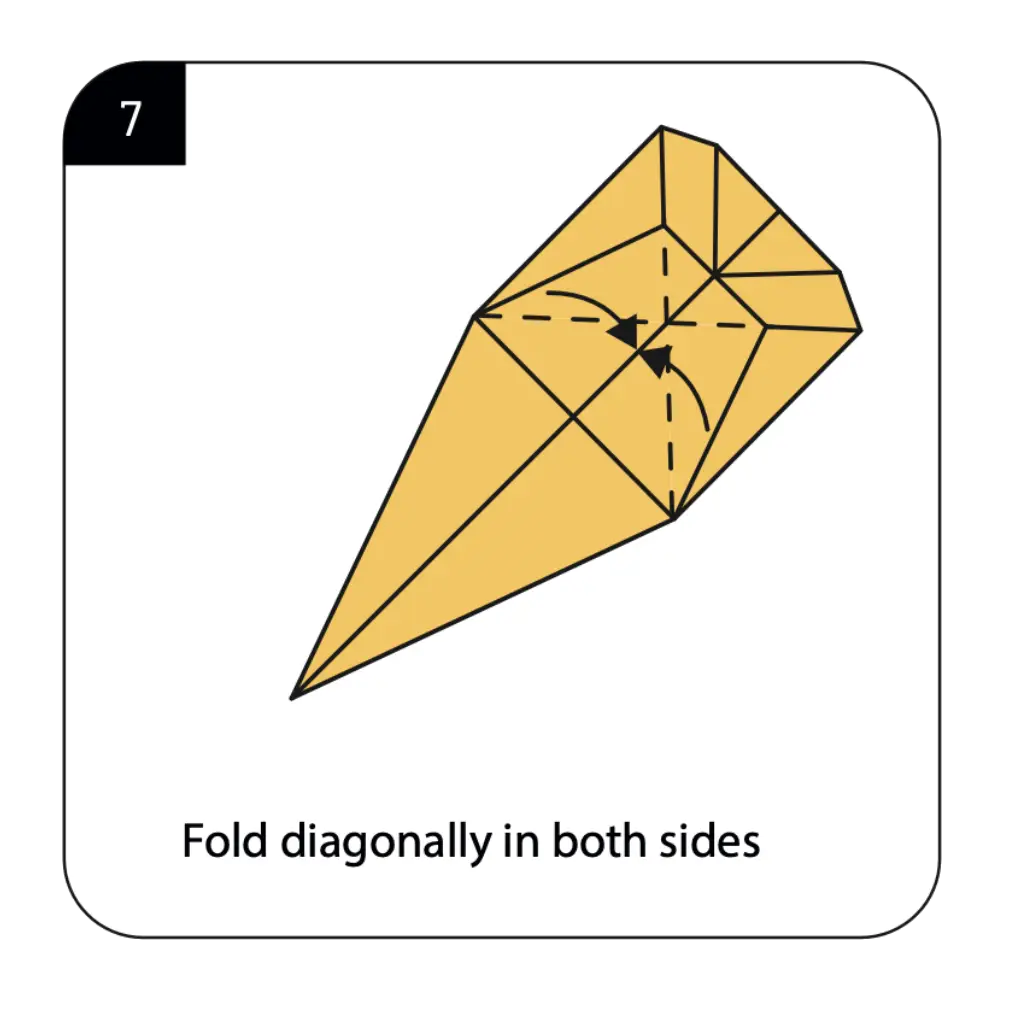
Fold diagonally on both sides as indicated to further define your cat’s body structure and features. These strategic folds enhance the three-dimensional quality of your origami Basic cat and begin establishing its distinctive silhouette. The symmetry and precision of these diagonal folds contribute significantly to the balanced appearance of your paper cat. These angular folds transform flat sections into more complex shapes that better represent the natural contours of a cat’s body structure.
Step 8: Form the Ear Structures
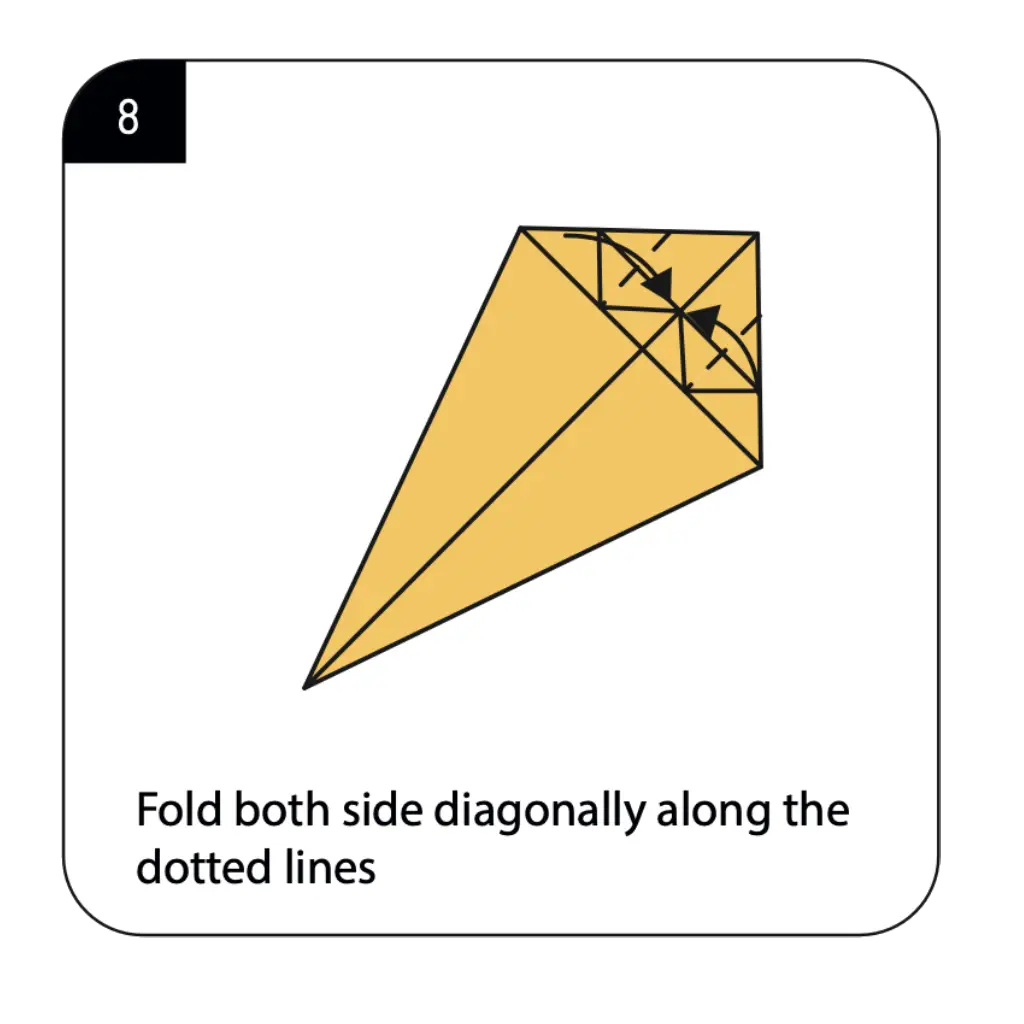
Fold both sides diagonally along the dotted lines as shown to create the triangular ear shapes characteristic of cats. This step is crucial for making your origami instantly recognizable as a feline. The size and position of these ear folds significantly impact the cute appearance of your paper cat. Work carefully to ensure the ear folds are symmetrical and properly positioned to create the alert, attentive expression typical of cats. These distinctive pointed ears are perhaps the most recognizable feature of your origami Basic cat.
Step 9: Create Additional Head Detail
Fold both sides diagonally along the dotted lines again as shown, refining the facial structure of your origami Basic cat. These precise folds enhance the dimensional quality and feline appearance of your paper model. The careful execution of these folds creates more definition in your cat’s face and head region. This step adds important details that make your origami more clearly representative of a cat’s facial structure, completing the characteristic feline head shape.
Step 10: Establish the Final Structure
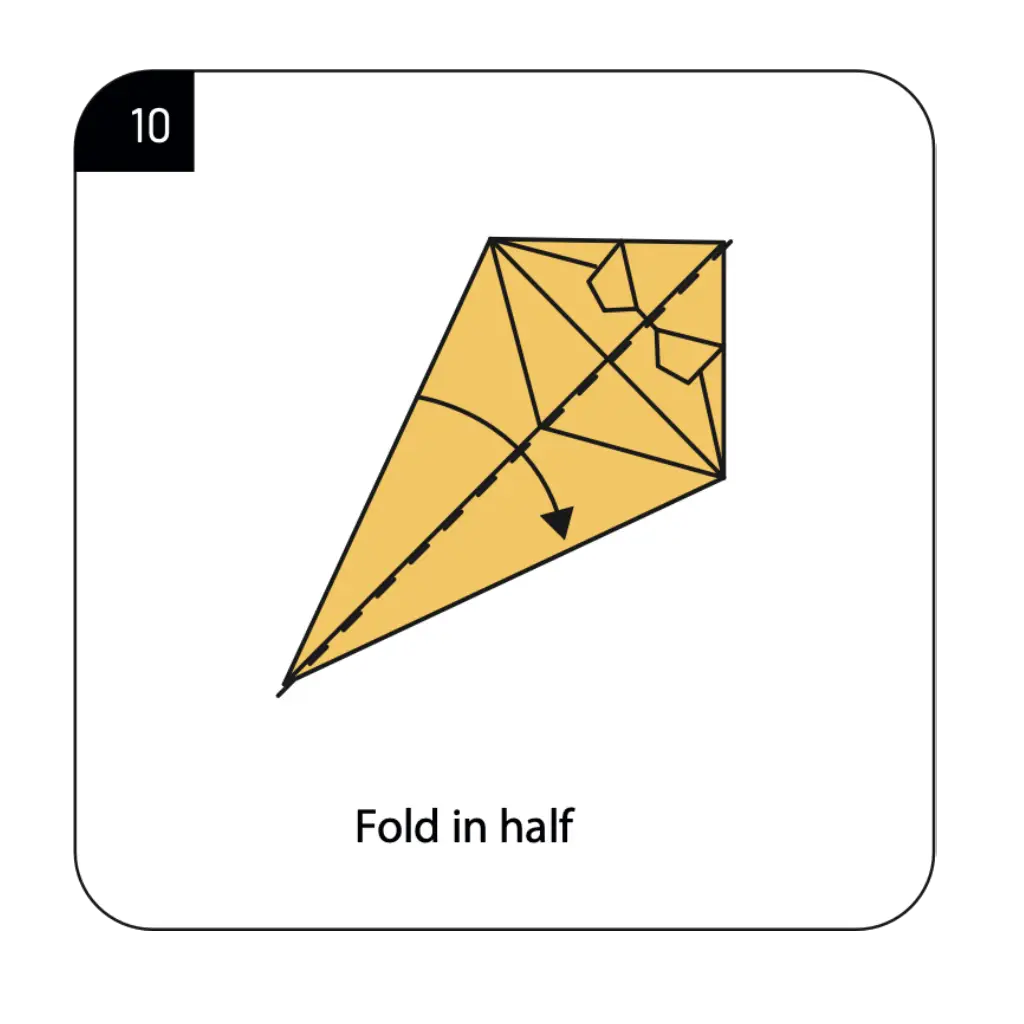
Fold the model in half as indicated to bring together the elements of your origami Basic cat into a cohesive three-dimensional form. This important fold unifies the separate components of your paper cat and establishes its final structural stability. The precision of this center fold affects how well your finished cat will stand and display. This step transforms your flat folded elements into a properly proportioned three-dimensional cat figure with distinctive head, body, and tail regions.
Step 11: Create the Facial Features
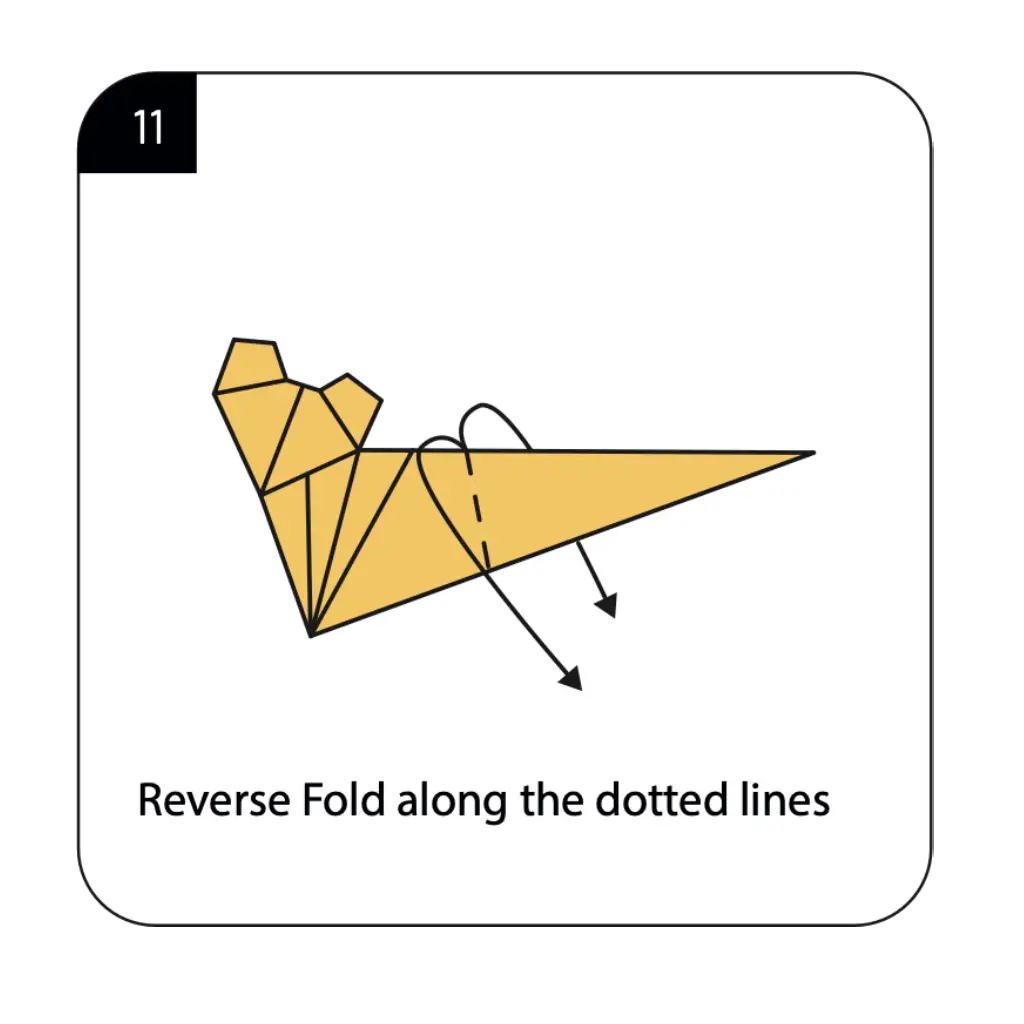
Perform reverse folds along the dotted lines as shown to create definition in the facial area of your cat. These detailed folds establish the muzzle and facial structure that make your origami recognizably feline. The reverse folding technique requires careful manipulation but adds significant character to your paper cat. These essential folds complete the face of your origami Basic cat, giving it personality and the characteristic short muzzle structure of a domestic cat.
Step 12: Complete Your Origami Basic Cat
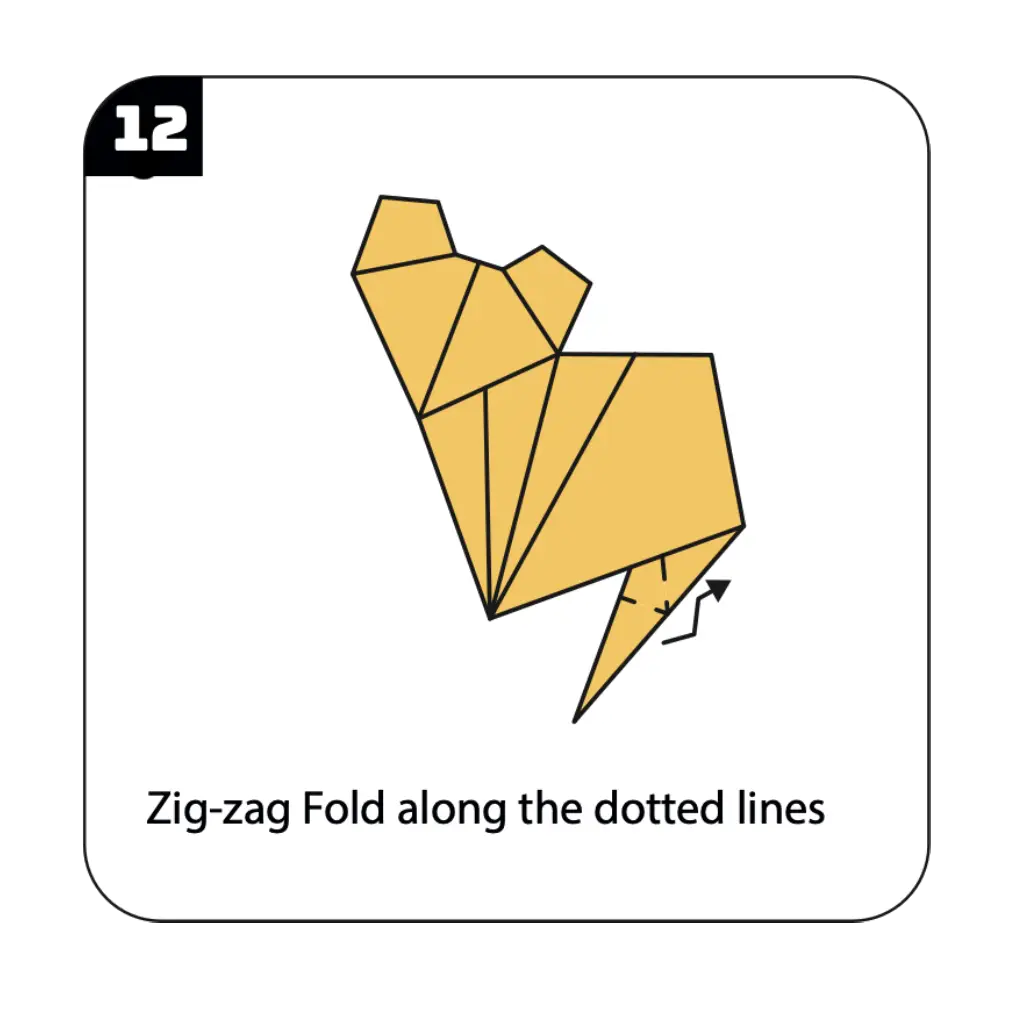
Perform zig-zag folds along the dotted lines as shown to finalize the details of your cat, including the tail and remaining body features. These final folds add the finishing touches that enhance the realism and charm of your paper feline. Take care with these detail folds to ensure clean lines and proper definition. Your origami Basic cat is now complete, displaying the characteristic features that make it immediately recognizable as a cute feline friend, from its triangular ears to its distinctive tail.
Conclusion
Congratulations on creating your origami Basic cat! This charming paper feline represents the perfect blend of simplicity and character that makes origami such a beloved craft. From a simple square sheet, you’ve fashioned a three-dimensional representation that captures the distinctive features and playful essence of our feline friends. The origami Basic cat showcases how thoughtful folding techniques can translate animal characteristics into elegant paper interpretations, combining geometric precision with artistic expression. Your completed model makes a delightful decoration, a thoughtful gift for cat lovers, or the beginning of an origami animal collection. The techniques you’ve learned—including reverse folds, diagonal folds, and three-dimensional shaping—build valuable skills that transfer to many other origami designs. We hope this tutorial has sparked your interest in both paper folding and animal-inspired creations. Remember that practice enhances precision—each cat you fold will be more refined than the last, allowing you to perfect this engaging paper model that celebrates one of our most beloved companion animals.
- “Before starting your origami cat, learn essential paper folding techniques in our Origami Basics for Beginnersguide.”
- “Explore more pet designs in our collection of Origami Animals, including dogs, rabbits, and birds.”
- “Looking for more creative paper projects? Check our Creative Origami Collection for unique and inspiring designs.”
- “Find beautiful ways to display your paper cats with our Decorative Origami Ideas for home and gifts.”
- “Create a complete paper garden scene by adding Origami Flowers for your cat to play in.”
- “Learn how to create multiple cats in different poses using techniques from our Modular Origami Projects guide.”
