
Introduction
Origami, the ancient Japanese art of paper folding, provides wonderful opportunities to celebrate the natural world through creative paper crafts, and few creatures are as beloved and important as the humble bee. This origami bee tutorial transforms a simple square sheet of paper into a charming representation of these essential pollinators, making it perfect for spring celebrations, garden-themed activities, Earth Day projects, or educational lessons about the vital role bees play in our ecosystem. What makes this origami bee particularly delightful is its combination of recognizable features and accessible folding techniques—the distinctive yellow and black coloring, geometric body shape, and characteristic pointed abdomen make it instantly identifiable as a bee while remaining achievable for folders of all skill levels. Unlike more complex insect models, this bee design captures the essential character of these hardworking creatures through just seven straightforward steps, making it ideal for classroom nature studies, springtime craft sessions, or simply as an engaging way to teach children about pollination and environmental stewardship. The completed model serves as both an attractive decoration and an educational tool, sparking conversations about biodiversity, garden ecosystems, and the crucial relationship between bees and flowering plants. Whether you’re creating a paper garden, teaching about beneficial insects, or simply enjoying the meditative aspects of origami, this bee tutorial offers the perfect balance of simplicity and natural charm.
Step-by-Step Instructions
Step 1: Create the Initial Foundation Folds For Origami Bee
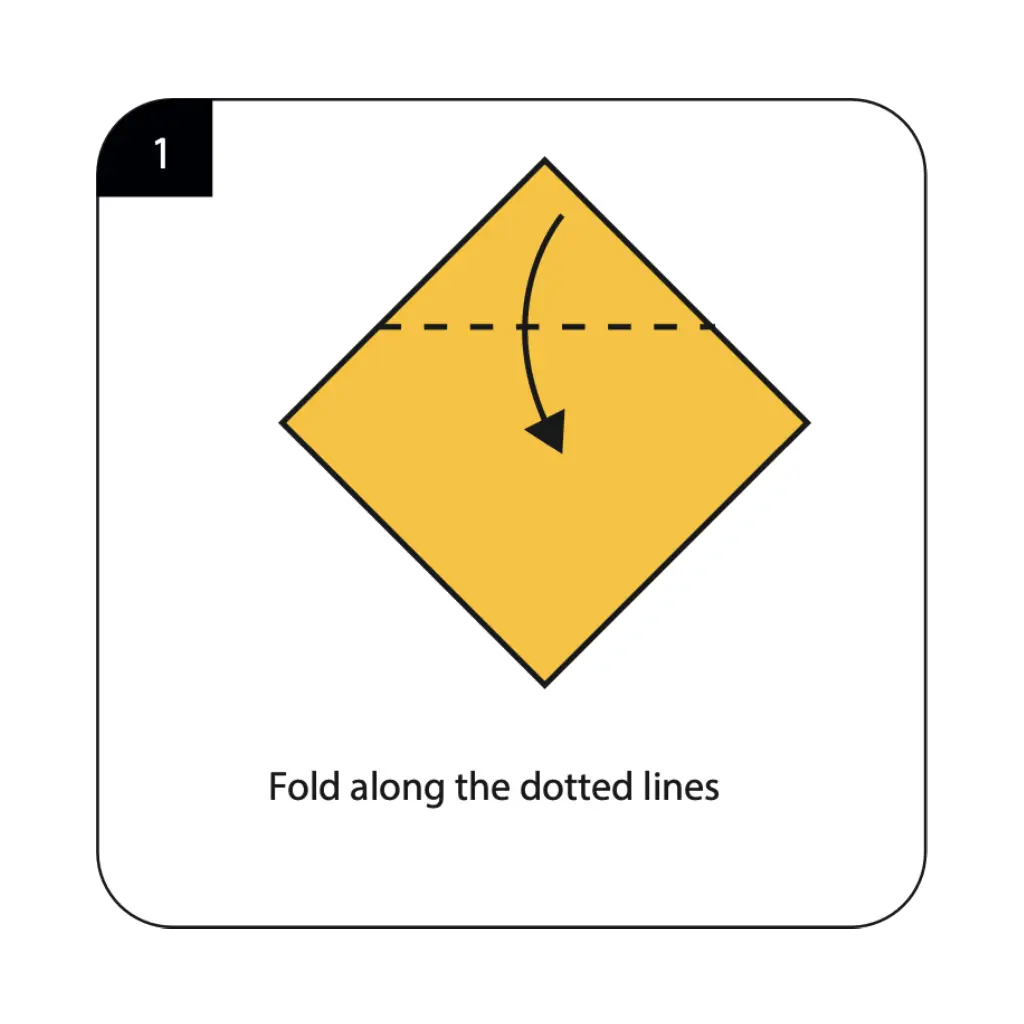
Begin with a square sheet of paper, preferably yellow or gold on one side and white or cream on the other for realistic bee coloring. Fold along the dotted lines as shown in the diagram to establish the basic reference creases that will guide your bee’s construction. These initial folds create the structural framework needed for the bee’s distinctive diamond-shaped body and establish the proportions that make the finished model recognizable as this important pollinator. The precision of these foundation folds is crucial for ensuring proper symmetry in your finished bee, so take care to align the edges perfectly and create sharp, clean creases. These preliminary folds transform the flat square into the angled form that will eventually become your bee’s geometric body structure.
Step 2: Form the Body Structure For Origami Bee

Fold backward along the dotted lines as indicated in the diagram, creating the layered structure that will become your bee’s segmented body. This important step begins establishing the three-dimensional quality that distinguishes your origami bee from simpler flat designs. The backward folds create depth and dimension while maintaining the angular, geometric appearance characteristic of origami insects. Work carefully to ensure these folds are symmetrical and well-aligned, as they establish the foundation for your bee’s distinctive body shape. These structural folds prepare your model for the more complex shaping that will create the bee’s recognizable form in subsequent steps.
Step 3: Establish Reference Creases For Origami Bee

Fold the paper along the dotted lines as shown, then unfold to create permanent crease lines that will guide the advanced shaping of your bee. These reference creases are essential for the proper formation of your bee’s wings and body segments in later steps. Although you unfold at this stage, these creases remain as crucial guidelines that ensure accurate positioning of subsequent folds. The precision of these reference lines directly affects how well your finished bee will capture the proportions and angles of a real bee’s anatomy. Take time to create sharp, well-defined creases that will serve as reliable guides for the complex folding techniques to come.
Step 4: Create the Wing Structure For Origami Bee
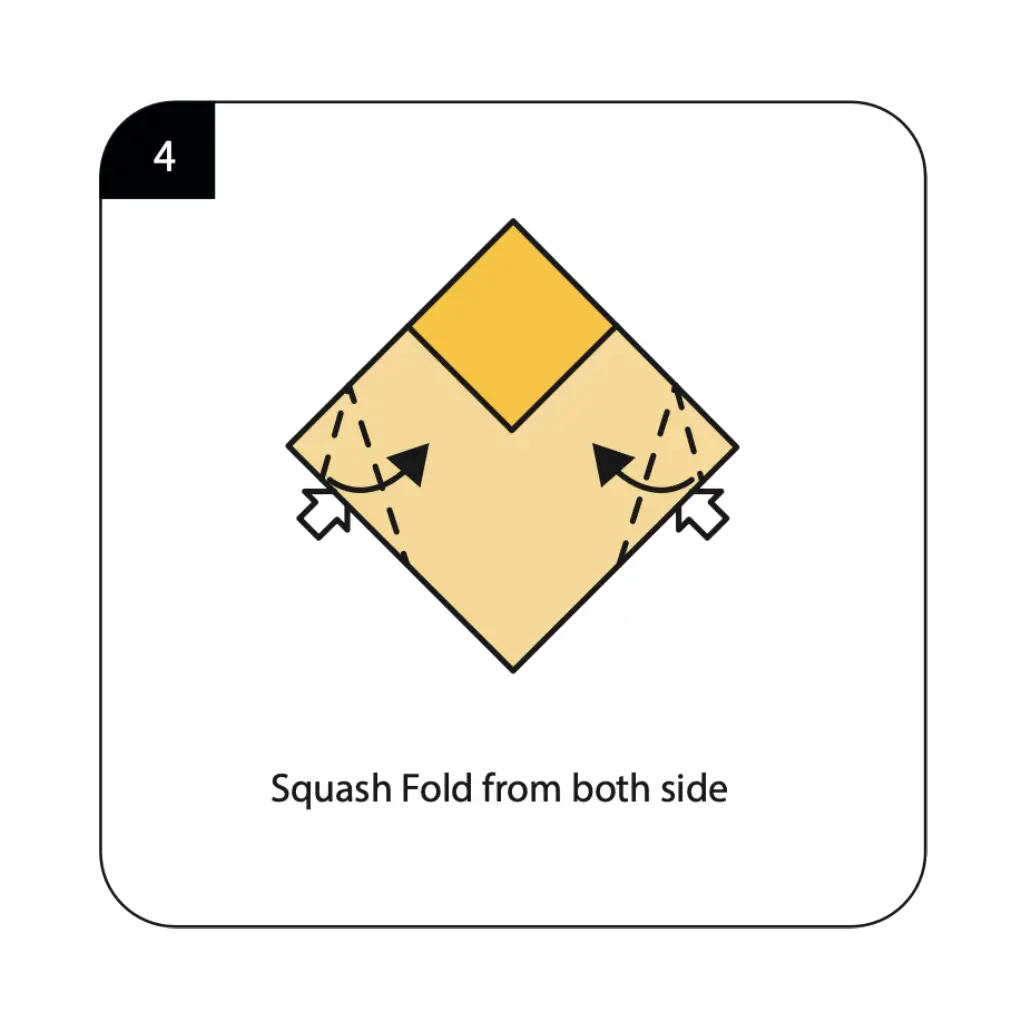
Perform squash folds from both sides as indicated in the diagram. This advanced origami technique creates the bee’s wings by flattening and reshaping specific sections of the folded paper. The squash fold requires careful manipulation of multiple paper layers simultaneously while maintaining the integrity of previous folds. This step is crucial for creating the wing elements that make your origami instantly recognizable as a flying insect. Work slowly and deliberately during this complex fold, ensuring both sides are executed identically for symmetrical wings that enhance the bee’s realistic appearance and balanced proportions.
Step 5: Define the Wing Details
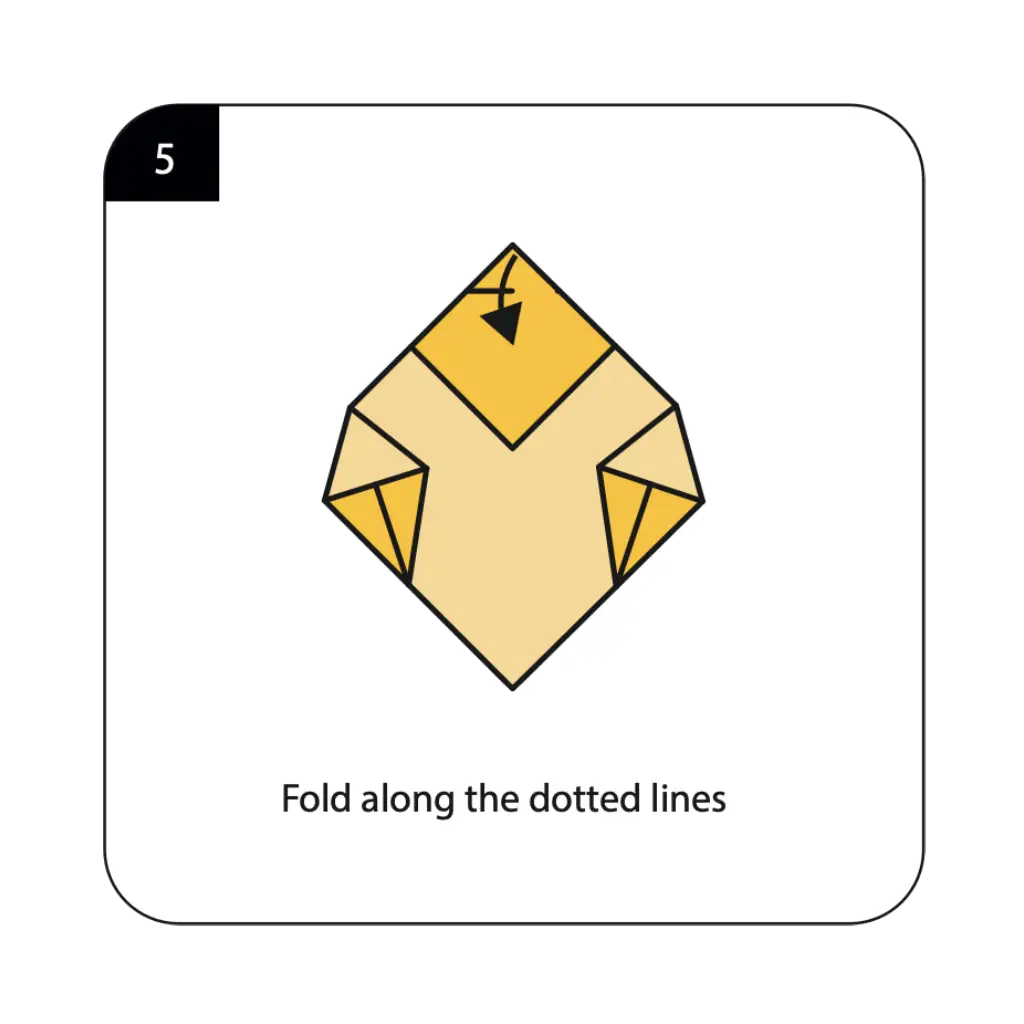
Fold along the dotted lines as shown to refine the wing structure and create more definition in your bee’s flight appendages. These additional folds enhance the dimensional quality of the wings while establishing the proper angles and proportions that characterize bee wing anatomy. The careful execution of these wing-defining folds distinguishes a professional-looking origami bee from simpler versions by adding realistic detail and structural complexity. These refinements require attention to precision but significantly enhance the overall visual impact and recognizability of your paper bee creation, making it clearly identifiable as this important garden pollinator.
Step 6: Complete the Body Shape
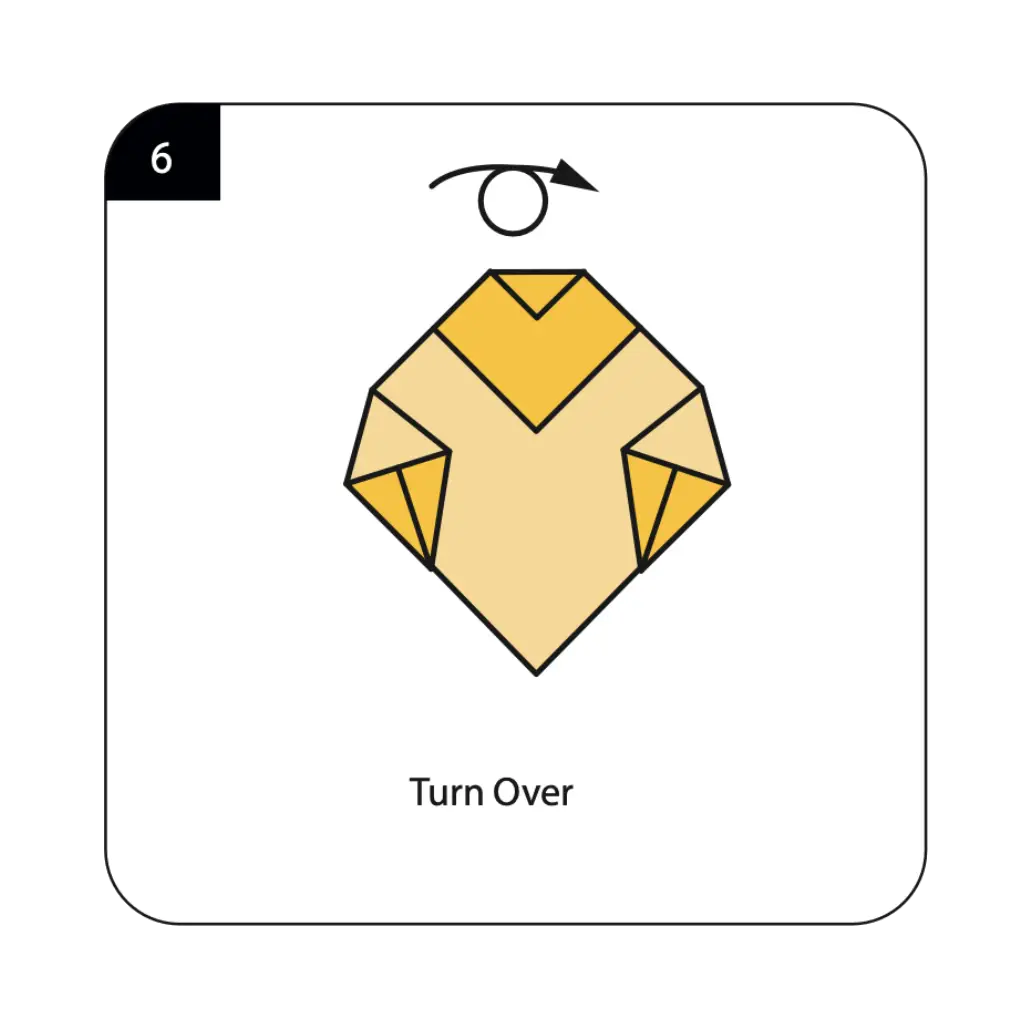
Turn over your model as instructed to prepare for the final shaping that will complete your bee’s distinctive form. This reorientation reveals the surface that will display your bee’s characteristic markings and allows access to the folds needed to finalize the body structure. Handle the partially completed model gently during this transition to preserve all previous folds and maintain the wing and body proportions you’ve established. The turned-over surface provides the ideal canvas for completing your bee’s transformation from geometric folded form to recognizable insect character ready for final decorative details.
Step 7: Finalize Your Origami Bee

Draw the eyes and add distinctive black stripes to complete your origami bee’s transformation into a recognizable pollinator. This creative finishing phase brings personality and life to your geometric paper creation through simple artistic touches that capture the essential visual elements of real bees. The addition of eyes creates character and charm while the black stripes establish the iconic bee coloring that makes your origami instantly identifiable. Your completed origami bee now combines the precision of paper folding with artistic expression, ready to buzz into imaginative play scenarios, educational displays about pollinators, or decorative arrangements celebrating the vital role these creatures play in our natural world.
Conclusion
Congratulations on creating your origami bee! This charming paper pollinator demonstrates how simple folding techniques combined with thoughtful design can create educational and decorative models that celebrate the natural world. From a basic square sheet, you’ve fashioned a recognizable representation of one of our most important beneficial insects, complete with distinctive wings, segmented body, and characteristic bee coloring. The origami bee showcases how paper folding can serve as both an artistic medium and an educational tool, introducing concepts about pollination, biodiversity, and environmental stewardship through hands-on creative activity. Your completed model makes an excellent addition to spring decorations, garden-themed displays, or classroom lessons about the interconnected relationships in nature. The techniques you’ve learned, including squash folds, reference creasing, and artistic finishing, build valuable skills that transfer to many other origami projects while fostering appreciation for both paper crafts and environmental science. We hope this tutorial has sparked interest in both origami and the fascinating world of beneficial insects, encouraging exploration of how these small creatures play enormous roles in maintaining healthy ecosystems. Remember that each bee you create offers opportunities to discuss conservation, garden ecology, and the simple ways we can all help support pollinator populations in our communities and beyond.
- “Before starting your origami bee, master fundamental techniques in our Origami Basics for Beginners guide.”
- “Create a complete garden ecosystem by exploring our Origami Animals Collection featuring butterflies, ladybugs, and other beneficial insects.”
- “Discover more nature-inspired projects in our Creative Origami Gallery for educational and seasonal crafts.”
- “Find beautiful ways to display your paper bees with our Decorative Origami Ideas for spring and garden themes.”
- “Complete your pollinator garden by adding Origami Flowers for your bee to visit and pollinate.”
- “Create an entire hive of bees using techniques from our Modular Origami Projects for impressive educational displays.”
