
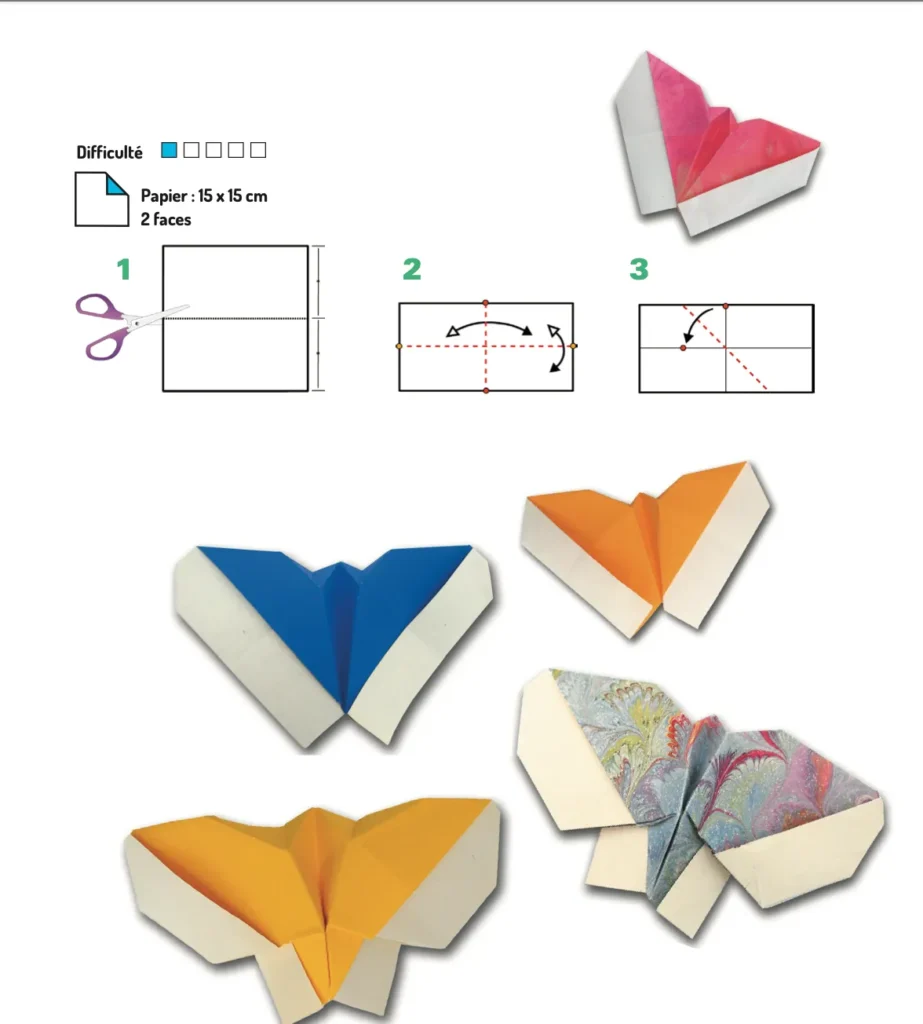
Introduction:
Origami Butterfly Tutorial
Welcome to the enchanting world of origami butterflies! This comprehensive tutorial will guide you through creating delicate paper butterflies using traditional Japanese folding techniques. Butterflies are among the most popular origami designs, beloved for their elegant wings, symmetrical beauty, and symbolic representation of transformation. Whether you’re a beginner just starting your paper folding journey or an experienced origamist looking to expand your repertoire, this step-by-step guide breaks down each fold with clear instructions to ensure success. The butterfly model presented here strikes the perfect balance between simplicity and artistic expression, making it accessible while still producing an impressive result. Grab a square sheet of colorful origami paper—vibrant colors work beautifully for butterflies—and let’s begin crafting these delightful symbols of grace and natural beauty that will brighten any space!
Detailed Step Descriptions:
STEP 4: FOLDING THE RECTANGLES
Fold the rectangular sections in half along the marked lines to establish the foundation of your origami butterfly. This precise folding technique creates the baseline structure that will eventually form the butterfly’s distinctive wings. Expert origami artists recommend using your fingernail to create sharp, clean creases for professional-looking results. The symmetry established in this step is crucial for creating a balanced, natural-looking butterfly with evenly proportioned wings.

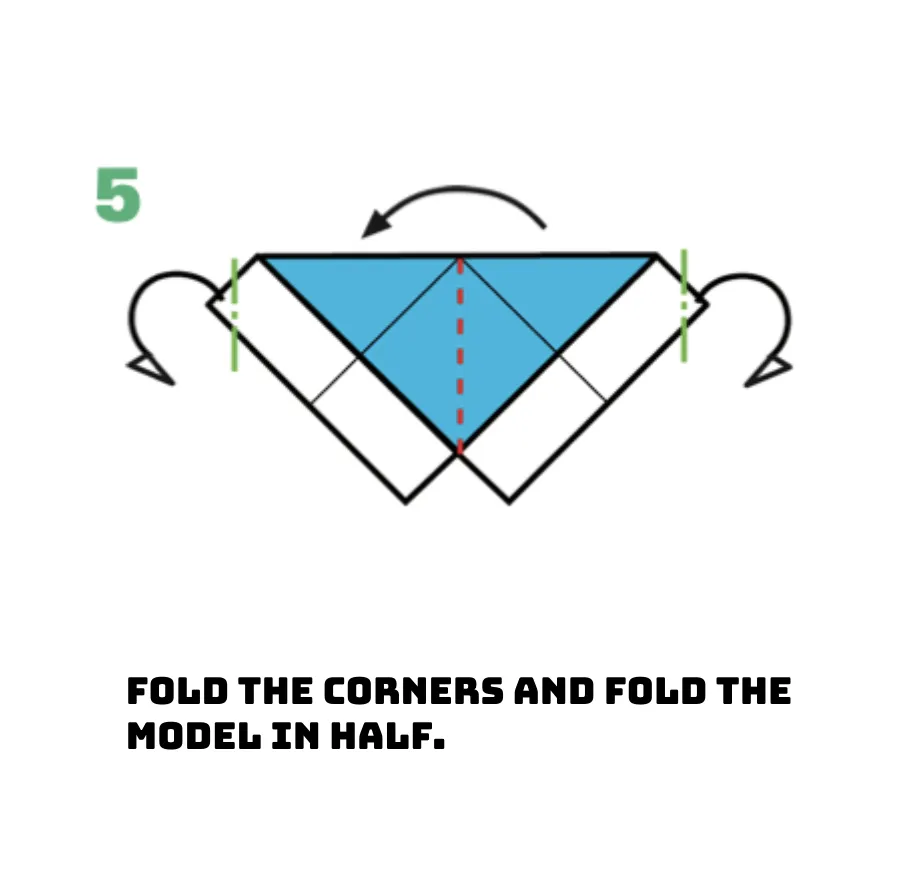
STEP 5: FOLDING DOWN CORNERS AND CREATING CENTER FOLD
Fold down the angles as shown and then fold the entire model in half along the center line. This critical step establishes the butterfly’s body while creating the foundation for its graceful wing structure. Japanese origami masters emphasize this central fold as essential for creating the characteristic butterfly silhouette. Apply even pressure along all fold lines to create clean creases that will maintain their shape in the finished model.
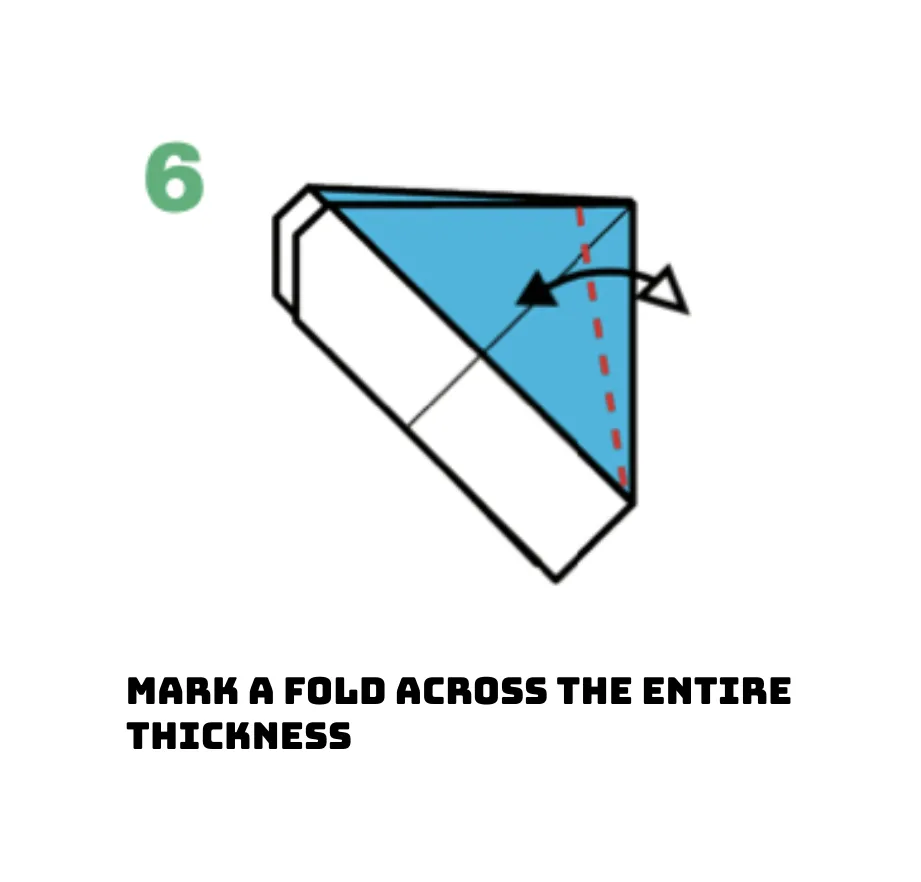
STEP 6: CREATING THE THICKNESS FOLD
Mark a fold through the entire thickness of the paper as indicated by the directional arrows. This structural fold adds dimension to your origami butterfly, helping to create its three-dimensional quality. Popular origami butterfly designs often utilize this technique to transform flat paper into lifelike winged creatures. Take your time with this fold, as its precision directly influences how realistic your finished butterfly will appear.
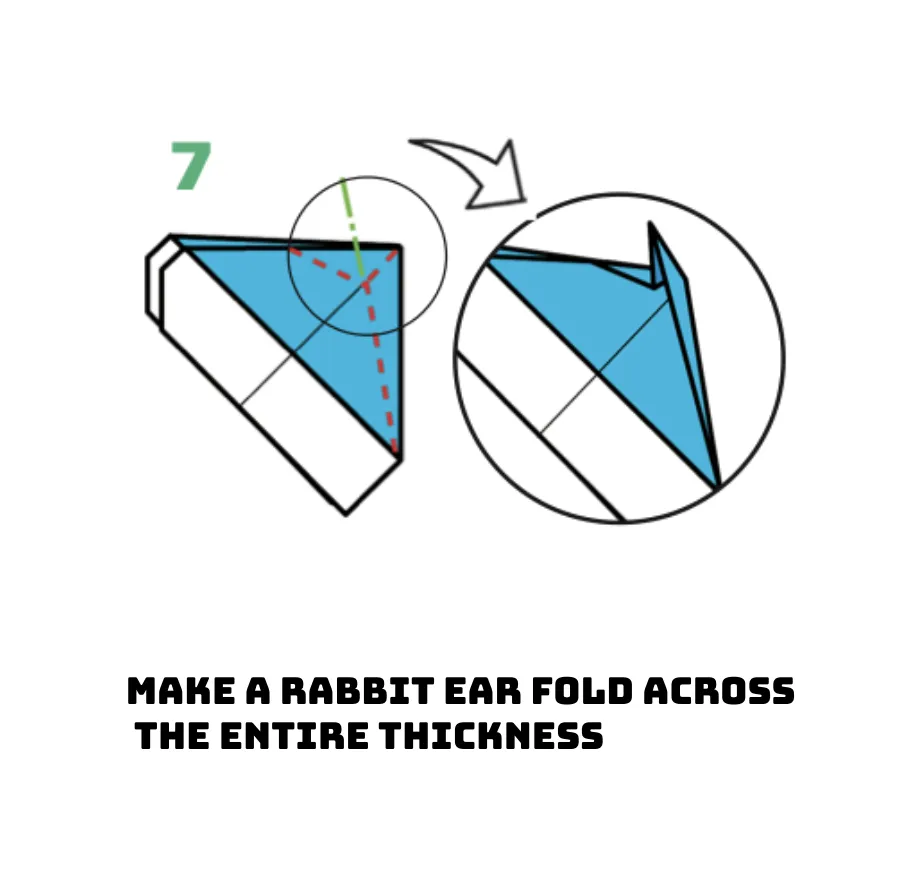
STEP 7: MAKING THE RABBIT EAR FOLD
Create a rabbit ear fold through the entire thickness of the paper following the marked lines and detailed view. This specialized origami technique is essential for forming the distinctive shape of the butterfly’s delicate wing sections. Traditional butterfly origami patterns incorporate this fold to create the natural contours seen in real butterfly wings. The rabbit ear fold adds sophisticated detail and dimension that elevates simple paper into an elegant butterfly form.
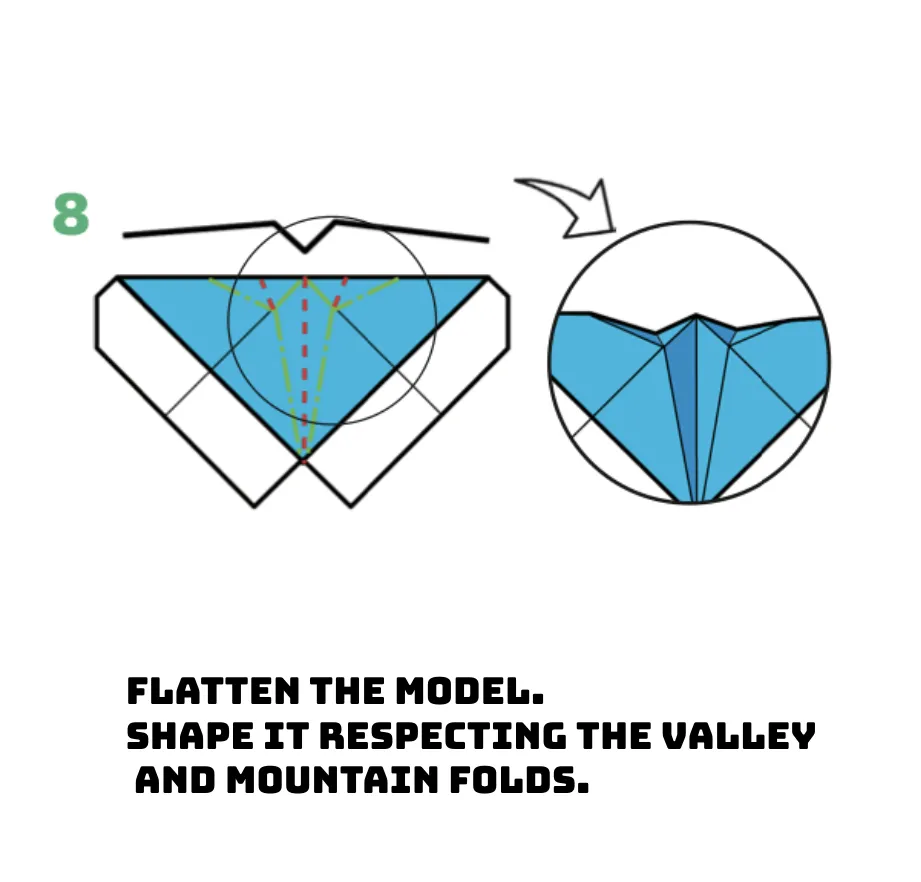
STEP 8: FLATTENING AND SHAPING
Flatten the model completely, then shape it by carefully implementing valley and mountain folds as shown. This critical shaping process transforms the flat design into the recognizable three-dimensional butterfly structure. Expert origami creators emphasize the importance of these contrasting fold types for creating realistic paper butterflies. Pay particular attention to the circular detail view, which shows how to create the central body definition of your butterfly.
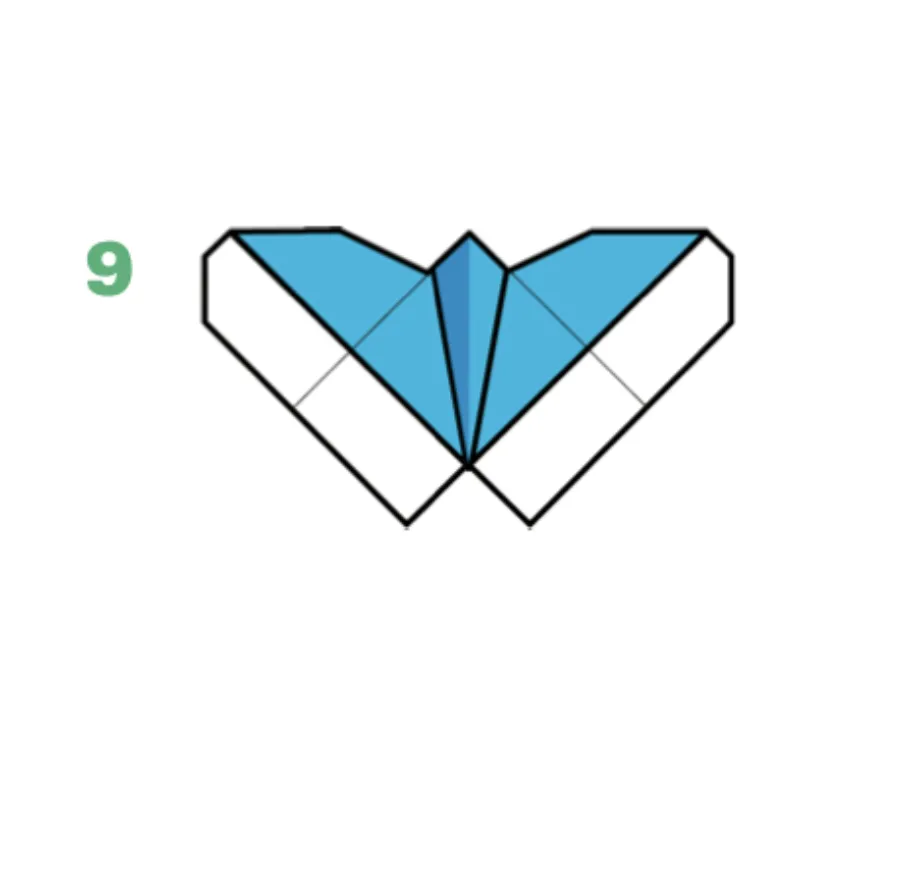
STEP 9: COMPLETING THE BASIC BUTTERFLY
Finalize your origami butterfly by refining all folds and ensuring symmetry in the wing formations. The completed model now displays the classic butterfly silhouette with distinct wings and a defined central body. Your beautiful paper butterfly showcases the elegant simplicity that makes origami such a beloved art form worldwide. Display your creation as a standalone piece or combine it with other origami butterflies for a magnificent decorative arrangement.
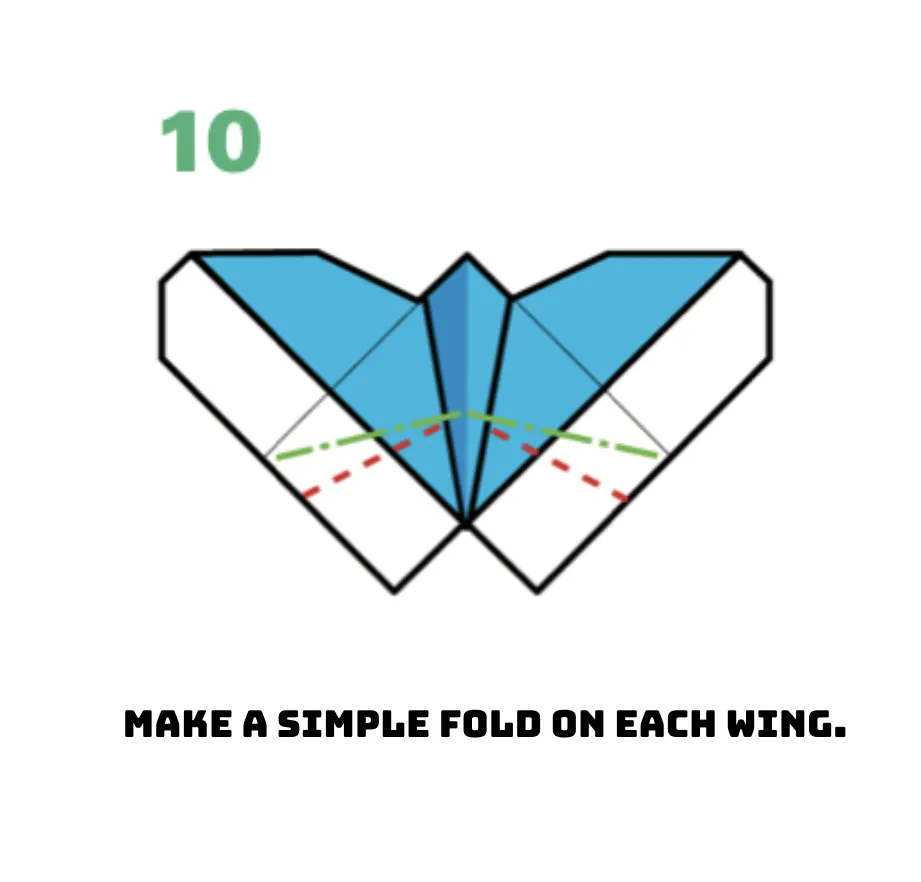
STEP 10: ADDING WING DETAIL
Create a simple fold on each wing section along the marked lines to add elegant detail to your butterfly. This enhancement adds realistic wing texture and dimension to your origami butterfly design. Popular origami butterfly variations often include these additional folds to more closely mimic natural butterfly wings. Apply gentle pressure when making these decorative folds to avoid disrupting the overall structure of your creation.
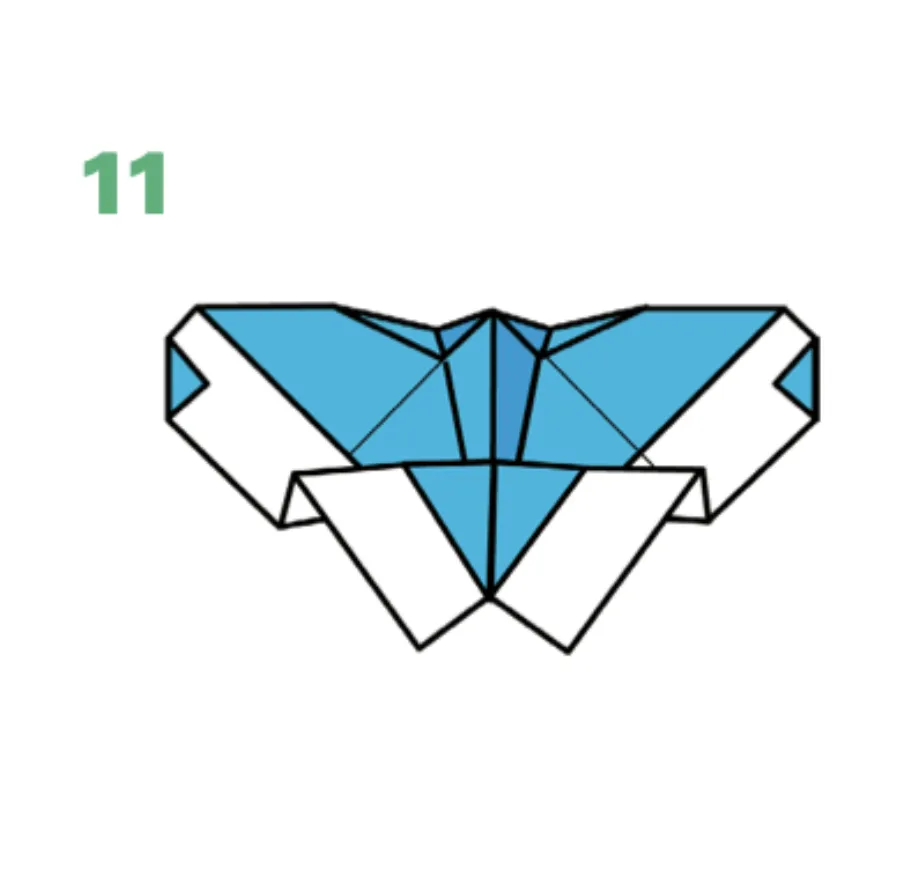
STEP 11: FURTHER WING REFINEMENT
Continue refining your butterfly by implementing the indicated folds, then turn the model over as shown. These strategic creases add sophisticated dimension and movement to your origami butterfly’s wings. Japanese origami tradition includes these detailed refinements that transform basic models into artistic creations. The directional arrows guide you in creating perfectly balanced folds that enhance your butterfly’s realistic appearance.
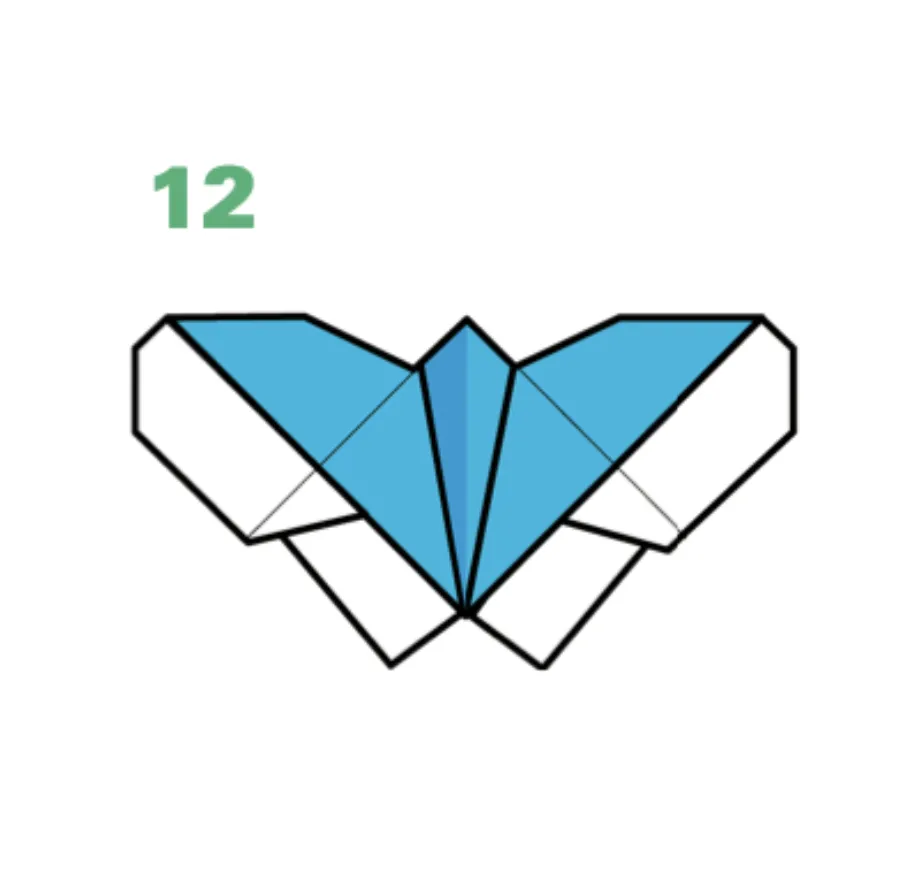
STEP 12: FINALIZING THE BUTTERFLY VARIATION
Complete your enhanced butterfly by ensuring all folds are crisp and the model maintains perfect symmetry. The finished variation showcases additional wing texture that mimics the delicate veining seen in real butterflies. Your completed origami butterfly is now ready to be displayed, used as decoration, or given as a thoughtful handmade gift. This final version represents the beautiful combination of simplicity and elegance that makes origami butterflies so beloved.
Conclusion:
Congratulations on creating your beautiful origami butterfly! Through a sequence of precise folds and careful shaping, you’ve transformed a simple square of paper into a delicate winged creature that captures the grace and beauty of nature. Your finished butterfly can be used in countless creative ways—attached to greeting cards, strung together as mobiles, displayed in shadow boxes, or simply placed on a shelf to bring a touch of natural elegance to any space. The techniques you’ve learned—from basic folds to more advanced methods like the rabbit ear fold—provide an excellent foundation for exploring more complex origami designs. We hope this tutorial has inspired you to continue your paper folding journey and discover the joy of creating these symbols of transformation and beauty. Share your colorful paper butterflies with our community and explore more captivating origami designs to expand your creative repertoire!
- Explore our complete butterfly origami collection → Discover more butterfly designs, from simple models for beginners to complex creations that mimic specific butterfly species.
- Master essential origami techniques for insects → Learn specialized folding methods used in this butterfly tutorial, including the rabbit ear fold and valley-mountain combinations.
- Best papers for origami butterflies → Find out which papers create the most beautiful and durable origami butterflies, with tips on color selection and patterned papers.
- Create an origami butterfly mobile → Learn how to display multiple butterflies in a hanging mobile that creates a stunning decorative element for any room.
- Seasonal butterfly decoration ideas → Discover creative ways to incorporate your origami butterflies into seasonal decorations, from spring displays to holiday ornaments.
