

Are you searching for a delightful Easter craft that’s both simple and impressive? Look no further than these charming origami chicks in eggs! This adorable paper folding project creates the perfect springtime decoration that looks like it requires two separate pieces but amazingly uses just one sheet of paper. These origami chicks in eggs make wonderful Easter decorations, greeting card embellishments, or personalized table settings for your holiday gathering.
In this comprehensive tutorial, I’ll guide you through creating these sweet origami chicks in eggs step by step, with clear instructions even beginners can follow. The best part? You need minimal supplies to get started on these delightful paper creations!
Why You’ll Love Making Origami Chicks in Eggs
Before we dive into the folding instructions, let’s explore why these origami chicks in eggs have become such a popular Easter craft:
- They require just one sheet of paper – no gluing separate pieces together
- The origami chicks in eggs look more complicated than they actually are (perfect for impressing friends!)
- You can customize them with different colors and patterns
- They’re quick to make once you learn the technique
- These origami chicks in eggs are suitable for crafters of all ages (with some adult supervision for younger children)
- They make thoughtful handmade decorations or gifts
Many paper crafts enthusiasts consider these origami chicks in eggs a springtime classic because they perfectly capture the essence of new beginnings that Easter represents. The clever design shows a cute chick peeking out from its cracked shell, creating an adorable 3D effect from a flat piece of paper.
Materials Needed for Origami Chicks in Eggs
One of the best things about creating origami chicks in eggs is the simplicity of materials required. Here’s all you need:
- Square paper: Traditional origami paper works best for origami chicks in eggs because it has color on one side and white on the other. This dual-color aspect is perfect for creating the contrast between the chick and eggshell.
- Pen or marker: For drawing the eye on your completed origami chicks in eggs
- Optional: Glue if you want to attach your origami chicks in eggs to cards or other crafts
Paper Alternatives for Origami Chicks in Eggs
Don’t have traditional origami paper? No problem! These origami chicks-in eggs can be made with various paper alternatives:
- Regular printer paper cut into squares
- Scrapbook paper (just make sure it’s not too thick)
- Gift wrapping paper
- Pages from magazines or catalogs
- Old maps for unique patterned origami-chicks in eggs
- Pages from coloring books that have been colored in
- Newspaper for a rustic look
The key is ensuring that whatever paper you use for your origami chicks in eggs can be folded crisply and hold its shape. Papers that are too thick or too thin might make the process more challenging.
Step-by-Step Instructions for Origami Chicks in Eggs
Now let’s create these adorable origami chicks-in eggs together! Follow these detailed instructions carefully:
Step 1: Prepare Your Paper
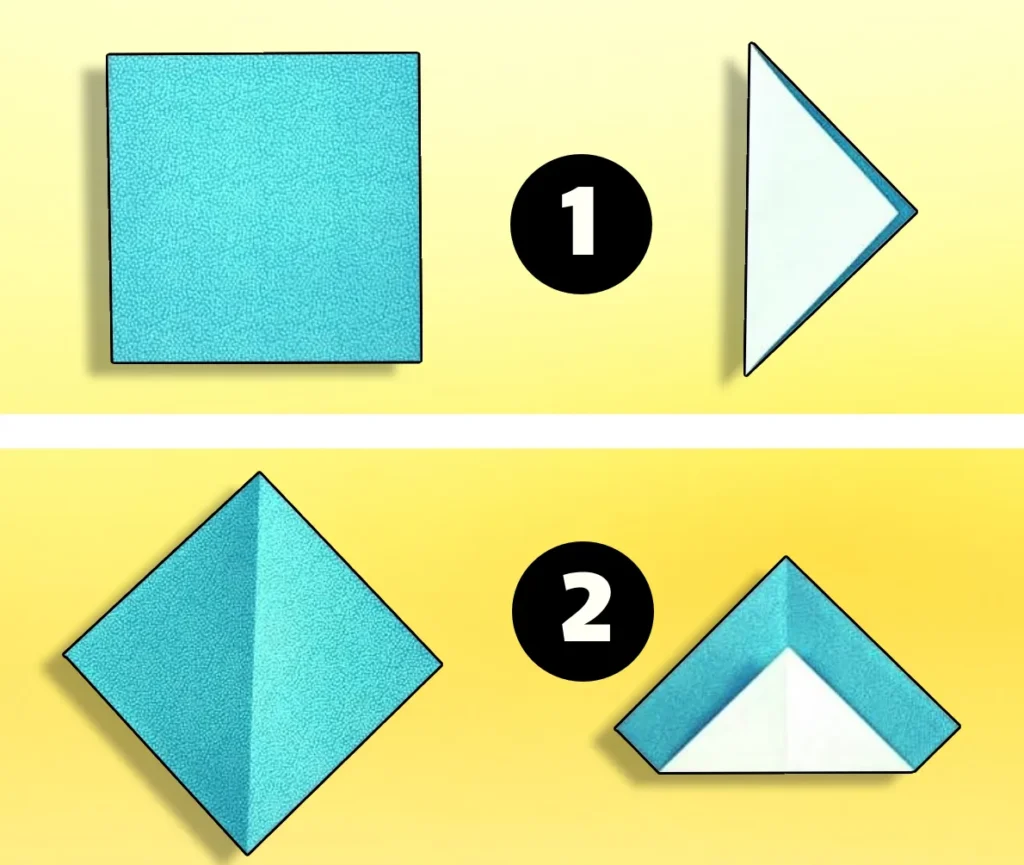
For these origami chicks-in eggs, begin with a square piece of paper. Position it with the colored side facing up if you want a colored chick with a white egg. If you prefer a white chick with a colored egg, place the colored side down.
Create the Initial Fold
Fold your paper in half diagonally to form a triangle, with the colored side on the inside (assuming you want a colored chick). Press firmly along the crease, then unfold the paper back to its square form. This diagonal crease will guide your subsequent folds.
Step 2: Position the Paper
Rotate your paper so that one corner points toward you, with the crease line running vertically. Your paper should now resemble a diamond shape from your perspective. This positioning is crucial for creating properly shaped origami-chicks in eggs.
Form the Base of Your Chick
Take the bottom corner that’s pointing toward you and fold it upward toward the top corner. However, don’t fold it all the way to the top—stop about two-thirds of the way up (approximately 1½ inches from the top corner). This partial fold is what creates the proper proportions for your origami chicks-in eggs.
Step 3: Create the Wings
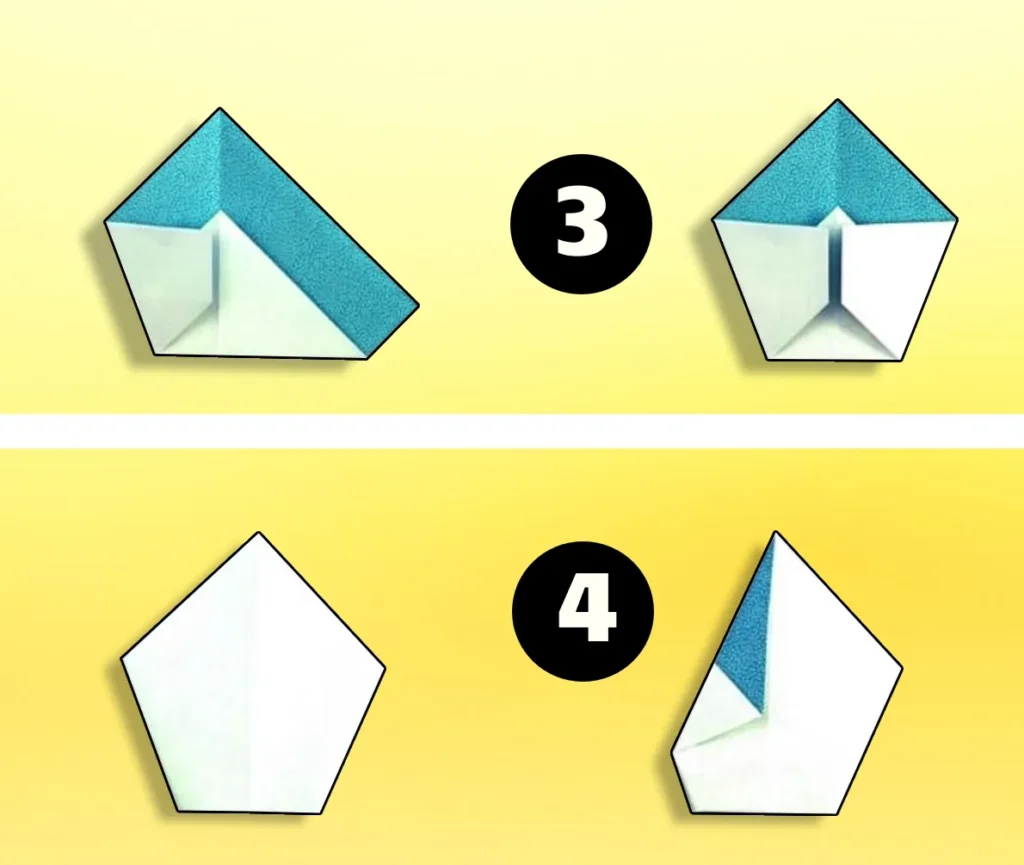
Next, fold the left side of this triangle toward the center line. Repeat with the right side, folding it toward the center as well. Your origami-chicks in eggs should now have a pentagon-like shape with the colored side still facing down.
Flip the Paper
Carefully turn your folded paper over. At this point, the colored side (which will become the visible part of your chick) should be facing up. This step is important for the proper appearance of your origami-chicks in eggs.
Step 4: Form the Upper Portion
Take the top left corner of the pentagon and fold it toward the center. Do the same with the top right corner. These folds help shape the head area of your origami-chicks in eggs.
Create the Chick’s Head
Fold the top point downward at a slight angle to form the head of your chick. The angle of this fold will determine how your chick appears to be looking, so adjust it until you’re happy with the expression of your origami chicks in eggs.
Step 5: Form the Beak
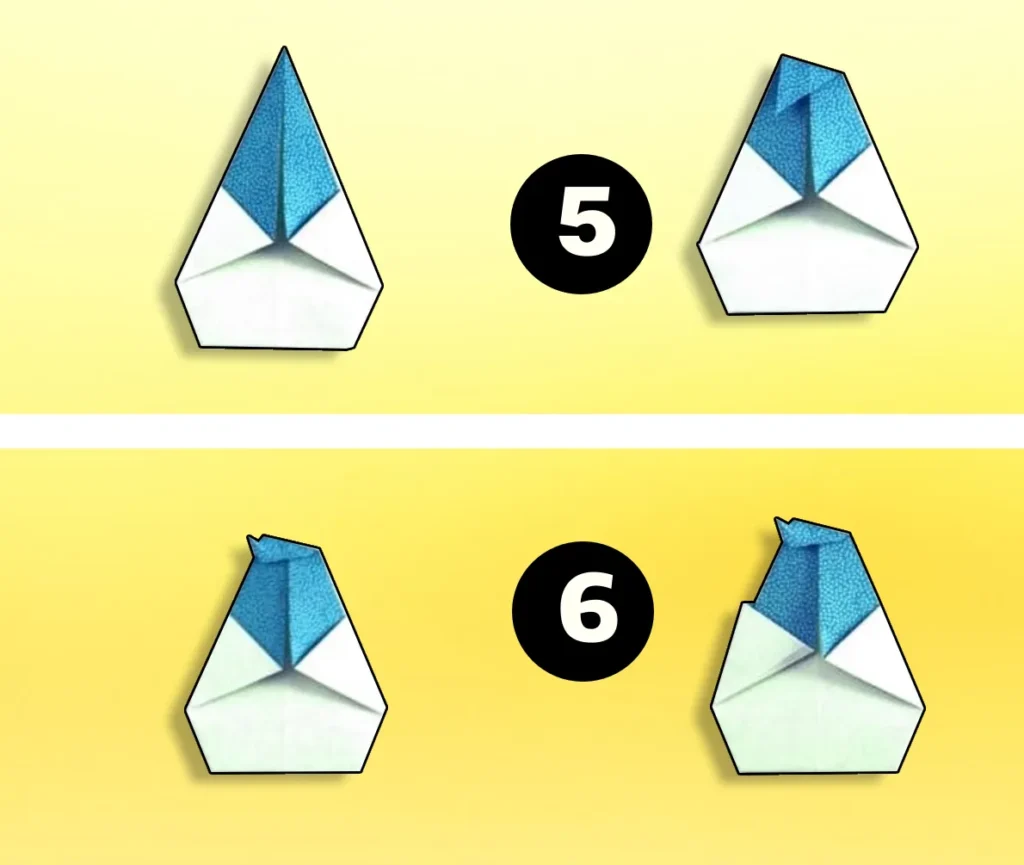
Fold the very tip of the head section back upward at an angle to create a small beak. This tiny fold adds character to your origami chicks and completes the chick’s face.
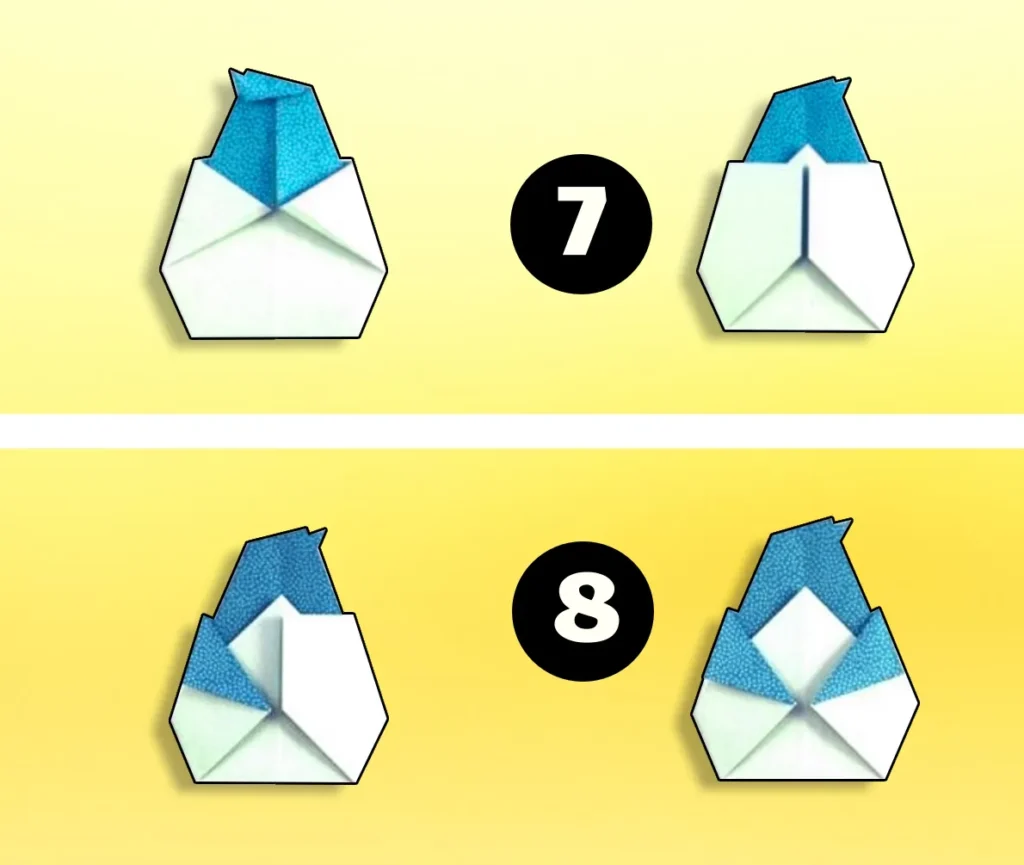
Begin the Eggshell
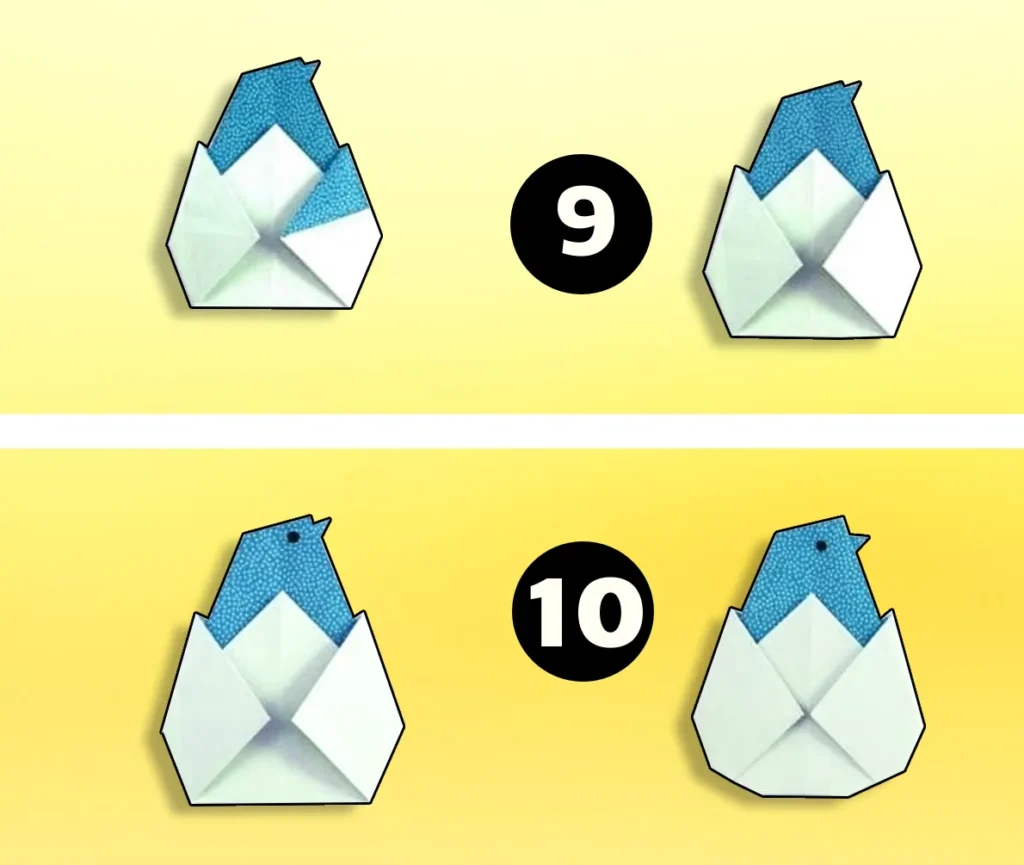
Now comes the slightly trickier part of making origami chicks-in eggs. You should notice two white triangular pockets on either side of your colored chick. Gently open the left pocket and push it outward about ¼ inch, then flatten it to create part of the eggshell.
Step 6: Complete the Eggshell
Repeat the previous step with the right pocket. This symmetrical process creates the appearance of your chick hatching from an egg, which is the signature feature of these origami-chicks in eggs.
Flip Again
Turn your creation over once more. You should now see the back of your chick with white sections on either side.
Step 7: Shape the Eggshell
Fold each side outward to create triangular shapes. These will form the broken eggshell of your origami chicks in eggs.
Refine the Eggshell Shape
Fold these triangular flaps back in on themselves to create a more natural-looking eggshell edge. This step adds dimension to your origami chicks-in eggs and makes them look more realistic.
Step 8: Add the Final Touches
Turn your creation over one last time to see your chick. For a more egg-like shape, fold in the bottom corners slightly. Then, use your pen or marker to add a simple eye to your chick. Your origami-chicks in eggs are now complete!
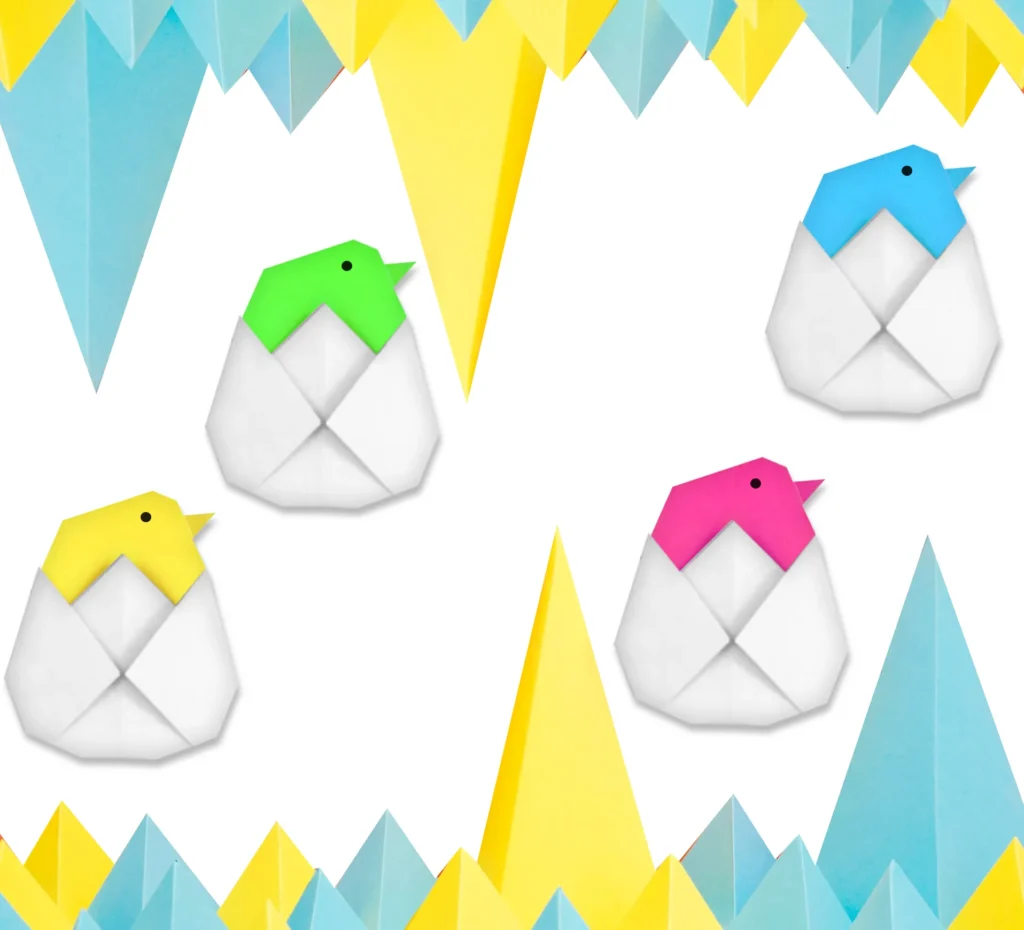
Customization Ideas for Origami Chicks in Eggs
One of the joys of making origami chicks–in eggs is how easily they can be customized. Here are some creative variations to try:
Color Variations for Origami Chicks in Eggs
- Traditional yellow chicks: Use yellow paper with the colored side facing in for classic origami chicks in-eggs
- Pastel collection: Create a set of origami chicks-in eggs using soft pink, blue, lavender, and mint papers for a pretty Easter display
- Patterned papers: Try floral or polka-dotted papers for uniquely decorated origami chicks in eggs
- Metallic papers: For elegant origami chicks-in eggs that catch the light beautifully
Decorative Enhancements
Your basic origami chicks-in eggs can be embellished with:
- Tiny paper flowers glued near the eggshell
- Small ribbon bows attached to the back
- Glitter applied sparingly to the eggshell edges
- Googly eyes instead of drawn ones for playful origami chicks in eggs
Size Options
Experiment with different sized papers to create a family of origami chicks in eggs:
- Large (8×8 inch paper) for centerpieces
- Medium (6×6 inch paper) for standard decorations
- Mini (3×3 inch paper) for card embellishments or tiny origami chicks in eggs that can be strung together
Creative Uses for Your Origami Chicks in Eggs
Now that you’ve mastered making these charming origami chicks in eggs, here are wonderful ways to use them:
Easter Celebrations with Origami Chicks in Eggs
- Place cards: Write guests’ names on the egg portion of your origami chicks in eggs for personalized table settings
- Basket fillers: Add several origami-chicks in eggs to Easter baskets for a handmade touch
- Garlands: String multiple origami chicks-in eggs together to create festive decorations
- Mantel displays: Arrange a row of origami chicks in eggs along your fireplace mantel for spring decor
Greeting Cards and Gifts
- Attach origami chicks-in eggs to the front of handmade Easter cards
- Use them as gift toppers instead of bows
- Create a mobile of hanging origami-chicks in eggs as a special gift
- Include instructions with a set of pre-cut papers so recipients can make their own origami-chicks in eggs
Educational Activities
Teachers love using origami chicks in eggs for:
- Fine motor skills practice
- Following multi-step instructions
- Learning about bird life cycles
- Understanding transformation through art
Troubleshooting Your Origami Chicks in Eggs
Even with clear instructions, you might encounter some challenges when making your first few origami chicks in-eggs. Here are solutions to common issues:
Problem: The Eggshell Won’t Stay Open
Solution: If the eggshell sections of your origami chicks-in eggs keep folding back in, try creasing the folds more firmly. You can also slightly moisten the folds (very lightly!) to help the paper maintain its shape as it dries.
Problem: The Chick’s Head Looks Misshapen
Solution: The angle of the head fold is crucial for attractive origami chicks-in eggs. Try refolding with a slightly different angle until you achieve the look you want. Practice makes perfect with origami-chicks in eggs!
Problem: Paper Too Stiff or Too Flimsy
Solution: The quality of paper significantly affects your origami chicks-in eggs. If your paper is too stiff, the folds may not hold well or might look bulky. If too thin, your origami-chicks in eggs might not maintain their shape. Standard origami paper (approximately 70 gsm) works best.
Frequently Asked Questions About Origami Chicks in Eggs
How long does it take to make one origami chick in an egg?
Your first few origami-chicks in eggs might take 10-15 minutes each, but with practice, you can create one in just 2-3 minutes. The learning curve for origami chicks-in eggs is relatively gentle compared to more complex origami designs.
Can I make origami chicks in eggs with children?
Yes! Origami chicks-in eggs are suitable for children approximately 7 years and older with some adult guidance. Younger children might need help with the more precise folds, especially when creating the eggshell portion of the origami chicks in eggs.
How can I display my origami chicks in eggs?
Origami chicks-in eggs can be displayed standing on flat surfaces, attached to cards or gifts, hung as ornaments (with a string glued to the back), or arranged in decorative nests made of paper shreds or raffia.
Will my origami chicks in eggs stay folded?
Generally, once folded, origami chicks in eggs maintain their shape well. For extra durability, particularly if you’re using them as decorations that need to last, you can apply a very light mist of clear acrylic spray to help your origami chicks in-eggs keep their form.
Why Origami Is a Beneficial Craft
Creating origami chicks in eggs and other paper folding projects offers numerous benefits:
- Develops patience and precision: Each fold in your origami chicks-in eggs requires care and attention
- Enhances concentration: Following the sequential steps to complete origami-chicks in eggs builds focus
- Improves hand-eye coordination: The precise folding required for origami-chicks in eggs enhances fine motor skills
- Provides screen-free entertainment: Making origami chicks-in eggs offers a tactile alternative to digital activities
- Creates a sense of accomplishment: Completing your origami chicks in eggs gives a satisfying feeling of achievement
- Reduces stress: The meditative quality of folding origami chicks-in eggs can be calming
More Easter Origami Projects to Try
If you’ve enjoyed making origami chicks-in eggs, you might want to explore these related Easter paper crafts:
- Origami bunnies to accompany your origami chicks in eggs
- Paper Easter baskets to hold your origami chicks in eggs
- Origami flowers for spring displays alongside your origami chicks in eggs
- Egg-shaped containers that can hold small treats
Conclusion: Enjoy Your Origami Chicks in Eggs Creation
Creating origami chicks in eggs is a delightful way to celebrate spring and Easter. With just a single sheet of paper, you can fold these charming decorations that capture the essence of the season. Whether you’re making them as gifts, decorations, or just for the joy of crafting, these origami chicks in eggs are sure to bring smiles.
Remember that like any skill, practice improves performance. Your first origami chicks in eggs might not be perfect, but each one you make will be better than the last. The beauty of origami lies in the process as much as the result, so enjoy the creative journey of making these adorable origami chicks in eggs!
Once you’ve mastered the technique, you’ll be folding origami chicks in eggs quickly enough to make a whole flock. They make particularly thoughtful handmade gifts that show you’ve put time and care into creating something special.
So gather your paper, follow the steps, and enjoy creating these sweet origami chicks in eggs that perfectly celebrate the renewal and joy of springtime!
Happy folding!
