
Introduction
Origami Christmas, the ancient Japanese art of paper folding, offers wonderful opportunities to create festive holiday decorations that bring the magic of Christmas into your home through handcrafted beauty. The origami Christmas tree stands out as one of the most beloved seasonal projects, transforming a simple square sheet of paper into a symbol of holiday joy, family traditions, and winter celebrations. This beginner-friendly tutorial is described as “simple with layered variations,” making it perfect for creating multiple trees in different sizes for impressive holiday displays, Christmas card decorations, or as charming gifts that capture the spirit of the season. What makes this origami Christmas tree particularly special is its combination of recognizable holiday symbolism and accessible folding techniques—the distinctive triangular silhouette, layered branch structure, and characteristic evergreen shape make it instantly identifiable while remaining achievable for crafters of all skill levels. Unlike more complex holiday models, this Christmas tree design achieves maximum festive impact through just nine straightforward steps, making it ideal for family craft sessions, classroom holiday activities, or creating personalized Christmas decorations that reflect your unique style. The completed model serves as both a beautiful standalone decoration and a versatile element that can be incorporated into larger holiday displays, greeting cards, or gift presentations that celebrate the warmth and wonder of the Christmas season.
Step-by-Step Instructions
Step 1: Create the Foundation Structure
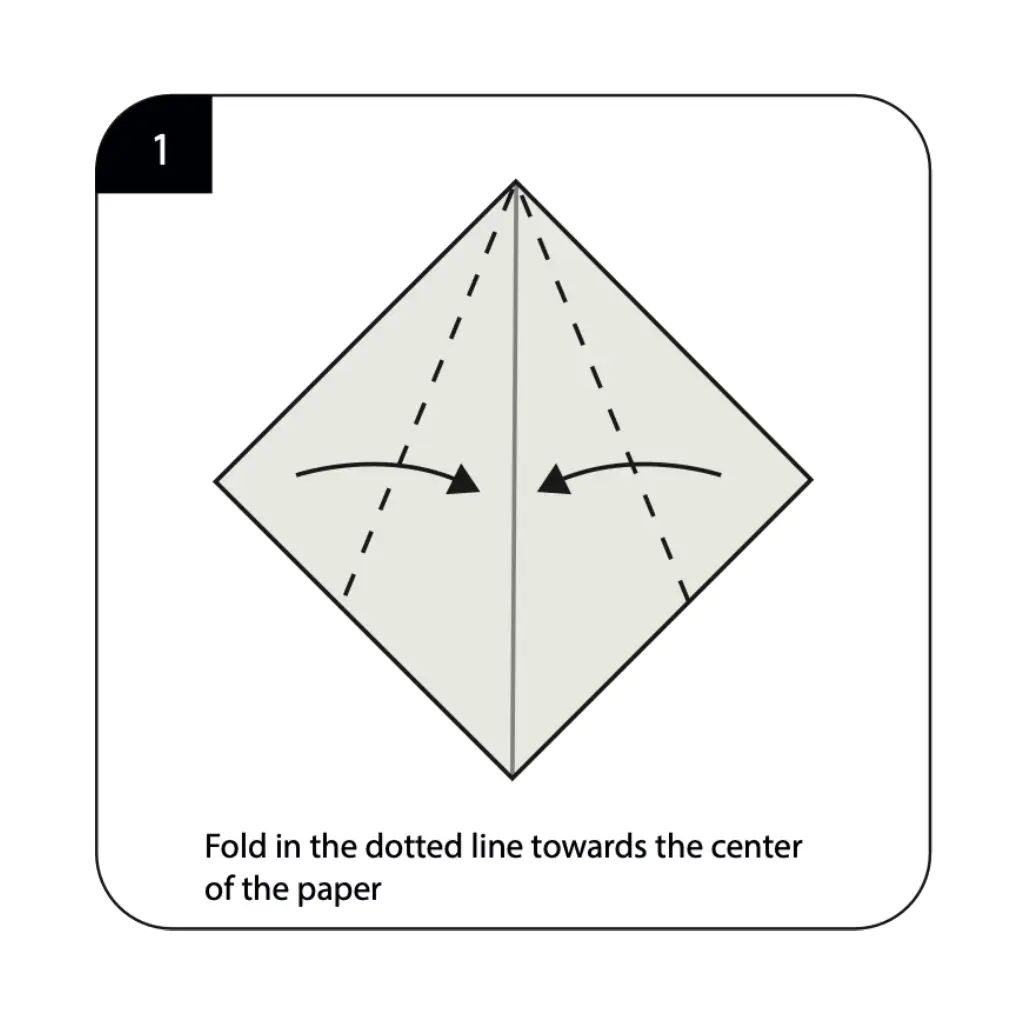
Start with a square of Origami Christmas paper placed diagonally with the non-colored (white) side facing up as specified in the instructions. Fold along the dotted lines toward the center of the paper to establish the basic triangular framework for your Christmas tree. These initial folds create the fundamental structure that will support all subsequent shaping and define the tree’s proportions. The precision of these foundation folds is crucial for ensuring your finished Christmas tree has the proper symmetry and stability needed for display. Take care to align the edges precisely and create sharp, clean creases that will serve as reliable guides throughout the folding process, establishing the framework for your festive paper evergreen.
Step 2: Form the Initial Tree Shape For Origami Christmas
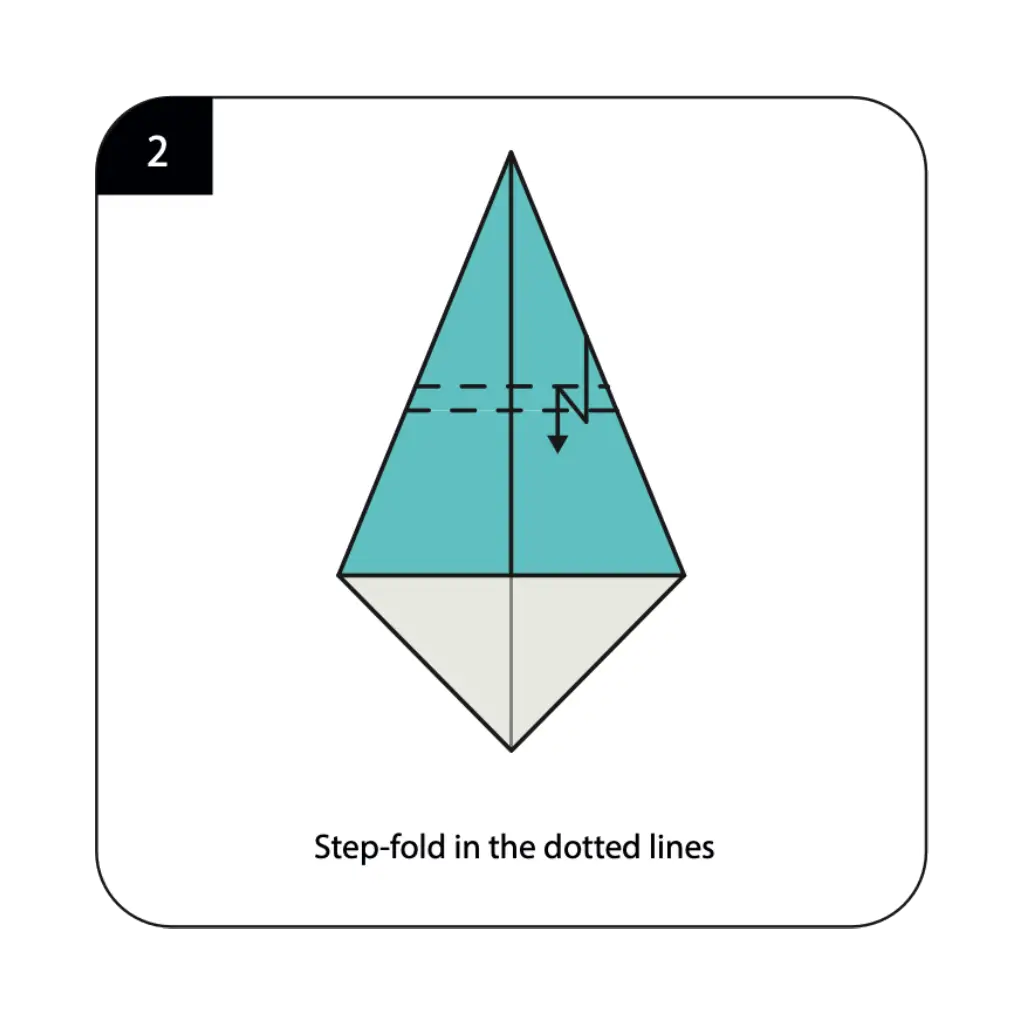
Create step-folds along the dotted lines as indicated in the diagram, beginning to establish the layered appearance characteristic of Christmas trees. These step-folds are essential for creating the dimensional quality that distinguishes your Origami Christmas tree from simple flat triangular shapes. The accuracy and consistency of these step-folds directly affect how realistic and impressive your finished Christmas tree will appear. Work methodically to ensure each layer is properly positioned and sized, creating the tiered structure that mimics the natural branching pattern of evergreen trees. This step begins transforming your geometric foundation into the recognizable silhouette of a festive Christmas tree.
Step 3: Prepare for Advanced Shaping For Origami Christmas
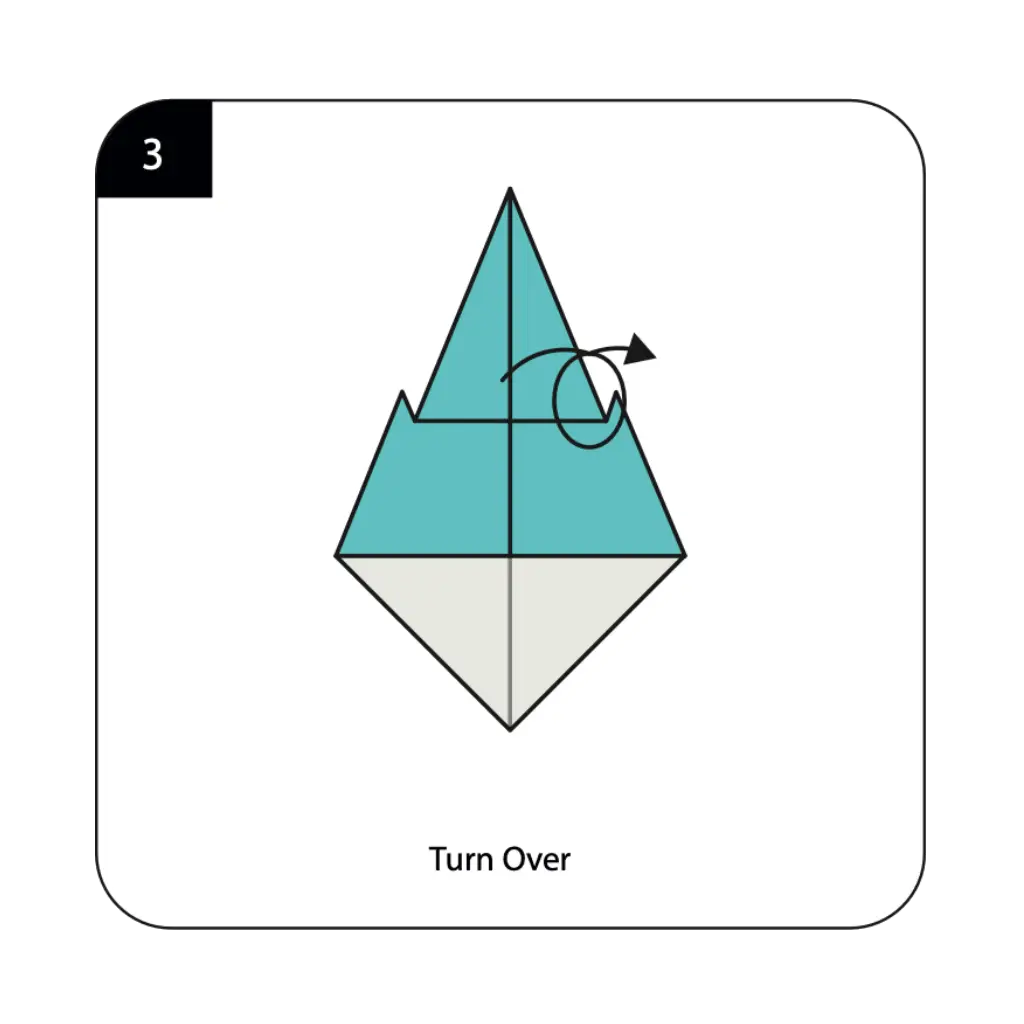
Turn over your partially folded model as instructed to access the reverse side for the next series of shaping folds. This reorientation is crucial for proper development of your Christmas tree’s three-dimensional structure and layered appearance. Handle the model gently during this transition to preserve the integrity of your previous folds and maintain the established tree proportions. The turned-over surface provides access to the fold lines needed for creating the detailed branch structure that will give your origami Christmas tree its characteristic festive appearance and realistic evergreen silhouette.
Step 4: Create the Tree Base Structure
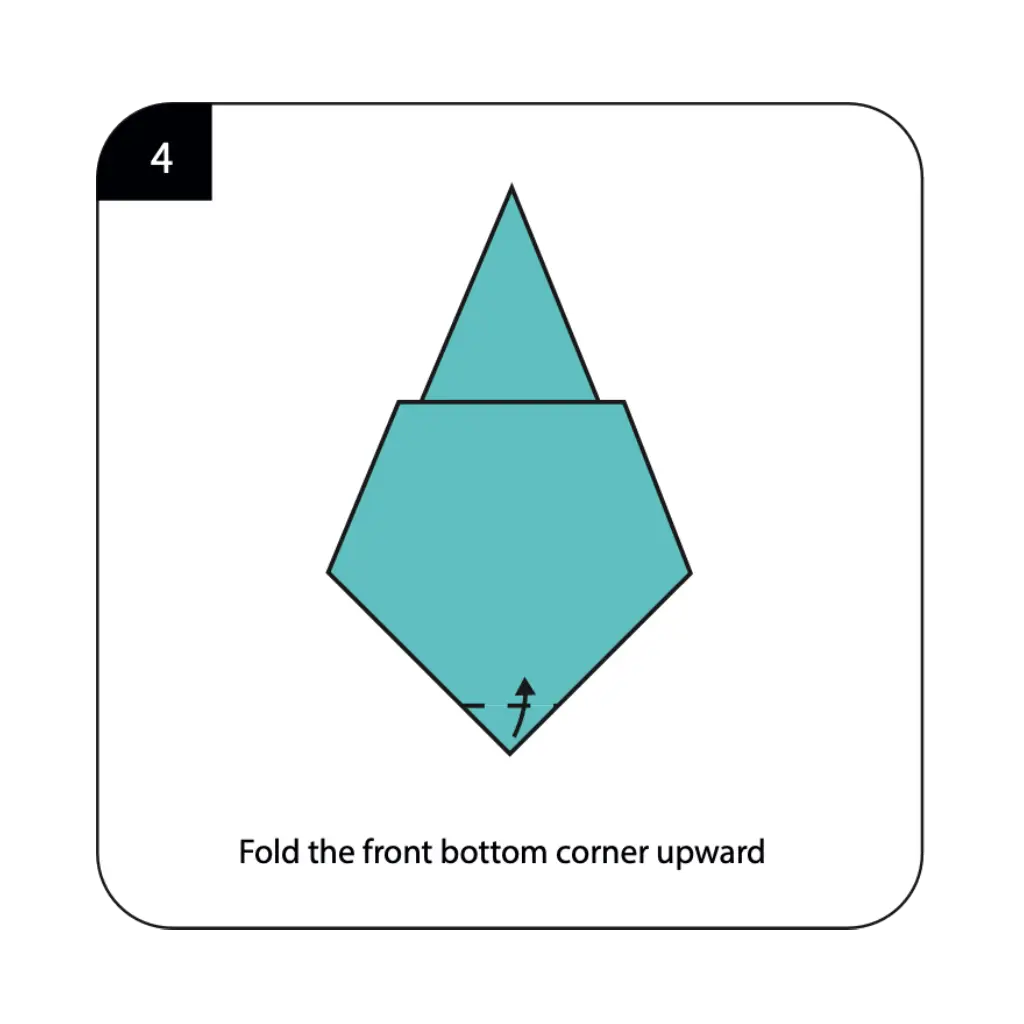
Fold the front bottom corner upward as shown in the diagram to begin establishing the trunk and base structure of your Christmas tree. This important fold creates the foundation that allows your finished tree to stand upright and display properly as a three-dimensional decoration. The position and angle of this upward fold affects both the stability and proportions of your completed Christmas tree. Work carefully to ensure this fold aligns properly with the existing tree structure while creating the sturdy base needed for your holiday decoration to maintain its shape and stand proudly as a festive centerpiece.
Step 5: Develop the Branch Layers
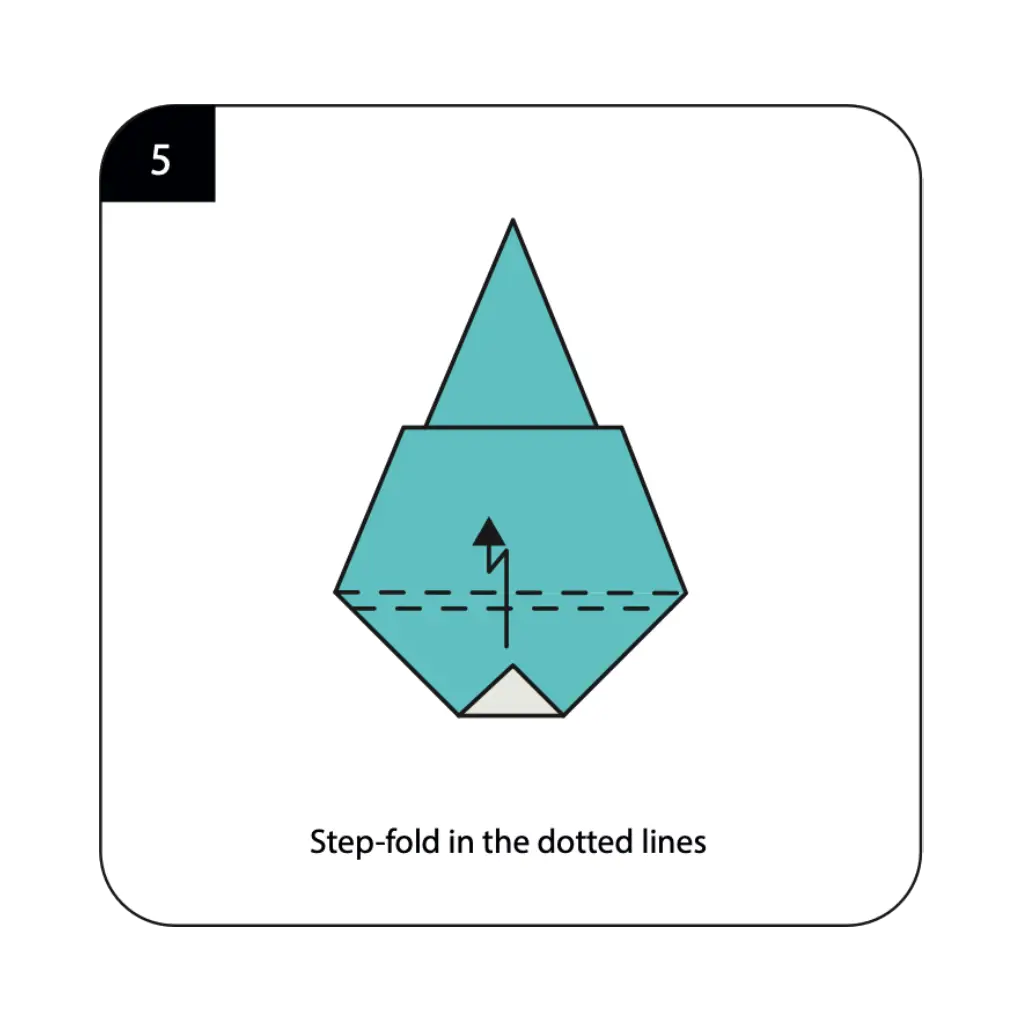
Execute step-folds along the dotted lines as indicated to create the distinctive layered branch structure of your Christmas tree. These detailed folds are crucial for achieving the realistic evergreen appearance that makes your Origami Christmas instantly recognizable as a Christmas tree. The precision of these branch-defining folds determines how convincing and attractive your finished tree will be as a holiday decoration. Take time to create consistent, well-aligned layers that capture the natural tiered growth pattern of evergreen trees, building the dimensional structure that gives your paper Christmas tree its festive character and seasonal appeal.
Step 6: Refine the Tree Structure
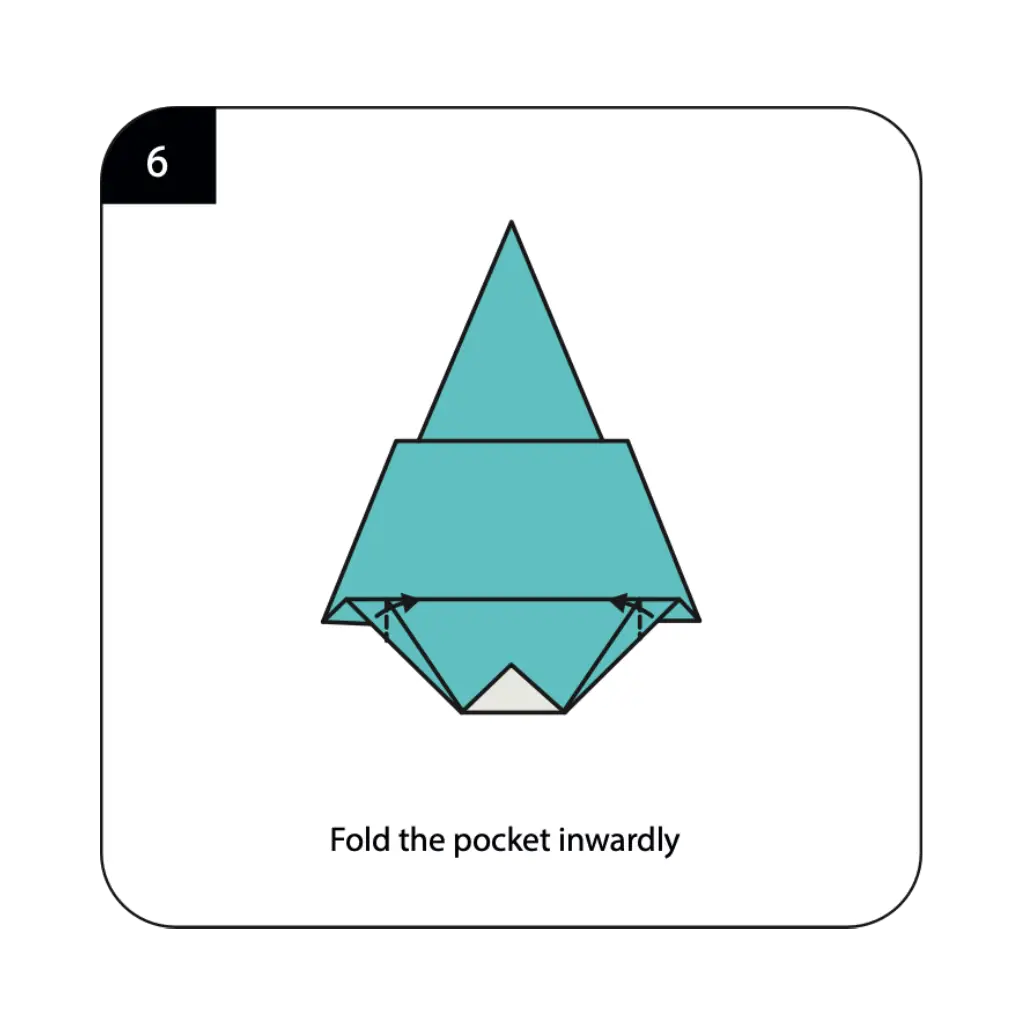
Fold the pocket inwardly as shown to add definition and stability to your Christmas tree’s internal structure. This technical fold enhances the three-dimensional quality of your tree while securing the layered elements in their proper positions. The careful execution of this inward fold contributes to the overall structural integrity and appearance of your origami Christmas tree. This step requires attention to detail but significantly improves the stability and professional appearance of your finished holiday decoration, ensuring that your paper tree maintains its shape and displays beautifully as part of your Christmas décor.
Step 7: Create Additional Branch Detail
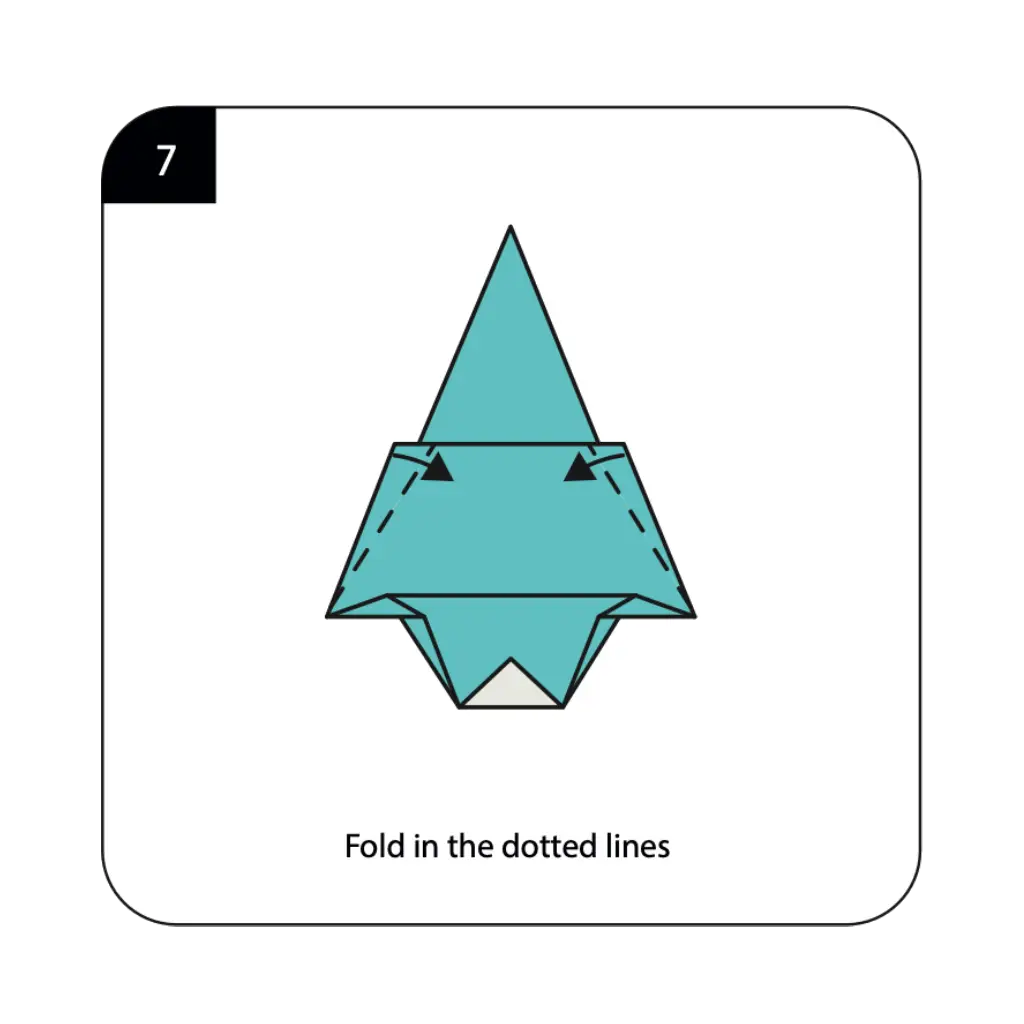
Fold along the dotted lines as indicated to add further refinement to your Christmas tree’s branch structure and enhance its realistic appearance. These additional folds create more detailed branching patterns that distinguish your Origami Christmas tree from simpler holiday decorations. The strategic placement of these folds adds visual interest and depth to your Christmas tree while maintaining the clean, geometric aesthetic characteristic of origami design. Work carefully to ensure these detail folds enhance rather than complicate your tree’s appearance, creating subtle variations that add realism without overwhelming the elegant simplicity of the overall design.
Step 8: Prepare for Final Details
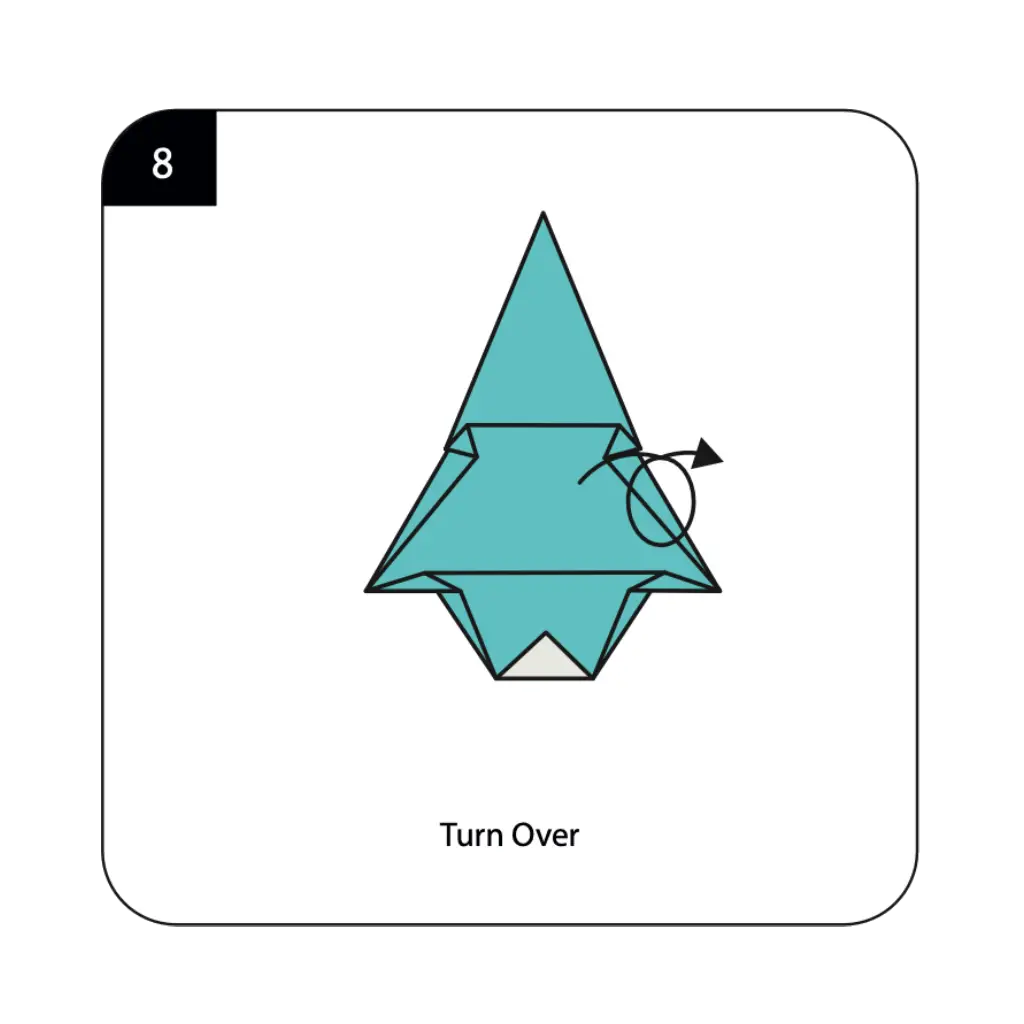
Turn over your nearly completed Christmas tree as instructed to access the final surface for decorative finishing. This reorientation reveals the side that will display your tree’s festive decorations and allows for the final adjustments needed to complete your holiday creation. Handle the advanced model carefully during this transition to preserve all the detailed folding work you’ve completed and maintain the tree’s structural integrity. The surface now facing up provides the ideal canvas for adding the decorative elements that will transform your geometric paper creation into a cheerful Christmas celebration piece.
Step 9: Complete Your Origami Christmas Tree
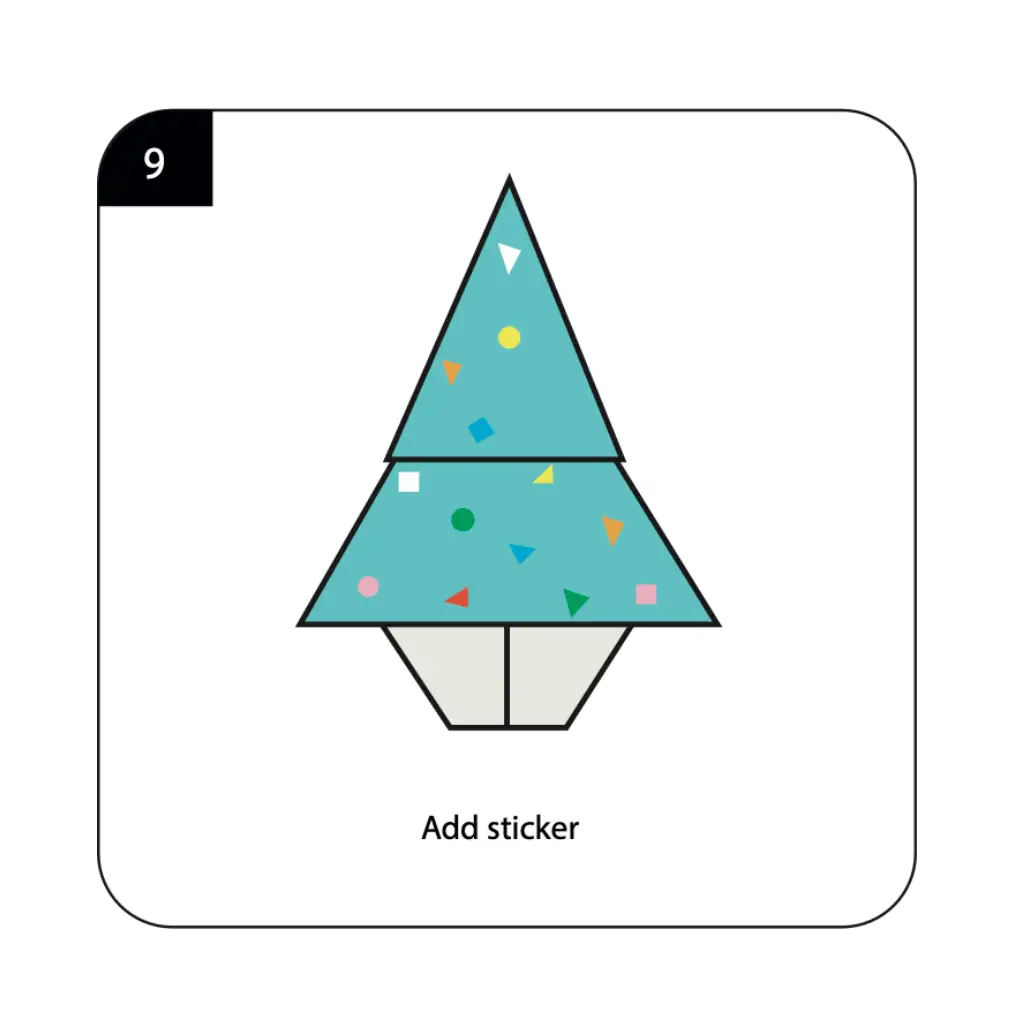
Add stickers, draw ornaments, or use colorful markers to decorate your Christmas tree with festive details like baubles, garland, and a star on top. This creative finishing phase allows unlimited artistic expression as you design unique decorations that reflect your personal holiday style and family traditions. The well-structured paper foundation provides an excellent canvas for holiday embellishments, whether using simple dot stickers for ornaments or elaborate hand-drawn decorations. Your completed origami Christmas tree now combines the precision of paper folding with the joy of holiday creativity, ready to bring festive cheer to your home, serve as a heartfelt handmade gift, or become part of a larger Christmas display that celebrates the magic and wonder of the holiday season.
Conclusion
Congratulations on creating your origami Christmas tree! This delightful holiday decoration demonstrates how simple folding techniques can capture the essence of Christmas celebration through handcrafted beauty and personal creativity. From a basic square sheet, you’ve fashioned a three-dimensional tree that embodies the joy, tradition, and festive spirit of the Christmas season while showcasing your paper folding skills. The origami Christmas tree perfectly balances structural technique with holiday symbolism, creating a meaningful decoration that connects traditional Japanese paper artistry with beloved Christmas customs. Your completed model serves multiple purposes—as a charming table decoration, a personalized Christmas card embellishment, a thoughtful handmade gift, or part of a larger holiday display that brings warmth and joy to your seasonal celebrations. The techniques you’ve learned, including step-folding, layered construction, and creative finishing, build valuable foundation skills for more complex origami projects while creating beautiful holiday memories. We hope this tutorial has sparked your interest in both paper folding and creative holiday crafting, encouraging you to explore how handmade decorations can enhance the personal meaning and family connections that make Christmas special. Remember that each Christmas tree you create offers opportunities to experiment with different colors, sizes, and decorative styles, allowing you to develop unique holiday traditions that reflect your family’s personality and create lasting memories through the joy of creative expression.
- “Before starting your Christmas tree, master fundamental techniques in our Origami Basics for Beginners guide.”
- “Create a complete holiday scene by adding origami reindeer and other creatures from our Origami Animals Collection.”
- “Discover more festive projects in our Creative Origami Gallery featuring seasonal and holiday-themed designs.”
- “Find beautiful ways to display your Christmas trees with our Decorative Origami Ideas for holiday home décor.”
- “Complete your Christmas display by adding Origami Flowers like poinsettias and holly for festive arrangements.”
- “Create an entire Christmas village using techniques from our Modular Origami Projects for impressive holiday displays.”
