
Introduction
Origami, the ancient Japanese art of paper folding, offers wonderful opportunities to celebrate the magnificent creatures of our oceans, and few marine animals capture our imagination quite like the intelligent and playful dolphin. This origami dolphin tutorial presents an intermediate-level project that transforms a simple square sheet of paper into a graceful representation of these beloved marine mammals, complete with their characteristic curved body, distinctive fins, and streamlined form. What makes this origami dolphin particularly rewarding is its combination of technical challenge and impressive visual results—the finished model captures the essence of a dolphin’s fluid movement through water while demonstrating advanced folding techniques that build valuable Origami Dolphin skills. Unlike simpler animal models, this dolphin design incorporates sophisticated elements like the water base formation, reverse folds, and detailed fin shaping that create a truly three-dimensional marine creature. The completed model showcases the dolphin’s iconic features including the elongated snout, dorsal fin, and graceful body curve that makes these animals instantly recognizable and universally beloved. Whether you’re passionate about marine life, looking to expand your Origami Dolphin repertoire with challenging techniques, or creating ocean-themed decorations, this dolphin tutorial offers both technical growth and the satisfaction of crafting a beautiful representation of one of the ocean’s most intelligent inhabitants.
Step-by-Step Instructions
Step 1: Create the Foundation Grid For Origami Dolphin
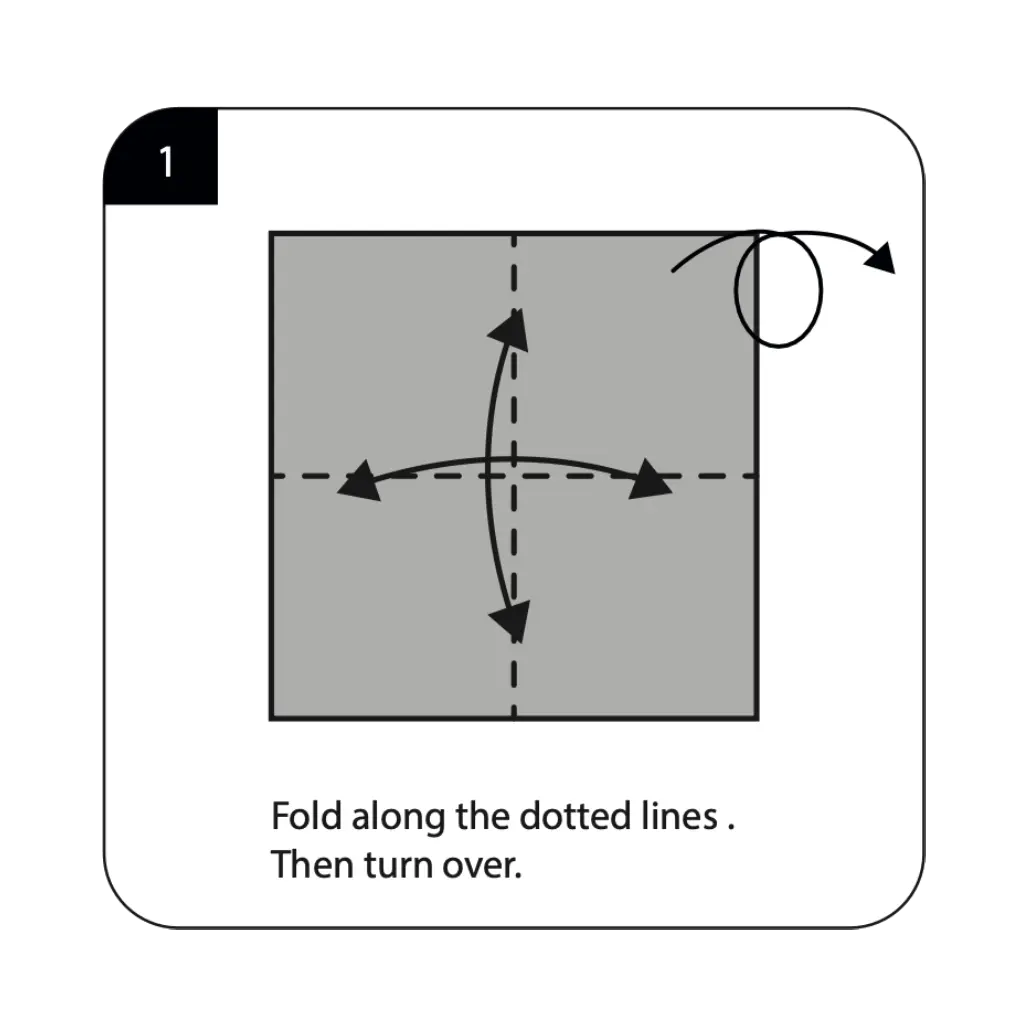
Begin with a square sheet of paper, preferably gray or blue to represent the dolphin’s natural coloring. Fold along all the dotted lines as shown in the diagram, then turn over to establish the comprehensive crease pattern needed for this complex model. These initial folds create the fundamental grid that will guide the formation of your dolphin’s sophisticated structure throughout the folding process. The precision of these foundation creases is absolutely crucial for the success of this intermediate-level project, as they determine the accuracy of all subsequent folds. Take extra care to make each crease sharp and well-defined, creating the roadmap that will transform your flat square into a three-dimensional marine creature.
Step 2: Establish the Diagonal Framework For Origami Dolphin
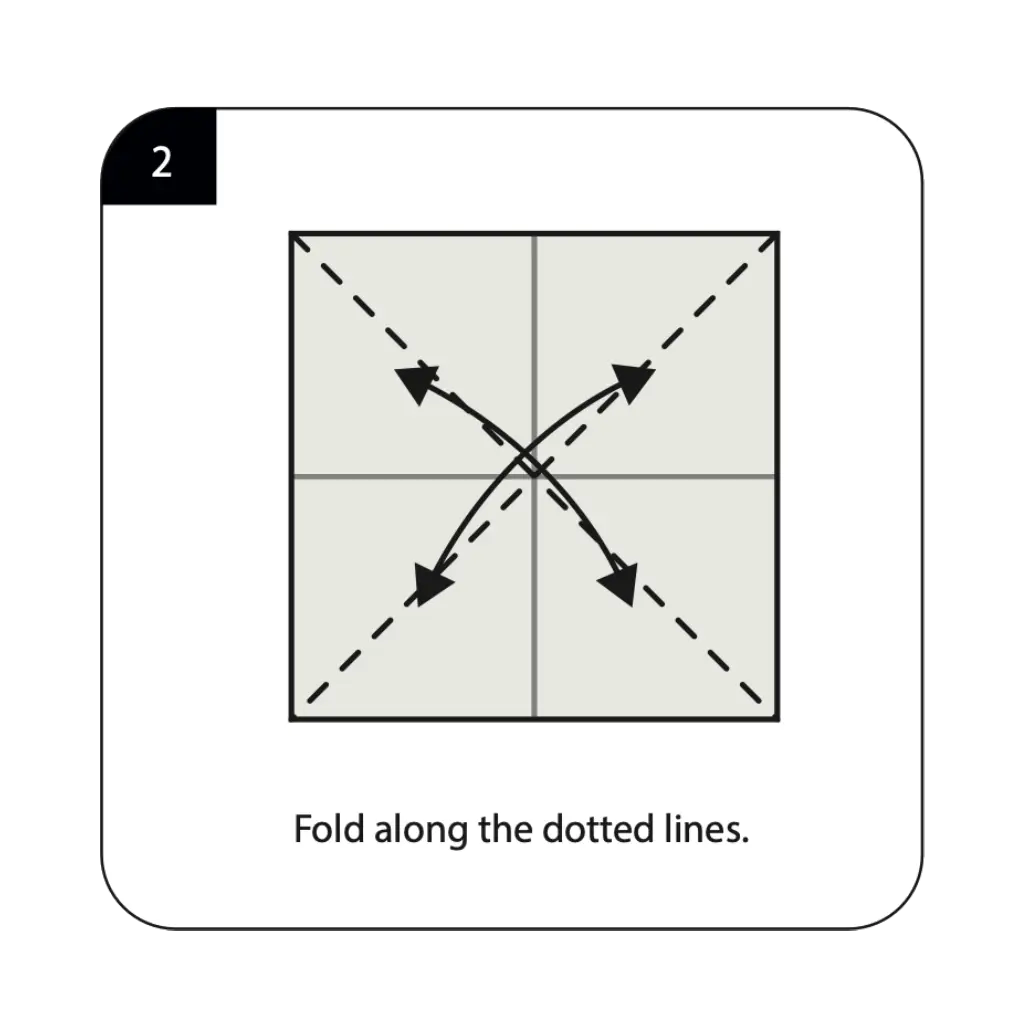
Fold along the dotted lines as indicated to create the diagonal crease pattern that forms the structural foundation of your origami dolphin. These diagonal folds work in conjunction with the grid from Step 1 to establish the complex geometry needed for advanced origami techniques. The accuracy of these diagonal creases directly affects how well your dolphin will take shape in later steps, so work methodically to ensure perfect alignment. This step prepares your paper for the sophisticated folding sequence that will create the dolphin’s characteristic streamlined form and distinctive marine features.
Step 3: Form the Water Base
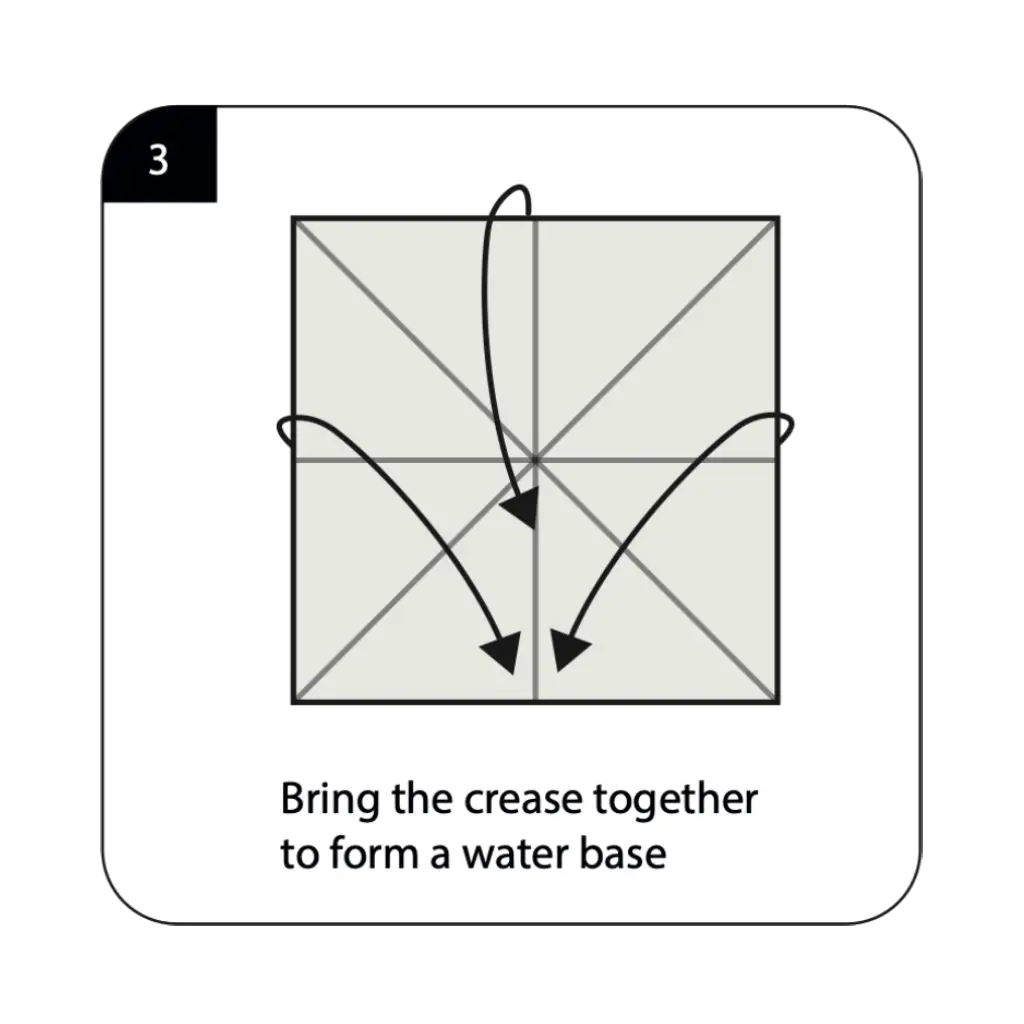
Bring the creases together to form a water base as shown in the diagram—a fundamental origami base used specifically for creating aquatic animals and sea creatures. This advanced technique consolidates multiple crease lines into a three-dimensional foundation that serves as the starting point for many marine-themed origami models. The water base requires careful manipulation of several layers simultaneously while maintaining the integrity of your established crease pattern. This complex base formation is essential for creating the fluid, organic shapes characteristic of sea life and provides the structural foundation needed for your dolphin’s graceful curves.
Step 4: Shape the Initial Body Structure For Origami Dolphin
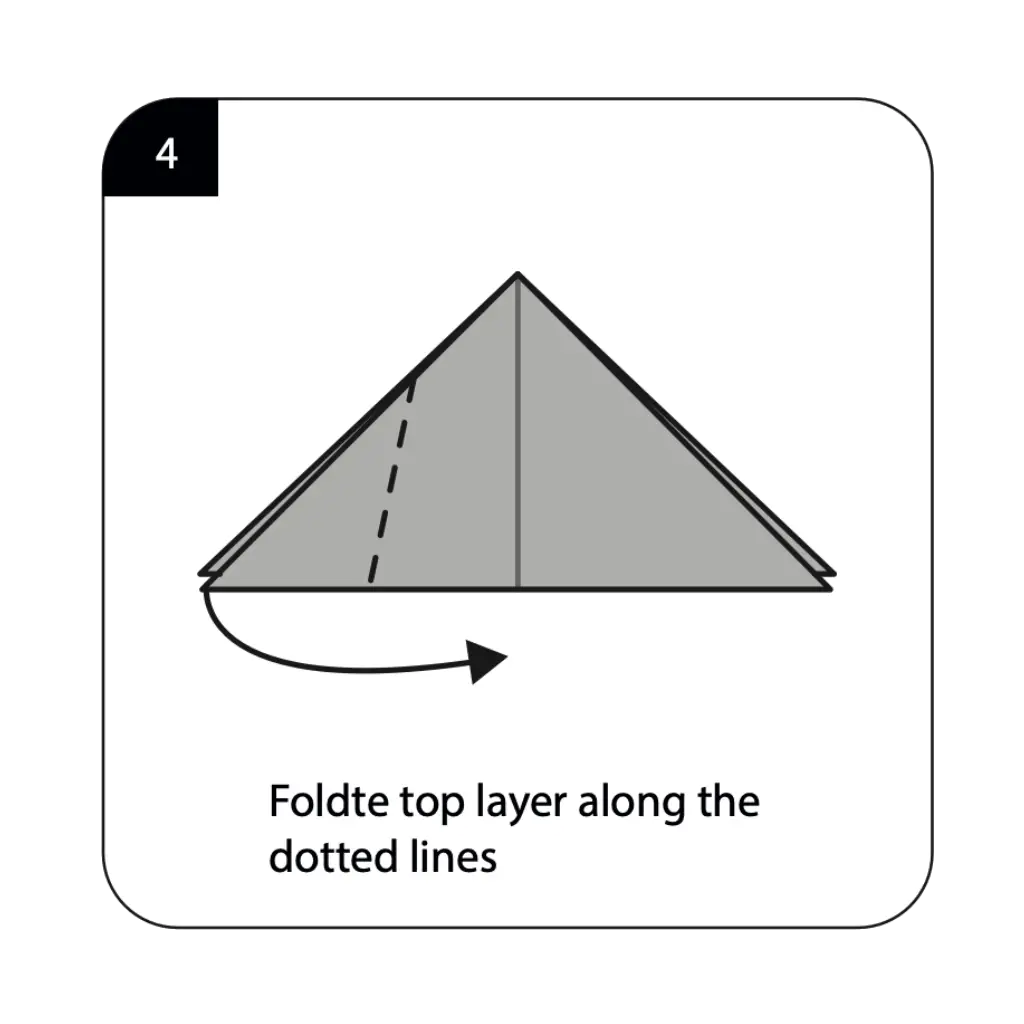
Fold the top layer along the dotted lines as indicated to begin establishing the basic form of your dolphin’s body. These strategic folds start transforming the water base into the elongated, streamlined shape characteristic of dolphins and other marine mammals. The precision of these body-shaping folds determines the proportions and elegance of your finished dolphin model. Work carefully to maintain symmetry while creating the tapered form that will eventually become the dolphin’s distinctive torpedo-shaped body, built for efficient movement through ocean waters.
Step 5: Continue Body Development For Origami Dolphin
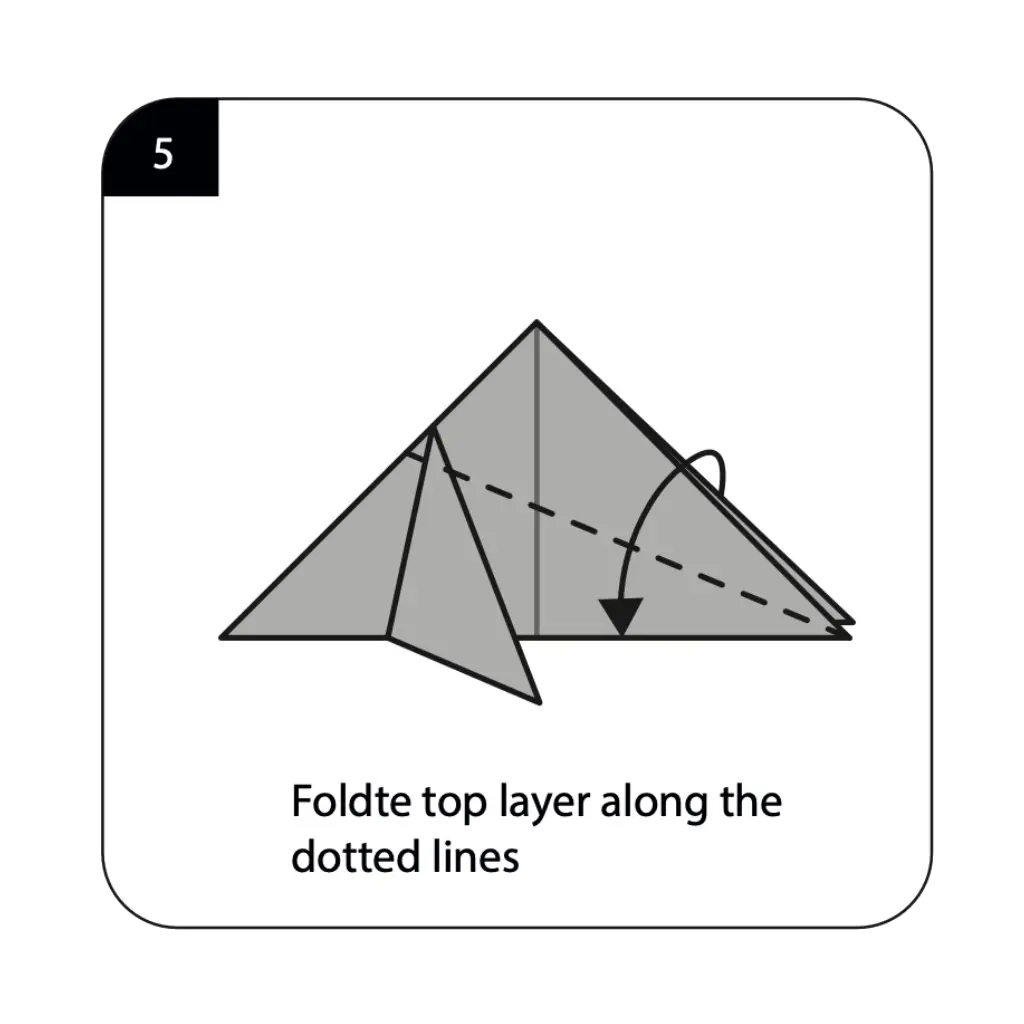
Execute another series of folds on the top layer along the dotted lines to further refine your dolphin’s body structure and proportions. These additional shaping folds add more definition to the dolphin’s form while maintaining the sleek, hydrodynamic appearance of these remarkable marine mammals. The careful execution of these folds enhances the three-dimensional quality of your origami dolphin and begins establishing the curved profile that makes dolphins instantly recognizable. This step continues building the sophisticated body structure that distinguishes this intermediate model from simpler animal designs.
Step 6: Refine the Dolphin’s Form
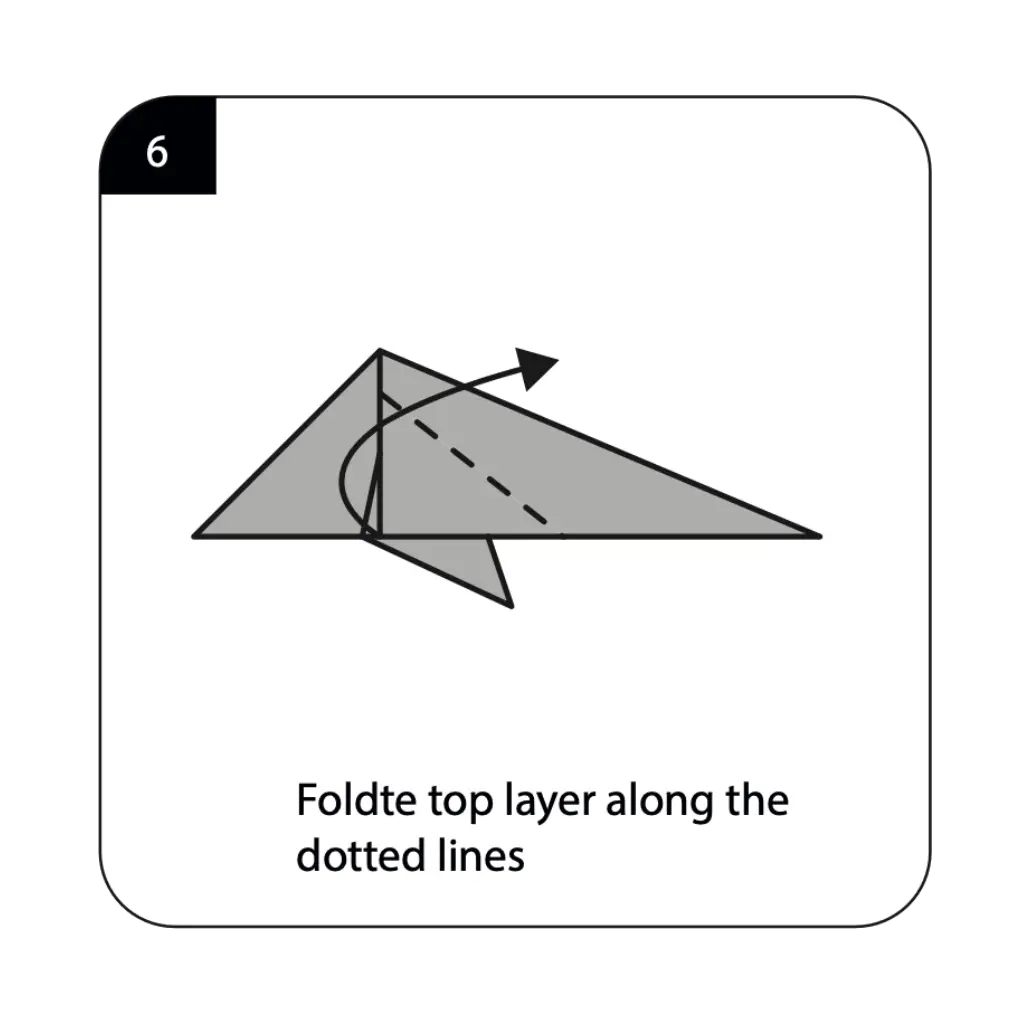
Fold the top layer along the dotted lines once more to add final definition to your dolphin’s body shape and establish proper proportions for the head and tail sections. These refinement folds create the subtle curves and angles that capture the essence of a dolphin’s graceful anatomy. The positioning of these folds affects the overall character and realism of your finished model, so take time to achieve clean, precise creases. This step completes the basic body structure and prepares your model for the detailed work that will create the dolphin’s distinctive features and fins.
Step 7: Create the Downward Body Curve For Origami Dolphin
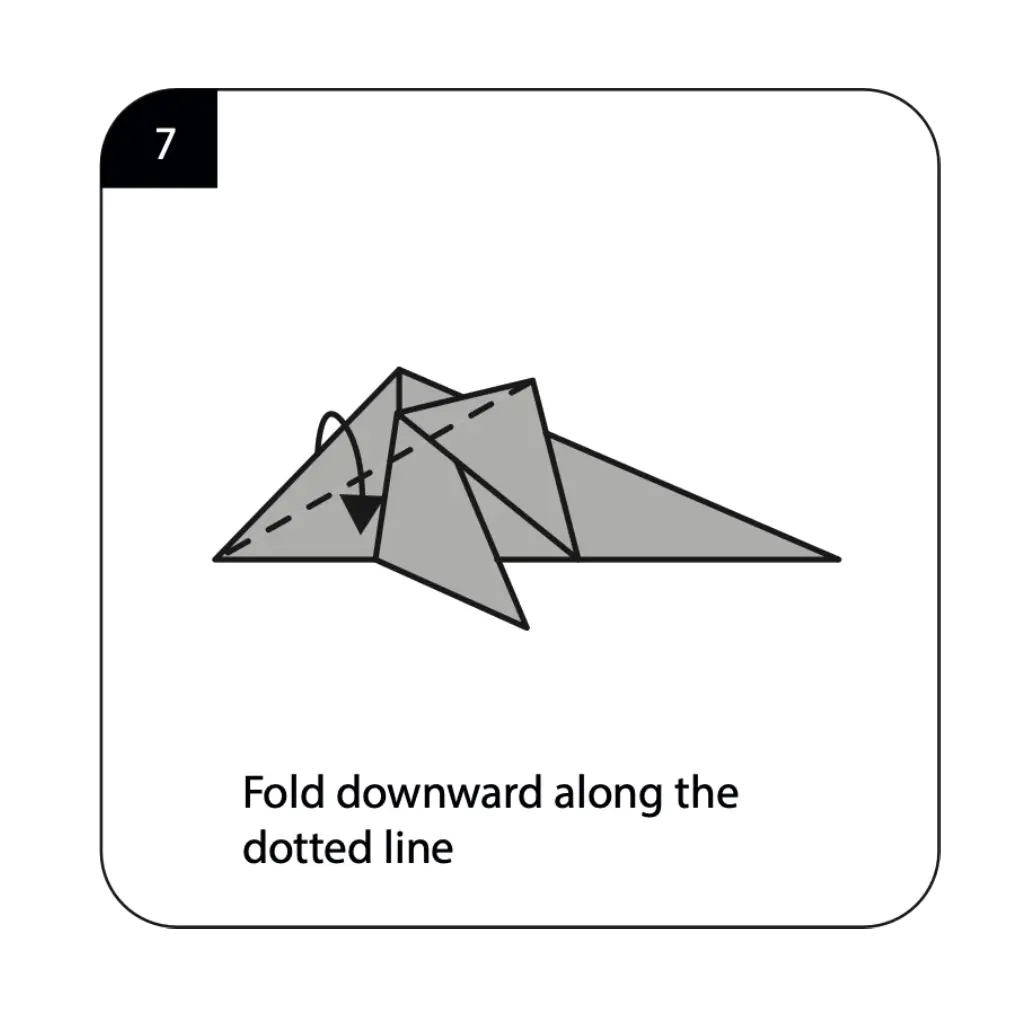
Fold downward along the dotted line as shown to establish the characteristic curved posture of a swimming dolphin. This important fold creates the arching movement that suggests the dolphin’s natural swimming motion and adds dynamic energy to your static paper model. The angle and position of this downward fold significantly impact the overall impression of movement and grace in your finished dolphin. This shaping technique demonstrates how strategic folding can capture not just the physical form but also the implied motion and behavior of living creatures.
Step 8: Form the Tail Structure For Origami Dolphin
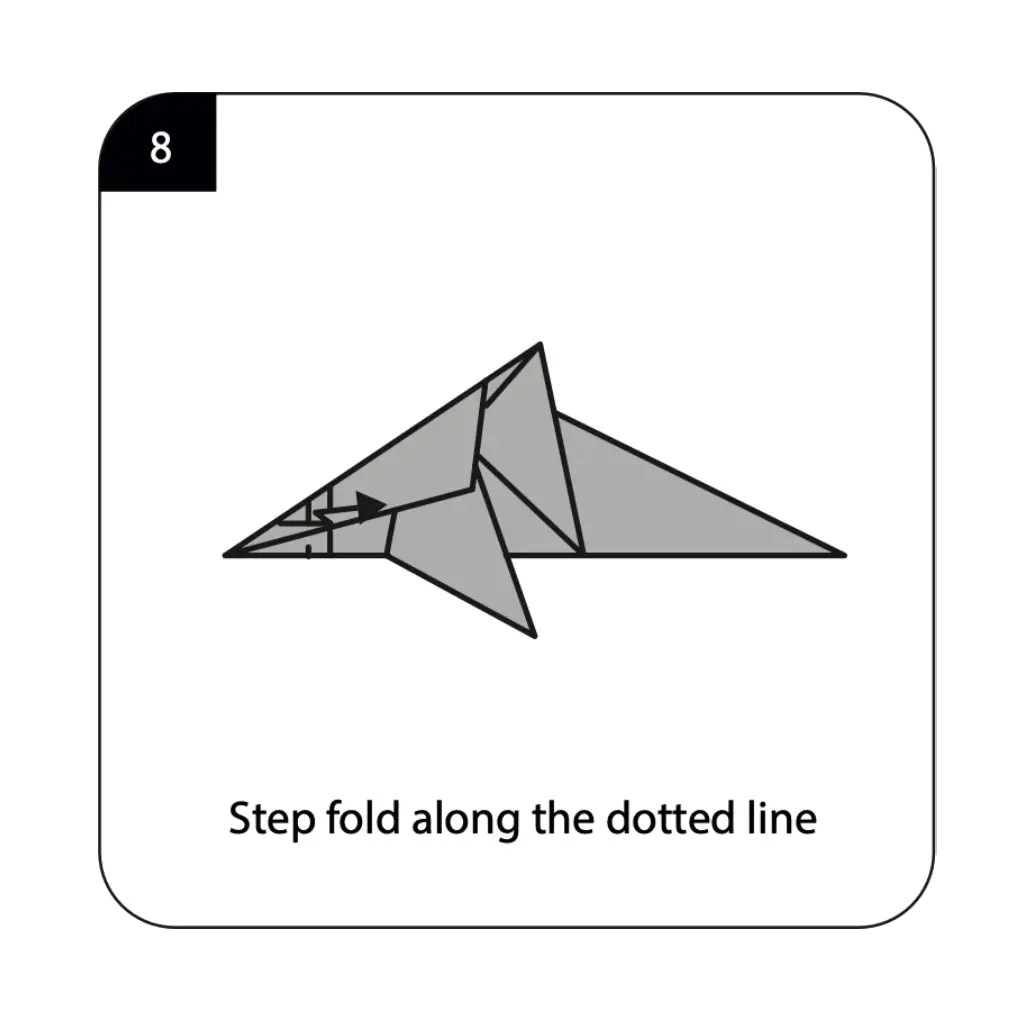
Execute a step fold along the dotted line to begin creating the dolphin’s powerful tail section. This advanced folding technique adds dimension and definition to the rear portion of your dolphin while establishing the proportional relationship between body and tail. The step fold requires careful manipulation of multiple paper layers to create the structured tail assembly that propels real dolphins through the water. This technical fold demonstrates the sophisticated techniques needed to capture the complex anatomy of marine mammals in Origami Dolphin form.
Step 9: Define the Head and Snout
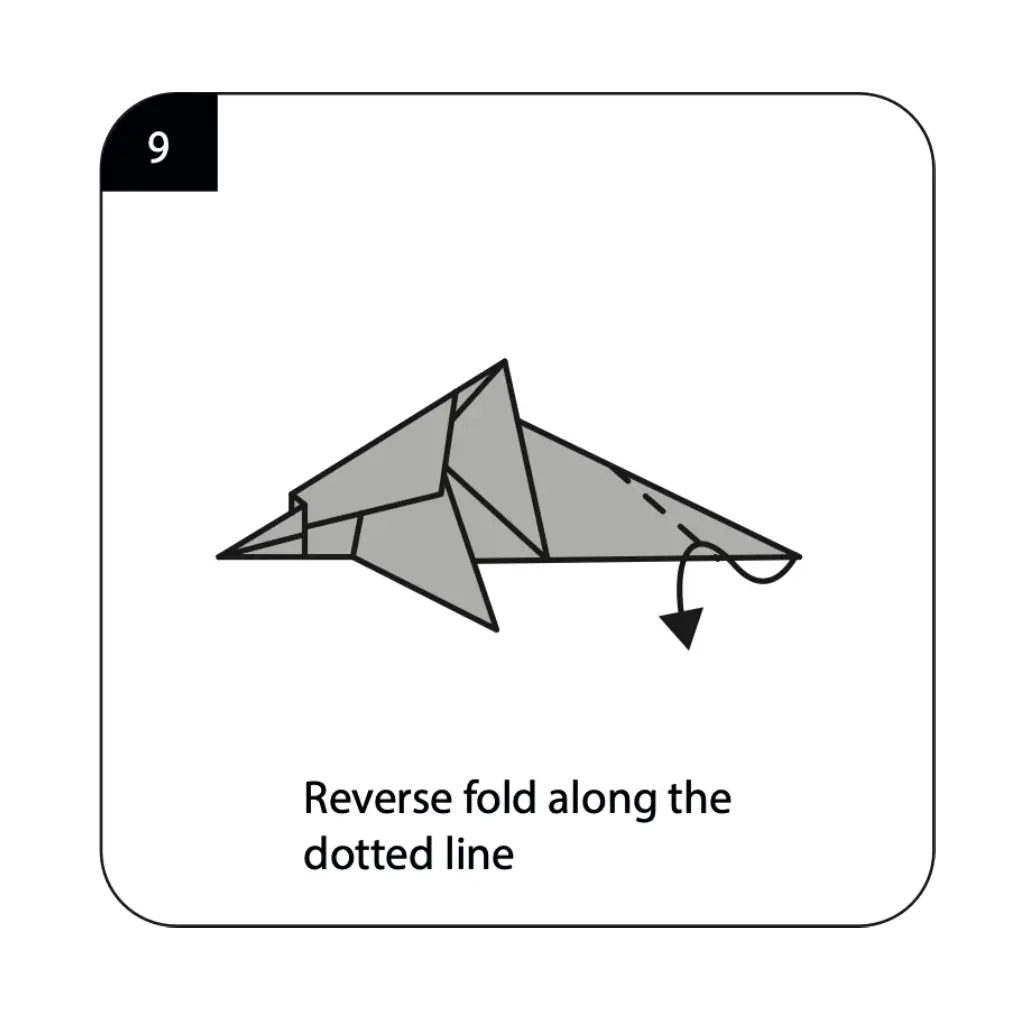
Perform a reverse fold along the dotted line to create the dolphin’s distinctive elongated snout and head shape. This advanced technique requires careful manipulation of the paper layers to form the characteristic beak-like projection that dolphins use for echolocation and feeding. The reverse fold is crucial for achieving the proper head proportions and creating the intelligent, alert expression associated with these remarkable marine mammals. This step transforms the abstract body form into a clearly recognizable dolphin with its most distinctive facial feature.
Step 10: Add the Secondary Fin
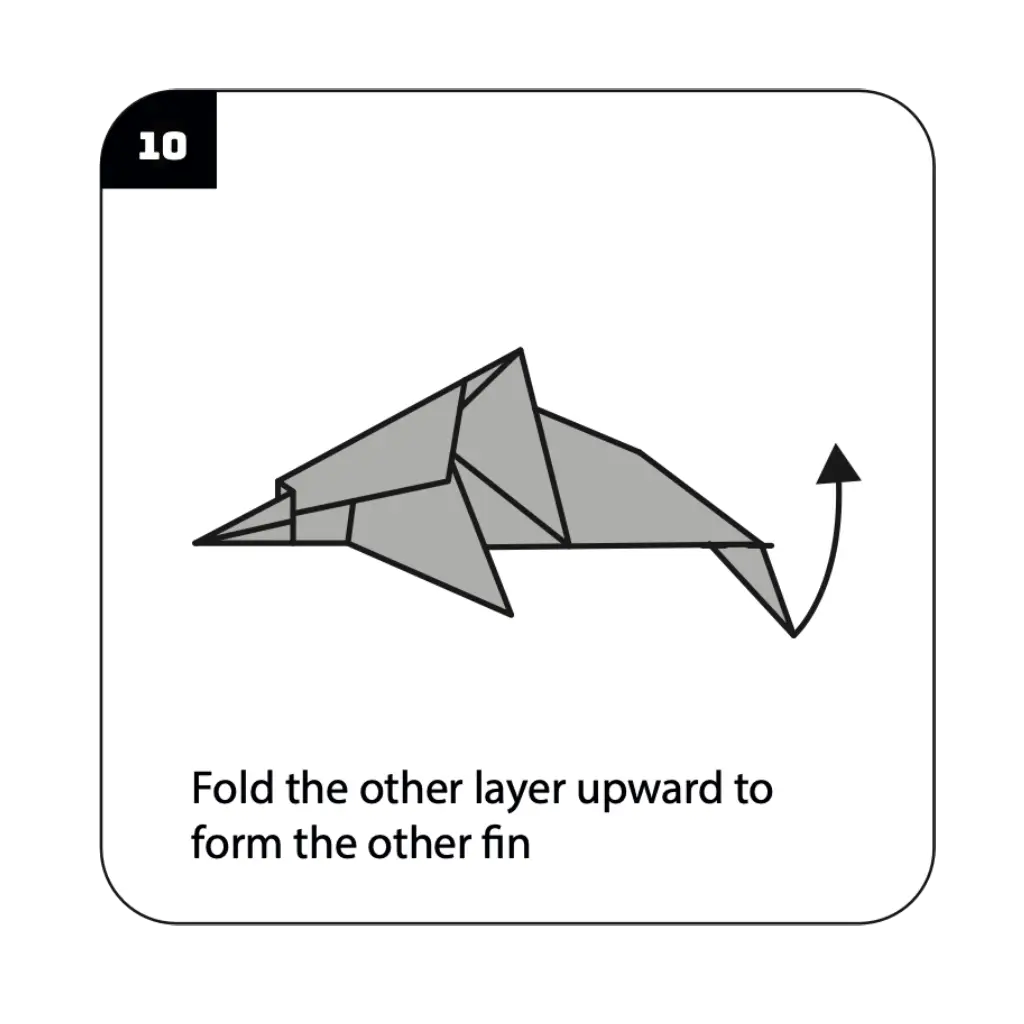
Fold the other layer upward to form the second fin, creating the paired fin structure characteristic of dolphin anatomy. This step adds symmetry and balance to your origami dolphin while enhancing its three-dimensional appearance and biological accuracy. The careful positioning of this second fin contributes to the overall stability and visual appeal of your finished model. This anatomical detail demonstrates how advanced origami can capture not just the general form but also the specific structural elements that make each animal species unique and recognizable.
Step 11: Complete the Fin Details
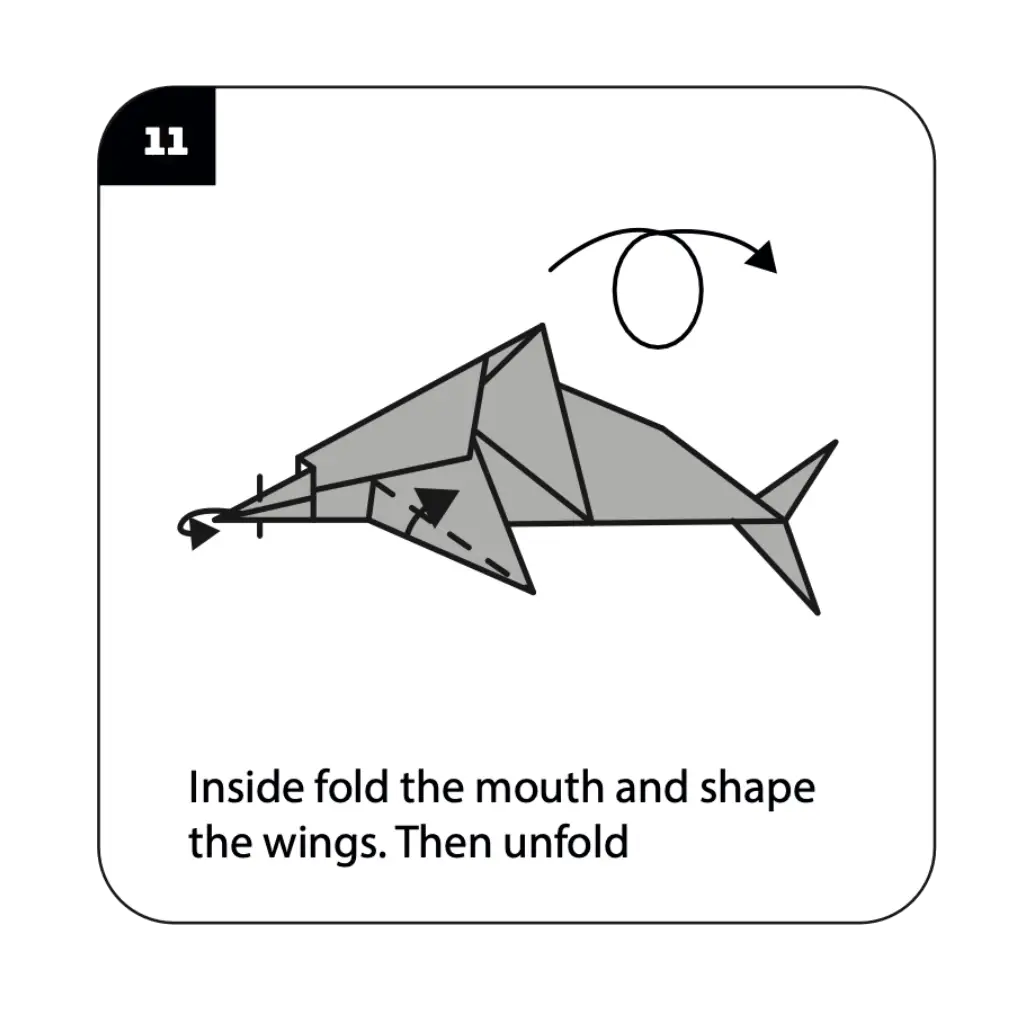
Inside fold the mouth area and shape the fins as indicated, then carefully unfold to complete the final details of your origami dolphin. This finishing technique adds the subtle refinements that distinguish a professional-quality model from simpler versions. The careful shaping of the mouth and fins requires gentle manipulation while maintaining the structural integrity of your dolphin’s body. These final details bring together all the previous folding work into a cohesive, lifelike representation that captures both the physical form and the graceful spirit of these beloved marine creatures.
Conclusion
Congratulations on completing your origami dolphin! This sophisticated paper creation represents a significant achievement in intermediate origami skills, demonstrating your mastery of complex techniques like the water base, reverse folds, and advanced shaping methods. From a simple square sheet, you’ve crafted a graceful marine mammal that captures both the physical beauty and intelligent spirit of real dolphins. The origami dolphin showcases how advanced paper folding can translate the fluid movement and organic curves of sea life into geometric precision, creating a model that’s both technically impressive and emotionally engaging. Your completed dolphin serves as both an artistic accomplishment and an educational tool that sparks conversations about marine conservation, ocean ecosystems, and the remarkable intelligence of these beloved creatures. The techniques you’ve mastered through this project—including complex base formations, layered folding, and detailed shaping—represent valuable skills that open doors to even more challenging origami designs. We hope this tutorial has deepened your appreciation for both the technical artistry of origami and the magnificent diversity of marine life that shares our planet. Remember that each dolphin you create offers opportunities to refine your technique and explore variations that capture different poses and expressions of these graceful ocean ambassadors.
- “Before attempting this intermediate dolphin, ensure you’ve mastered fundamental techniques in our Origami Basics Guide.”
- “Create a complete ocean ecosystem by exploring our Origami Animals Collection featuring whales, sharks, and sea turtles.”
- “Discover more challenging marine life projects in our Creative Origami Gallery for advanced folders.”
- “Display your dolphin with other ocean creatures using ideas from our Decorative Origami Guide for marine-themed displays.”
- “Complete your underwater scene by adding Origami Flowers to represent sea anemones and coral.”
- “Create an entire pod of dolphins using techniques from our Modular Origami Projects for impressive group displays.”
