
Introduction
The origami dragonfly represents one of the most elegant and technically challenging insect models in paper folding, described as “intermediate but widely available” for those ready to advance their Origami Dragonfly skills. This sophisticated tutorial transforms a simple square sheet into a graceful dragonfly complete with delicate wings, segmented body, and the characteristic hovering posture of these remarkable aerial predators. With fifteen detailed steps involving advanced techniques like squash folds, inside reverse folds, and precise cutting, you’ll create a paper dragonfly that captures the ethereal beauty and engineering marvel of these ancient insects. Whether for nature displays, summer decorations, or demonstrating mastery of complex Origami Dragonfly techniques, this dragonfly offers both technical challenge and stunning visual results.
Step-by-Step Instructions
Step 1: Create the Foundation Triangle For Origami Dragonfly
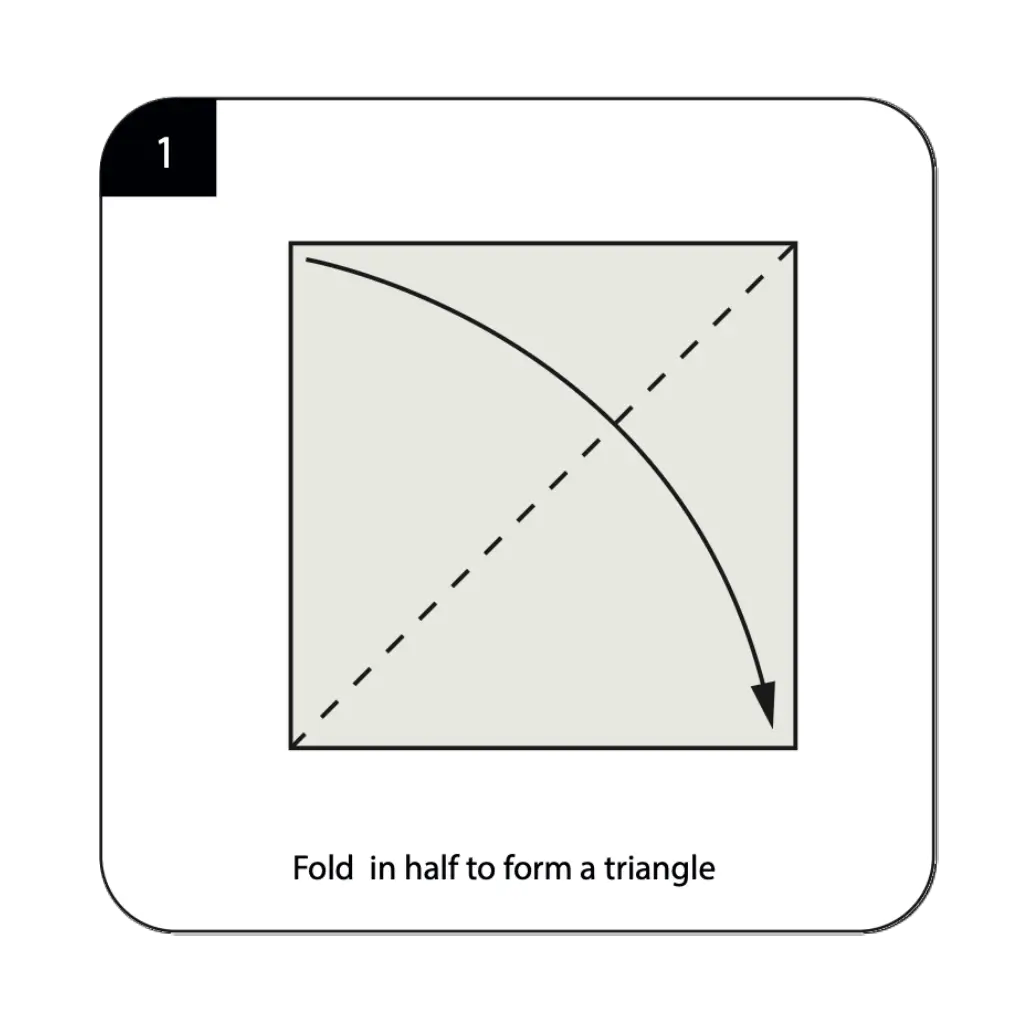
Start with a square of Origami Dragonfly paper with the non-colored (white) side facing up as specified in the instructions. Fold the paper in half to form a triangle, establishing the basic foundation for your dragonfly construction. This initial triangular fold creates the primary reference structure that will guide all subsequent folding and ensure proper proportions in your finished insect. The precision of this foundation fold is crucial for achieving the balanced, graceful appearance characteristic of dragonflies and their distinctive anatomy. Take care to align the edges perfectly and create a sharp, clean crease that will serve as the backbone for your delicate paper insect.
Step 2: Form the Secondary Triangle For Origami Dragonfly
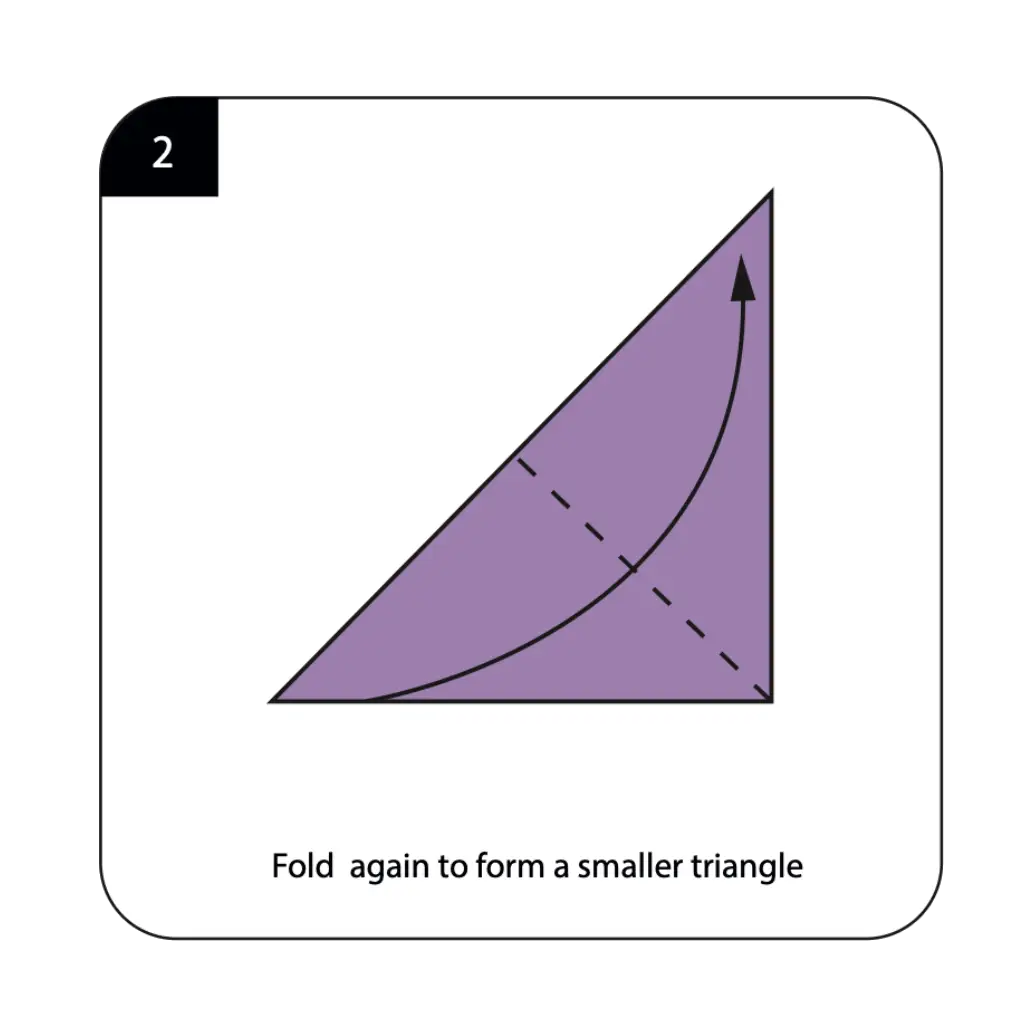
Fold the triangle again to create a smaller, more compact triangle as shown in the diagram. This secondary folding consolidates the paper into a denser form that provides the structural foundation needed for the complex wing and body formation to come. The accuracy of this double-folded triangle directly affects the symmetry and proportions of your finished dragonfly model. This step demonstrates how systematic reduction and consolidation prepare the paper for the advanced techniques required to create realistic insect anatomy through strategic geometric manipulation.
Step 3: Open and Flatten the Structure For Origami Dragonfly
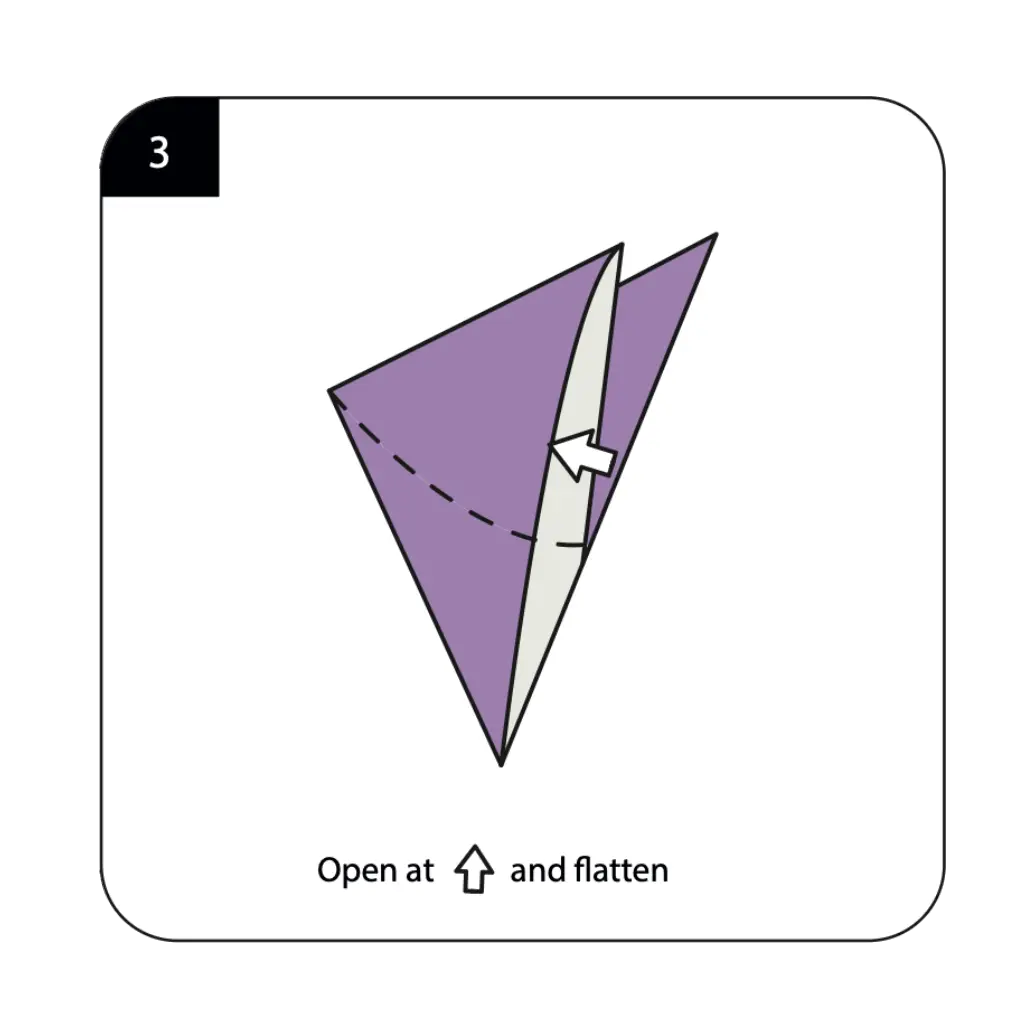
Open the folded triangle and flatten it carefully as indicated, creating the expanded base form needed for the dragonfly’s wing development. This opening and flattening technique transforms the compact triangle into a working surface suitable for the complex wing formation that distinguishes dragonflies from other insects. The gentle manipulation required for this step demonstrates how careful handling can prepare folded paper for advanced shaping without compromising structural integrity. Work slowly and deliberately during this opening process to maintain clean crease lines while creating the foundation for your dragonfly’s characteristic four-wing structure.
Step 4: Repeat the Pocket Formation For Origami Dragonfly
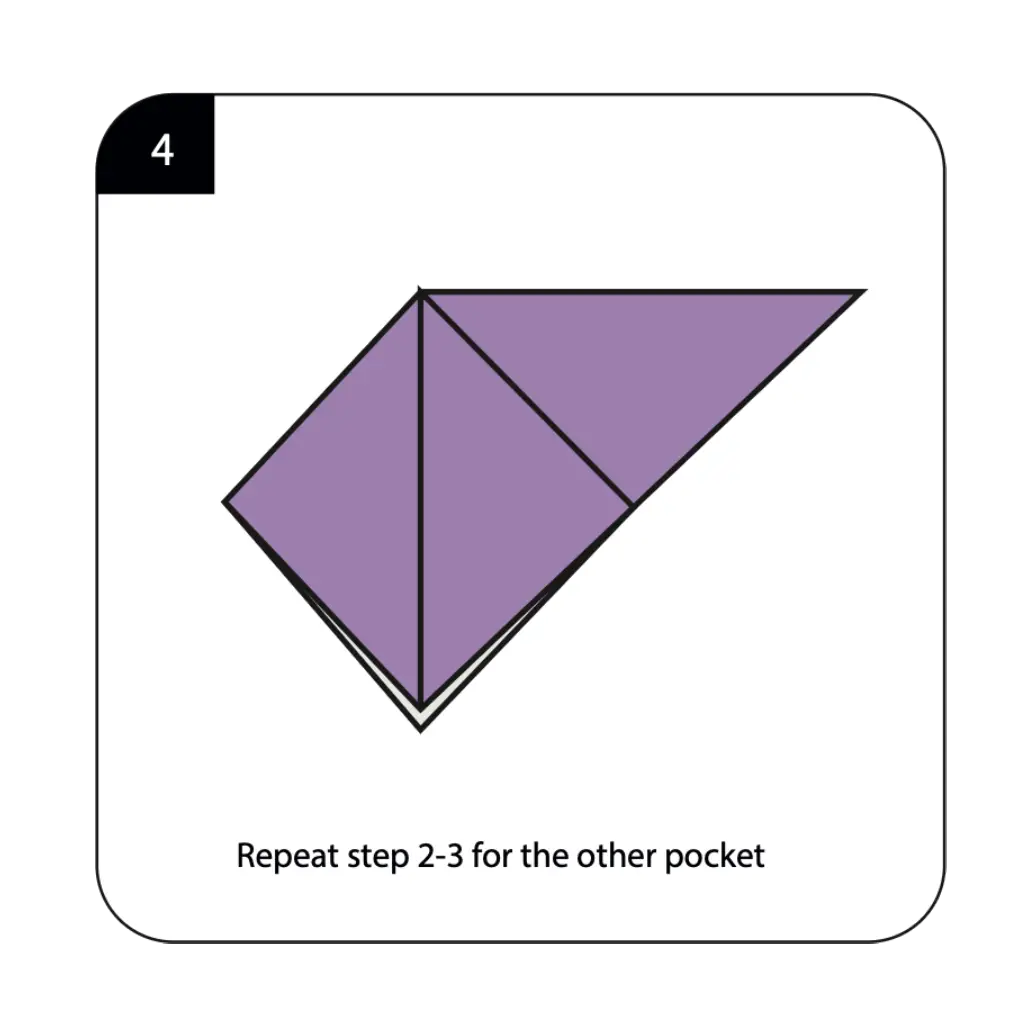
Repeat steps 2-3 for the other pocket as indicated, ensuring symmetrical development on both sides of your dragonfly model. This systematic repetition creates balanced wing structures that mirror the natural symmetry found in real dragonflies and their perfectly matched wing pairs. The consistency between both pocket formations is crucial for achieving the harmonious proportions that make dragonflies such graceful and efficient fliers. This step emphasizes how methodical technique and attention to symmetry combine to create the foundation for realistic insect representation through paper folding artistry.
Step 5: Create Reference Creases For Origami Dragonfly

Fold the corner along the dotted line and unfold to create a permanent reference crease that will guide subsequent wing shaping. This crease-and-unfold technique establishes important guidelines without committing to permanent folds, allowing for precise alignment in later steps. The strategic placement of this reference crease affects the wing proportions and overall balance of your finished dragonfly model. This step demonstrates how preparatory creasing can enhance the accuracy and professional appearance of complex Origami Dragonfly models by providing reliable reference points for advanced folding techniques.
Step 6: Execute the Squash Fold For Origami Dragonfly
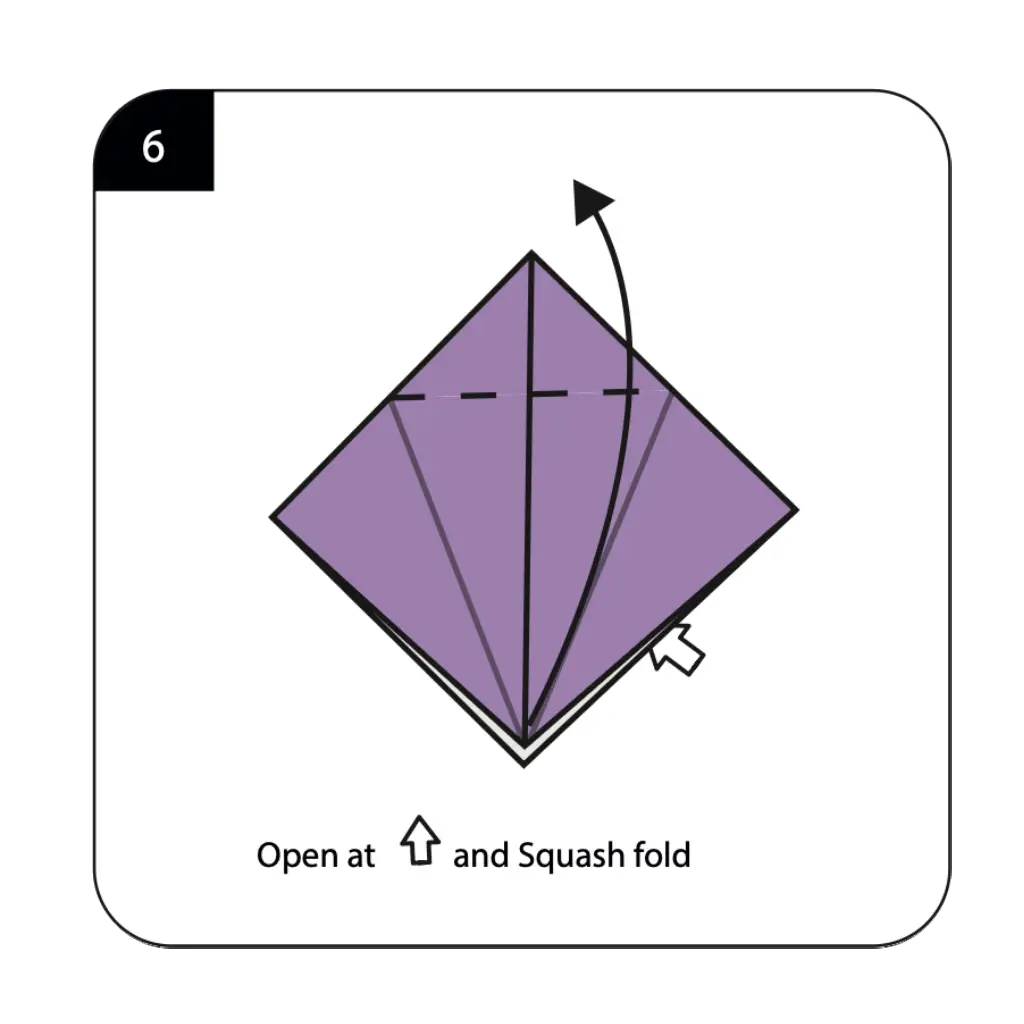
Open and perform a squash fold as shown in the diagram, using this advanced technique to create the dimensional wing structure characteristic of dragonflies. The squash fold requires careful manipulation of multiple paper layers simultaneously while maintaining the integrity of your established foundation structure. This technical fold is crucial for creating the broad, flat wing surfaces that enable dragonflies’ remarkable aerial capabilities and hovering flight patterns. The successful execution of this squash fold significantly enhances the three-dimensional quality and realistic wing appearance of your origami dragonfly model.
Step 7: Complete the Back Wing Structure For Origami Dragonfly
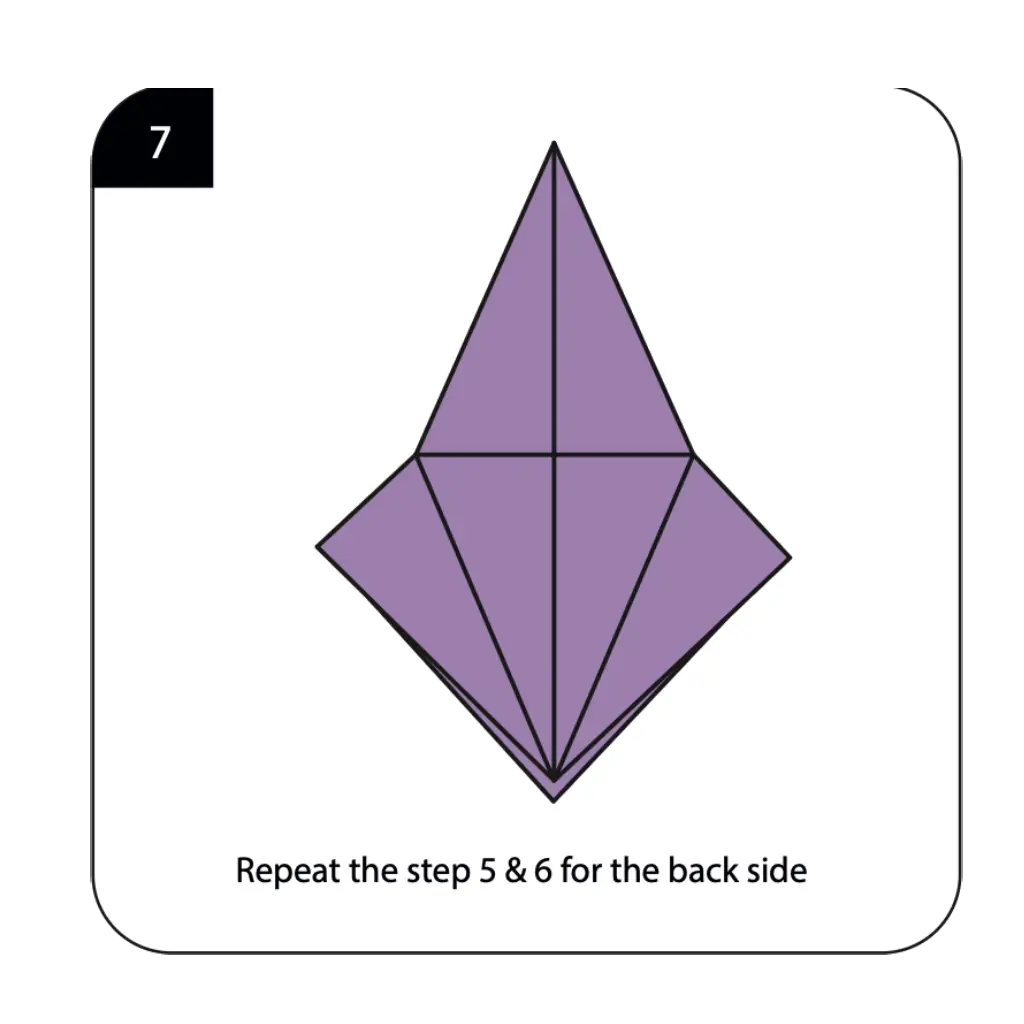
Repeat steps 5 and 6 for the back side as indicated, ensuring that all four wing sections receive identical treatment for perfect symmetry. This systematic completion of wing formation creates the complete set of four wings that characterizes dragonflies and distinguishes them from other flying insects. The precision of this back-side repetition determines how well your finished model displays the balanced wing arrangement essential for realistic dragonfly representation. This step demonstrates how thorough attention to symmetrical construction creates the foundation for models that accurately capture the natural proportions of living creatures.
Step 8: Shape the Body Structure For Origami Dragonfly

Fold along the dotted line toward the center of the model to begin creating the dragonfly’s distinctive elongated body and thorax section. This central fold establishes the proportional relationship between the wing assembly and the body, creating the characteristic silhouette that makes dragonflies instantly recognizable. The positioning of this body-defining fold affects the overall balance and realistic appearance of your finished insect model. This step begins the transformation from abstract wing structure to a clearly identifiable dragonfly through the creation of the segmented body that houses the insect’s vital organs and flight muscles.
Step 9: Complete Symmetrical Body Formation For Origami Dragonfly
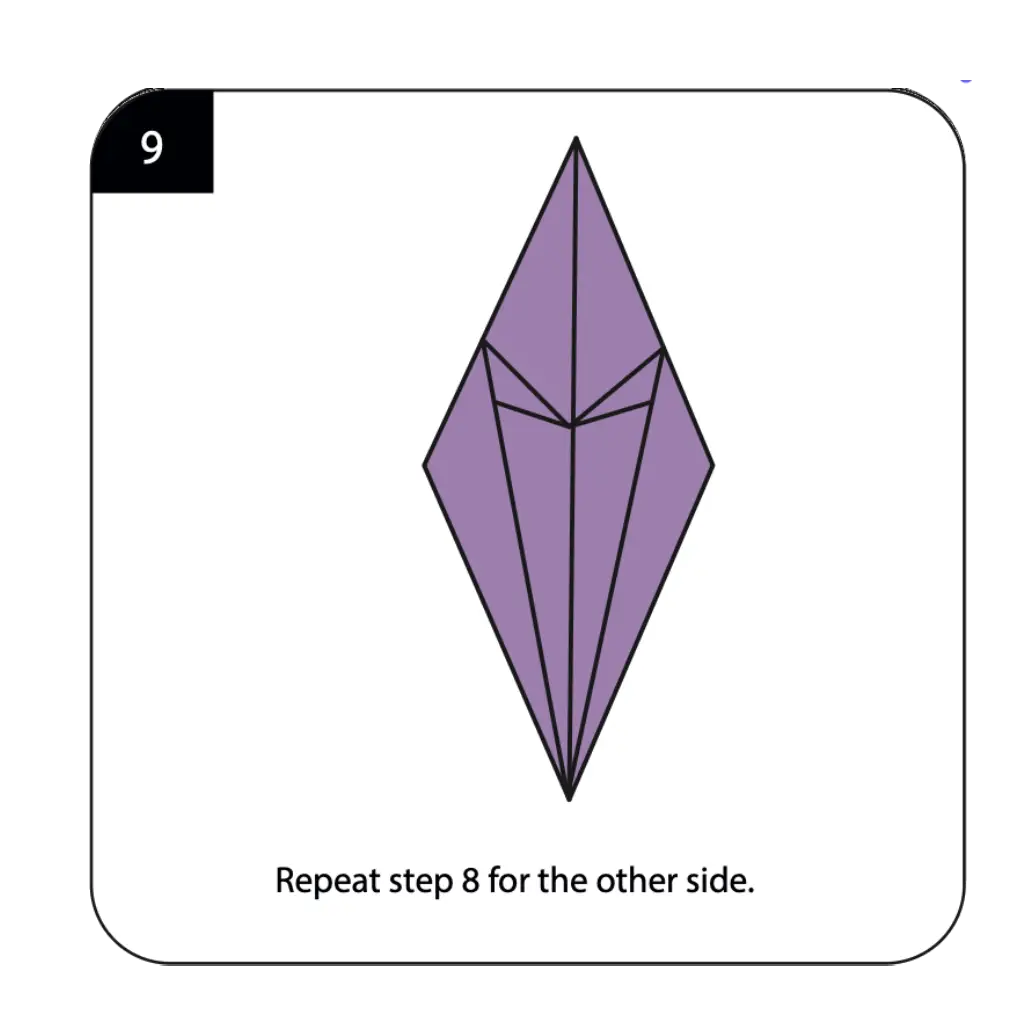
Repeat step 8 for the other side as indicated, ensuring that both sides of the body receive identical treatment for balanced construction. This symmetrical body formation creates the streamlined thorax section that connects the wing assembly to the dragonfly’s head and tail segments. The consistency between both body sides determines how well your model captures the precise engineering of real dragonflies and their optimized body structure. This step emphasizes how bilateral symmetry in folding techniques mirrors the natural symmetry found in living insects and their evolutionary adaptations for efficient flight.
Step 10: Create Internal Wing Structure
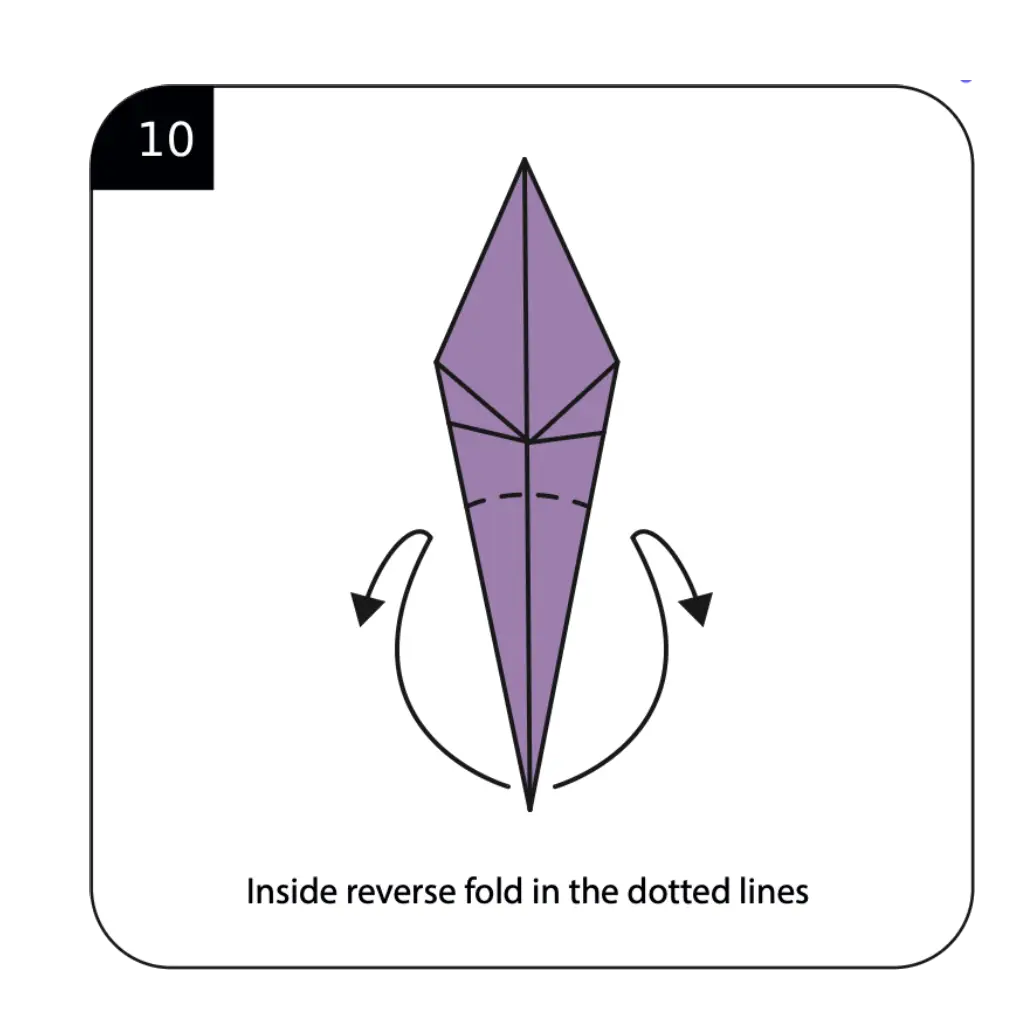
Perform inside reverse folds along the dotted lines to create the internal wing structure that adds realism and dimension to your dragonfly model. These advanced reverse folds require careful manipulation of the paper layers to create the subtle wing details that distinguish professional-quality models from simpler versions. The precision of these internal folds affects how convincingly your paper dragonfly represents the complex wing structure of real insects. This step demonstrates how advanced Origami Dragonfly techniques can capture the intricate details that make the difference between abstract representation and lifelike insect models.
Step 11: Shape the Wing Extensions
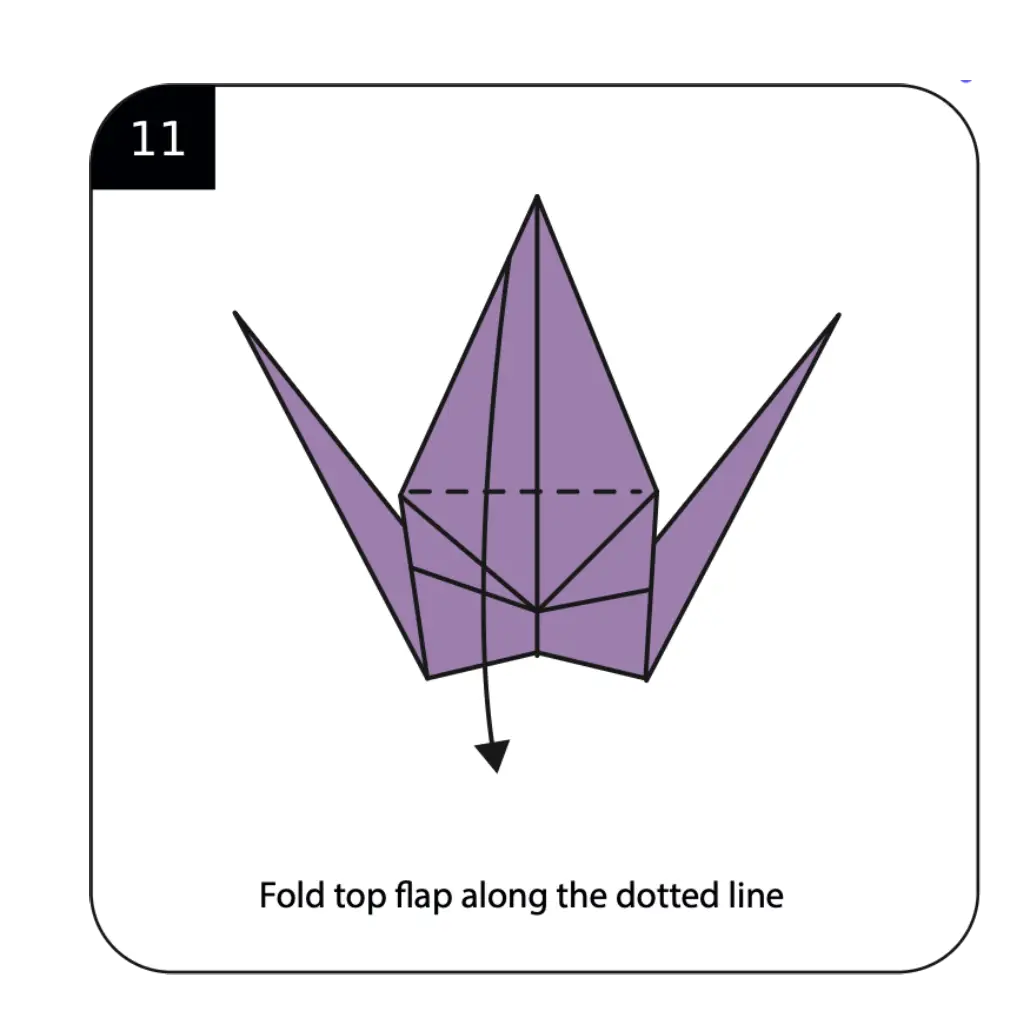
Fold the top flap along the dotted line to create the extended wing structure that gives dragonflies their characteristic wingspan and flight capability. This wing extension fold establishes the proper proportions between body and wings while creating the broad surface area needed for the dragonfly’s hovering flight patterns. The angle and positioning of this extension fold significantly impact the dynamic appearance and realistic proportions of your finished model. This step transforms your basic wing structure into the impressive wing span that makes dragonflies such effective aerial predators and masters of flight.
Step 12: Define Head and Tail Sections
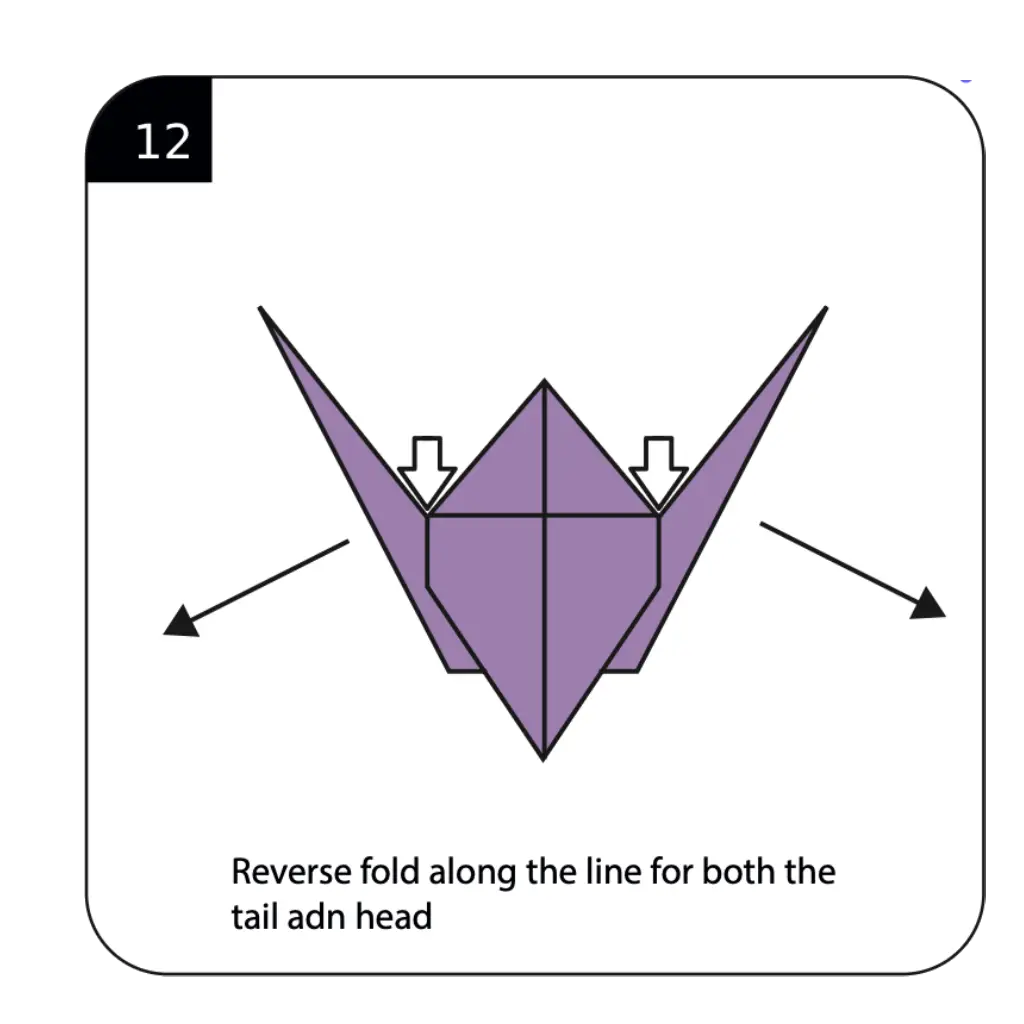
Perform reverse folds along the designated lines for both the tail and head sections, creating the distinctive pointed extremities of your dragonfly. These dual reverse folds establish the elongated body segments that house the dragonfly’s sensory organs and reproductive systems while creating the streamlined profile essential for efficient flight. The precision of these head and tail formations determines how well your model captures the characteristic body proportions of real dragonflies. This step completes the basic anatomical structure and prepares your model for the final detailing that will bring it to life.
Step 13: Create the Body Tip
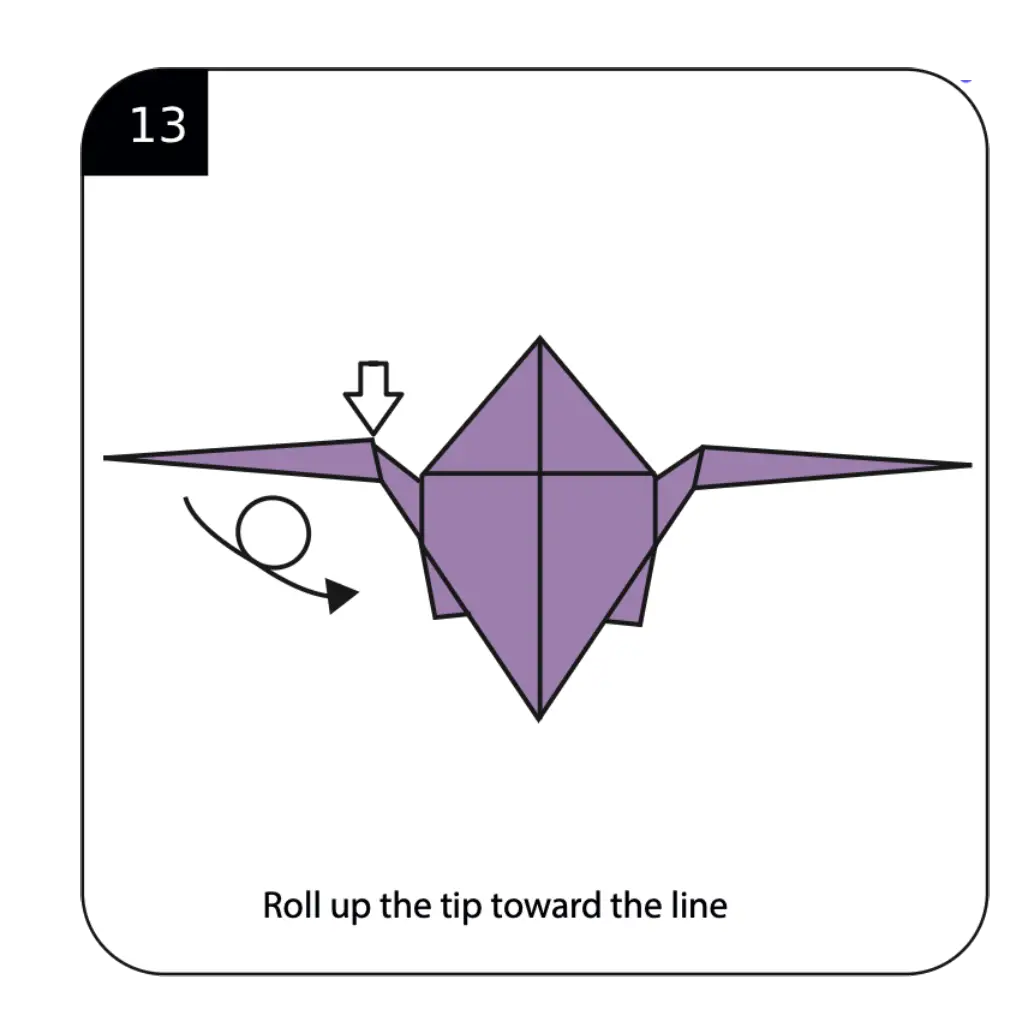
Roll up the tip toward the designated line to form the tapered end of the dragonfly’s abdomen, creating the realistic body termination found in living insects. This rolling technique adds dimension and natural curvature to the tail section while demonstrating how Origami Dragonfly can capture organic forms through geometric manipulation. The careful execution of this body tip formation enhances the lifelike quality of your paper dragonfly and adds to its overall realistic appearance. This step shows how attention to anatomical details elevates Origami Dragonfly models from simple representations to convincing recreations of natural forms.
Step 14: Add Structural Definition
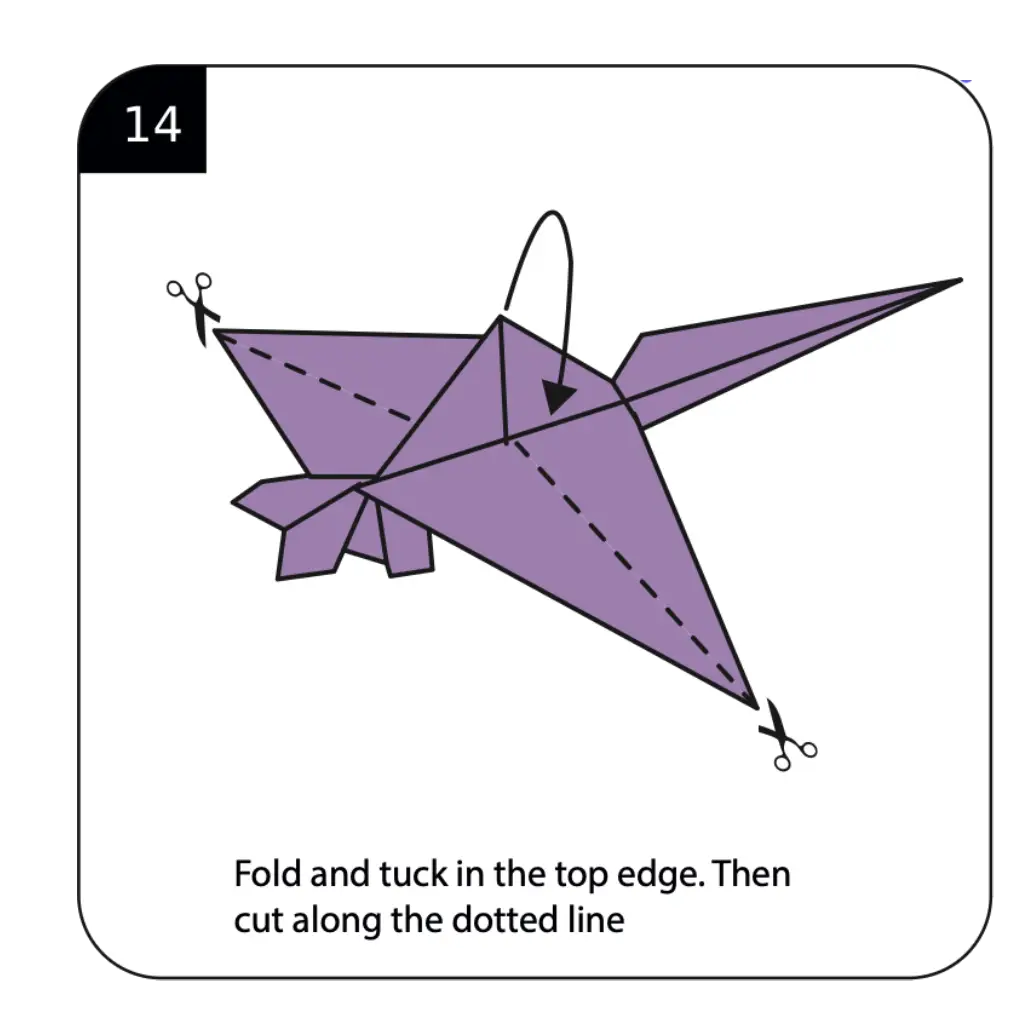
Fold and tuck in the top edge, then cut along the dotted line to create the structural definition needed for your dragonfly’s final form. This combination of folding and cutting techniques allows for the precise shaping that captures the complex geometry of dragonfly anatomy. The strategic cutting enhances the model’s realism while maintaining the structural integrity essential for display and handling. This step demonstrates how traditional Origami Dragonfly techniques can be enhanced with minimal cutting to achieve greater anatomical accuracy and visual impact.
Step 15: Complete Your Origami Dragonfly
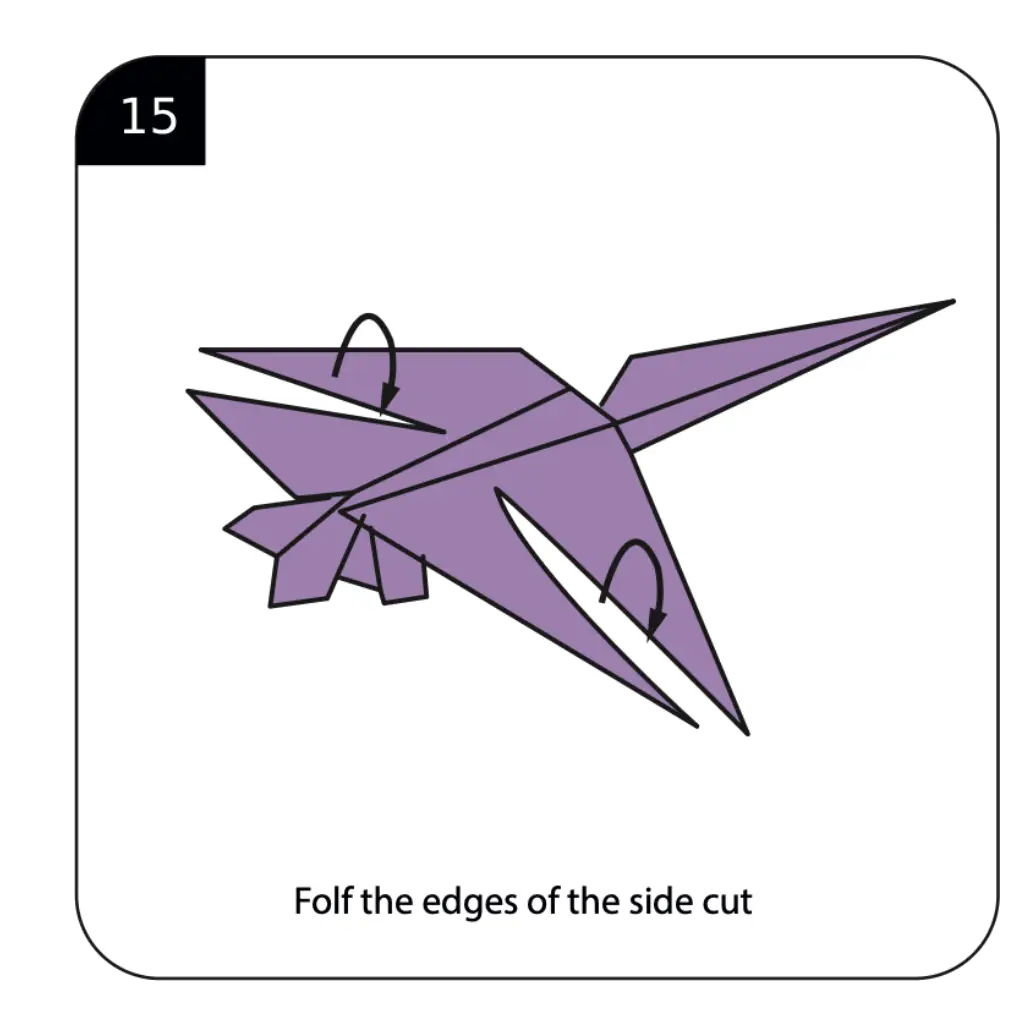
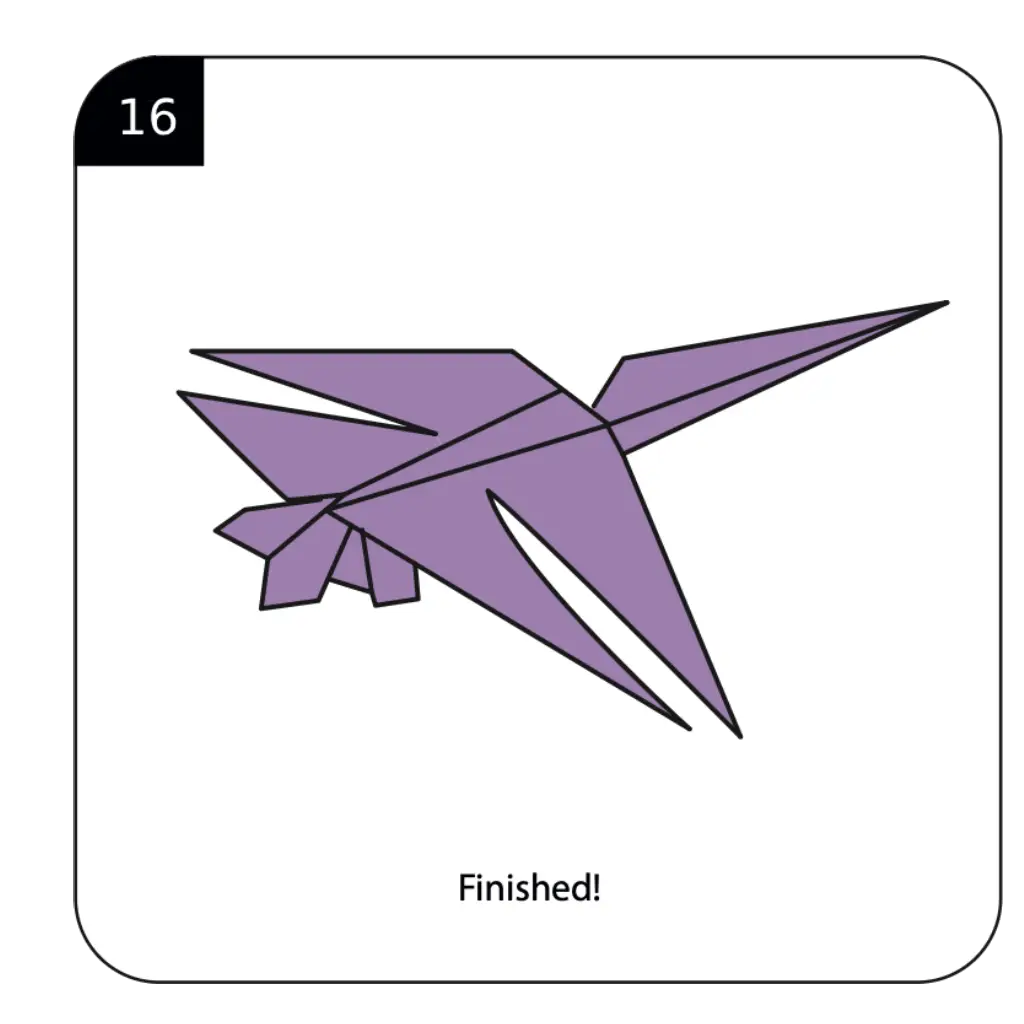
Fold the edges of the side cuts to create the final details that complete your dragonfly’s transformation from paper to lifelike insect. These finishing folds refine the wing edges and body details, adding the subtle touches that distinguish masterful Origami Dragonfly from basic models. Your completed origami dragonfly now displays all the characteristic features of these remarkable insects—the four delicate wings, segmented body, and graceful proportions that make them such efficient aerial hunters. The finished model showcases advanced paper folding techniques while capturing the ethereal beauty and engineering marvel of one of nature’s most ancient and successful flying creatures, ready to grace nature displays, demonstrate advanced origami skills, or serve as an elegant reminder of the intricate beauty found in the insect world.
Conclusion
Your origami dragonfly represents a significant achievement in advanced paper folding, demonstrating mastery of complex techniques while capturing the delicate beauty of these ancient aerial masters. This sophisticated model combines technical precision with artistic interpretation, creating a paper insect that embodies both the grace and engineering marvel of real dragonflies. The advanced techniques you’ve conquered—including squash folds, inside reverse folds, and precision cutting—establish you among skilled Origami Dragonfly artists capable of tackling the most challenging designs. Your completed dragonfly serves as both an impressive display piece and a testament to the remarkable complexity achievable through dedicated practice and precise execution.
- “Build advanced skills with prerequisite techniques in our Origami Basics for Beginners before attempting this challenging dragonfly.”
- “Create complete pond ecosystems with aquatic creatures from our Origami Animals Collection featuring frogs, fish, and water birds.”
- “Explore more complex insect models in our Creative Origami Gallery for expert-level challenges.”
- “Display your dragonfly in nature scenes using ideas from our Decorative Origami Guide for impressive arrangements.”
- “Add pond plants and water lilies from our Origami Flowers Collection to complete your dragonfly’s habitat.”
- “Create swarms of dragonflies using advanced techniques from our Modular Origami Projects for stunning group displays.”
