
Introduction
Origami, the ancient Japanese art of paper folding, offers countless opportunities to create spooky and delightful characters that capture the spirit of Halloween and autumn celebrations. The origami ghost stands out as one of the most charming and accessible Halloween projects, described as “perfect for Halloween, easy folds” that transform a simple square sheet of paper into a friendly specter that’s more cute than scary. This beginner-friendly tutorial demonstrates how to create a recognizable ghost with the characteristic flowing shape, mysterious presence, and whimsical personality that makes these supernatural characters beloved figures in Halloween folklore. What makes this origami ghost particularly appealing is its perfect balance of spooky theme and accessible technique—the distinctive floating silhouette, ethereal appearance, and characteristic ghost features make it instantly identifiable while requiring only basic folding skills that children and adults can master together. Unlike more complex Halloween models, this ghost design achieves maximum spooky charm through just eight straightforward steps, making it ideal for classroom Halloween activities, seasonal decorating projects, or creating an entire haunted house full of friendly paper spirits. The completed model captures the essence of these mysterious beings while maintaining the playful, non-threatening character that makes ghosts perfect for family-friendly Halloween celebrations and autumn crafting activities.
Step-by-Step Instructions
Step 1: Create the Foundation Reference Crease For Origami Ghost

Start with a square of origami paper placed diagonally with the non-colored (white) side facing up as specified in the instructions. Fold the paper in half to create a strong crease, then fold it back to establish the central reference line for your ghost. This initial fold creates the fundamental guideline that ensures proper symmetry and proportions in your finished Halloween ghost. The precision of this foundation crease is crucial for achieving the balanced, floating appearance characteristic of ghosts in popular culture. Take care to align the edges perfectly and create a sharp, well-defined fold that will serve as the backbone for your spooky paper creation throughout the entire folding process.
Step 2: Form the Basic Ghost Shape For Origami Ghost

Fold the paper to meet the center line as shown in the diagram, beginning to establish the distinctive ghost silhouette. These strategic folds create the initial structure that will become your ghost’s flowing, ethereal form. The accuracy of these center-meeting folds directly affects the symmetry and recognizable ghost shape of your finished model. Work carefully to ensure both sides fold identically toward the center line, creating the balanced proportions that give your origami ghost its characteristic floating appearance. This step begins transforming the flat diamond shape into the elongated form that will eventually become your friendly Halloween specter.
Step 3: Define the Ghost’s Body Structure For Origami Ghost
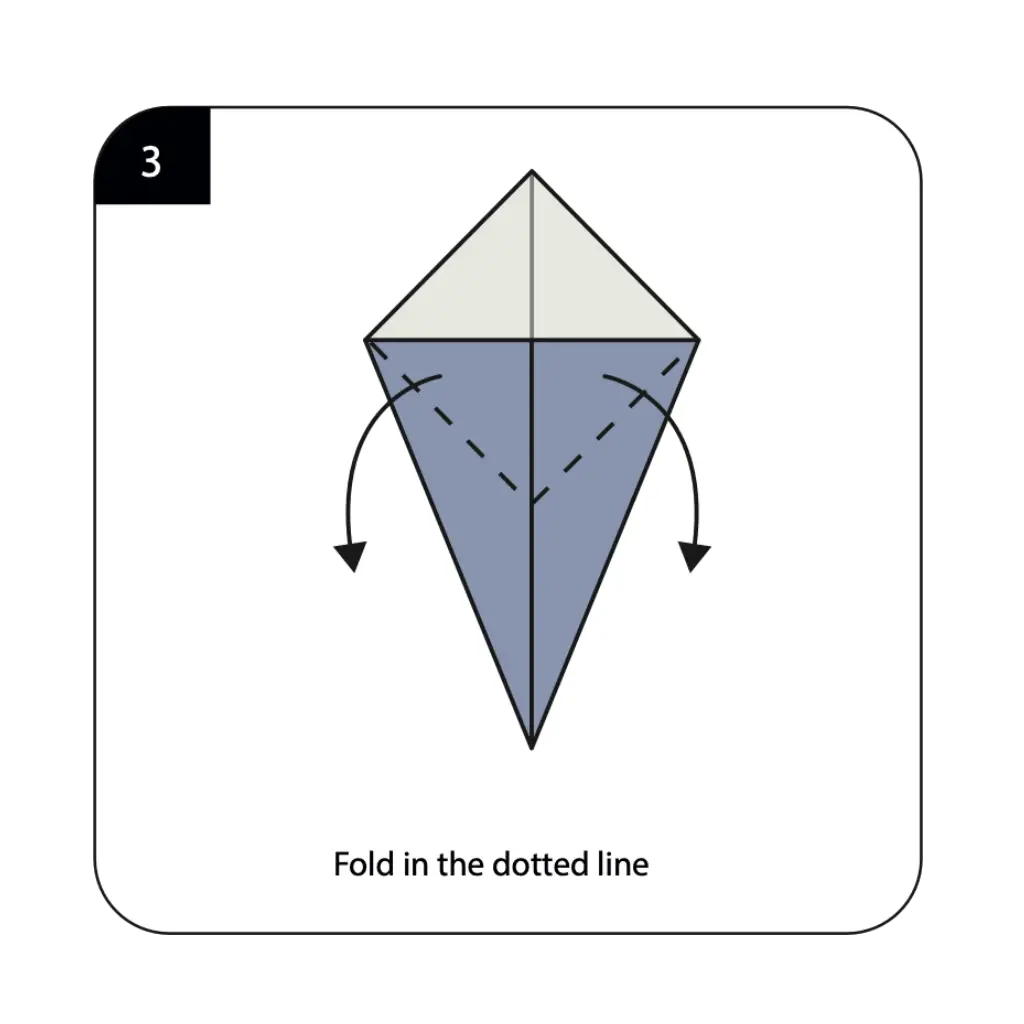
Fold along the dotted line as indicated in the diagram to further refine your ghost’s distinctive shape and proportions. This important fold continues developing the flowing, tapered form that makes ghosts instantly recognizable in Halloween imagery. The position and angle of this fold affects the overall character and appearance of your finished ghost, influencing whether it appears more whimsical or mysterious. This shaping step enhances the three-dimensional quality of your origami while maintaining the clean, geometric aesthetic that characterizes traditional paper folding techniques, creating a ghost that’s both spooky and sophisticated.
Step 4: Create the Head and Body Definition For Origami Ghost
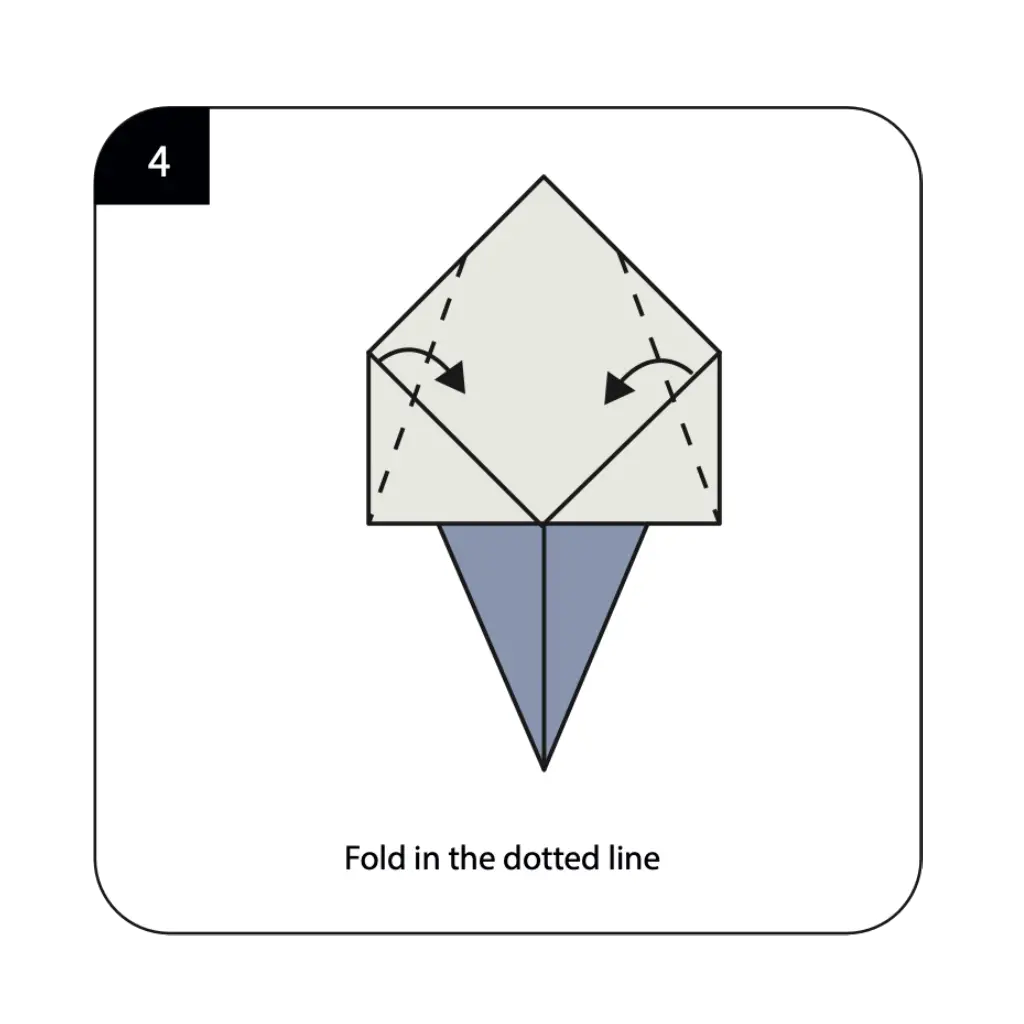
Fold along the dotted line as shown to establish clear definition between your ghost’s head and flowing body sections. This crucial fold creates the proportional relationship that makes your origami instantly recognizable as a ghost rather than an abstract shape. The careful execution of this fold determines how well your finished model captures the classic ghost silhouette with its distinctive head-to-body ratio. Work precisely to ensure this fold enhances the ghost’s characteristic appearance while maintaining structural stability that allows your paper specter to display properly as a Halloween decoration or playful craft creation.
Step 5: Develop the Flowing Ghost Form
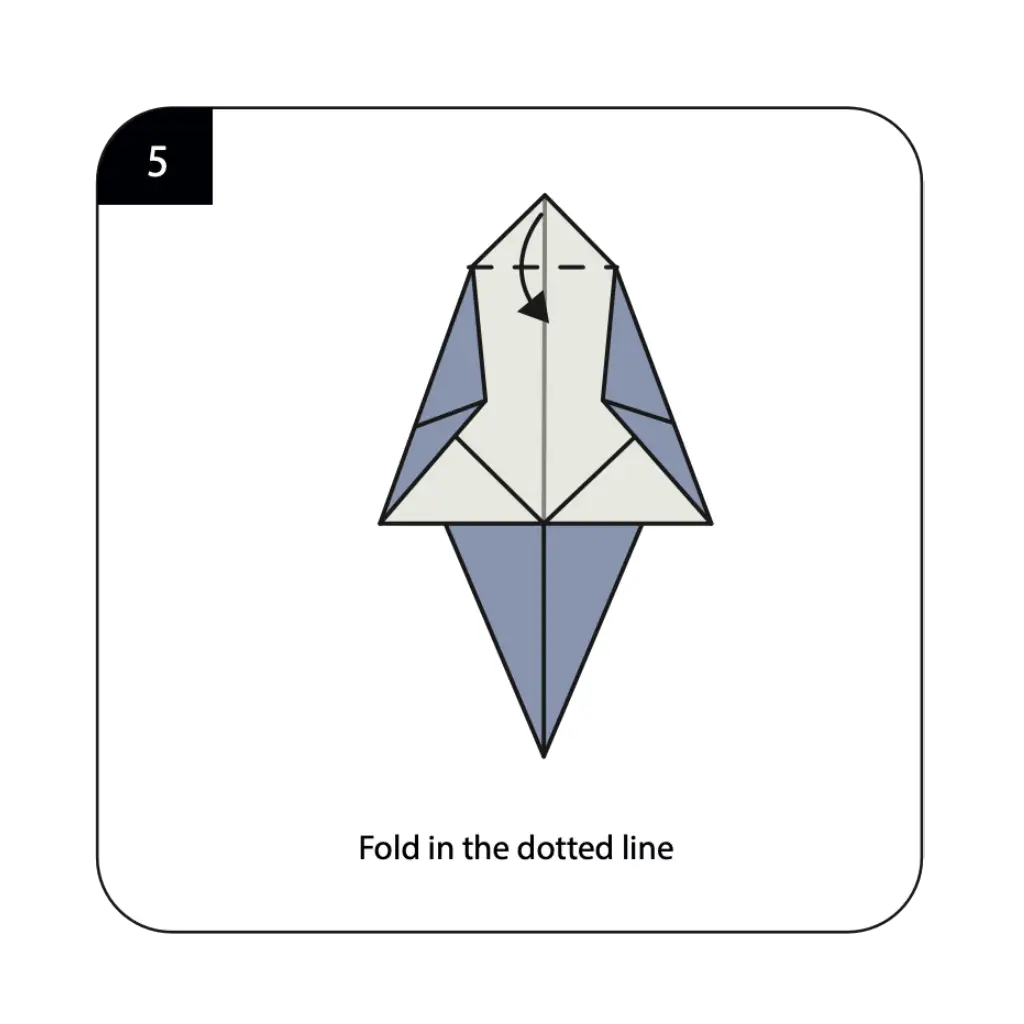
Execute another fold along the dotted line as indicated to continue refining your ghost’s ethereal, flowing appearance. This fold adds more definition to the ghost’s body while enhancing the sense of movement and floating quality that characterizes these supernatural beings. The strategic placement of this fold contributes to the overall grace and mystery of your origami ghost’s silhouette. This step continues building the distinctive tapered shape that flows from the rounded head to the wispy bottom, creating the characteristic form that makes ghosts such recognizable and beloved figures in Halloween folklore and seasonal celebrations.
Step 6: Finalize the Body Structure
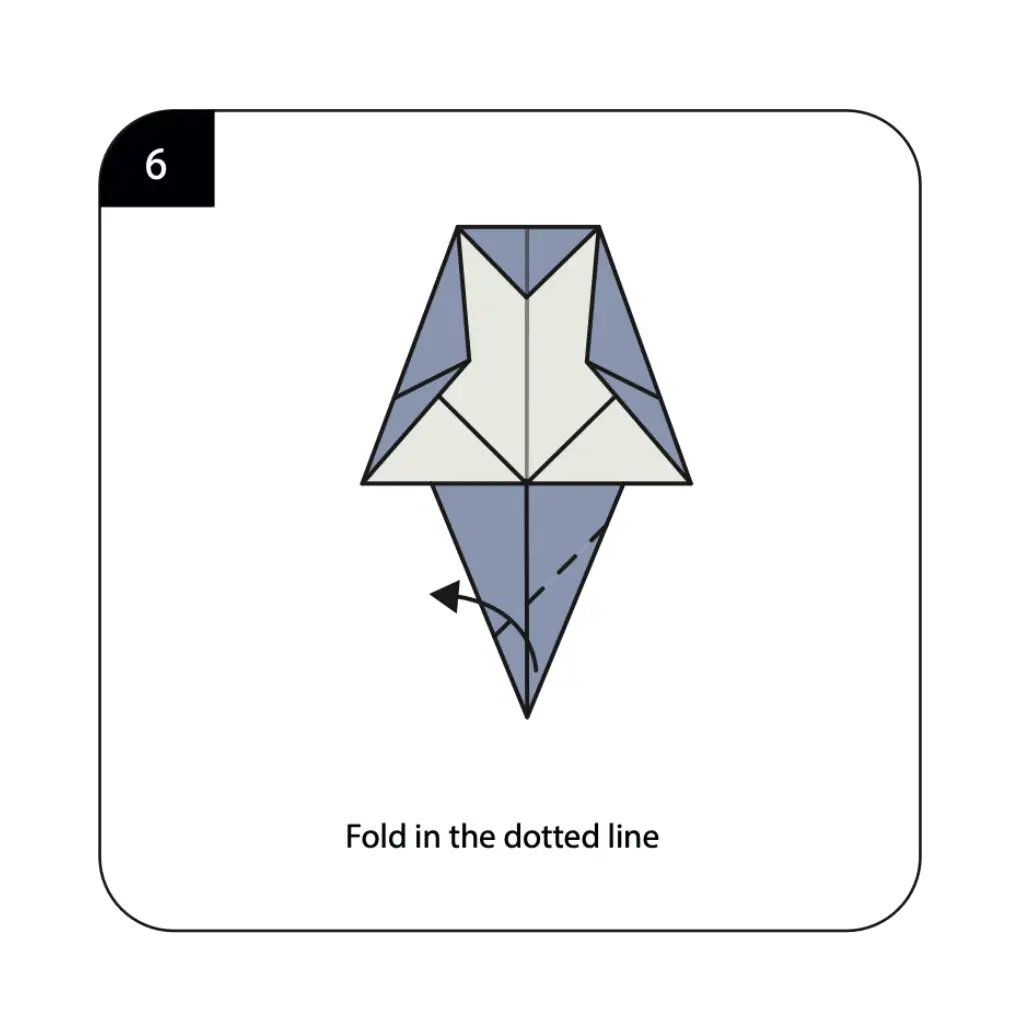
Make the final structural fold along the dotted line to complete the basic form of your origami ghost. This last shaping fold brings together all previous elements into the cohesive ghost silhouette that will serve as the foundation for decorative finishing. The precision of this final structural fold affects both the appearance and stability of your completed Halloween decoration. This step completes the transformation from geometric paper shapes to a recognizable supernatural character, establishing the flowing, ethereal form that captures the essence of friendly ghosts in popular culture and seasonal imagery.
Step 7: Prepare for Decoration
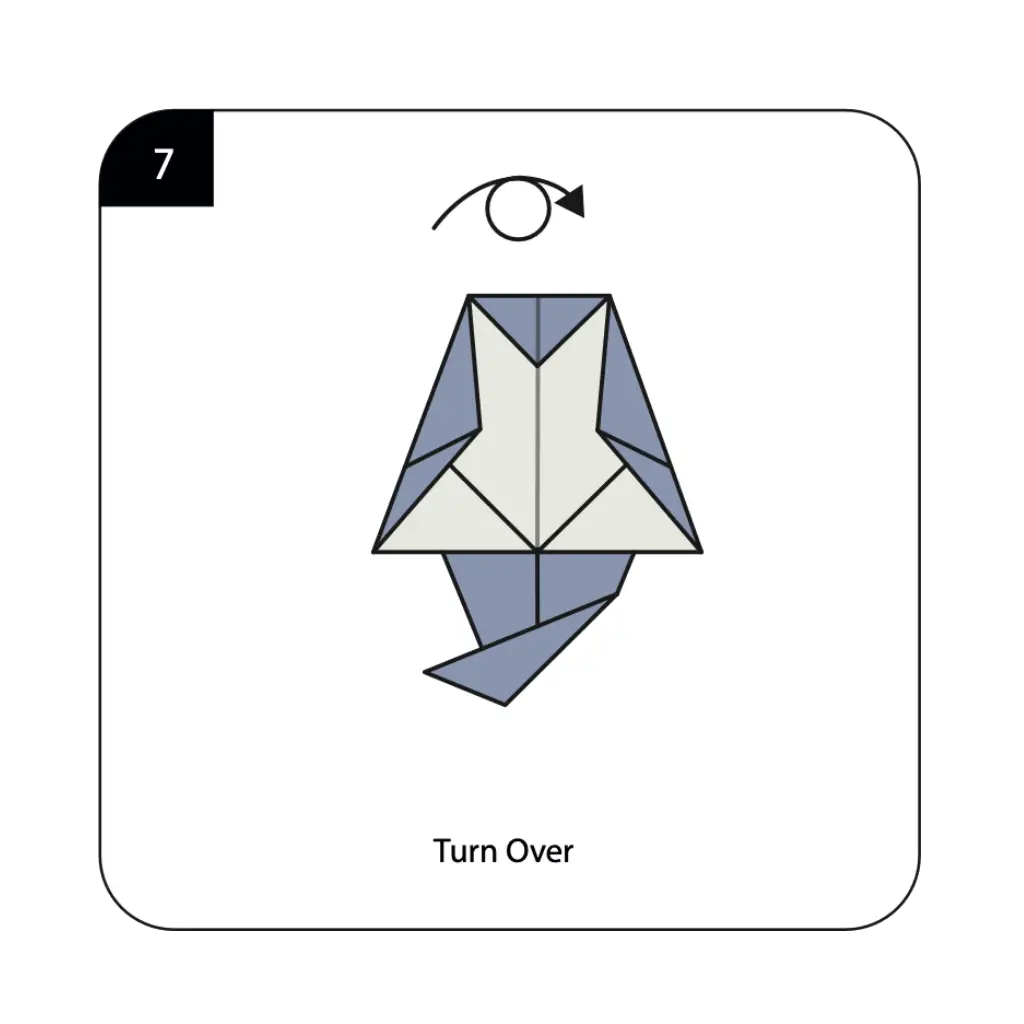
Turn over your nearly completed ghost as instructed to access the surface that will display the facial features and personality of your Halloween creation. This reorientation reveals the clean, smooth surface ideal for adding the expressive details that will bring your paper ghost to life. Handle the folded model gently during this transition to preserve the structural integrity and ghost-like proportions you’ve carefully created. The surface now facing up provides the perfect canvas for adding the friendly eyes and mouth that will transform your geometric creation into a charming Halloween character.
Step 8: Complete Your Origami Ghost
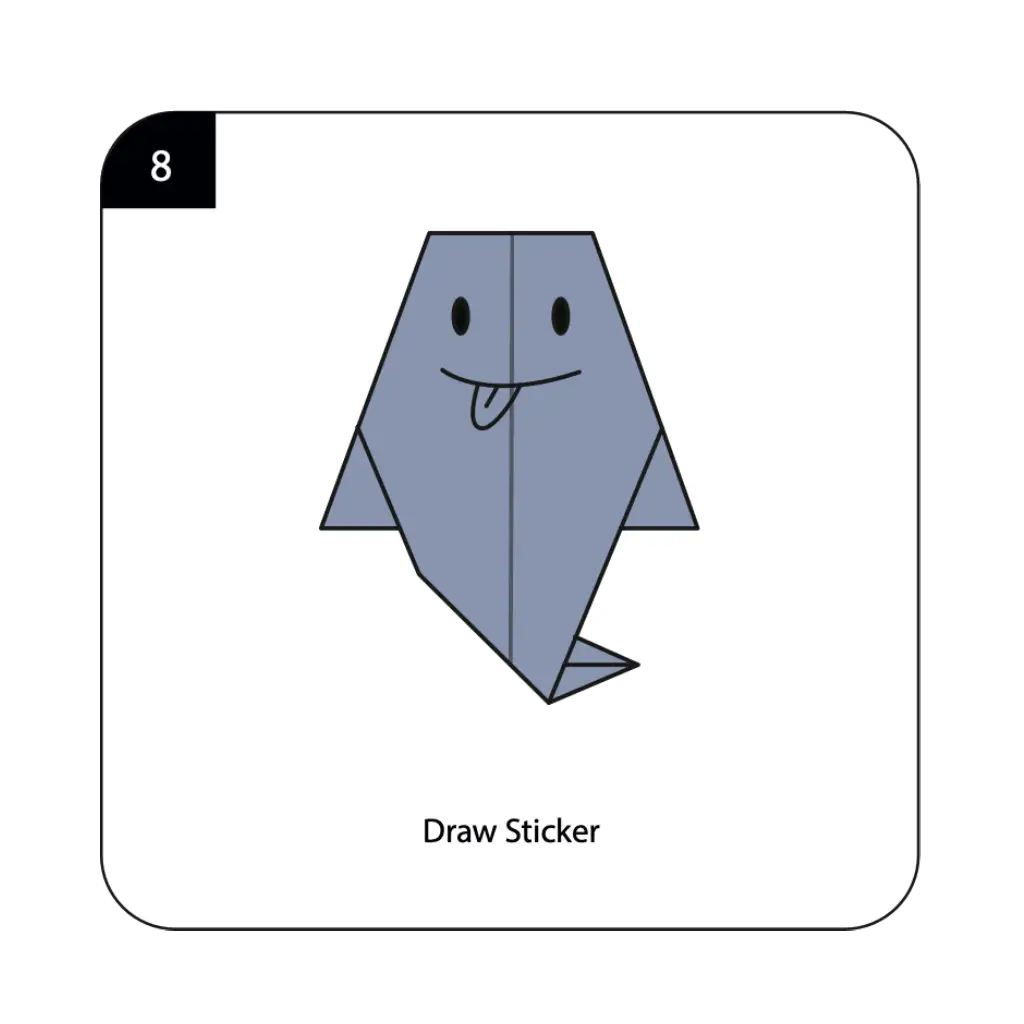
Draw or add stickers to create your ghost’s friendly facial features, bringing personality and character to your Halloween paper creation. This creative finishing phase allows unlimited artistic expression as you design unique eyes, mouth, and other details that reflect your ghost’s individual personality. The simple facial features—typically dots for eyes and a small circle or curve for the mouth—instantly transform your folded paper into a recognizable Halloween character. Your completed origami ghost now combines the precision of paper folding with creative expression, ready to float into Halloween displays, spooky storytelling adventures, or seasonal decorations that celebrate the playful side of supernatural folklore and autumn festivities.
Conclusion
Congratulations on creating your origami ghost! This delightful Halloween character demonstrates how simple folding techniques can capture the whimsical spirit of seasonal celebrations through handcrafted creativity and imagination. From a basic square sheet, you’ve fashioned a friendly specter that embodies the playful mystery and gentle spookiness that makes Halloween such a beloved holiday for all ages. The origami ghost showcases the perfect balance between traditional paper folding precision and creative character development, resulting in a decoration that’s both technically accomplished and emotionally engaging. Your completed model serves multiple purposes—as a charming Halloween decoration, an engaging craft activity for children, a creative storytelling prop, or part of a larger spooky display that brings seasonal magic to your home. The techniques you’ve learned, including precise creasing, proportional shaping, and creative finishing, build valuable foundation skills for more complex origami projects while creating meaningful connections to holiday traditions. We hope this tutorial has sparked your interest in both paper folding and seasonal crafting, encouraging you to explore how handmade decorations can enhance the personal joy and family memories that make Halloween special. Remember that each ghost you create offers opportunities to experiment with different expressions and personalities, allowing you to develop an entire haunted collection of friendly paper spirits that reflect your unique creativity and celebration style.
“Before starting your origami ghost, learn fundamental folding techniques in our Origami Basics for Beginners guide.””Create a spooky Halloween scene by adding origami bats, spiders, and cats from our Origami Animals Collection.””Discover more Halloween and seasonal projects in our Creative Origami Gallery for year-round celebrations.””Find beautiful ways to display your paper ghosts with our Decorative Origami Ideas for Halloween home décor.””Complete your haunted scene by adding spooky Origami Flowers like black roses and autumn leaves.””Create an entire ghostly gathering using techniques from our Modular Origami Projects for impressive Halloween displays.”
