
Introduction:
Welcome to the delightful world of origami heart bookmarks! This practical and romantic paper craft combines the functionality of a bookmark with the charm of a decorative heart, making it perfect for book lovers, students, and anyone who appreciates handmade gifts. Our comprehensive 15-step tutorial transforms a simple square of paper into a beautiful heart-shaped bookmark that clips securely onto any page corner. Whether you’re creating Valentine’s Day gifts, personalizing your reading experience, or teaching children the joy of paper folding, this origami heart bookmark offers both aesthetic appeal and practical value. The red paper demonstrated here creates a classic romantic look, but any color can be used to match your style or occasion. With clear step-by-step instructions suitable for beginners, you’ll soon be creating these charming bookmarks for yourself and loved ones. Let’s begin this rewarding journey into functional origami art!
Detailed Step Descriptions:
STEP 1: CREATING THE DIAGONAL CREASE
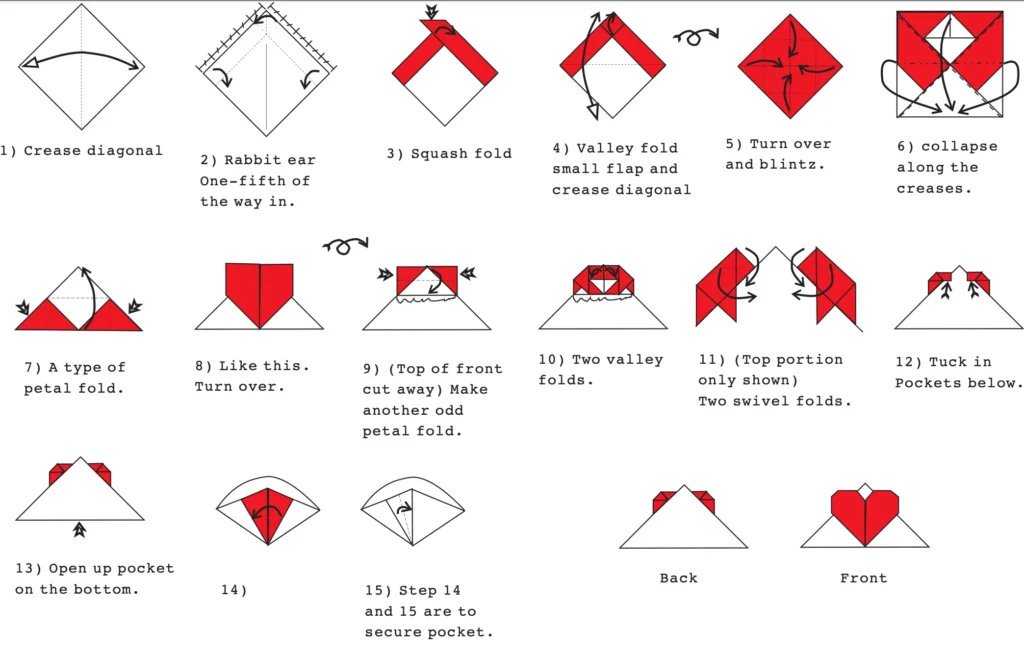
Begin your origami heart bookmark by folding the square paper diagonally and creating a precise center crease. This foundational fold establishes the primary axis that will guide all subsequent folding in your bookmark creation. Professional origami artists emphasize the importance of sharp, accurate creases for achieving symmetrical heart shapes. Use the pad of your finger or a bone folder to create a crisp fold line that will serve as a reference throughout the project.
STEP 2: MAKING THE RABBIT EAR FOLD
Create a rabbit ear fold approximately one-fifth of the way in from the edge of your paper. This specialized origami technique is essential for developing the dimensional structure of your heart bookmark. The rabbit ear fold creates the foundation for the heart’s distinctive curved top while maintaining bookmark functionality. Precision in this step ensures your finished bookmark will have the proper proportions and visual appeal.
STEP 3: EXECUTING THE SQUASH FOLD
Transform the previous fold into a squash fold, a fundamental technique in creating origami heart designs. This fold flattens the raised portion created by the rabbit ear, establishing the base for the heart’s upper lobes. Popular origami bookmark tutorials highlight this step as crucial for achieving the characteristic heart shape. Apply even pressure when squashing to create uniform thickness throughout your bookmark structure.
STEP 4: VALLEY FOLDING AND DIAGONAL CREASE
Create a small valley fold on the flap while simultaneously forming a diagonal crease as indicated. This combination of folds begins shaping the distinctive curves that make heart bookmarks instantly recognizable. Traditional origami heart patterns utilize these precise angles to create the romantic silhouette bookworms love. The valley fold adds dimension while the diagonal crease guides the paper into the desired heart formation.
STEP 5: TURNING OVER AND BLINTZING
Flip your model over and create a blintz fold, bringing corners to the center of your emerging heart shape. The blintz fold is a classic origami technique that creates multiple layers, adding thickness for bookmark durability. This step transforms the simple folded square into a more complex structure suitable for functional use. Valentine’s Day origami projects often feature this technique for creating substantial, gift-worthy paper crafts.
STEP 6: COLLAPSING ALONG THE CREASES
Carefully collapse the model along the established crease lines to form the basic heart bookmark structure. This pivotal step brings together all previous folds into a cohesive three-dimensional form. Expert origami bookmark tutorials emphasize patience during this collapse to maintain clean lines and symmetry. The red color becomes more prominent as layers overlap, creating the vibrant heart that makes these bookmarks special.
STEP 7: CREATING A PETAL FOLD VARIATION
Execute a specialized type of petal fold to begin forming the heart’s characteristic top curves. This modified petal fold differs from standard versions, specifically adapted for bookmark functionality. DIY bookmark enthusiasts appreciate this technique for creating the rounded tops essential to heart shapes. The fold adds both aesthetic appeal and structural integrity to your origami heart bookmark.
STEP 8: POSITIONING AND TURNING Origami Heart Bookmark
Complete the fold sequence to achieve the form shown, then turn the model over for the next phase. This intermediate stage reveals how multiple folds combine to create the recognizable heart silhouette. Origami heart bookmark patterns often include this turning point to access different folding planes. Proper execution ensures your bookmark will have the symmetric beauty that makes handmade gifts special.
STEP 9: MAKING THE ODD PETAL FOLD Origami Heart Bookmark
With the top front portion cut away in the diagram for clarity, create another unique petal fold. This unusual variation adds dimension to the heart’s upper section while maintaining bookmark practicality. Creative origami techniques like this distinguish handmade bookmarks from simple paper corner markers. The fold contributes to both the decorative appeal and the gripping function of your heart bookmark.
STEP 10: ADDING TWO VALLEY FOLDS Origami Heart Bookmark
Create two precise valley folds to further define the heart shape and enhance the bookmark’s structure. These strategic folds add definition to the heart’s curves while creating the pocket for page insertion. Valentine’s origami projects often feature these detailed folds that transform basic shapes into romantic symbols. Accuracy in these valley folds ensures your bookmark will grip pages securely without damaging them.
STEP 11: CREATING SWIVEL FOLDS Origami Heart Bookmark
Form two swivel folds on the top portion of your heart bookmark for additional shaping. Swivel folds add sophisticated detail to origami bookmarks, creating the refined look gift recipients appreciate. These advanced techniques demonstrate how simple paper can be transformed into functional art pieces. The top-only view in the diagram helps focus attention on these crucial shaping elements.
STEP 12: TUCKING INTO POCKETS Origami Heart Bookmark
Tuck the designated flaps into the pockets created below to secure the heart bookmark’s structure. This locking mechanism ensures your origami bookmark maintains its shape during regular use. Functional origami designs rely on these clever tucking techniques to create durable paper crafts. The interlocking elements prevent the bookmark from unfolding while marking your favorite reading passages.
STEP 13: OPENING THE BOTTOM POCKET Origami Heart Bookmark
Carefully open the pocket at the bottom of your heart bookmark to create the page-gripping mechanism. This functional element transforms your decorative heart into a practical reading accessory. DIY bookmark tutorials emphasize this step as essential for creating bookmarks that stay securely in place. The pocket design allows the bookmark to slide onto page corners without causing damage to books.
STEP 14-15: SECURING THE POCKET Origami Heart Bookmark
Complete steps 14 and 15 to properly secure the pocket that gives your bookmark its functionality. These final structural adjustments ensure your origami heart bookmark grips pages firmly but gently. The distinctive heart shape is now complete, showing both front and back views as illustrated. Your finished bookmark combines romantic aesthetics with practical design, perfect for personal use or gifting.
Conclusion:
Congratulations on creating your beautiful origami heart bookmark! This charming paper craft perfectly blends form and function, offering both a practical reading tool and a decorative element that brings joy to your reading experience. Through 15 carefully designed steps, you’ve mastered techniques including rabbit ears, petal folds, and pocket formations—skills that open doors to countless other origami projects. Your handmade heart bookmark makes an ideal gift for book lovers, students, teachers, or anyone who appreciates thoughtful handcrafted items. Whether used for Valentine’s Day presents, party favors, or personal reading companions, these bookmarks add a touch of love to every page. The durability of the folded design ensures your creation will last through many reading adventures. We hope this tutorial has inspired you to explore more origami projects and share the joy of paper folding with others. Happy reading and happy folding!
- Explore more origami bookmark designs → Discover creative bookmark patterns including animals, flowers, and geometric designs perfect for all reading preferences.
- Valentine’s Day origami projects → Create romantic paper crafts including heart boxes, love notes, and decorative hearts for special occasions.
- Essential origami techniques for beginners → Master fundamental folds used in this bookmark tutorial, including valley folds, petal folds, and squash folds.
- Best papers for origami bookmarks → Learn which papers create durable, attractive bookmarks that withstand regular use while maintaining their shape.
- Origami gift ideas for book lovers → Explore paper craft projects perfect for readers, including bookmarks, book covers, and decorative page markers.
