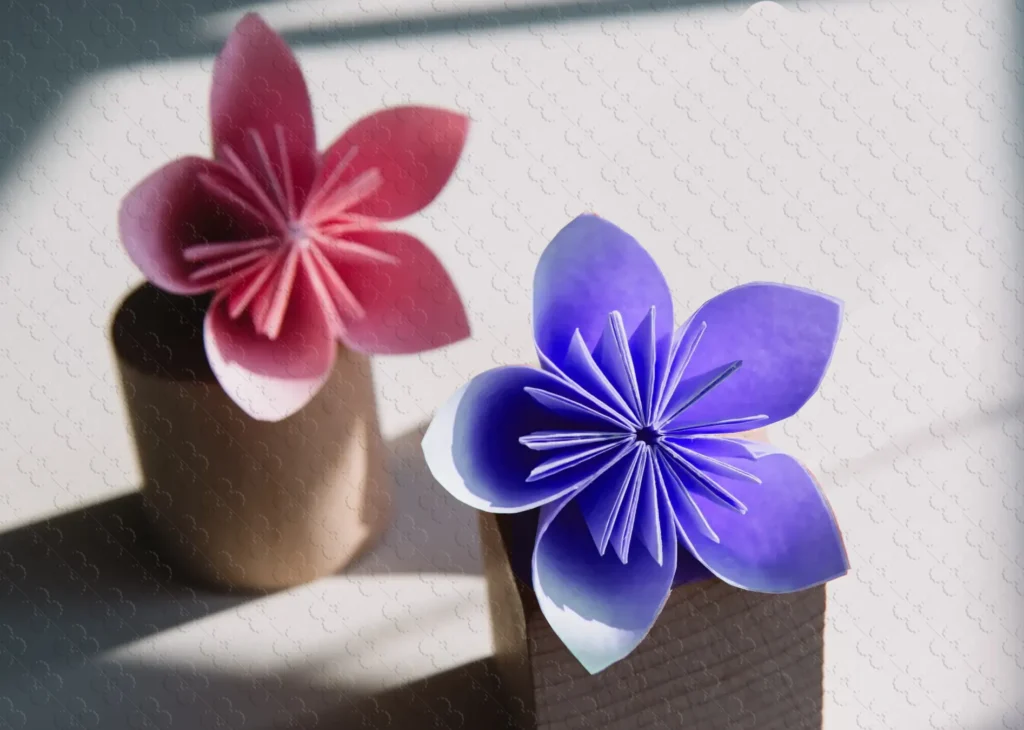

Have you ever marveled at the intricate beauty of an origami Kusudama flower? These stunning paper creations have captivated paper-folding enthusiasts for centuries, and today I’m sharing a comprehensive guide to crafting your very own origami-Kusudama-flower at home. Whether you’re a beginner looking to expand your origami skills or an experienced folder seeking a rewarding project, the origami Kusudama flower offers the perfect blend of challenge and satisfaction.
The word “Kusudama” comes from Japanese, where “kusu” means medicine and “dama” means ball. Historically, the origami Kusudama flower was part of a traditional Japanese medicine ball, often filled with herbs and incense. Today, the origami-Kusudama-flower has evolved into a popular decorative art form that showcases the elegant intersection of mathematics, art, and patience.
In this detailed tutorial, I’ll guide you through each fold and assembly step needed to create a beautiful five-petal origami Kusudama flower that will impress friends and family alike. Let’s dive into the wonderful world of origami Kusudama flowers!
What is an Origami Kusudama Flower?
Before we begin folding our origami flower, let’s understand what makes this particular origami creation special. The origami flower is actually part of a modular origami tradition, meaning it’s composed of multiple identical units that are assembled together. A complete origami-Kusudama-flower typically consists of five individual petal units that are glued or sewn together to create a three-dimensional floral shape.
What distinguishes the origami-Kusudama-flower from other paper flowers is its geometric precision and the way each petal curves outward from a central point. The finished origami flower resembles a blooming flower with distinct pointed petals that create a star-like appearance when viewed from above.
Traditional origami-Kusudama-flowers were often combined to form spherical arrangements (known as Kusudama balls), but individual origami Kusudama flowers make beautiful decorations on their own. The versatility of the origami Kusudama flower makes it perfect for various creative applications, from home decor to gift toppers and special occasion ornaments.
Materials Needed for Your Origami Kusudama Flower
Before we begin folding our origami flower, let’s gather all the necessary materials:
- 5 square sheets of paper (one for each petal of your origami Kusudama flower)
- Glue (craft glue or a glue stick works well for assembling your origami-Kusudama-flower)
- Scissors (optional, for trimming or adjusting your origami flower)
- Ruler or bone folder (helpful for creating crisp folds in your origami Kusudama-flower)
- Surface to work on (a clean, flat table provides the ideal foundation for creating your origami Kusudama flower)
Paper Selection for Origami Kusudama Flowers
The type of paper you choose significantly impacts the appearance of your origami Kusudama flower. Here are some recommended options:
- Origami paper: The classic choice for any origami flower, available in various colors and patterns
- Scrapbooking paper: Slightly heavier, perfect for a sturdier origami flower
- Washi paper: Traditional Japanese paper that gives an authentic look to your origami-Kusudama-flower
- Duo-colored paper: Creates interesting color transitions in your origami flower
For beginners, I recommend starting with 6-inch (15 cm) square papers in solid colors for your first origami flower. This size is easy to work with, and solid colors help you clearly see the folding lines. As you gain confidence, you can experiment with different sizes and patterns for your origami Kusudama flower creations.
Detailed Steps to Create Your Origami Kusudama Flower
Now let’s begin the step-by-step process of creating your beautiful origami-Kusudama-flower. We’ll first create five identical petal units, then assemble them to form the complete origami Kusudama flower.
Creating Each Petal of Your Origami Kusudama Flower
Step 1: The Initial Fold
Begin your origami-Kusudama-flower petal by taking one square sheet of paper and positioning it with one corner facing you (like a diamond shape). Carefully fold the paper in half horizontally from bottom to top, creating a triangle. Make sure to align the edges precisely and create a sharp crease—this forms the foundation of your origami Kusudama-flower petal.

Step 2: Creating the Basic Petal Shape
For this crucial step in your origami Kusudama flower petal, take the triangle you’ve formed and fold both the bottom left and right points upward to meet the top point. Your paper should now resemble a smaller diamond shape with a horizontal line across the middle. This preliminary form begins to establish the distinctive shape of your origami-Kusudama-flower petal.

Step 3: Establishing the Folding Guidelines
This step creates important reference lines for your origami-Kusudama flower petal. Take the right edge of the left layer and fold it to align precisely with the bottom left edge. Then, similarly fold the left edge of the right layer to align with the bottom right edge. These two folds will create crucial crease lines. Once you’ve made clear creases, unfold both folds. These guidelines will direct the next transformative step of your origami Kusudama-flower petal.

Step 4: The Squash Fold Technique
Now comes a key transformation in your origami-Kusudama-flower petal. Carefully lift the two layers you’ve been working with so they stand upright. Then, using the crease lines you created in the previous step as guides, gently squash the layers flat. This “squash fold” technique creates a shape resembling a kite—a fundamental component of your origami Kusudama flower petal that gives it its characteristic dimensional quality.
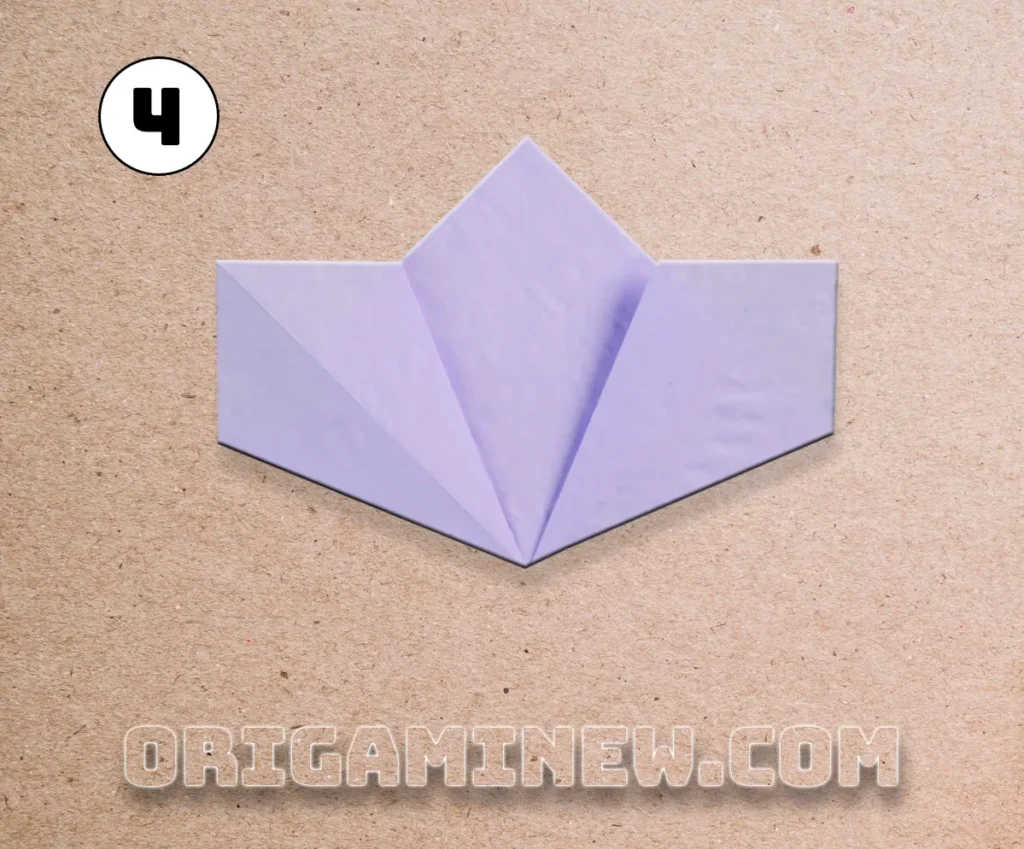
Step 5: Creating the Petal Points
Look at your origami Kusudama flower petal-in-progress. You’ll notice it has a shape somewhat like a kite with two points at the top. Fold these two points downward along imaginary lines that would connect from the outer corners to the center line. These folds start defining the pointed tip of your origami Kusudama flower petal, giving it its distinctive shape.

Step 6: Forming the Tab for Assembly
This step prepares your origami-Kusudama-flower petal for assembly. Fold the bottom left and right edges upward along the natural crease lines formed by your previous folds. These small flaps you’re creating will become the attachment tabs that allow you to connect multiple petals together to form your complete origami Kusudama flower.

Step 7: Completing the Petal Unit
The final step in creating each petal of your origami flower involves securing those tabs you just created. Apply a small amount of glue to these two flaps, then press them together firmly. Hold for a few seconds until the glue sets enough to maintain the shape. Congratulations—you’ve just completed one petal unit of your origami Kusudama-flower!

Repeat Steps 1-7 four more times to create a total of five identical petal units for your origami Kusudama-flower. Consistency is key to creating a symmetrical and beautiful final origami Kusudama flower.
Assembling Your Origami Kusudama Flower
Now that you’ve created all five petal units, it’s time to assemble them into your complete origami Kusudama-flower.
Step 8: Initial Assembly
Begin assembling your origami Kusudama-flower by taking three of your petal units. Apply a small amount of glue to the side edge of one petal, then attach it to the side edge of a second petal. Hold them together for a moment until the glue begins to set. Next, glue the third petal to the second one in the same manner, and finally, connect the third petal back to the first to form a partial origami Kusudama flower of three interconnected petals.

Step 9: Completing the Flower Structure
Take the remaining two petal units of your origami Kusudama flower and glue them to the existing structure. Apply glue to both side edges of each remaining petal and carefully attach them to fill the gaps in your developing origami Kusudama-flower. This step requires some patience and dexterity as you complete the three-dimensional structure of your origami-Kusudama-flower.

Step 10: Final Adjustments
Your origami Kusudama flower is now fully assembled! Take a moment to make any necessary adjustments to ensure all petals are evenly spaced and properly aligned. Gently shape the petals of your origami Kusudama flower by curving them slightly outward if desired, enhancing the blooming appearance of your creation. The completed origami-Kusudama flower should have five distinct petals arranged in a symmetrical, star-like pattern when viewed from above.

Tips for Perfecting Your Origami Kusudama Flower
Creating a beautiful origami Kusudama flower takes practice, but these helpful tips will guide you toward success:
- Make precise folds: The beauty of an origami flower lies in its symmetry, which depends on accurate folding. Take your time with each crease.
- Use the right amount of glue: Too much glue can make your origami Kusudama flower messy, while too little won’t hold the structure securely. A small dot of glue is usually sufficient.
- Be patient during assembly: Assembling your origami flower requires patience. Consider using paper clips to hold petals together while the glue dries.
- Try different paper types: Experiment with various papers to create unique origami-Kusudama flowervariations. Patterned paper can create striking origami flower designs.
- Pre-crease your paper: Before starting the actual folding of your origami Kusudama -lower petal, lightly pre-crease your paper along both diagonals to help with alignment.
Creative Ways to Use Your Origami Kusudama Flower
Now that you’ve mastered creating an origami Kusudama flower, here are wonderful ways to use your creation:
Decorative Applications for Origami Kusudama Flowers
- Hanging ornaments: Attach a string to your origami-Kusudama-flower to create beautiful hanging decorations
- Bouquet arrangements: Combine multiple origami-Kusudama-flowers with wire stems for an everlasting paper bouquet
- Gift toppers: Secure a small origami Kusudama-flower to wrapped presents for an elegant touch
- Mobile decorations: Create a balanced mobile using several origami-Kusudama-flowers of varying sizes and colors
- Table centerpieces: Arrange origami-Kusudama flowers in a decorative container for a striking table display
Seasonal and Event-Specific Uses
- Wedding decorations: White or pastel origami-Kusudama-flowers make elegant wedding decor elements
- Holiday ornaments: Create origami-Kusudama-flowers in seasonal colors for festive decorations
- Birthday celebrations: Bright, colorful origami-Kusudama-flowers can enhance party decor
- Baby showers: Soft-colored origami Kusudama flowers create a gentle, whimsical atmosphere
Advanced Variations of the Origami Kusudama Flower
Once you’ve mastered the basic origami Kusudama flower, consider trying these variations:
- Multi-layered Kusudama: Create a more complex origami-Kusudama-flower by using two different sizes of petals layered together
- Kusudama ball: Combine 12 origami-Kusudama-flowers to form a complete sphere, the traditional Kusudama form
- Mixed media Kusudama: Enhance your origami-Kusudama-flower with beads, sequins, or painted details
- Twisted petal Kusudama: Modify the basic petal fold to create an origami-Kusudama-flower with spiral-shaped petals
- Miniature Kusudama: Challenge yourself by creating a tiny origami-Kusudama-flower using 3-inch paper squares
The History and Cultural Significance of Origami Kusudama Flowers
The origami Kusudama flower has a rich history dating back to ancient Japan. Originally, Kusudama were medicinal balls created by sewing together herbs and flowers in a pouch. Over time, paper versions of these medicinal balls emerged, giving birth to the origami Kusudama flower we know today.
In traditional Japanese culture, the origami-Kusudama-flower symbolized good health and healing. They were often given as gifts with wishes for wellness and recovery. Today, the origami-Kusudama-flower has transcended its medicinal origins to become a celebrated art form worldwide, appreciated for its geometric beauty and the meditative quality of its creation process.
The mathematical precision behind the origami-Kusudama-flower has also made it a subject of study among those interested in the intersection of art and mathematics. The symmetry and structure of an origami-Kusudama-flower demonstrate principles of geometry in an accessible and beautiful form.
Frequently Asked Questions About Origami Kusudama Flowers
Q: How long does it take to make an origami Kusudama flower?
A: For beginners, creating a complete origami Kusudama flower might take about 30-45 minutes. With practice, you can create each petal in just a few minutes, making the entire origami Kusudama flower in about 15-20 minutes.
Q: Can I make an origami Kusudama flower without glue?
A: While traditional origami-Kusudama-flower assembly uses glue, you can also connect the petals using a needle and thread. Simply sew through the corners where the petals meet to create a no-glue origami-Kusudama-flower.
Q: What’s the best paper size for beginners making an origami Kusudama flower?
A: Beginners should start with 6-inch (15 cm) square papers. This size provides enough space to work comfortably while creating your first origami-Kusudama-flower.
Q: How many pieces of paper do I need for one origami Kusudama flower?
A: A standard origami-Kusudama-flower requires 5 square pieces of paper—one for each petal. For a complete Kusudama ball, you would need 60 squares (to make 12 origami Kusudama flowers).
Q: Can children make origami Kusudama flowers?
A: The origami-Kusudama-flower is moderately challenging and most suitable for children aged 10 and above with some origami experience. Younger children might need assistance with the precise folds and assembly of an origami-Kusudama-flower.
Conclusion: The Joy of Creating Origami Kusudama Flowers
Creating an origami-Kusudama-flower offers more than just a beautiful decoration—it provides a meditative creative experience that combines precision, patience, and artistic expression. As you master the art of the origami-Kusudama-flower, you connect with a centuries-old tradition while creating something uniquely your own.
Each origami Kusudama flower you create becomes more refined as your folding skills improve. The satisfaction of transforming simple square papers into an elegant three-dimensional origami Kusudama flower is truly rewarding. Whether you make them for personal enjoyment, home decoration, or as heartfelt gifts, origami Kusudama flowersrepresent the beautiful intersection of craft, mathematics, and artistic expression.
I hope this guide has inspired you to try creating your own origami Kusudama flower. With practice and patience, you’ll soon be creating stunning origami-Kusudama-flowers that showcase your creativity and attention to detail. Happy folding!
Have you created an origami-Kusudama-flower using this tutorial? Share your creations in the comments below! I’d love to see how your unique origami Kusudama flowers turned out.
