
Introduction:
Welcome to the beautiful world of origami lilies! This comprehensive tutorial will guide you through creating elegant paper lilies using traditional Japanese folding techniques. The origami lily is one of the most beloved paper flower designs, appreciated for its graceful petals, dimensional beauty, and relatively simple folding process. Whether you’re decorating for a special occasion, creating handmade gifts, or simply enjoying the meditative practice of paper folding, this step-by-step guide makes crafting beautiful paper lilies accessible to everyone. The lily design presented here strikes the perfect balance between simplicity and sophistication, allowing beginners to achieve impressive results while still offering satisfying complexity for experienced folders. Grab a square sheet of vibrant origami paper—yellow works beautifully for classic lilies, but any color will create stunning results—and let’s begin transforming a simple square into an elegant flower that will brighten any space!
Detailed Step Descriptions:
STEP 1: FOLDING THE FIRST BASIC CREASE

Begin your origami lily by folding the square paper in half vertically along the dotted line. This fundamental fold establishes the first axis of symmetry that will guide the entire flower creation process. Professional origami artists recommend using the pad of your finger to crease from the center outward for the cleanest result. Open the paper flat again after making this crease—it will serve as an important reference line for subsequent folds.
STEP 2: CREATING THE DIAGONAL FOLD

Fold your square paper diagonally by bringing one corner to the opposite corner. This diagonal fold creates the diamond shape that forms the foundation for your origami lily structure. Japanese origami masters emphasize the importance of precise alignment at this stage for a symmetrical finished flower. Press firmly along the entire fold line to create a sharp crease that will serve as a guide throughout the folding process.
STEP 3: FOLDING THE SECOND DIAGONAL

Create another diagonal fold by bringing the left corner to the right corner of your diamond shape. This crucial fold establishes the second axis of symmetry necessary for creating the lily’s balanced petal arrangement. Popular origami flower tutorials highlight this step as essential for creating the geometric framework of the lily. After making this crease, your paper should now have both diagonal folds clearly marked, forming an X pattern.
STEP 4: CREATING THE HORIZONTAL FOLD

Fold the bottom half of the diamond upward along the dotted line as shown in the diagram. This fold begins transforming the flat diamond into the three-dimensional structure needed for your origami lily. Traditional origami lily designs rely on this precise horizontal fold to establish the correct proportions for the flower. Apply even pressure across the fold line to create a clean crease that will define the lily’s base structure.
STEP 5: REINFORCING THE HORIZONTAL FOLD

Ensure the horizontal fold from the previous step is firmly creased and properly aligned. This reinforcement step is critical for creating stable, well-defined petals in your finished origami lily. Expert paper folders emphasize the importance of this foundation fold for supporting the more complex folds to come. Take time to verify all existing creases are sharp and precise before moving to the more intricate folding stages.
STEP 6: CREATING THE FIRST PETAL FOLD

Begin forming the lily’s petals by folding one layer of paper diagonally as indicated by the arrow. This specialized fold initiates the petal structure that gives the origami lily its characteristic floral appearance. The angle and position of this fold directly influence how elegant your finished flower will appear when completed. Ensure you’re only folding one layer of paper at this stage to properly develop the lily’s delicate petal structure.
STEP 7: CONTINUING THE PETAL FORMATION

Extend the petal fold further by following the directional arrow to create more definition. This progressive folding technique builds dimension and realistic contours into your origami lily petals. Japanese paper flower traditions emphasize these incremental folds that transform flat paper into lifelike botanical forms. Apply gentle pressure to avoid tearing the paper while creating the natural-looking curves that define lily petals.
STEP 8: FINALIZING THE PETAL STRUCTURE

Complete the formation of one section of petals by finalizing the fold indicated in the previous step. This critical stage establishes the three-dimensional quality that makes your origami lily look realistic. Advanced origami lily tutorials always emphasize this step for creating the natural opening effect of blooming flowers. Repeat this process with the remaining sections to create the lily’s complete petal arrangement.
STEP 9: COMPLETING YOUR ORIGAMI LILY
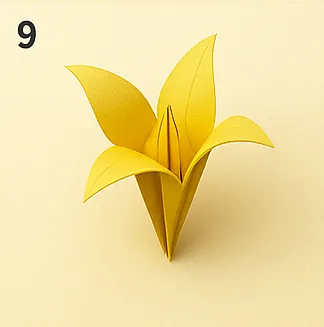
Gently shape and separate all petals to complete your beautiful origami lily flower. The finished model should display elegant, outward-curving petals with a dimensional center characteristic of real lilies. Your paper lily now captures the essence of this classic flower through the artful application of origami techniques. For display, slightly adjust the petals outward to create the appearance of a fully bloomed flower or keep them more closed for a budding lily.
Conclusion:
Congratulations on creating your beautiful origami lily! Through a sequence of precise folds and careful shaping, you’ve transformed a simple square of paper into an elegant flower that captures the grace and beauty of natural lilies. Your finished creation can be displayed as a standalone piece, combined with other origami flowers for a lasting bouquet, or given as a thoughtful handmade gift. The techniques you’ve learned—from basic folds to petal formation—provide an excellent foundation for exploring more complex origami flower designs. We hope this tutorial has inspired you to continue your paper folding journey and discover the joy of creating these timeless botanical representations. The origami lily symbolizes purity and renewal in many cultures, making your paper creation not just a beautiful decoration but also a meaningful gift. Share your colorful paper lilies with our community and explore more enchanting origami flower designs!
- Explore our complete origami flower collection → Discover more beautiful flower designs, including roses, tulips, cherry blossoms, and advanced lily variations.
- Master essential origami techniques for flowers → Learn specialized folding methods used in this lily tutorial, including petal formation and dimensional shaping.
- Best papers for origami lilies → Find out which papers create the most beautiful and durable origami lilies, with tips on color selection and paper weight.
- Create an origami flower bouquet → Learn how to combine your origami lily with other paper flowers to create stunning arrangements that never wilt.
- Seasonal origami lily decorations → Discover creative ways to incorporate your origami lilies into seasonal displays, from spring centerpieces to elegant holiday decor.
