
Introduction
Origami, the ancient Japanese art of paper folding, reaches fascinating new dimensions when applied to creating miniature furniture that captures the essence of everyday objects in perfect scaled detail. The origami miniature chair stands out as one of the most impressive and practical intermediate projects, described as having “clear instructions” despite its complexity, making it an excellent choice for folders ready to advance beyond basic models. This challenging tutorial demonstrates how to transform a simple square sheet of paper into a three-dimensional chair complete with seat, backrest, and legs that actually allow the finished model to stand independently. What makes this origami miniature chair particularly rewarding is its combination of technical sophistication and genuine functionality—the finished piece looks remarkably like a real chair while serving as actual furniture for dollhouses, dioramas, or miniature displays. Unlike purely decorative origami miniature chair models, this chair project requires mastery of advanced techniques including the bird base formation, reverse folds, and complex three-dimensional shaping that challenges your skills while producing an impressive functional result. The completed model showcases clean lines, proper proportions, and structural stability that make it perfect for dollhouse furniture sets, architectural models, or simply as a demonstration of how origami can recreate the objects of our daily lives in miniature form through the precise art of paper engineering.
Step-by-Step Instructions
Step 1: Create the Foundation Grid For Origami Miniature Chair
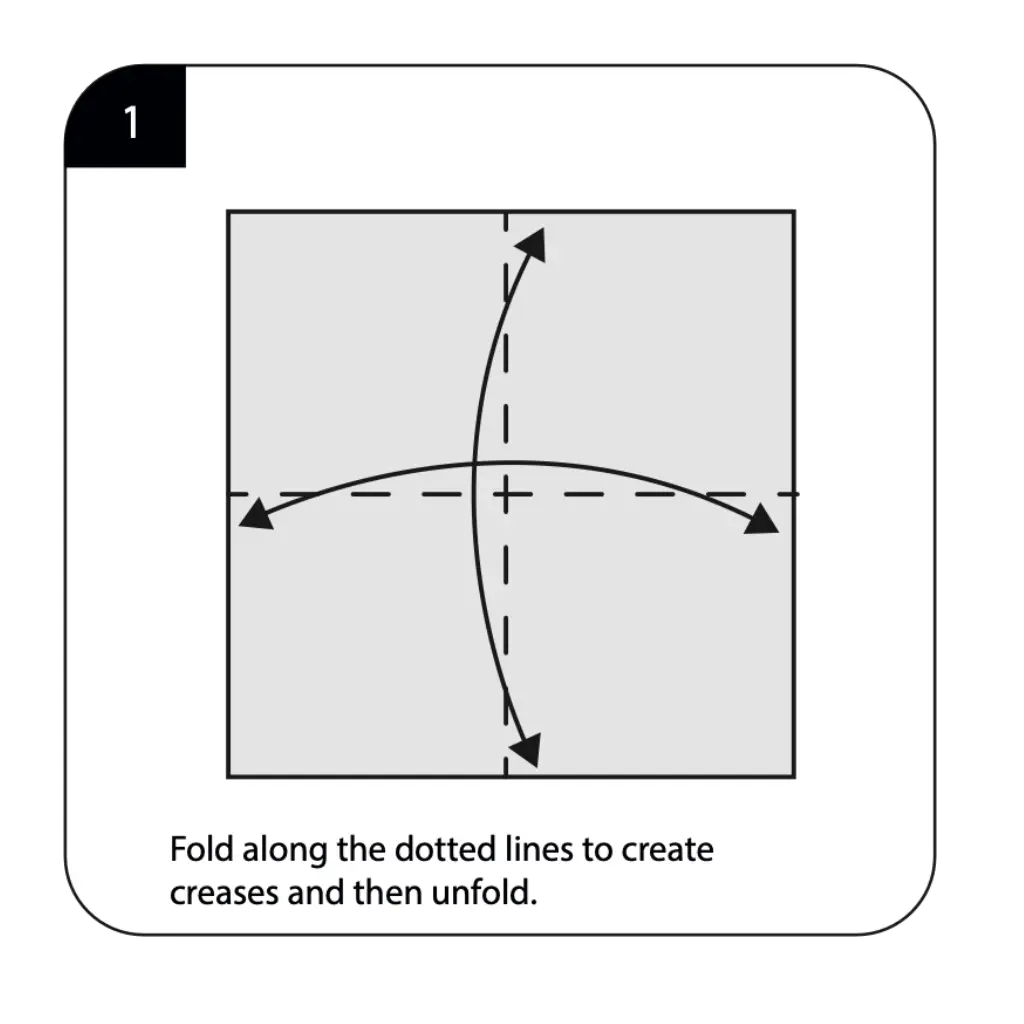
Start with a square of origami miniature chair paper with the non-colored (white) side facing up as specified in the instructions. Fold along all the dotted lines to create a comprehensive crease pattern, then unfold completely to establish the reference grid needed for this complex furniture model. These initial folds create the fundamental framework that will guide the formation of your chair’s sophisticated structure throughout the entire construction process. The precision of these foundation creases is absolutely crucial for the success of this intermediate-level project, as they determine the accuracy and alignment of all subsequent folds. Take extra care to make each crease sharp and well-defined, creating the detailed roadmap that will transform your flat square into a three-dimensional piece of miniature furniture.
Step 2: Form the Preliminary Base For Origami Miniature Chair
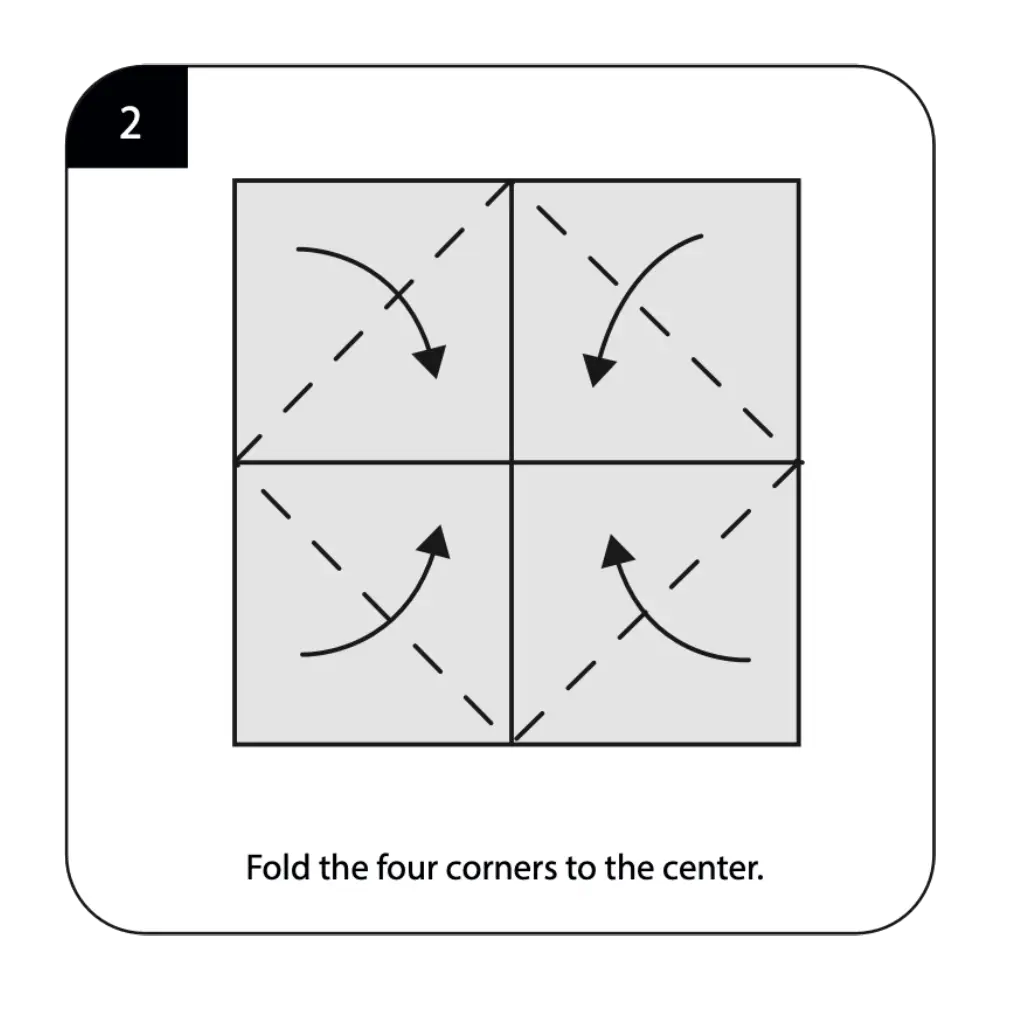
Fold all four corners to the center point as shown in the diagram, creating what’s known as a “blintz fold” in origami miniature chair terminology. This fundamental technique consolidates the square into a smaller, layered form that serves as the foundation for more complex furniture construction. The accuracy of these corner-to-center folds directly affects the symmetry and proportions of your finished miniature chair. Work carefully to ensure each corner reaches precisely to the center point, creating the balanced foundation needed for the chair’s structural elements. This step begins the transformation from flat paper to the layered structure that will eventually become your detailed piece of dollhouse furniture.
Step 3: Create the Bird Base Foundation For Origami Miniature Chair
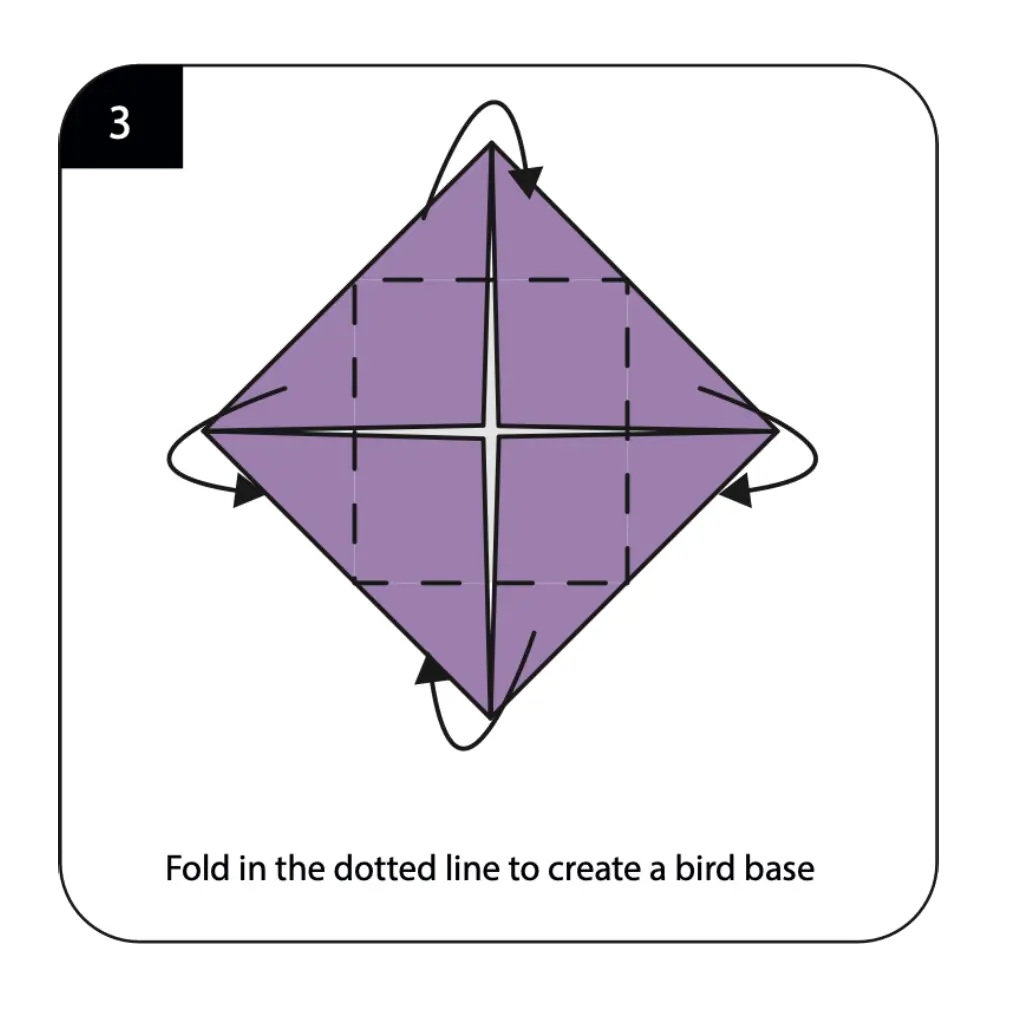
Fold along the dotted lines to create a bird base as indicated in the diagram—a classical origami miniature chair base that serves as the starting point for many complex models. The bird base formation requires careful manipulation of multiple layers while maintaining the integrity of your established crease pattern. This advanced base provides the three-dimensional structure needed for creating furniture with proper proportions and stability. The precision of this bird base formation is crucial for achieving the chair’s characteristic shape and ensuring it will stand properly when complete. This step demonstrates how traditional origami bases can be adapted for creating functional miniature objects.
Step 4: Execute Outside Reverse Folds For Origami Miniature Chair
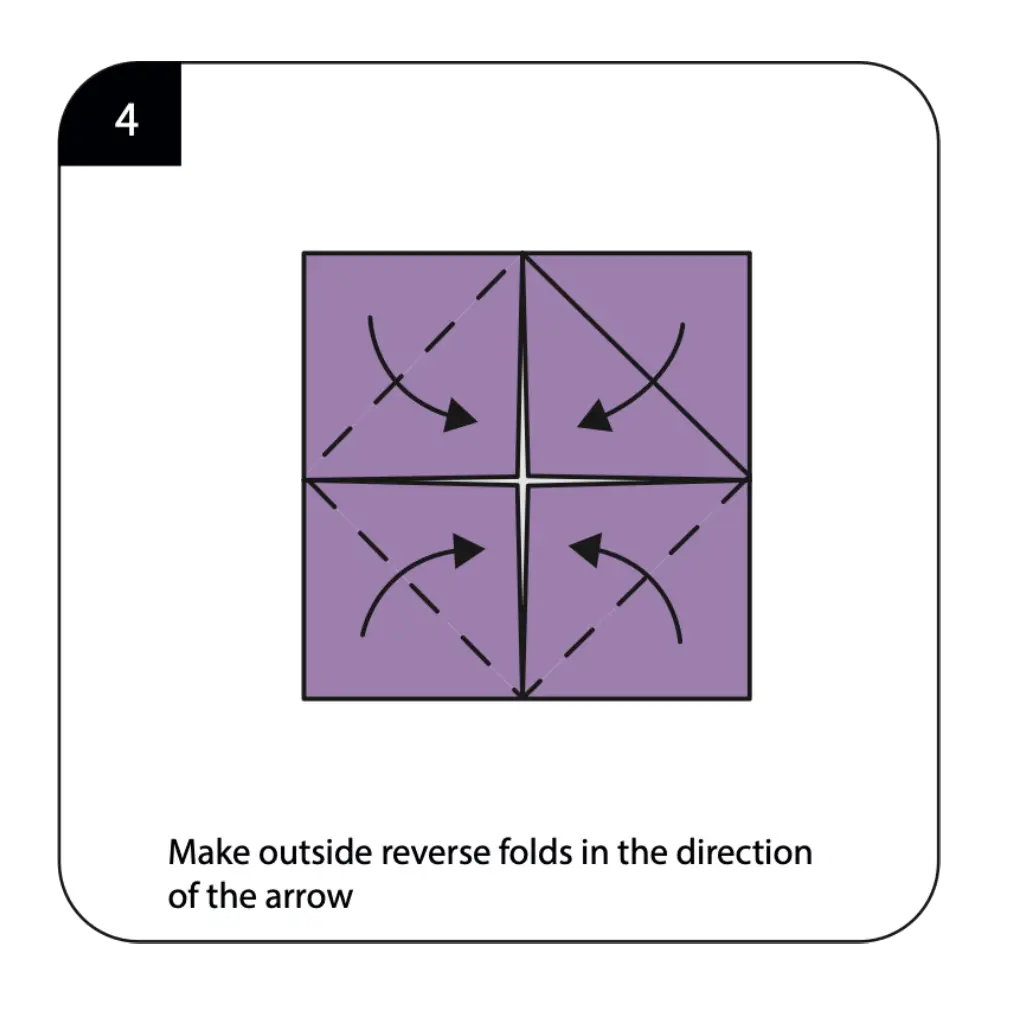
Make outside reverse folds in the direction of the arrows as shown in the diagram, using this advanced technique to begin shaping your chair’s distinctive features. The outside reverse fold requires careful manipulation of paper layers to create the structural elements that will become the chair’s seat and backrest components. This complex folding technique adds dimension and begins establishing the three-dimensional geometry needed for realistic furniture proportions. Work slowly and deliberately during this step, as the precision of these reverse folds determines how well your finished chair will capture the essential characteristics of real furniture design and structural stability.
Step 5: Reorient for Advanced Construction For Origami Miniature Chair
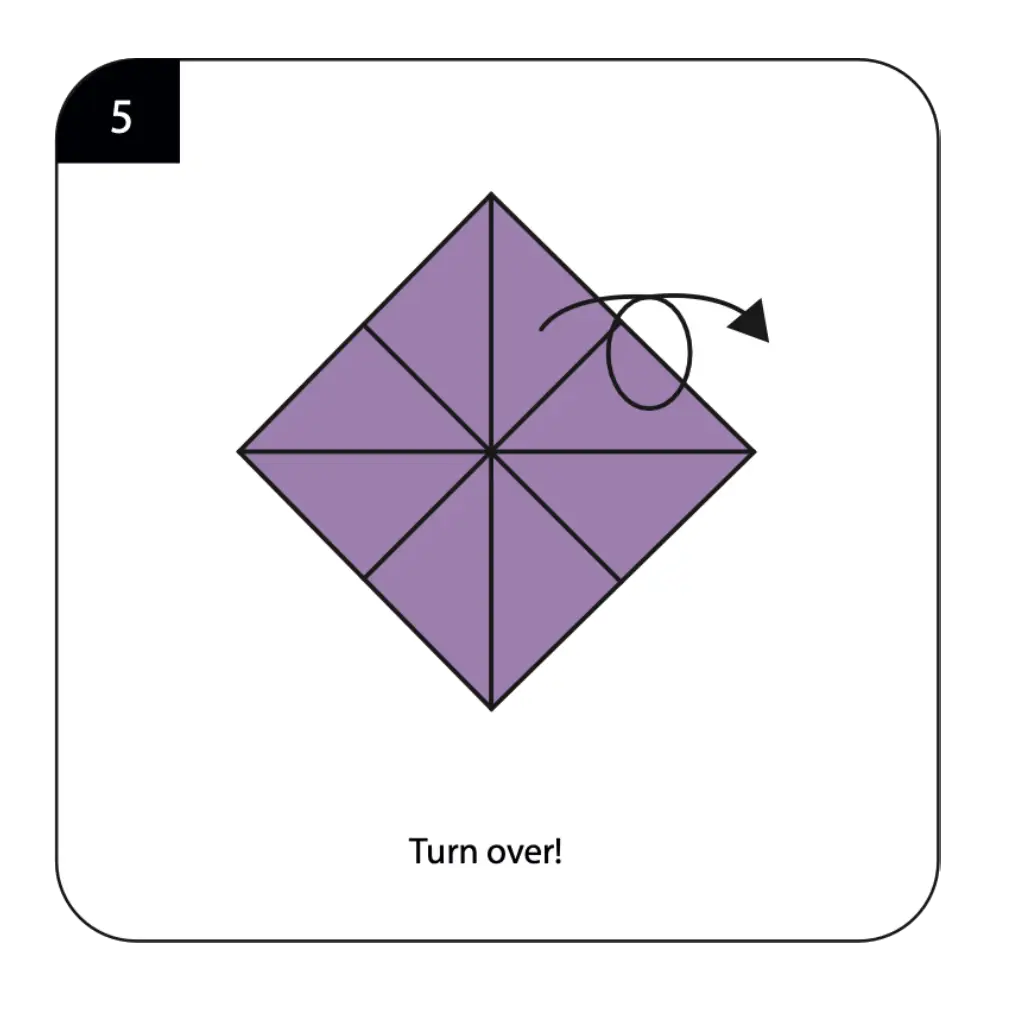
Turn over your partially completed model as instructed to access the reverse side for the next phase of detailed construction work. This reorientation is essential for proper development of your chair’s complex structure and allows access to the fold lines needed for creating the seat and leg assembly. Handle the sophisticated model carefully during this transition to preserve the integrity of your advanced folding work and maintain the established furniture proportions. The reverse side provides the working surface needed for the final shaping that will complete your chair’s transformation from geometric base to recognizable miniature furniture.
Step 6: Open and Shape the Structure For Origami Miniature Chair
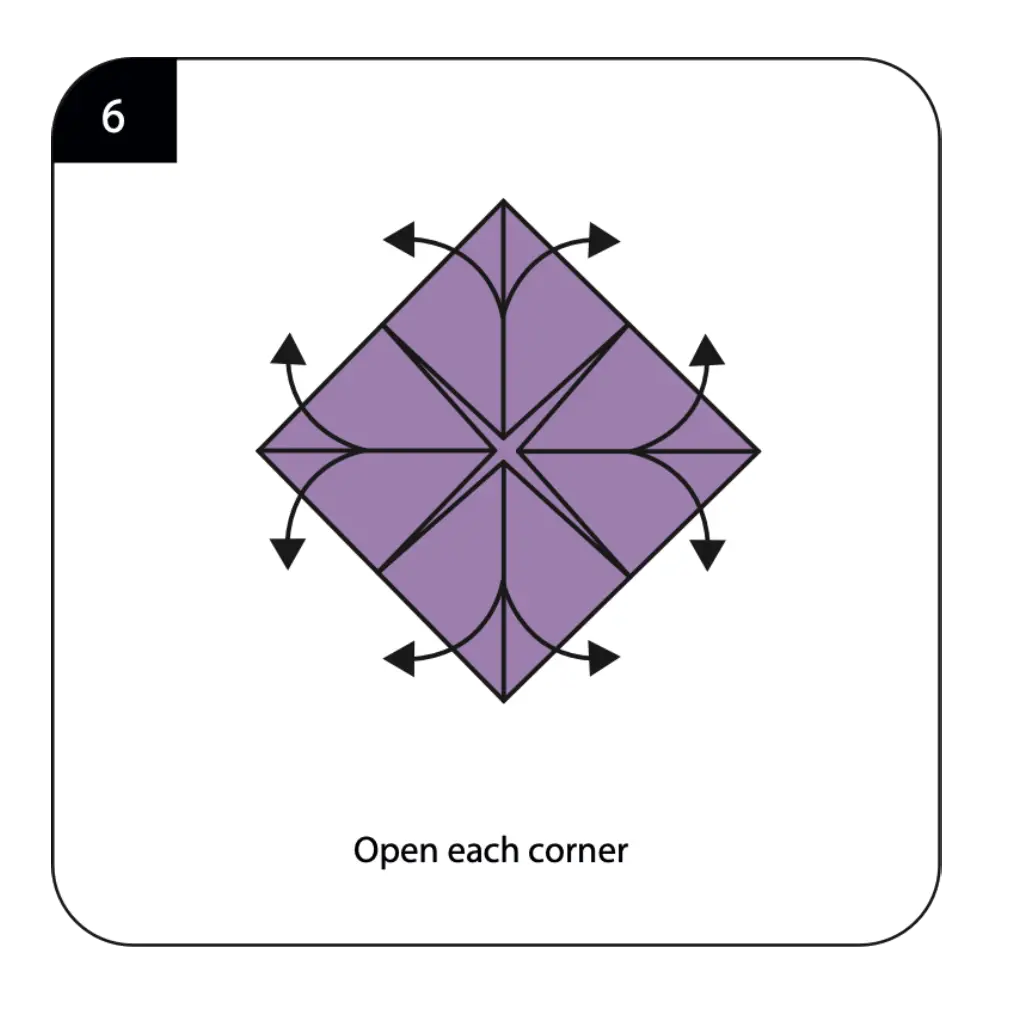
Open each corner as indicated in the diagram, carefully manipulating the paper to create the dimensional elements that will form your chair’s seat, backrest, and support structure. This step requires gentle but precise manipulation of multiple paper layers while maintaining the overall structural integrity of your miniature furniture piece. The opening technique transforms the flat, folded base into the three-dimensional form that clearly resembles a chair with distinct functional elements. Work carefully during this complex shaping phase, as proper execution determines how realistic and stable your finished origami miniature chair will appear and function.
Step 7: Complete the Support Structure For Origami Miniature Chair

Execute reverse folds to ensure the model can stand independently, creating the stable base and leg structure that allows your miniature chair to function as actual furniture. These final structural folds are crucial for achieving the stability and proper proportions that distinguish functional furniture from merely decorative models. The precision of these support-creating folds determines how well your chair will stand and maintain its shape during display or use in dollhouse settings. This step completes the engineering aspects of your paper furniture, ensuring that form follows function in creating a genuinely useful miniature object.
Step 8: Finalize Your Origami Miniature Chair
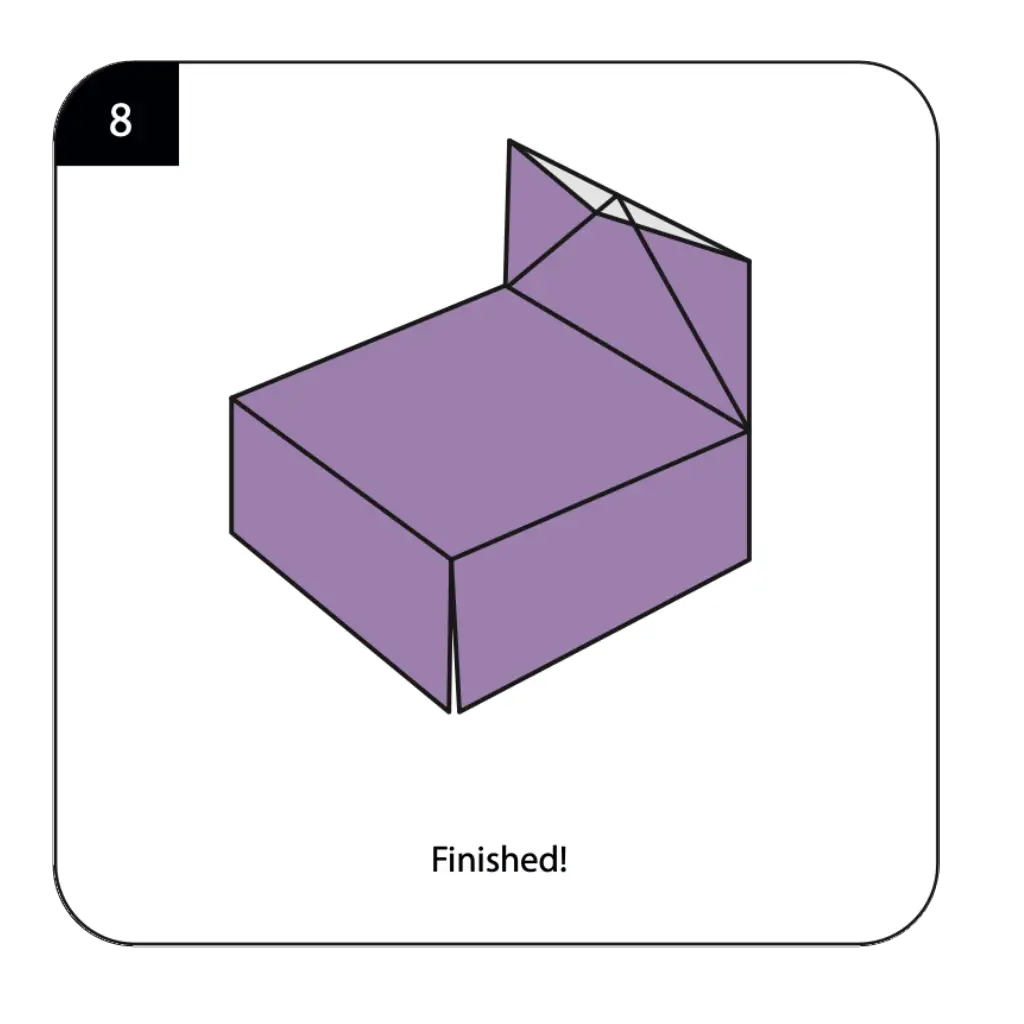
Your origami miniature chair is now complete and ready to furnish dollhouses, dioramas, or display collections! Make any final adjustments to ensure the chair stands properly and all structural elements are correctly positioned for optimal appearance and stability. The finished model should clearly display the characteristic elements of real furniture—seat, backrest, and stable base—while maintaining the clean geometric aesthetic of advanced origami miniature chair design. Your handcrafted paper chair demonstrates mastery of intermediate folding techniques while creating a functional piece of miniature furniture that showcases how origami can recreate the objects of daily life through the precise art of paper engineering and three-dimensional design.
Conclusion
Congratulations on completing your origami miniature chair! This sophisticated paper creation represents a significant achievement in intermediate origami skills, demonstrating your mastery of complex techniques including advanced bases, reverse folds, and three-dimensional furniture construction. From a simple square sheet, you’ve crafted a functional piece of miniature furniture that captures both the form and essence of real chairs while showcasing the remarkable possibilities of paper engineering. The origami miniature chair perfectly illustrates how traditional folding techniques can be applied to recreate everyday objects with surprising accuracy and detail, proving that origami extends far beyond simple decorative models into the realm of functional design. Your completed chair serves multiple purposes—as an impressive display of advancing origami skills, a practical addition to dollhouse furniture collections, or a demonstration piece that shows how paper folding can bridge the gap between art and utility. The techniques you’ve mastered through this project, particularly the use of classical bases for furniture construction and the integration of structural stability with aesthetic appeal, represent valuable skills that transfer to many other advanced origami designs. We hope this tutorial has expanded your appreciation for the engineering possibilities within paper folding and inspired you to explore other furniture and architectural models that challenge both your technical skills and creative vision. Remember that each piece of origami furniture you create offers opportunities to refine your technique and explore the fascinating intersection of traditional craft and modern design sensibilities.
- “Before attempting this intermediate chair, ensure you’ve mastered fundamental techniques in our Origami Basics for Beginners guide.”
- “Create miniature pets to sit in your chair by exploring our Origami Animals Collection featuring cats, dogs, and small creatures.”
- “Discover more furniture and architectural projects in our Creative Origami Gallery for advanced model makers.”
- “Display your miniature chair in dollhouse scenes using ideas from our Decorative Origami Guide for room arrangements.”
- “Complete your miniature room by adding tiny Origami Flowers as decorative accents for your furniture.”
- “Create an entire furniture set using techniques from our Modular Origami Projects for comprehensive dollhouse furnishing.”
