
Introduction
Origami, the ancient Japanese art of paper folding, offers an enchanting way to create stunning representations of the natural world. Among the most intriguing origami bird designs is the raven—a bird known for its intelligence, mystery, and striking appearance. This origami raven tutorial brings this fascinating corvid to life through simple folds and transformations, making it an excellent project for both beginners and intermediate paper folders. Unlike more complex bird models, this raven design achieves an impressive resemblance to the real bird while using straightforward techniques that anyone can master with a bit of patience. The sleek silhouette, pronounced beak, and distinctive proportions of the raven are all captured in this elegant paper model. Whether you’re fascinated by ravens’ mythology, appreciate their remarkable intelligence, or simply enjoy creating paper birds, this step-by-step guide will lead you through creating your own origami raven in just 11 manageable steps. Perfect for Halloween decorations, nature-themed displays, or simply as a striking standalone piece, this origami raven showcases how simple folds can create a recognizable and impressive paper sculpture.
Step-by-Step Instructions
Step 1: Create the Initial Foundation Fold For Origami Raven
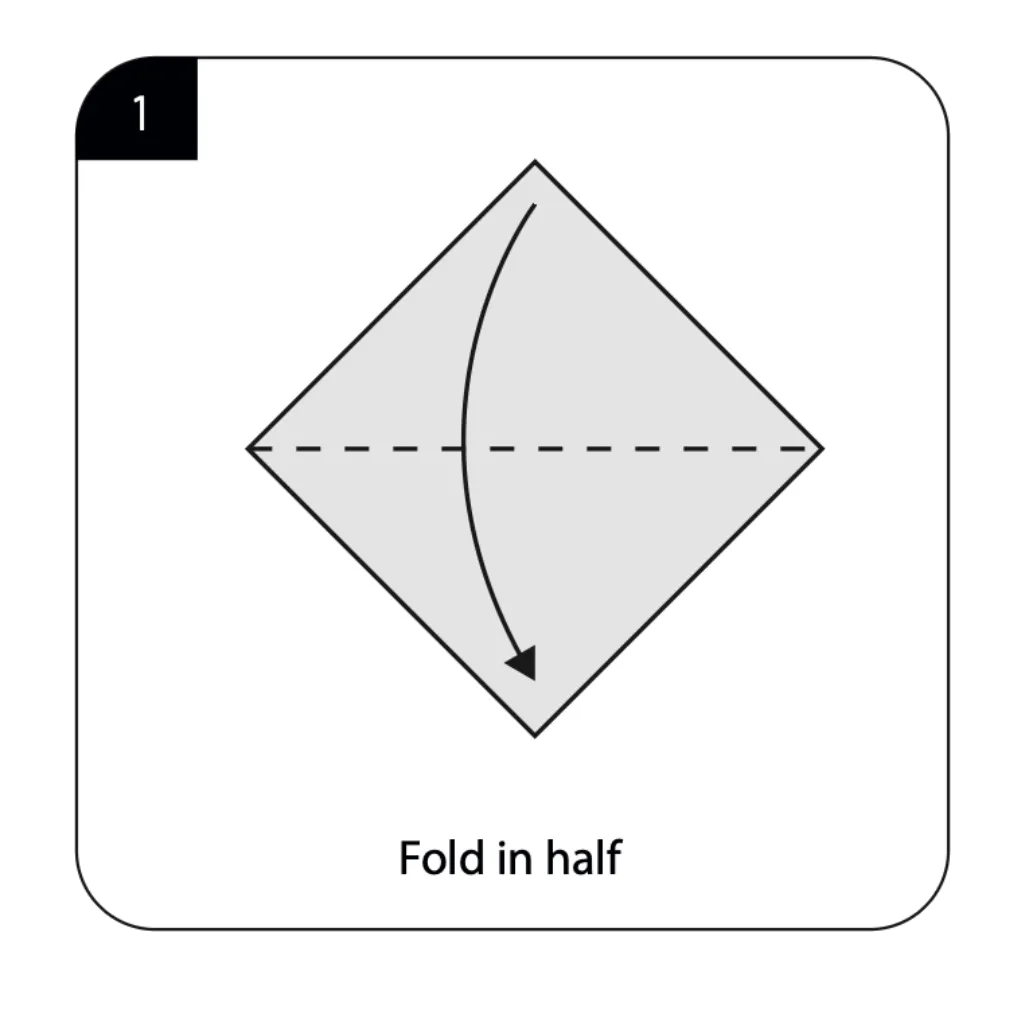
Begin with a square sheet of paper, preferably with color on one side (blue works well for our example, though black is traditional for ravens). Fold the paper in half diagonally to create a triangle, with the colored side facing outward. This fundamental fold establishes the foundation for your origami raven’s overall structure and proportions. The precision of this first fold is crucial, as it affects all subsequent steps in your raven creation. Make sure the corners align perfectly and press firmly to create a sharp, clean crease that will support later folds.
Step 2: Form the Basic Triangle
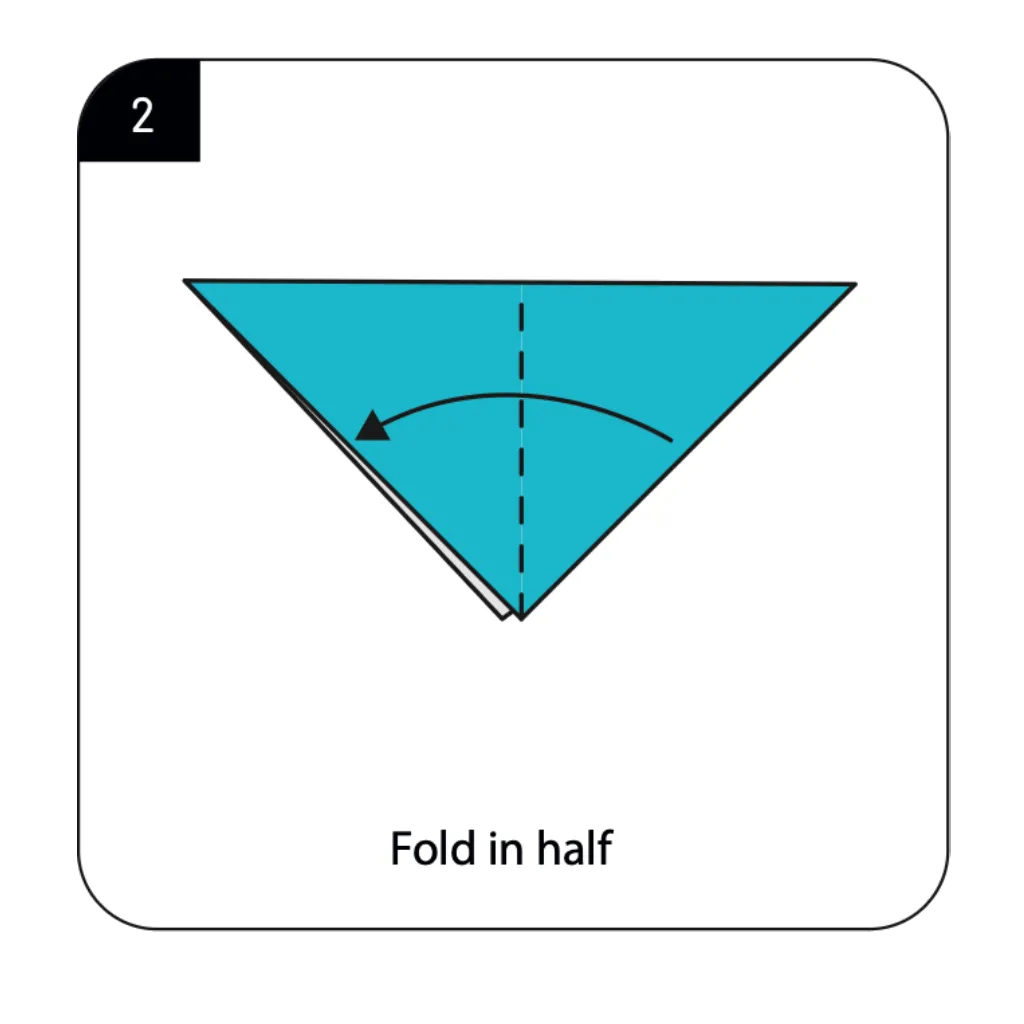
With the paper already folded into a triangle from Step 1, fold this triangle in half again, bringing the two points together to create a smaller, more compact triangle. This double-folded triangle serves as the basic structure from which your raven will emerge. The accuracy of this fold directly impacts the symmetry and balance of your finished origami bird. Ensure the edges align precisely and crease firmly for a clean fold line. This compact triangle creates the concentrated form needed for detailed bird features in later steps.
Step 3: Open and Reshape For Origami Raven
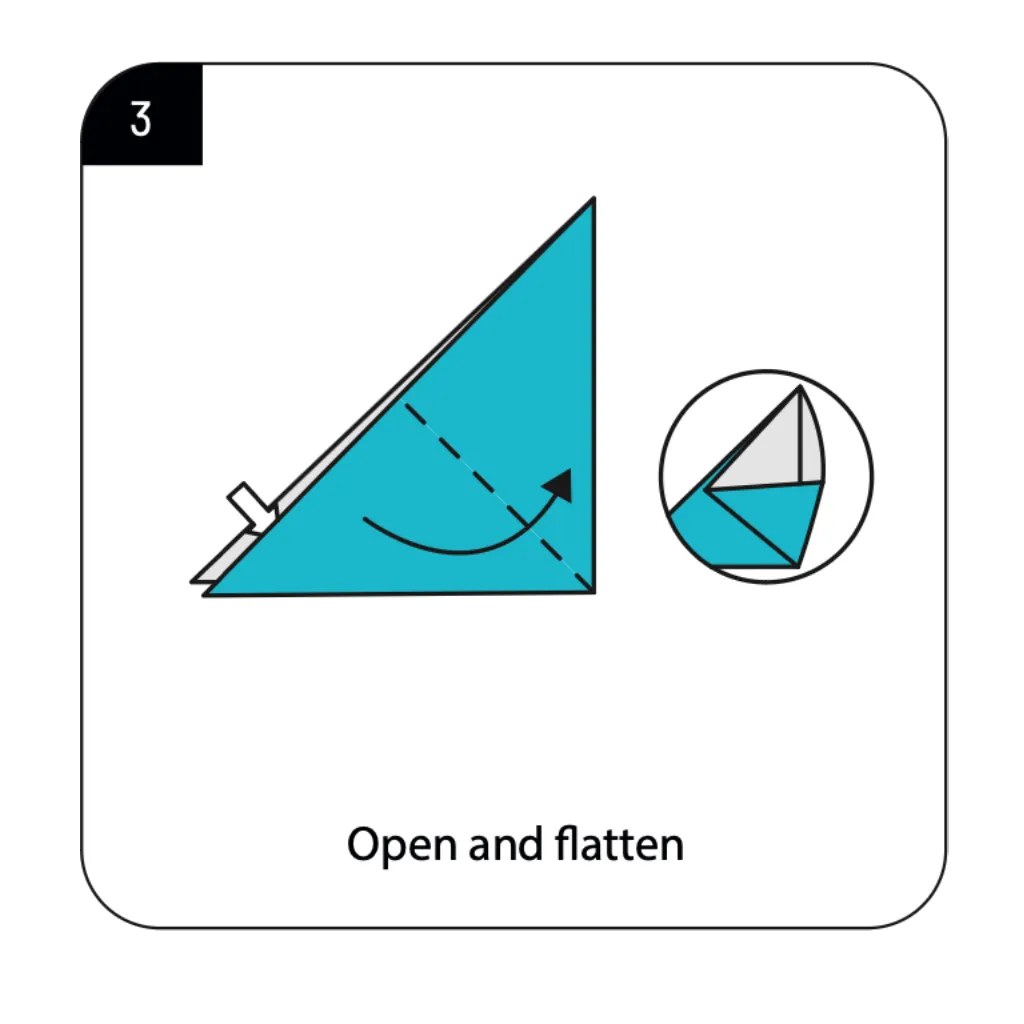
Open and flatten one corner of the folded triangle as shown in the diagram, creating a smaller triangle with a square base. This important reshaping begins transforming the basic geometric form toward a more bird-like structure. The small detail inset in the diagram shows the proper technique for opening and flattening this section. Work carefully to maintain clean, precise fold lines during this transition. This step creates the dimensional shift needed to eventually form your raven’s distinctive profile and proportions.
Step 4: Reorient Your Model
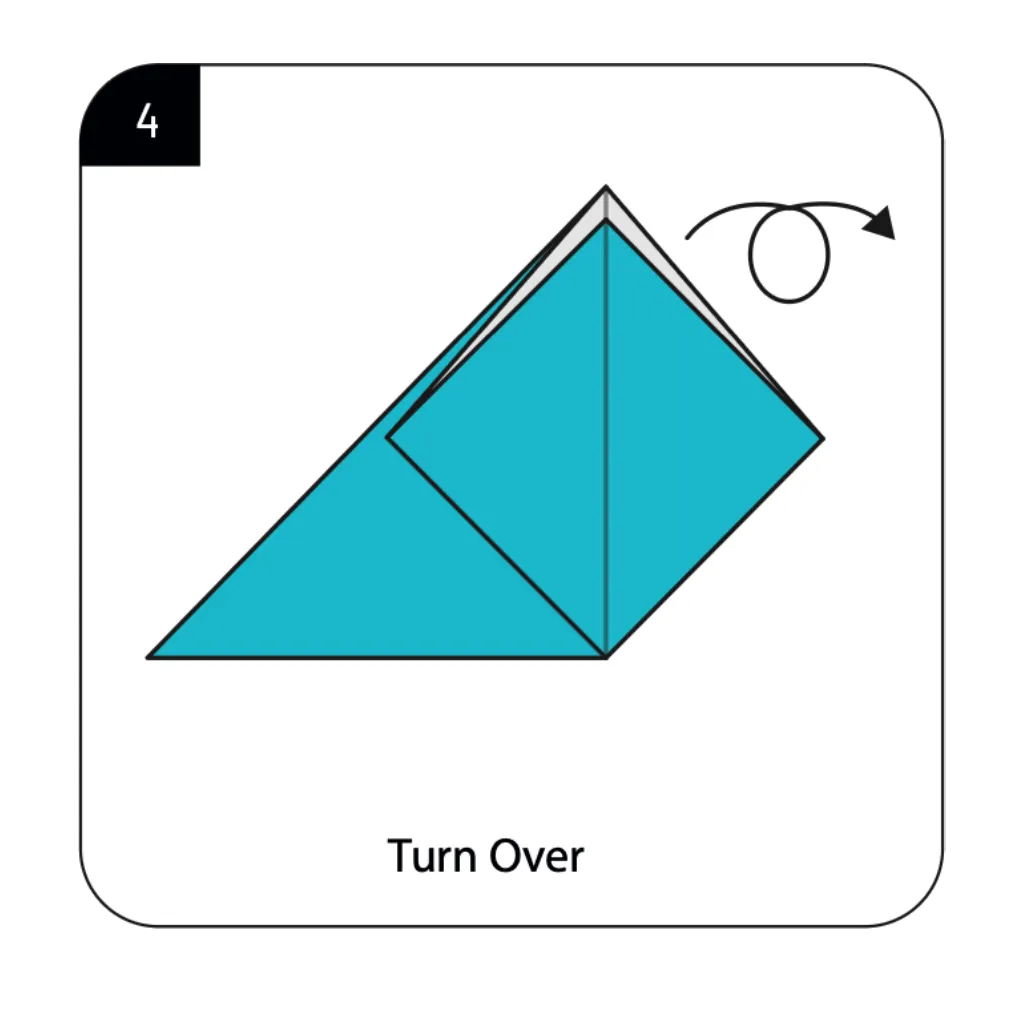
Turn over your model as indicated in the diagram, preparing it for the next series of transformative folds. This reorientation ensures the colored side will appear correctly in your finished raven. Handle the model gently during this transition to preserve the integrity of your previous folds. The proper positioning at this stage sets up the correct orientation for all subsequent steps and ensures your raven will display its color appropriately when complete.
Step 5: Continue Reshaping For Origami Raven

Open and flatten the model again as shown, creating another triangular shape with new proportions. This step continues the transformation process, further developing the structure that will become your raven. The techniques of opening and flattening require gentle manipulation of the paper while maintaining sharp creases. This progressive reshaping is essential for creating the distinctive elongated form of the raven’s body and the proportions needed for head and wings.
Step 6: Create the Internal Structure
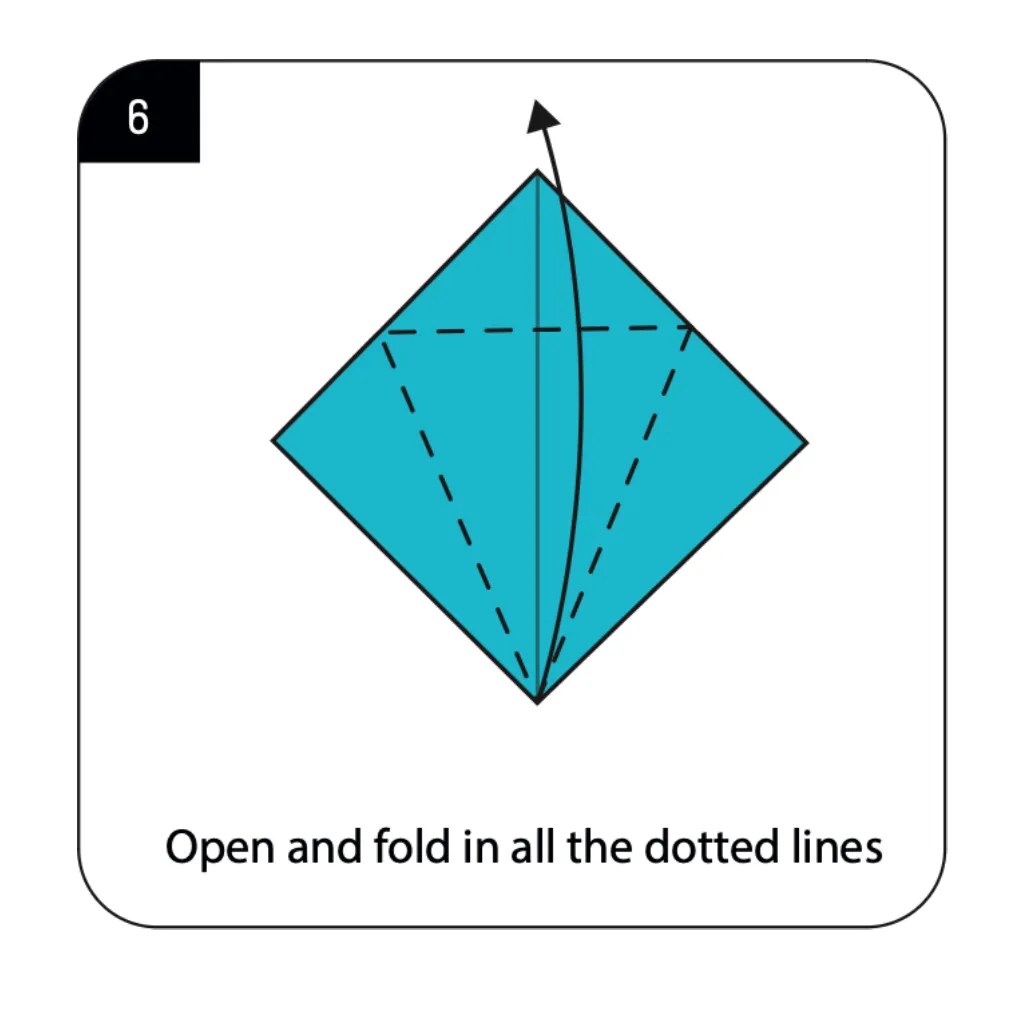
Open the model and fold in all the dotted lines as indicated, creating internal divisions that will define the raven’s body parts. This more complex step establishes the framework for your bird’s head, body, and wings through multiple precise folds. Work carefully and methodically, completing one fold line at a time while maintaining the overall symmetry of your model. These internal structural folds create the dimensional framework needed for your raven’s distinctive silhouette and proportions.
Step 7: Form the Raven’s Back For Origami Raven
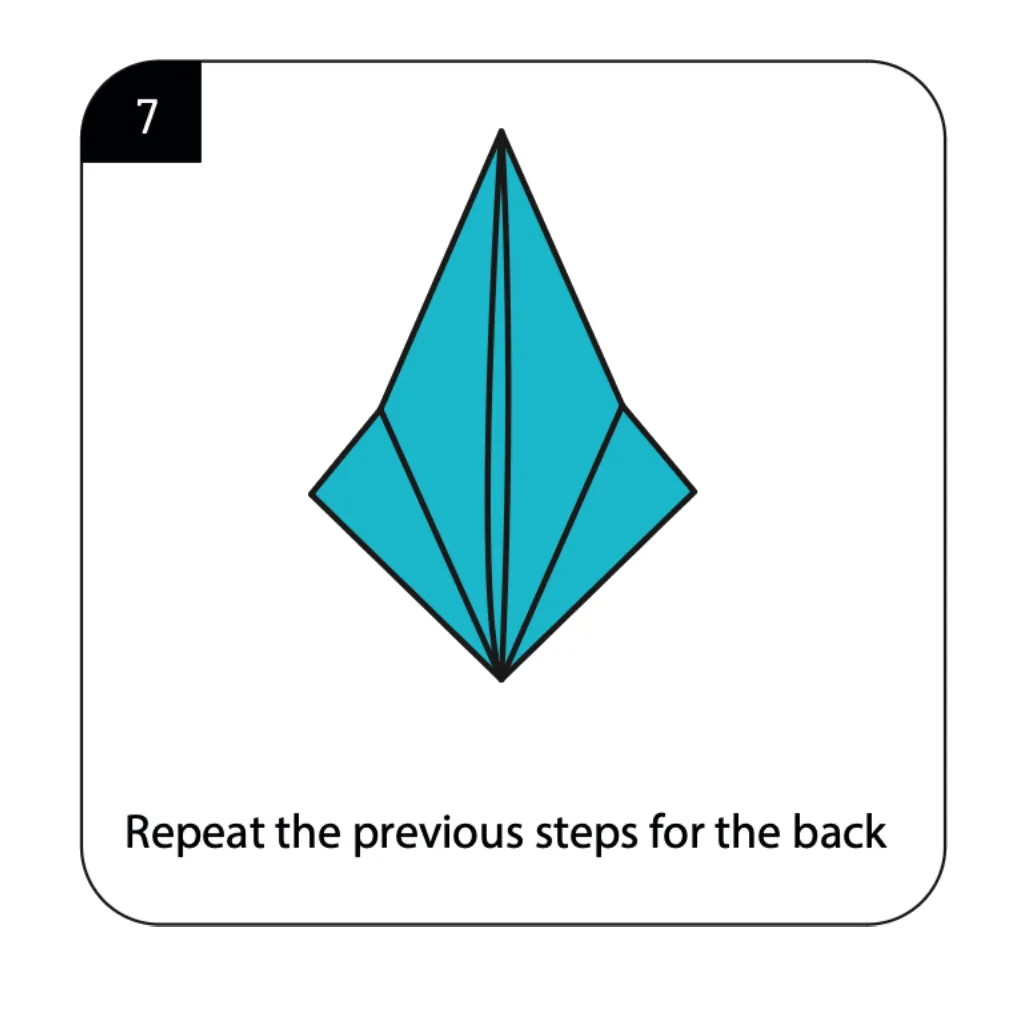
Repeat the previous steps for the back side of the model, ensuring both sides have the same fold pattern and structure. This step creates consistency throughout your origami raven and establishes the complete three-dimensional form. Working with identical precision on both sides ensures a balanced, symmetrical bird form. The completed back structure works in harmony with the front to create the full body shape of your raven, with proper proportions and stability.
Step 8: Begin Shaping the Wings
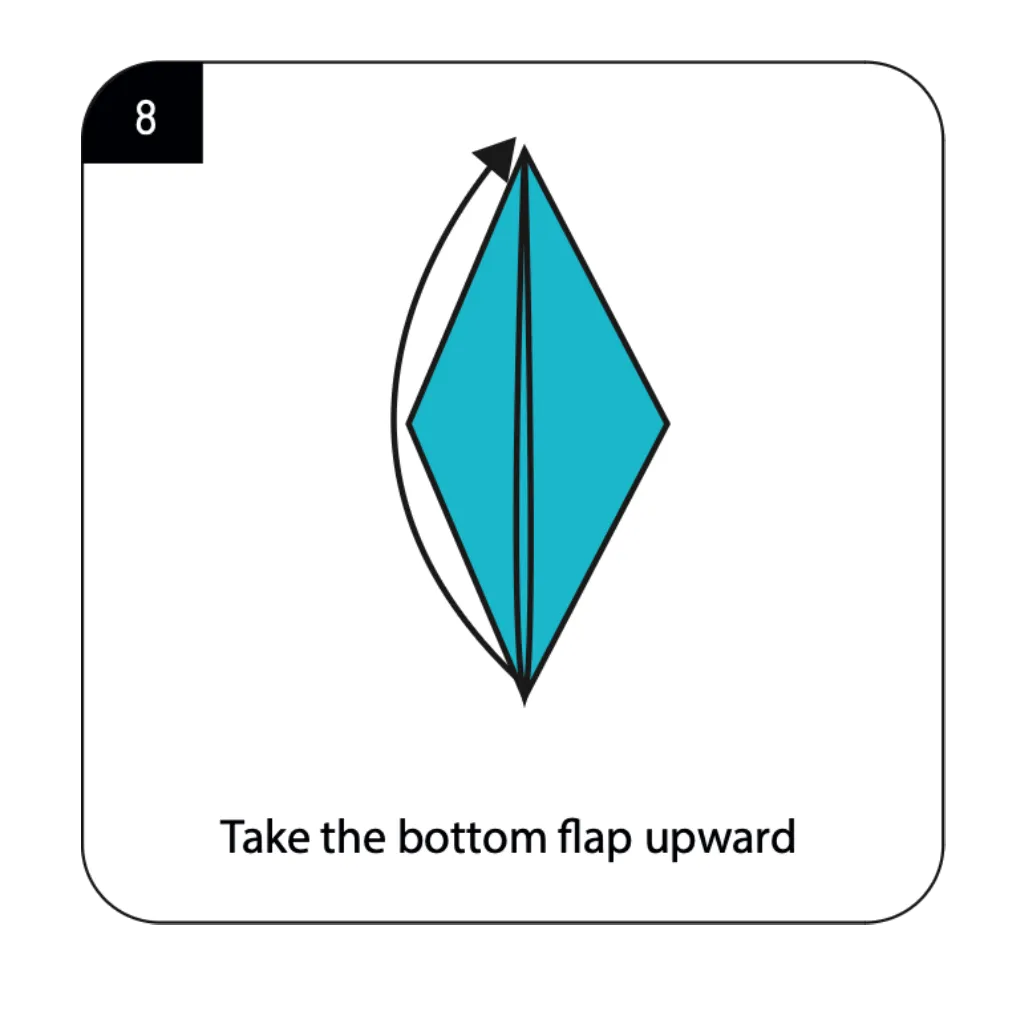
Take the bottom flap and fold it upward as shown in the diagram, beginning to define the wing section of your raven. This important fold starts transforming the abstract geometric shape into a recognizable bird form. The precise angle and position of this fold affects the wing shape and overall silhouette of your finished raven. This step begins establishing the characteristic proportions of the raven, with its relatively compact body and pronounced wings.
Step 9: Define the Body Shape For Origami Raven
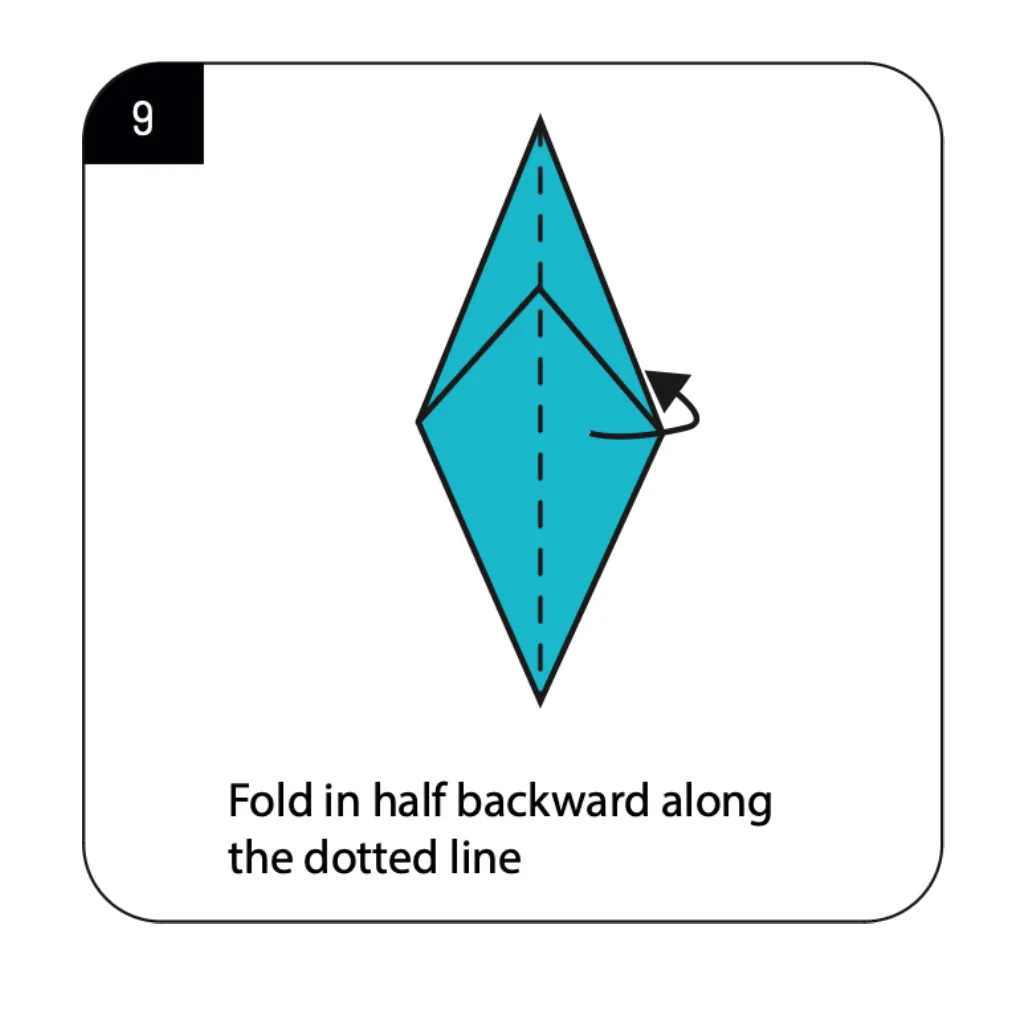
Fold the model in half backward along the dotted line as indicated, creating definition between the raven’s head and body sections. This crucial fold establishes the overall posture and stance of your origami bird. The accuracy of this fold directly impacts how your finished raven will stand and display. This backward fold creates the characteristic upright stance of the raven and prepares the model for the final defining details.
Step 10: Separate Head and Wing Features
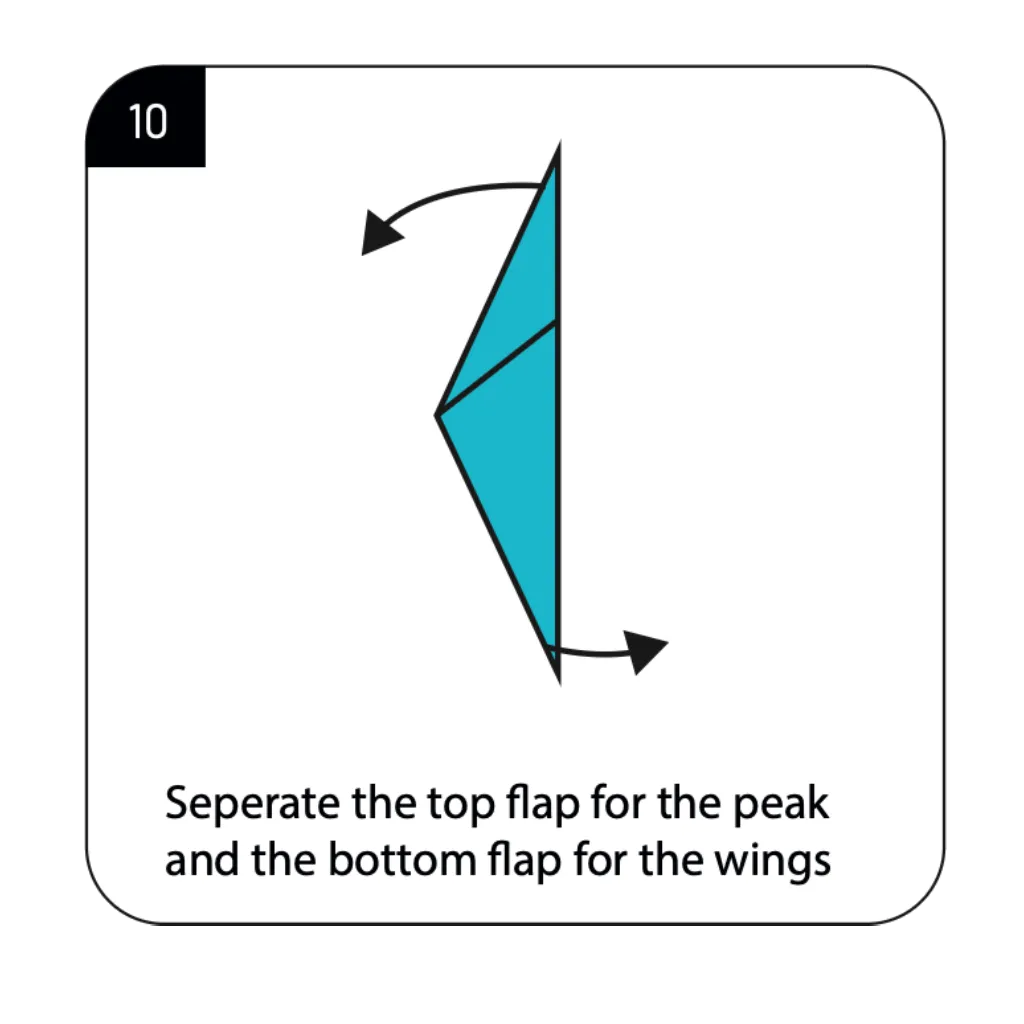
Carefully separate the top flap to form the raven’s peak (beak) and the bottom flap to create the wings, as shown in the diagram. This delicate step transforms the geometric form into distinctive bird features through selective separation of layered sections. Work gently to avoid tearing the paper while creating clean divisions between the head and wing components. This step dramatically enhances the realism of your origami raven by establishing its most recognizable features – the pronounced beak and defined wings.
Step 11: Complete Your Origami Raven For Origami Raven
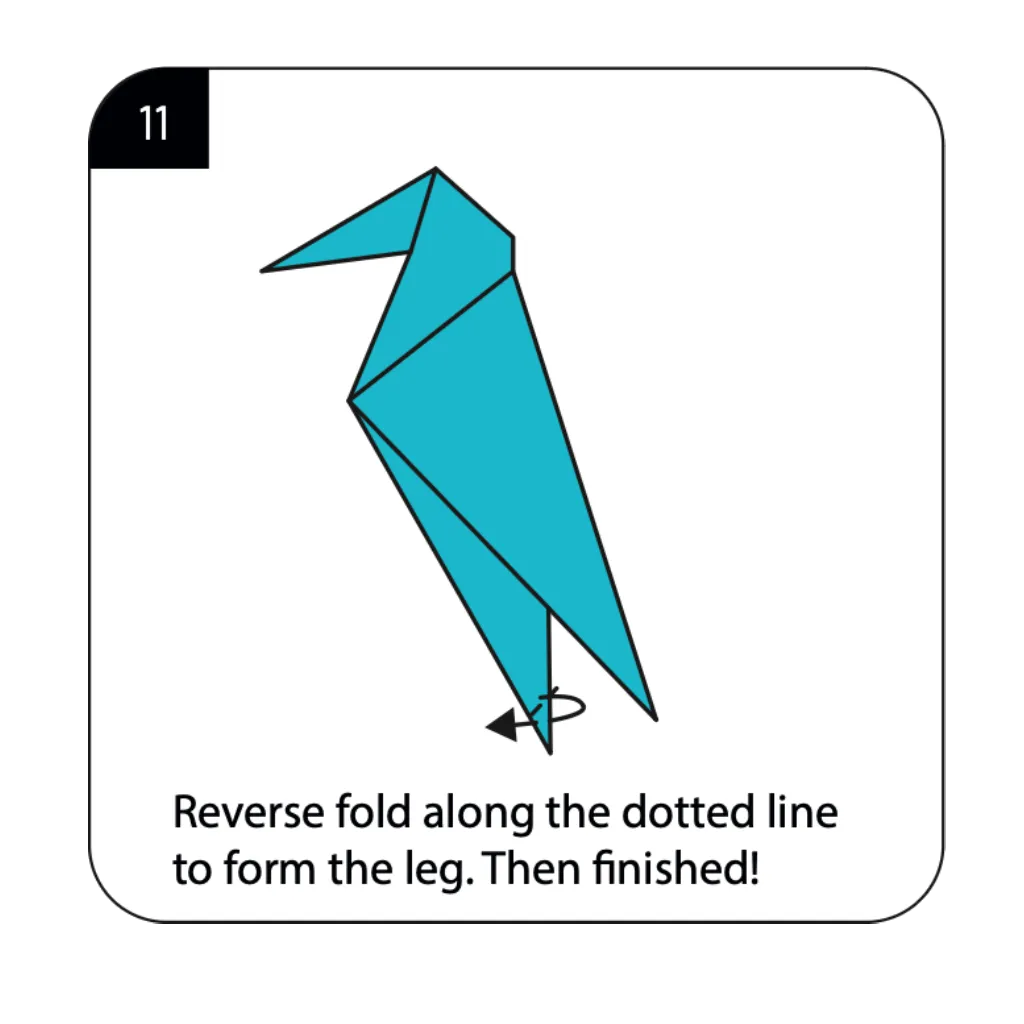
Perform a reverse fold along the dotted line to form the leg, then make any final adjustments to perfect your origami raven. This finishing touch adds the stabilizing leg feature that allows your raven to stand independently. The reverse fold requires precise technique but creates a natural-looking leg position that completes your bird’s realistic appearance. Your origami raven is now finished – the completed model captures the distinctive profile, proportions, and posture of this intelligent bird in an elegant paper sculpture.
Conclusion
Congratulations on creating your origami raven! This elegant paper bird represents the perfect balance between simplicity and sophistication in the art of paper folding. From a humble square sheet, you’ve crafted a three-dimensional sculpture that captures the distinctive characteristics of one of nature’s most intelligent birds. The origami raven showcases how thoughtful folding techniques can translate a bird’s key features—the pronounced beak, sleek body, and distinctive proportions—into a stylized yet recognizable paper form. Your completed model makes a striking decoration for nature displays, Halloween arrangements, or literary-themed collections inspired by famous raven poems and stories. The techniques you’ve learned—including reverse folds, inside folds, and three-dimensional shaping—build valuable skills that transfer to many other origami designs. We hope this tutorial has sparked your interest in both paper folding and bird-inspired creations. Remember that practice enhances precision—each raven you fold will be more refined than the last, allowing you to develop your unique interpretation of this mysterious and captivating bird.
- “Before starting your origami raven, learn essential paper folding techniques in our Origami Basics for Beginnersguide.”
- “Explore more bird designs in our comprehensive Origami Animals Collection, including owls, cranes, and eagles.”
- “Create a Halloween-themed display by combining your raven with other Creative Origami Projects like bats and pumpkins.”
- “Looking for display ideas? Check out our Decorative Origami Guide for beautiful ways to showcase your paper birds.”
- “Balance your nature-themed origami collection by adding Origami Flowers to complement your raven.”
- “Create an impressive flock of birds using techniques from our Modular Origami Gallery, perfect for advanced folders.”
