
The fascinating world of origami robot creation combines the ancient Japanese art of paper folding with modern technological inspiration. An origami robot represents the perfect blend of traditional crafting techniques and futuristic design, allowing paper folders of all skill levels to create charming mechanical companions using just a single sheet of paper. Whether you’re a beginner looking for a fun afternoon project or an experienced folder seeking to expand your repertoire, the origami robot offers an engaging challenge with a delightful result.
In this comprehensive guide, I’ll walk you through creating your own origami robot in eight detailed steps. The origami robot we’ll make features a distinct head, body, and limbs—all from one square piece of paper without any cutting or gluing. The beauty of this particular origami robot design lies in its simplicity and recognizable form. By the end of this tutorial, you’ll have mastered a charming origami robot that can stand on its own and bring a smile to anyone who sees it.
The Fascinating Intersection of Origami and Robotics
Before we begin folding our origami robot, it’s worth exploring the fascinating connection between origami and actual robotics. In recent years, engineers and scientists have drawn inspiration from origami folding techniques to create real-world robotic applications. These “origami-inspired robots” use principles of folding to create compact, deployable structures that can transform their shape and function—much like our paper origami robot will transform from a flat square into a three-dimensional figure.
From NASA’s foldable space equipment to medical micro-robots that can navigate within the human body, the principles behind your simple origami robot have serious scientific applications. As you follow this tutorial, you’ll be engaging with the same fundamental concepts that inspire cutting-edge technology, making your origami robotcreation both a fun craft and a connection to modern engineering marvels.
Materials Needed for Your Origami Robot
Before we dive into the folding process, let’s gather the necessary materials for your origami robot:
- Square paper: Traditional origami paper works best, preferably with different colors on each side for a more distinctive easy robot origami. As shown in the images, blue and white makes for an attractive origami robot.
- Flat surface: A clean table or desk provides the ideal foundation for creating your origami robot.
- Patience: While this origami robot is suitable for beginners, some steps require attention to detail.
- Optional: Fine-tipped marker for adding facial features or details to your completed origami robot.
For the best results, choose paper that holds creases well and is sturdy enough for your easy robot origami to stand when complete. Medium-weight origami paper (around 70-80 gsm) works perfectly for this origami robot design.
Step-by-Step Guide to Creating Your Origami Robot
Let’s begin creating your easy robot origami with detailed instructions for each step:
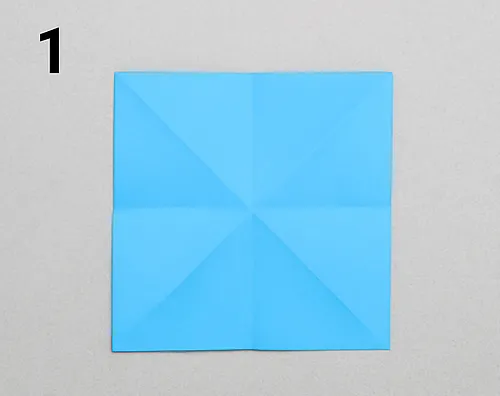
Step 1: Prepare Your Square with Preliminary Creases
Begin your easy robot origami journey with a square piece of paper positioned colored-side up (blue in our example). You’ll need to create a grid of creases that will guide all subsequent folds. First, fold the paper in half horizontally, crease firmly, and unfold. Then fold in half vertically, crease, and unfold. Next, fold along both diagonals by bringing each corner to the opposite corner, creasing firmly, and unfolding after each diagonal fold.
These initial creases form a “plus sign” and an “X” pattern on your paper, dividing it into eight triangular sections. These reference lines are essential for your easy robot origami as they establish the structural foundation and symmetry that will make your robot recognizably humanoid. Take your time with these preliminary folds, as their precision will affect every subsequent step in your origami robot creation.
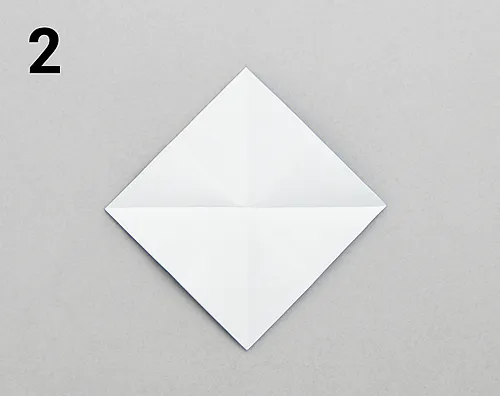
Step 2: Create the Preliminary Base Form
For this crucial origami robot foundation step, flip your creased square over so the white side faces up (or the lighter color if using different paper). Position the paper as a diamond shape, with corners pointing up, down, left, and right. Fold the top and bottom corners in to meet exactly at the center point where your creases intersect. Then fold the left and right corners to this same center point.
You should now have a smaller diamond shape with all four corners folded into the center. This preliminary base resembles an envelope and establishes the core structure from which your origami robot will emerge. The precision of these folds significantly impacts the final appearance of your origami robot, so align each corner carefully with the center intersection point before creating firm creases.
Step 3: Form the Robot’s Central Structure
Now flip your model over again, returning to the colored side (blue in our example). Your paper should now be a diamond shape with creases visible. For this transformative easy robot origami step, fold the bottom corner up to approximately the middle of the model, but stop short of the very center. Then fold the left corner inward to meet the central vertical line, and repeat with the right corner.
After completing these folds, your easy robot origami begins to take shape with a distinctive structure featuring a white diamond-shaped center (which will become the robot’s body or “chest plate”) surrounded by colored sections that will form the head, arms, and legs. This step establishes the basic humanoid proportions of your easy robot origami and begins to reveal its characteristic form.

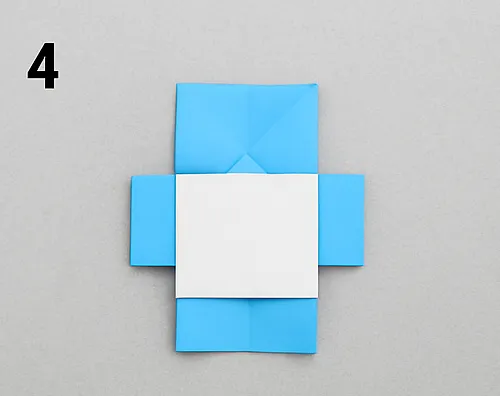
Step 4: Create the Arms of Your Robot
This step defines one of the most recognizable features of your origami robot—its arms. Focus on the flaps extending from the left and right sides of your model. Fold these flaps outward horizontally, creating perpendicular extensions from the central body structure. Make sure both arms extend at the same angle and distance for a symmetrical easy robot origami.
The positioning of these arms is crucial for the balance and appearance of your easy robot origami. They should extend straight out from the sides of the white center section. Once folded, your origami robot should have a distinct cross-like shape, with the white diamond in the center, colored sections at the top and bottom, and colored arms extending from both sides.
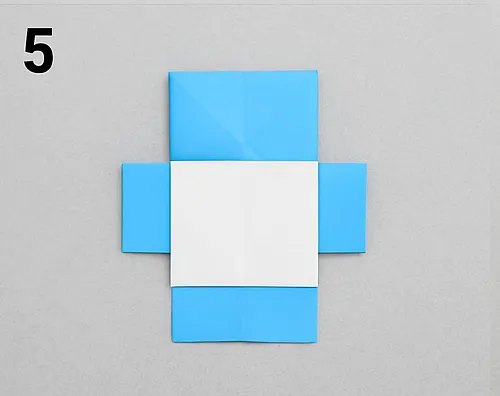
Step 5: Refine the Arms and Prepare for Leg Formation
In this refinement step for your origami robot, you’ll adjust and confirm the arm positions. The arms should extend perfectly horizontally from the central white section. Make sure they’re even on both sides and that the creases are firm and precise. This step may seem similar to the previous one, but it’s actually a check-and-adjust phase to ensure your easy robot origami proportions are correct before moving on to the more complex leg formations.
Take a moment to flatten your model completely, pressing down on all sections to reinforce the creases. Your easy robot origami should still maintain a cross-like appearance with the distinctive white center that forms the robot’s body. The precision of the arm positioning affects the stability of your completed easy robot origami, so take your time with these adjustments.
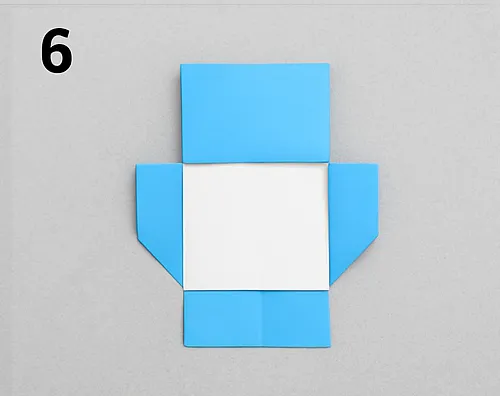
Step 6: Begin Forming the Legs
Now we’ll start creating the lower body of your origami robot. Focus on the bottom flap extending from beneath the white center section. Take the bottom corners of this flap and fold them inward and upward diagonally, creating triangular shapes on both sides. These diagonal folds should meet the edges of the central white section, forming what will become the upper portion of your easy robot origami legs.
After completing these folds, the bottom of your easy robot origami should have a trapezoidal shape, narrower at the bottom than at the top where it connects to the central body. This step begins to give your easy robot origami a more humanoid silhouette with defined legs rather than a simple flap at the bottom. The angle of these diagonal folds determines the stance of your easy robot origami, so aim for symmetry on both sides.
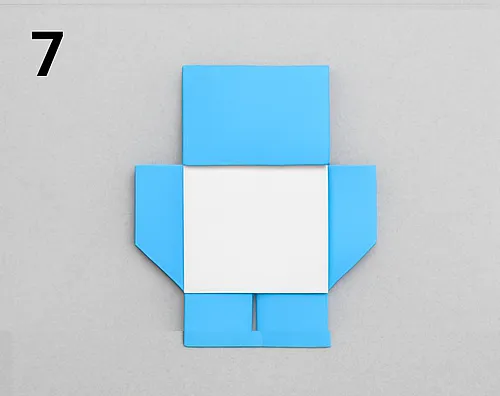
Step 7: Define the Upper Legs
Building on the previous step, we’ll now refine the upper leg structure of your origami robot. The trapezoidal section at the bottom of your model will be further defined to create more distinctive leg shapes. Focus on the diagonal edges you created in Step 6. These diagonal edges form the outer sides of your easy robot origami upper legs.
Ensure that these diagonal edges are crisp and well-defined, and that the bottom edge of the trapezoid remains straight and parallel to the floor. You may need to reinforce the creases to maintain this shape. At this stage, your easy robot origami should clearly show a head section at the top, arms extending from the sides, a central body section, and a developing leg structure at the bottom. The proportions should begin to resemble a simplified human or robot form.
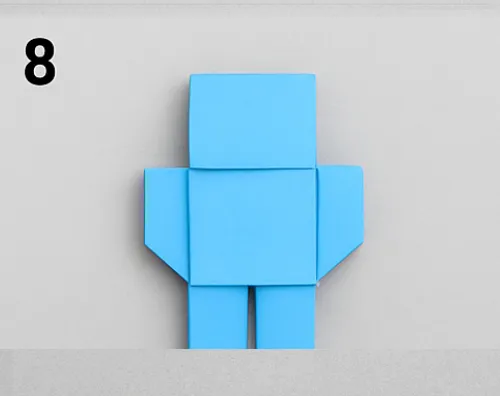
Step 8: Complete the Robot with Lower Legs
For the final structural step of your origami robot, we’ll complete the legs to allow your creation to stand independently. Take the bottom section of your model and fold it upward behind the upper legs, creating a perpendicular fold that forms the lower legs and feet of your easy robot origami. This fold should be made approximately one-third of the way up from the bottom edge.
After making this fold, adjust the angle of the fold and the position of the “feet” until your easy robot origami can stand stably on its own. You may need to make small adjustments to find the perfect balance point. Properly executed, this final structural fold transforms your flat design into a three-dimensional easy robot origami capable of standing independently—a satisfying conclusion to your folding journey.
Your easy robot origami is now structurally complete! For a finishing touch, you might want to add facial features with a marker—perhaps simple dot eyes and a line mouth on the top section to give your origami robot personality. You can also add details like buttons or panel lines on the body to enhance the robotic appearance.
Tips for Creating the Perfect Origami Robot
Creating an exceptional origami robot takes practice, but these helpful tips will ensure better results:
- Use crisp, clean folds: The secret to a great origami robot is sharp, precise creases. Run your fingernail or a bone folder along each fold to make it crisp and defined.
- Maintain symmetry: For the most appealing easy robot origami, ensure that folds on both sides are symmetrical and balanced. An asymmetrical robot might not stand properly.
- Work methodically: Rushing through the steps can lead to misaligned folds and an uneven origami robot. Take your time with each fold, ensuring accuracy before moving to the next step.
- Pre-crease carefully: The initial grid of creases in Step 1 guides all subsequent folds, so take extra care with these preliminary creases for your easy robot origami.
- Adjust as needed: If your easy robot origami doesn’t stand well in the final step, make small adjustments to the angle of the feet and legs until you find the right balance point.
Creative Variations for Your easy robot origami
Once you’ve mastered the basic origami robot, consider these creative variations:
Design Variations for Origami Robots
- Color combinations: Try different colored papers to create unique easy robot origami designs—silver for a futuristic robot, bright colors for a friendly toy robot, or patterned paper for an artistic interpretation
- Size variations: Create tiny easy robot origami models with 3-inch paper or large display pieces with 12-inch paper
- Articulated features: Advanced folders might experiment with additional folds to create movable arms or a rotating head for their origami robot
- Robot army: Create multiple easy robot origami in different colors and sizes for an impressive display
Decorative Enhancement Ideas
Take your origami robot to the next level with these embellishment ideas:
- Add details with metallic pens to create the appearance of metal panels and joins
- Create a small origami control panel or tools that your origami robot can hold
- Use glow-in-the-dark paper for a futuristic nighttime easy robot origami
- Add small LED lights beneath translucent paper for an illuminated origami robot
- Create a diorama or scene for your origami robot to inhabit
Educational Benefits of Creating an easy robot origami
Making an origami robot offers numerous educational benefits, particularly for children:
- Spatial reasoning: Understanding how a flat paper transforms into a three-dimensional origami robot builds spatial awareness and geometric thinking
- Following sequential instructions: The step-by-step process of creating an easy robot origami teaches the importance of following directions in order
- Geometric concepts: The easy robot origami incorporates principles of symmetry, angles, and proportions that reinforce mathematical concepts
- Fine motor skills: The precise folding required for an origami robot helps develop hand-eye coordination and dexterity
- STEM connections: The easy robot origami provides an entry point for discussions about real robotics, engineering, and technology
Origami Robots in Science and Engineering
The connection between paper origami robots and actual technological innovations is fascinating. Scientists and engineers increasingly draw inspiration from origami principles to solve complex problems:
- Self-assembling robots: Researchers have developed actual robots that can fold themselves from flat sheets into functional three-dimensional forms, much like your paper origami robot
- Space applications: NASA uses origami-inspired folding techniques to create compact solar panels and other equipment that must be transported in limited space before deploying
- Medical devices: Tiny origami-inspired medical tools can be inserted into the body in a folded state and then expanded to perform procedures
- Architectural innovations: Origami principles inform the design of collapsible structures and space-efficient buildings
- Consumer products: Everything from foldable smartphones to collapsible furniture benefits from the same principles you’re using to create your origami robot
By creating your paper origami robot, you’re engaging with concepts that have real-world applications in cutting-edge technology and design.
Frequently Asked Questions About Origami Robots
Q: How long does it take to make an origami robot?
A: For beginners, creating an origami robot might take 15-20 minutes. With practice, you can complete an origami robot in about 5-10 minutes.
Q: What type of paper works best for an origami robot?
A: Medium-weight origami paper (70-80 gsm) works best for an origami robot because it holds creases well while being sturdy enough for the robot to stand independently.
Q: Is the easy robot origami suitable for young children?
A: The easy robot origami is most suitable for children aged 8 and up. Younger children may need assistance with some of the more precise folds required for the origami robot.
Q: Can I use rectangular paper to make an easy robot origami?
A: You need to start with a square for your origami robot. If you only have rectangular paper, you can create a square by folding one corner to meet the opposite edge and cutting off the excess rectangle.
Q: How can I make my easy robot origami more durable?
A: For a more durable origami robot, consider using slightly heavier paper or applying a light spray of clear acrylic sealer after completion to help maintain its shape and strengthen the paper.
Conclusion: The Joy of Creating an Origami Robot
Creating an origami robot connects you to both ancient paper-folding traditions and modern technological innovations. The origami robot represents the perfect intersection of art and science—a simple paper creation that embodies principles used in cutting-edge engineering and robotics.
As you practice creating your easy robot origami, you’ll find that each one becomes more refined and stable. The meditative quality of folding an easy robot origami offers a moment of calm creativity in our busy lives, while the finished origami robot provides a tangible reminder of your skill and patience.
Whether you’re making an origami robot as a fun activity with children, a decorative piece, or simply as a creative outlet, the process itself is as rewarding as the result. As your fingers learn the sequence of folds, you develop a deeper appreciation for the transformation of a simple square of paper into a charming three-dimensional easy robot origami with personality and presence.
So gather your paper, find a quiet moment, and enjoy the simple pleasure of creating your own paper mechanical companion—an origami robot that stands as a testament to the elegance of paper engineering and the joy of creative expression!
Recommended Resources for Origami Enthusiasts
To further explore the world of origami and perfect your origami robot and other designs, consider these trusted resources:
- Origami USA – The largest origami organization in America, offering patterns, tutorials, and resources for all skill levels, including various origami robot designs and other geometric models.
- Japan Origami Academic Society – Explore the mathematical and scientific aspects of origami that inform designs like the origami robot.
- The Origami Resource Center – A comprehensive website with free diagrams, including geometric and modular designs that complement your origami robot skills.
- Robert J. Lang Origami – Learn about the mathematics behind origami and explore advanced techniques that can be applied to create more complex origami robot designs.
- MIT’s Origami Engineering Research – Discover how principles used in your paper origami robot are being applied to solve real-world engineering challenges.
Happy folding!
Have you created an origami robot using this tutorial? Share your creations in the comments below! I’d love to see how your unique paper robots turned out.
