
Introduction
Origami, the ancient Japanese art of paper folding, offers a wonderful way to create festive holiday decorations that combine creativity with tradition. The origami Santa Claus stands out as one of the most charming Christmas-themed paper crafts, bringing holiday cheer through simple folding techniques accessible to crafters of all skill levels. This cheerful paper Santa captures the jolly essence of the beloved Christmas figure while requiring only basic origami skills and a single square sheet of paper. Unlike more complex holiday designs, this Santa Claus model achieves a recognizable and adorable representation using straightforward folds that both children and adults can master with a bit of patience. The completed origami Santa Claus features Santa’s distinctive hat, friendly face, and red suit, creating a delightful holiday decoration perfect for Christmas trees, greeting cards, gift toppers, or festive table settings. Whether you’re preparing for seasonal celebrations, looking for engaging holiday activities for children, or simply wanting to add handmade charm to your Christmas décor, this step-by-step tutorial will guide you through creating your own paper Santa Claus in just 10 manageable steps. The simple materials required—just one square of paper, preferably red and white—make this an accessible holiday craft that delivers impressive results.
Step-by-Step Instructions
Step 1: Create the Initial Triangle Base
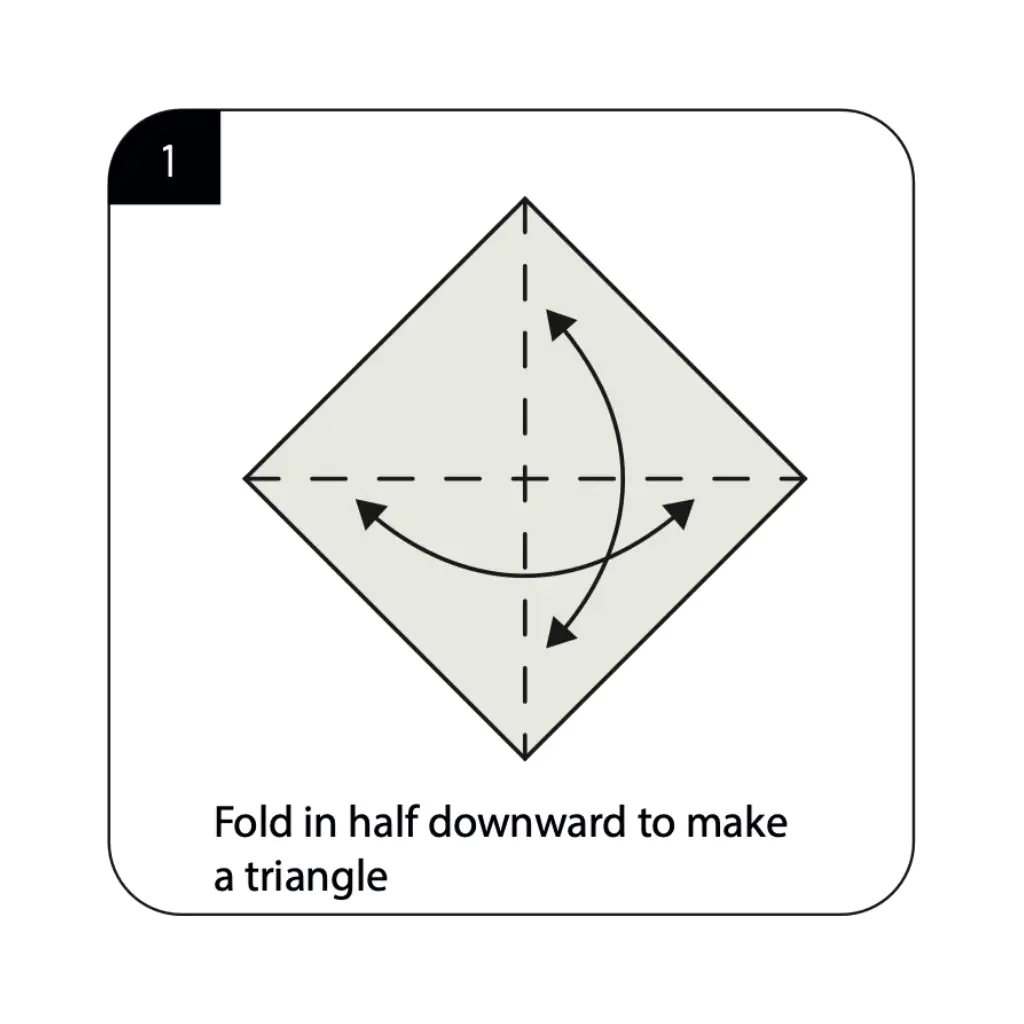
Begin with a square sheet of paper, preferably with white on one side and red or pink on the other for a traditional Santa color scheme. Fold the paper in half diagonally from corner to corner, creating a triangle with the colored side facing outward. This fundamental fold establishes the foundation for your entire origami Santa Claus structure. The precision of this first fold is crucial, as it affects the symmetry and balance of your finished model. Make sure the corners align perfectly and press firmly along the fold line to create a sharp, clean crease that will support subsequent folds.
Step 2: Form the Preliminary Reference Fold
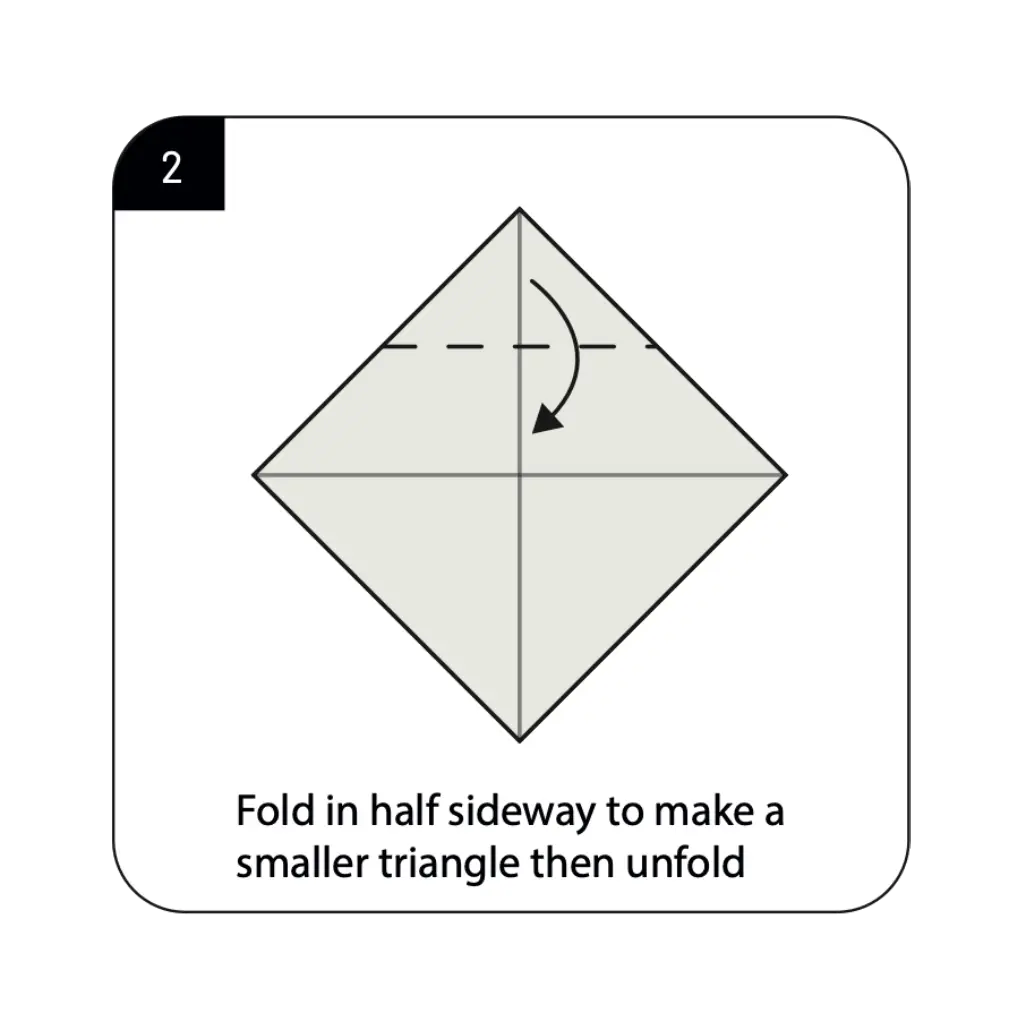
With your paper still folded as a triangle, fold it in half horizontally by bringing the left point to the right point, creating a smaller triangle, then carefully unfold back to the larger triangle. This fold establishes an important reference line that will guide several future steps in your Santa creation. The accuracy of this fold directly impacts the symmetry and proportions of your finished origami Santa Claus. Though you’ll return to the original triangle shape, the crease created remains as a crucial guideline for proper alignment in later steps.
Step 3: Create Santa’s Hat Top
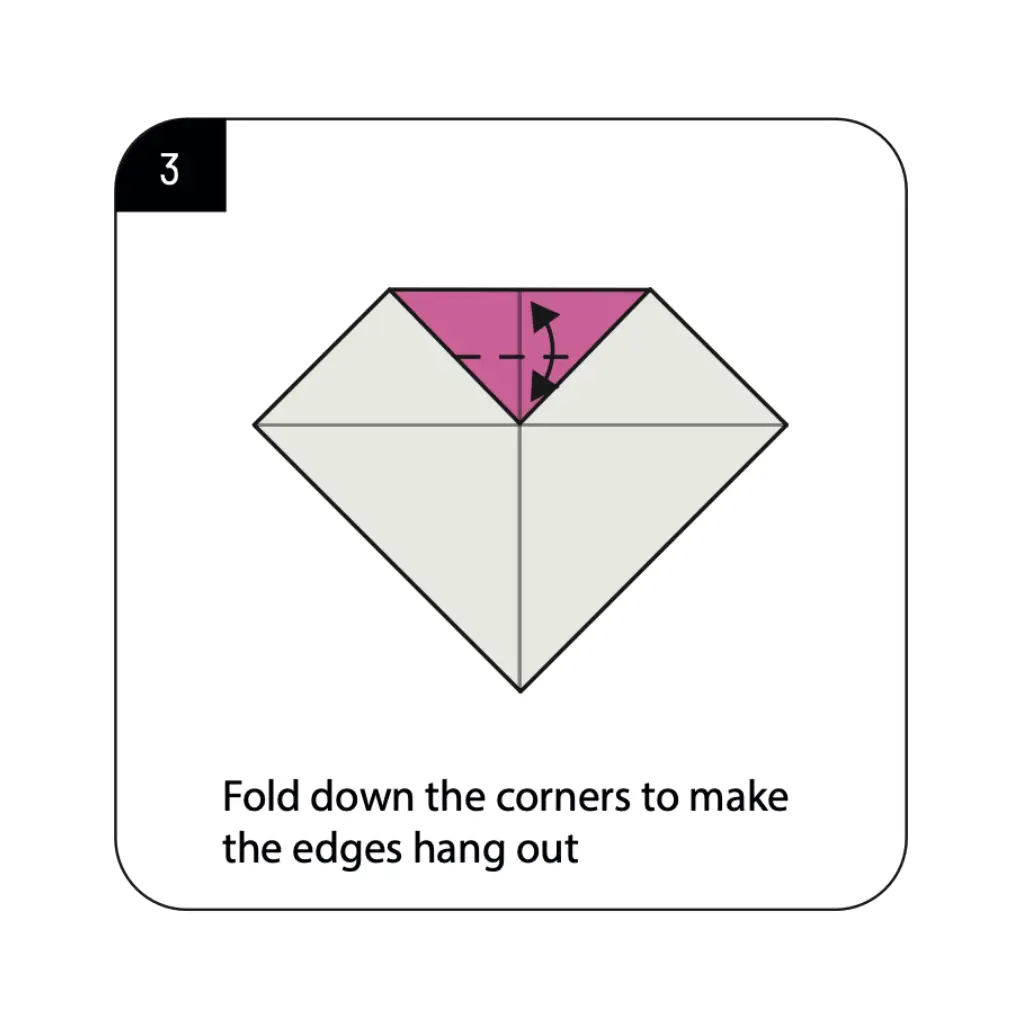
Fold down the top corners to create a small triangle at the top as shown in the diagram. This important fold begins defining the characteristic pointed hat of your Santa Claus figure. The colored portion (pink in the illustration) that appears will form the top of Santa’s hat. The precision of this fold affects the appearance and proportions of your finished Santa, particularly the distinctive hat shape. Ensure the fold is centered and symmetrical for a balanced, professional-looking origami Santa Claus figure.
Step 4: Begin Forming the Face Structure
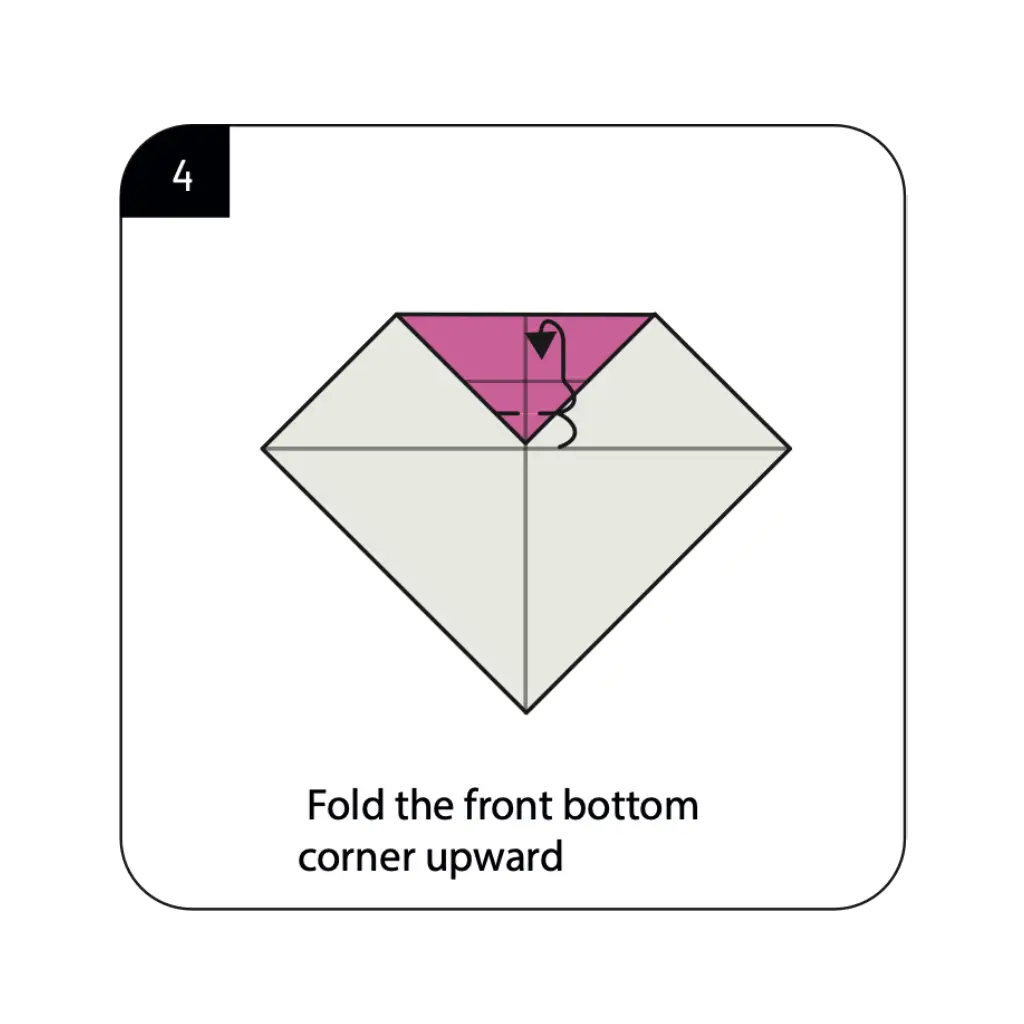
Fold the front bottom corner upward as shown in the diagram, creating another small triangular section. This fold begins establishing the face area of your Santa Claus figure, a crucial element for creating a recognizable character. The position and angle of this fold directly impact the proportion of Santa’s face to his hat in the finished model. This step continues developing the distinctive shape and color arrangement that will make your origami Santa Claus instantly recognizable as Santa Claus.
Step 5: Create the Beard Foundation
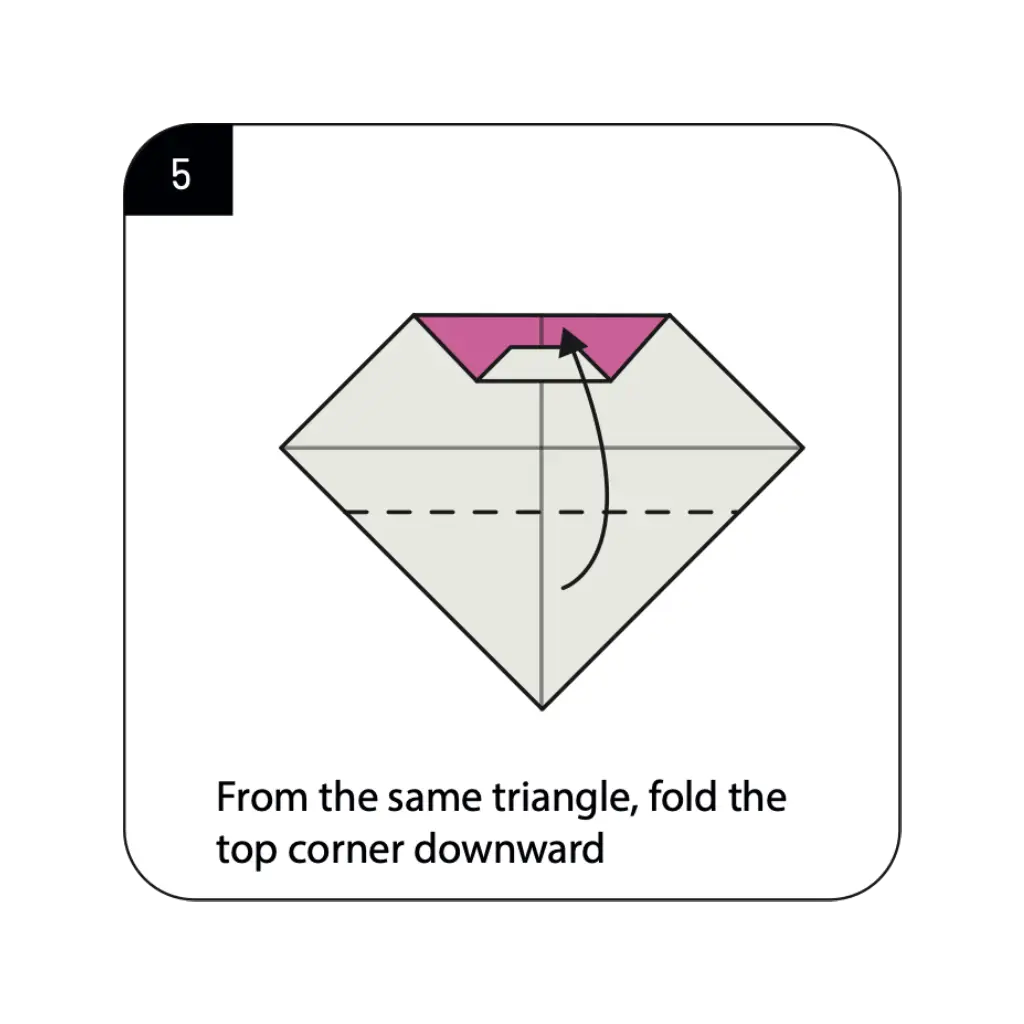
From the same triangle formed in Step 4, fold the top corner downward as indicated in the diagram. This precise fold creates the foundation for Santa’s beard, a defining characteristic of the Christmas figure. The angle and position of this fold affect the overall facial proportions of your origami Santa Claus. This fold establishes more definition in the face area and continues the transformation from abstract geometric shapes to a recognizable Santa Claus portrait form.
Step 6: Form the Back Structure
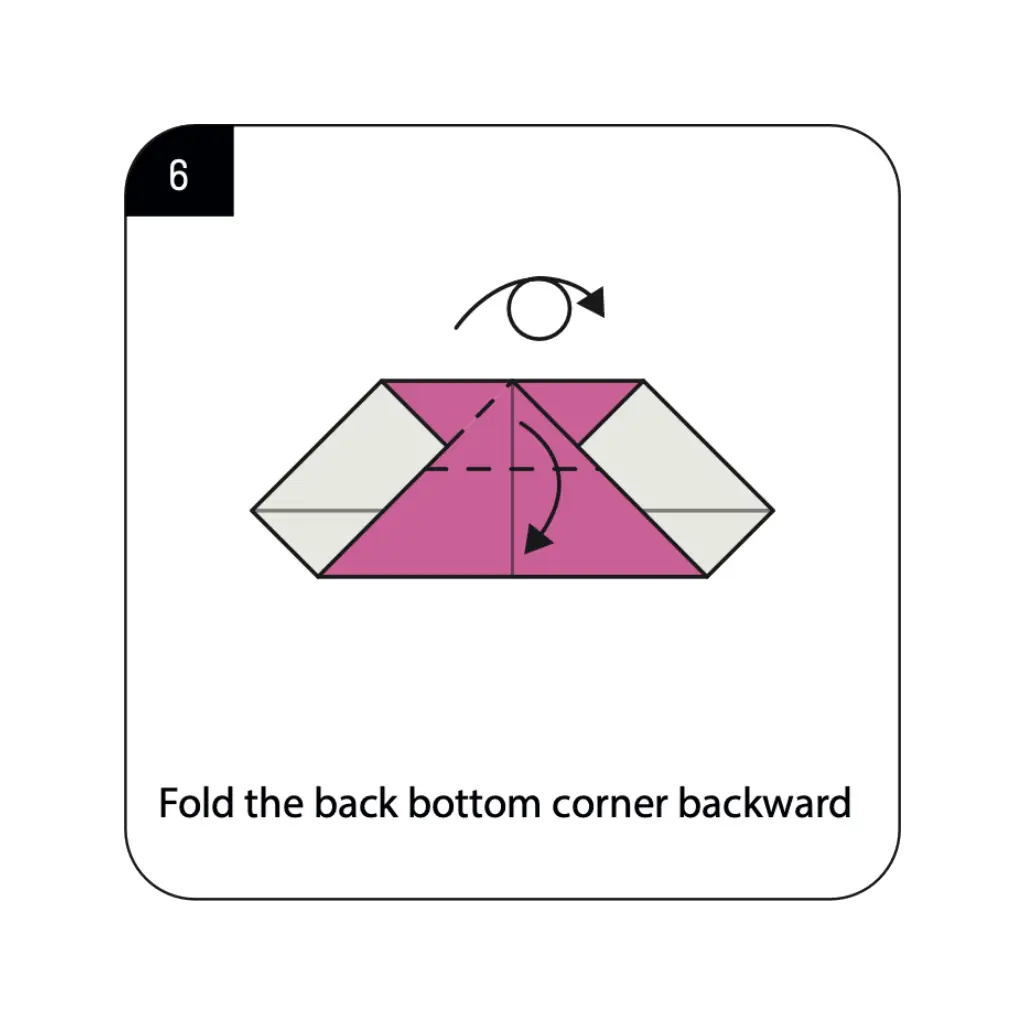
Fold the back bottom corner backward as shown, creating more dimension in your origami Santa Claus model. This fold helps establish the three-dimensional quality and proper balance of your paper figure. The careful execution of this fold affects how well your finished Santa will stand and display. This step completes the basic structural elements needed for your origami Santa Claus, establishing both front and back components that contribute to the character’s recognizable form.
Step 7: Reorient the Model
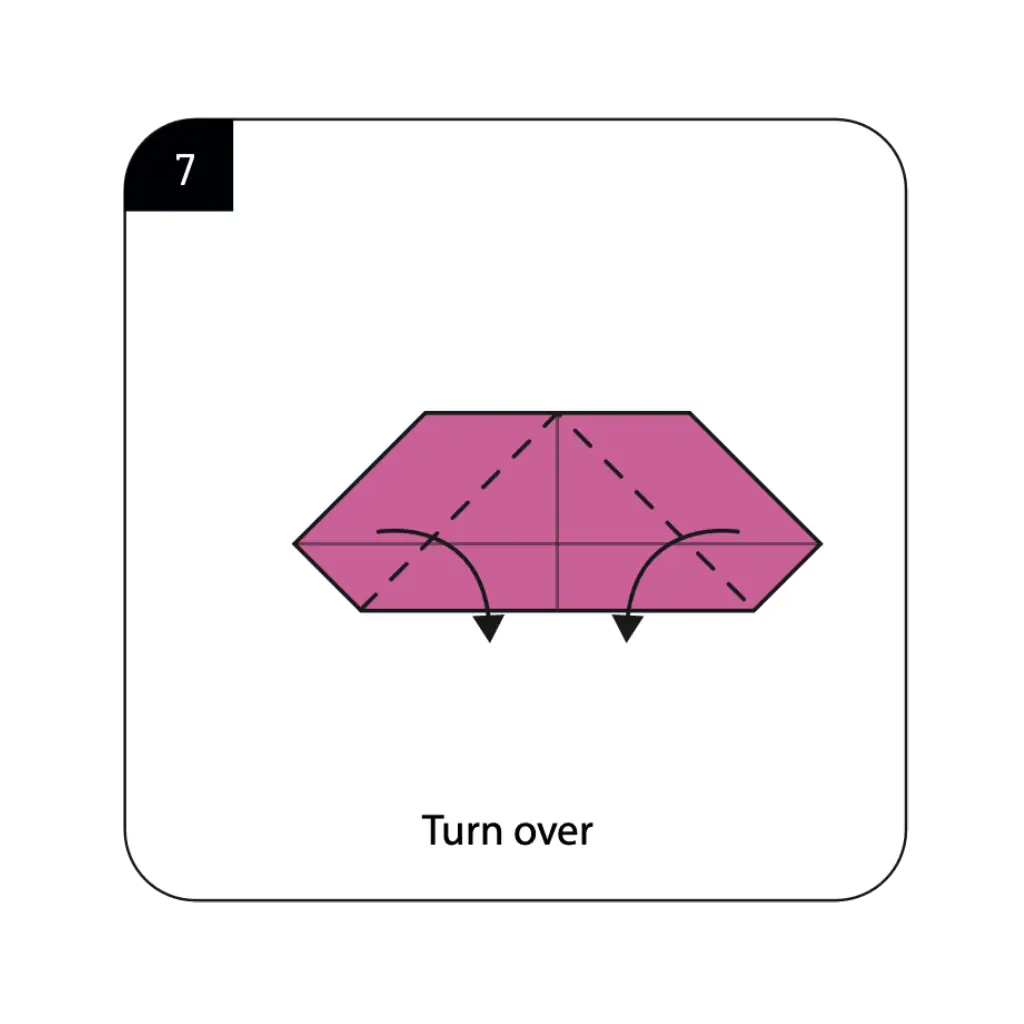
Turn over your model as indicated in the diagram to prepare for the next series of detailed folds. This reorientation ensures the proper development of Santa’s facial features and suit details. Handle the model gently during this transition to preserve the integrity of your previous folds. The proper positioning at this stage sets up the correct orientation for all subsequent steps that will define the characteristic features of your origami Santa Claus.
Step 8: Create Santa’s Arms
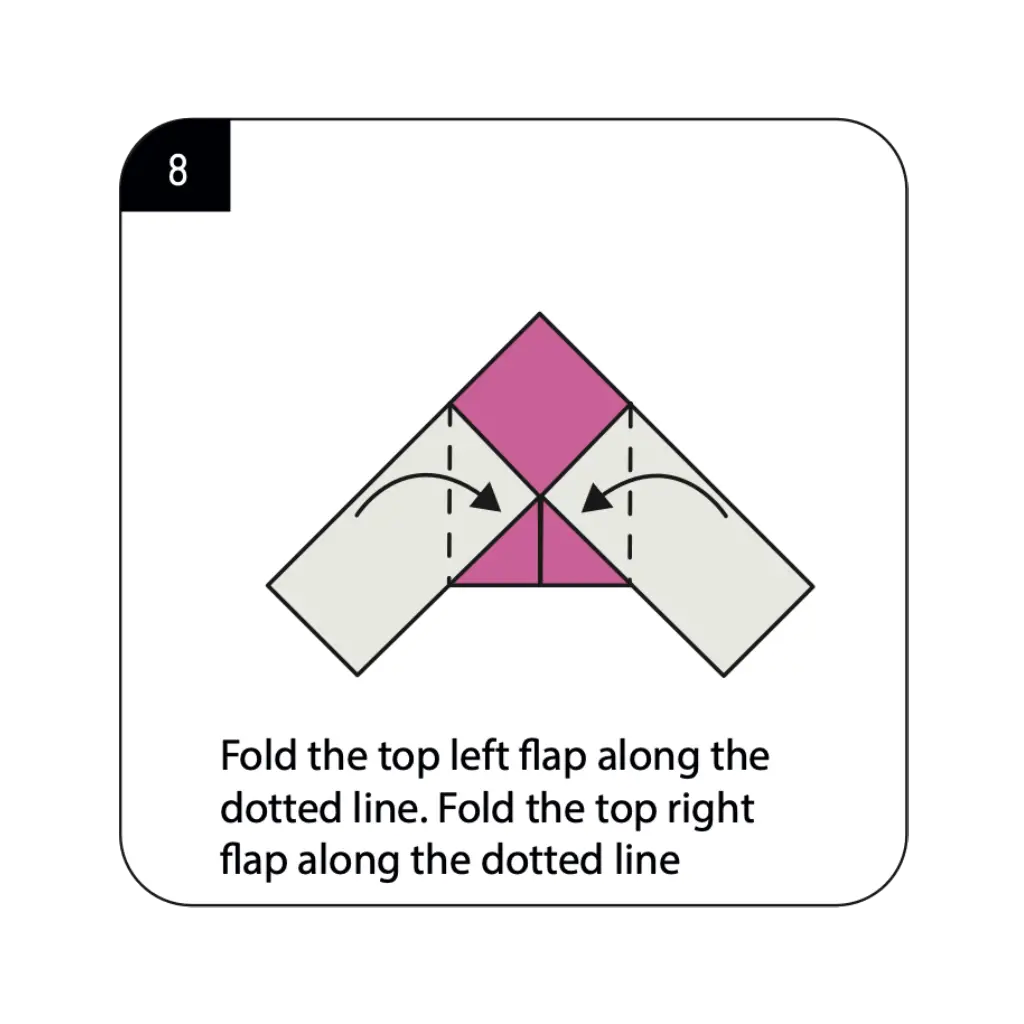
Fold the top left flap along the dotted line, then repeat with the top right flap, creating the arm sections of your Santa Claus figure. These parallel folds establish the width of Santa’s upper body and create his characteristic outstretched arms. The symmetry of these folds is important for a balanced, proportional appearance in your finished origami. These arm sections add significant character to your Santa Claus, transforming a simple folded form into a more recognizable figure with distinct body parts.
Step 9: Form the Body Structure
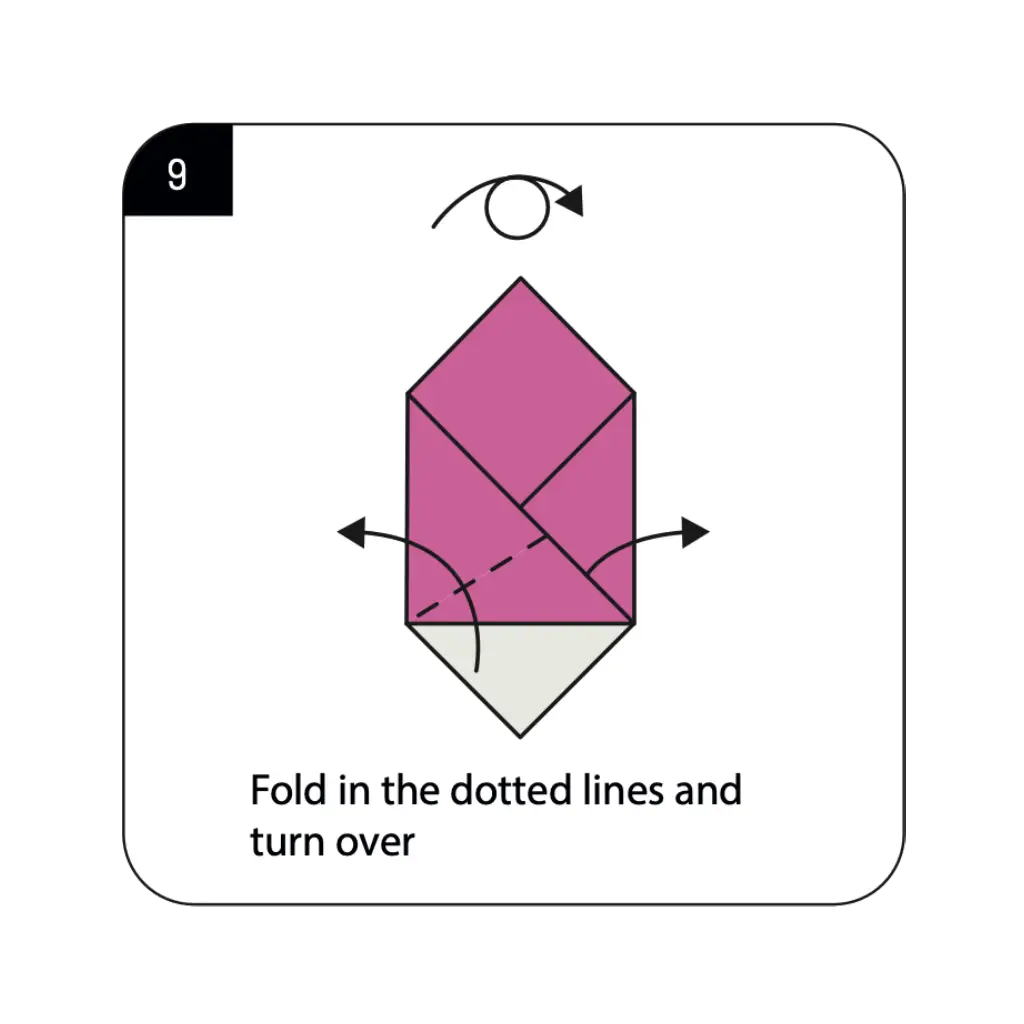
Fold in along the dotted lines and turn over the model as shown in the diagram. These strategic folds define Santa’s body shape and create the proper proportions between his head, arms, and torso. The precision of these folds directly impacts the recognizable silhouette of your origami Santa Claus. This step brings together all the previous elements into a cohesive figure that clearly represents the jolly Christmas character while maintaining the characteristic origami aesthetic.
Step 10: Complete Your Origami Santa Claus
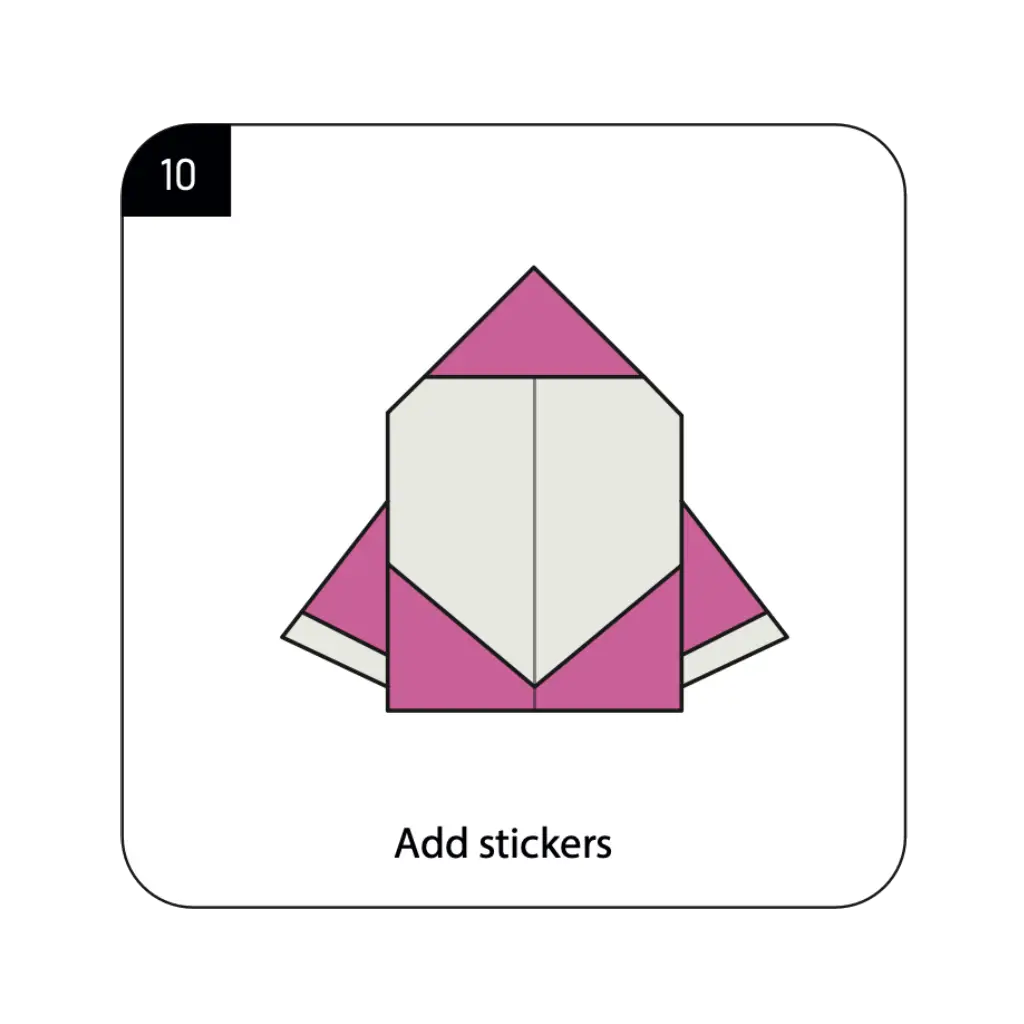
Your basic origami Santa is now complete! For the finishing touch, add small sticker details or draw eyes and a smile to bring your Santa to life. The addition of simple facial features transforms your paper creation from an abstract form to a cheerful Christmas character. These final details significantly enhance the charm and personality of your origami Santa Claus. Your completed model now displays all the characteristic elements of Santa—the pointed hat, friendly face, white beard, and red suit—created entirely through thoughtful paper folding techniques.
Conclusion
Congratulations on creating your origami Santa Claus! This charming paper representation of the beloved Christmas figure showcases how simple folding techniques can transform an ordinary square sheet into a festive holiday decoration. From the distinctive pointed hat to the jolly face and red suit, your origami Santa captures the cheerful essence of Christmas through the elegant art of paper folding. This accessible yet impressive model demonstrates the perfect balance between simplicity and character that makes origami such a rewarding craft, especially for seasonal celebrations. Your completed Santa makes a perfect decoration for Christmas trees, holiday cards, gift tags, or as part of a festive origami display. The techniques you’ve learned—including precise creasing, proportional folding, and adding simple decorative details—build valuable skills that transfer to many other origami designs. We hope this tutorial has sparked your interest in both paper folding and holiday-themed crafts. Remember that practice enhances precision—each Santa you fold will be more refined than the last, allowing you to create multiple paper Santas to share the joy of handmade holiday decorations with friends and family.
- “Before starting your origami Santa, learn essential paper folding techniques in our Origami Basics for Beginnersguide.”
- “Create a complete Christmas scene by combining your Santa with Origami Animals like reindeer and polar bears.”
- “Discover more holiday-themed paper projects in our Creative Origami Collection featuring festive designs.”
- “Find beautiful ways to display your paper Santa with our Decorative Origami Ideas for holiday home décor.”
- “Complete your Christmas origami display by adding Origami Flowers like poinsettias and holly.”
- “Create multiple matching Santas for a stunning holiday display using techniques from our Modular Origami Projects guide.”

Dear Sir/ma,
We are a financial services and advisory company, and our investors have mandated us to seek business opportunities and projects for potential funding and debt capital financing.
Please note that our investors are based in the Gulf region and are interested in investing in viable business ventures or projects that you are currently executing or plan to undertake as a means of expanding your global portfolio.
We are eager to have more discussions on this subject in any way you believe suitable.
Please get in touch with me on my direct email: michaelanthony@capitalltduk.com
Looking forward to working with you.
Yours faithfully,
Michael Anthony
(Financial Advisor)
Capital Ltd Consulting LLC