
Introduction:
Welcome to our delightful origami seal tutorial! This charming paper folding project brings one of the ocean’s most beloved mammals to life through a series of precise yet accessible folds. Perfect for beginners looking to advance their skills, this origami seal captures the playful essence and distinctive silhouette of these charismatic marine creatures. What makes this design special is its balance of realistic features—including the characteristic flippers, tapered body, and expressive head—while remaining achievable for intermediate folders. The blue paper shown creates a perfect oceanic appearance, though gray or white paper would also create beautiful, naturalistic seals. Whether you’re creating an underwater-themed display, teaching children about marine life, or simply expanding your origami Seal repertoire, this seal model offers both challenge and satisfaction. Through eleven thoughtfully sequenced steps, you’ll transform a simple square of paper into a recognizable seal that showcases your paper folding skills. Let’s dive into creating this charming marine mammal that will make a splash in your origami collection!
Detailed Step Descriptions:
STEP 1: CREATING THE INITIAL FOLD FOR ORIGAMI SEAL
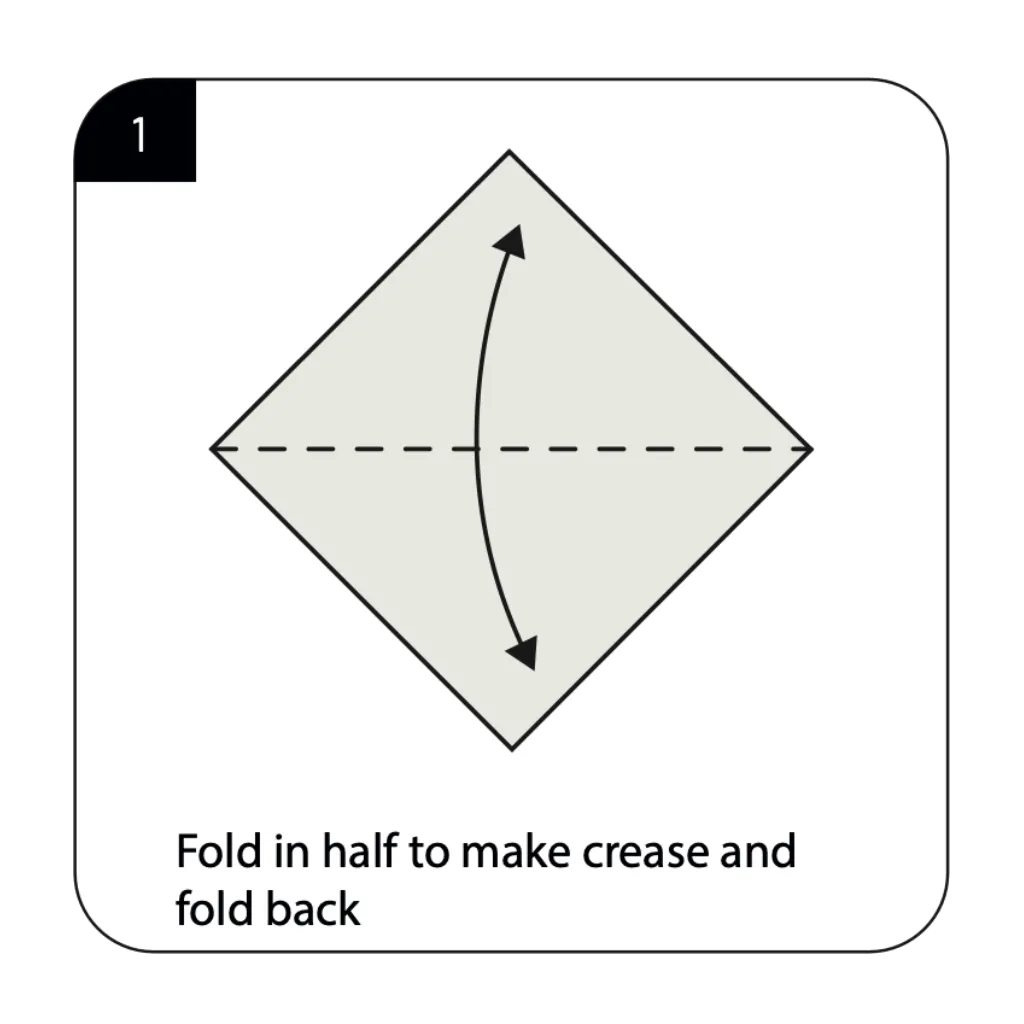
Begin your origami seal by folding the square paper in half diagonally to make a crease, then unfold back to a square. This foundational fold establishes the reference line that will guide the symmetry of your sea lion’s body structure. Basic origami Seal animals often start with these preliminary creases to ensure balanced proportions in the finished model. The clean, precise crease serves as an essential guideline for the more complex folding sequences that follow.
STEP 2: FOLDING TO CENTER FOR ORIGAMI SEAL
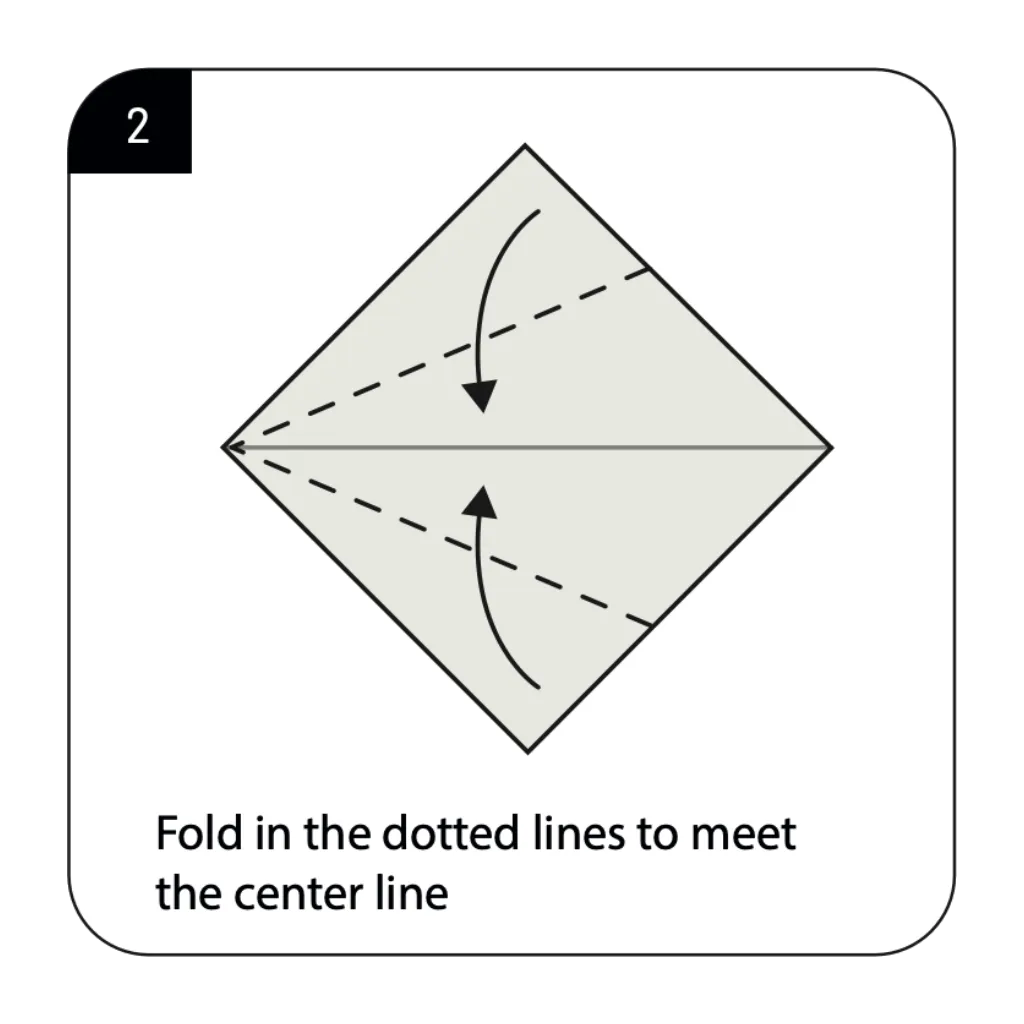
Fold in the dotted lines to meet the center line, bringing the side corners toward the middle of your paper. These strategic folds begin narrowing the paper into the tapered body shape characteristic of seals and sea lions. Ocean animal origami Seal designs rely on these initial shaping folds to establish the distinctive silhouette of marine creatures. Ensure both sides are folded with equal precision to maintain perfect symmetry in your developing seal model.
STEP 3: REPEATING THE CENTER FOLD FOR ORIGAMI SEAL
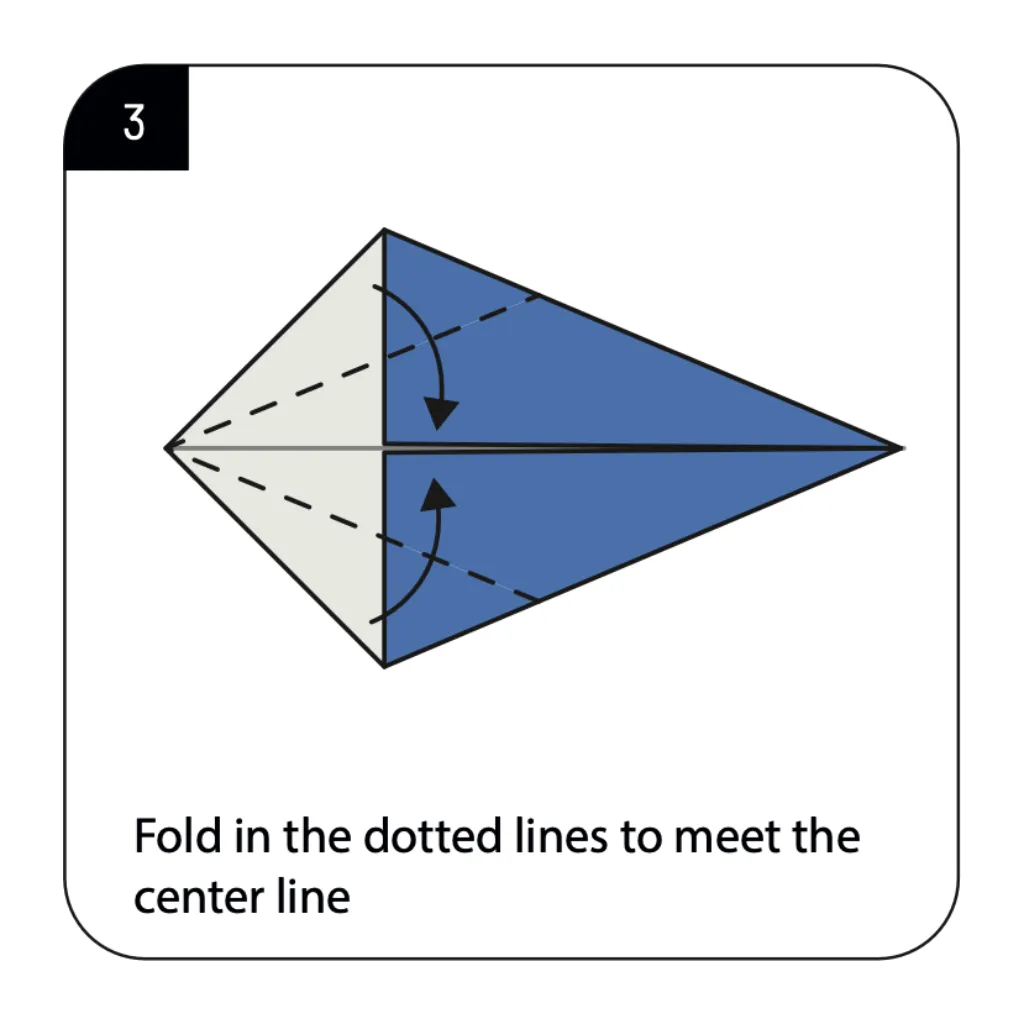
Fold in the dotted lines to meet the center line again, this time working with the opposite side of the model. This mirrored folding sequence continues developing the proportional relationships in your paper sea mammal. Marine origami Seal tutorials emphasize the importance of these balanced folds for creating realistic animal forms. The blue coloration now becomes visible, beginning to give your model the oceanic appearance appropriate for a seal.
STEP 4: OPENING THE POCKETS FOR ORIGAMI SEAL
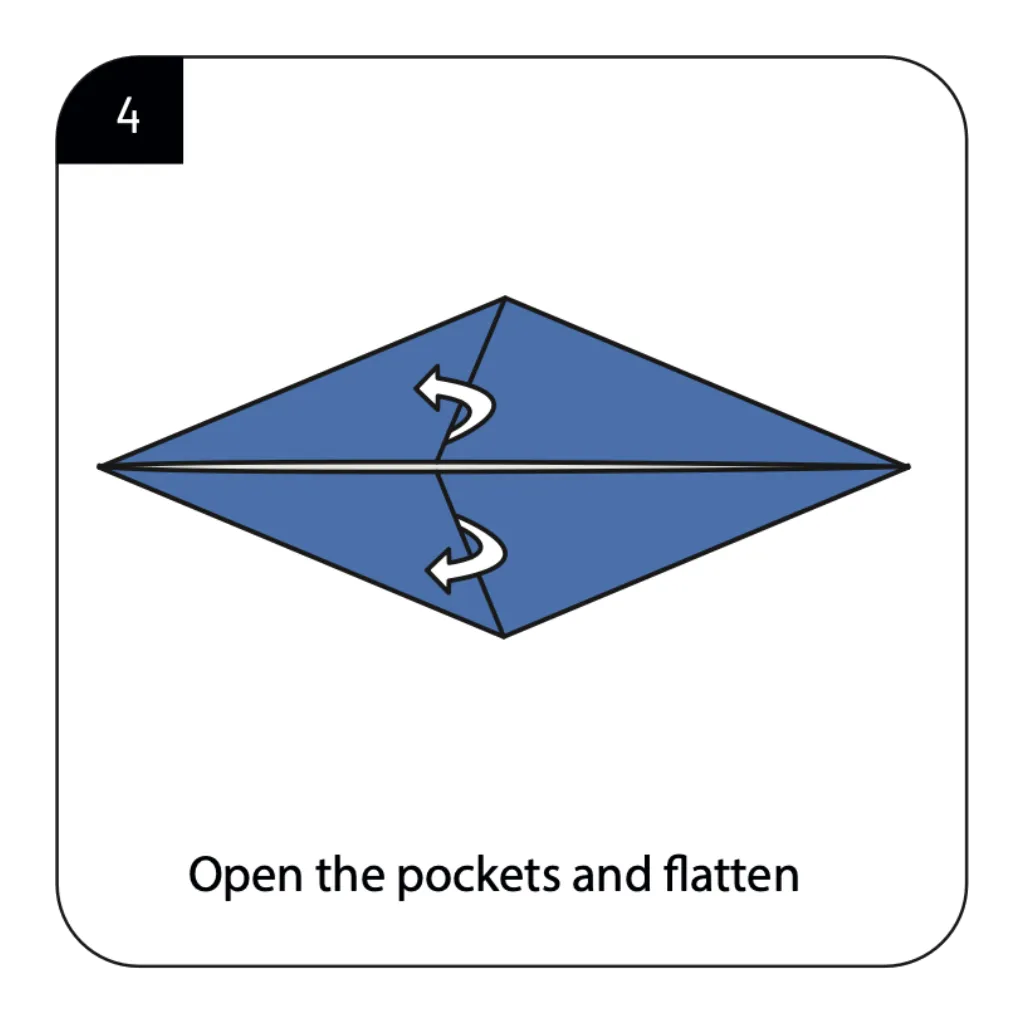
Open the pockets created by previous folds and flatten them to transform the model’s dimensional structure. This technique, common in intermediate origami Seal projects, converts creases into new folding planes and surfaces. Sea animal paper crafts utilize these opening moves to create the contours needed for realistic body shapes. Take care during this step to maintain clean edges and sharp corners that will define your seal’s form.
STEP 5: EXECUTING THE REVERSE FOLD FOR ORIGAMI SEAL
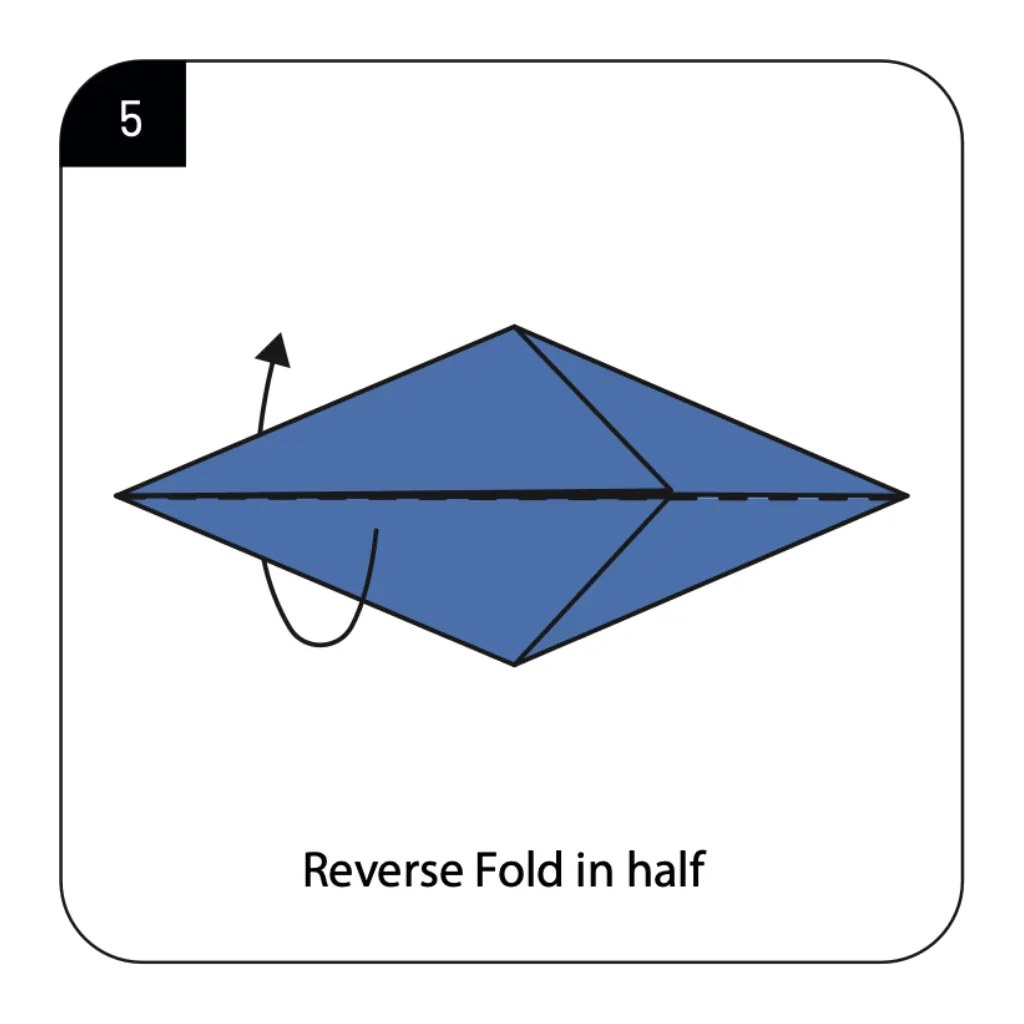
Perform a reverse fold, bringing the paper inward along existing creases to create a three-dimensional structure. This advanced folding technique transforms flat sections into the angled planes that give your seal dimensional quality. Paper sea lion models depend on these reverse folds to create the characteristic body shape and proportions. Apply even pressure when executing this fold to ensure clean lines and proper alignment in the developing structure.
STEP 6: CREATING THE FIRST POCKET FOLD FOR ORIGAMI SEAL
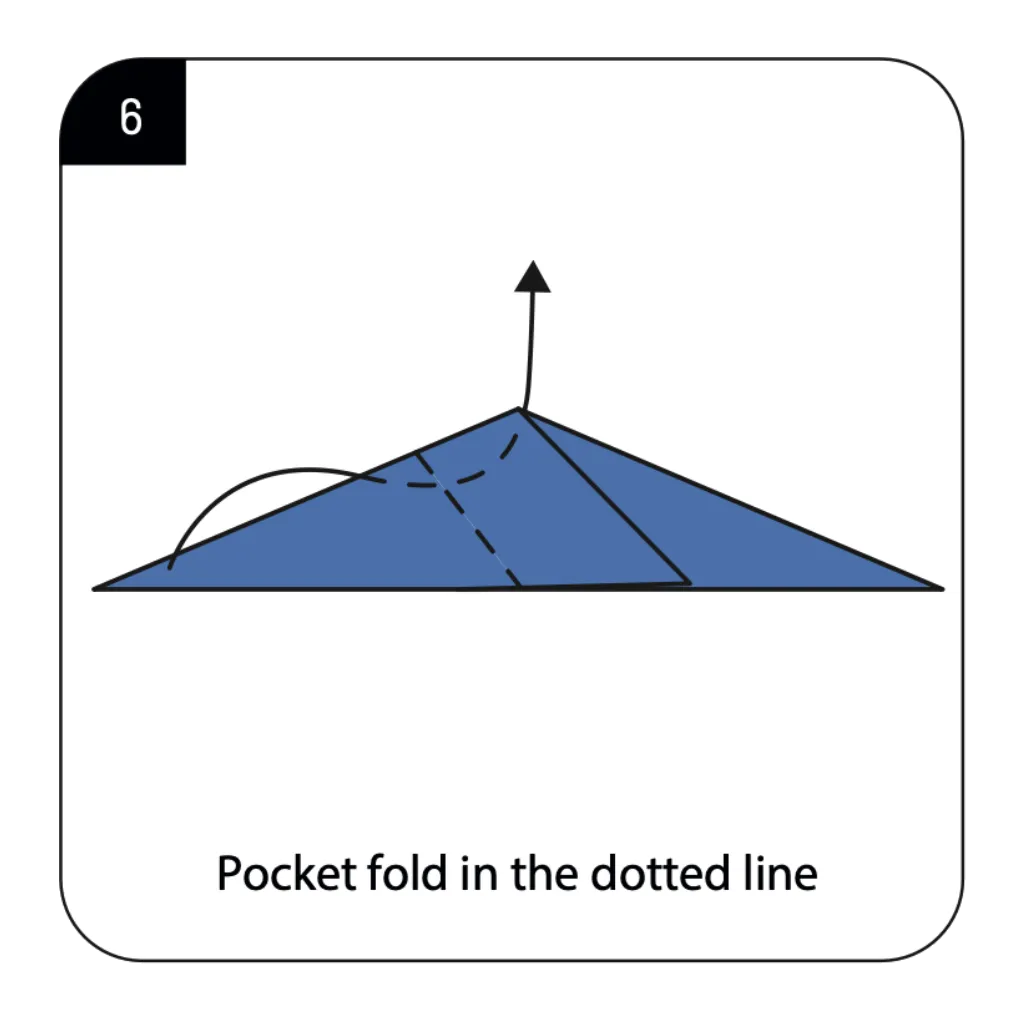
Create a pocket fold along the dotted line to begin forming what will become the seal’s front flipper. The pocket fold technique adds complexity and realistic detail to your origami sea creature’s anatomy. Aquatic animal origami designs utilize these specialized folds to differentiate fins, flippers, and other appendages. The precision of this fold directly influences how recognizable the flipper feature will be in your finished seal.
STEP 7: FORMING THE SECOND POCKET FOLD
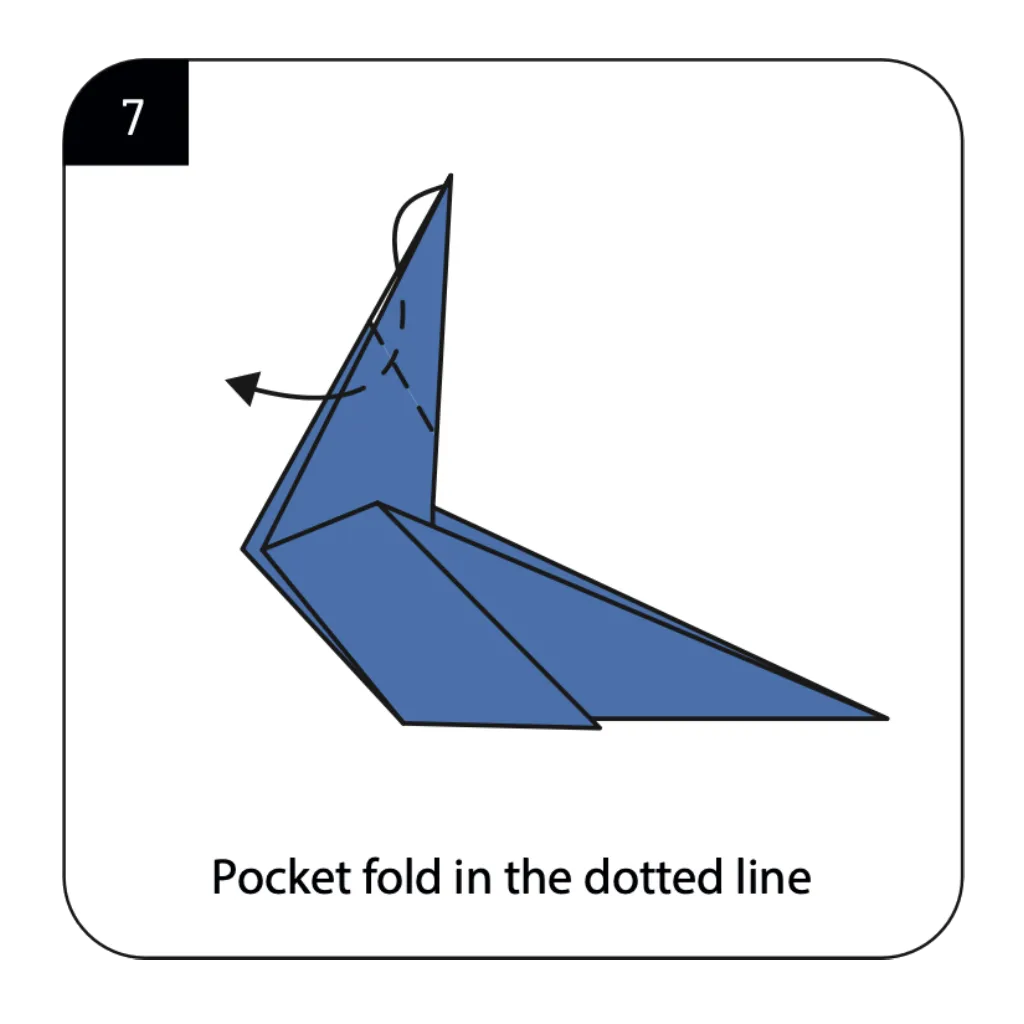
Execute another pocket fold along the dotted line to further define the seal’s distinctive body structure. This sequential folding continues building the three-dimensional qualities that make your paper sea lion realistic. Marine mammal origami tutorials highlight these cumulative folds that gradually transform abstract shapes into recognizable animals. The model now begins to display the characteristic profile that distinguishes seals from other origami sea creatures.
STEP 8: DEFINING THE HEAD STRUCTURE
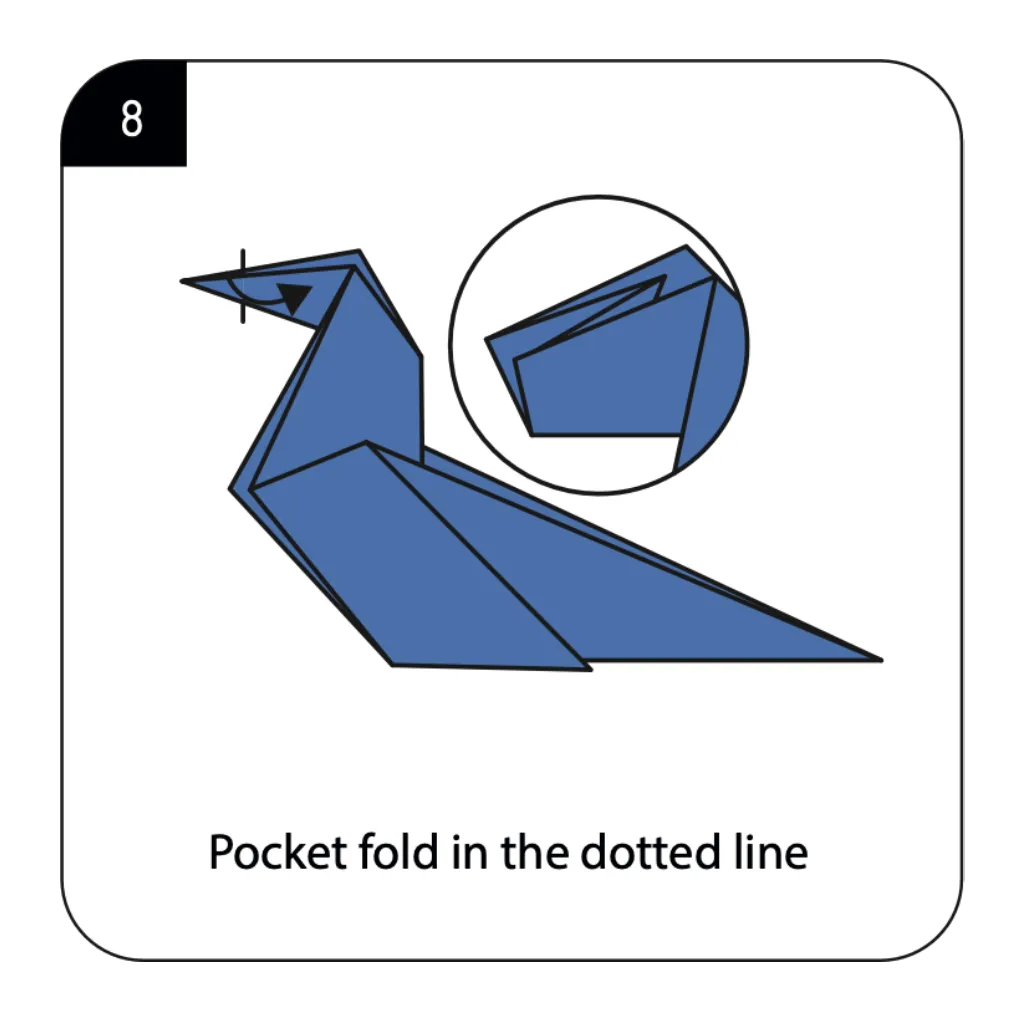
Create yet another pocket fold as indicated to establish the seal’s head and neck region. This critical fold gives your origami seal its expressive face and the proper proportional relationship between head and body. Detailed origami sea lions require these precise folds to capture the distinctive features of these charismatic animals. The magnified detail shows the exact placement needed to achieve the characteristic alert posture of a seal.
STEP 9: FOLDING THE FORWARD FLIPPERS
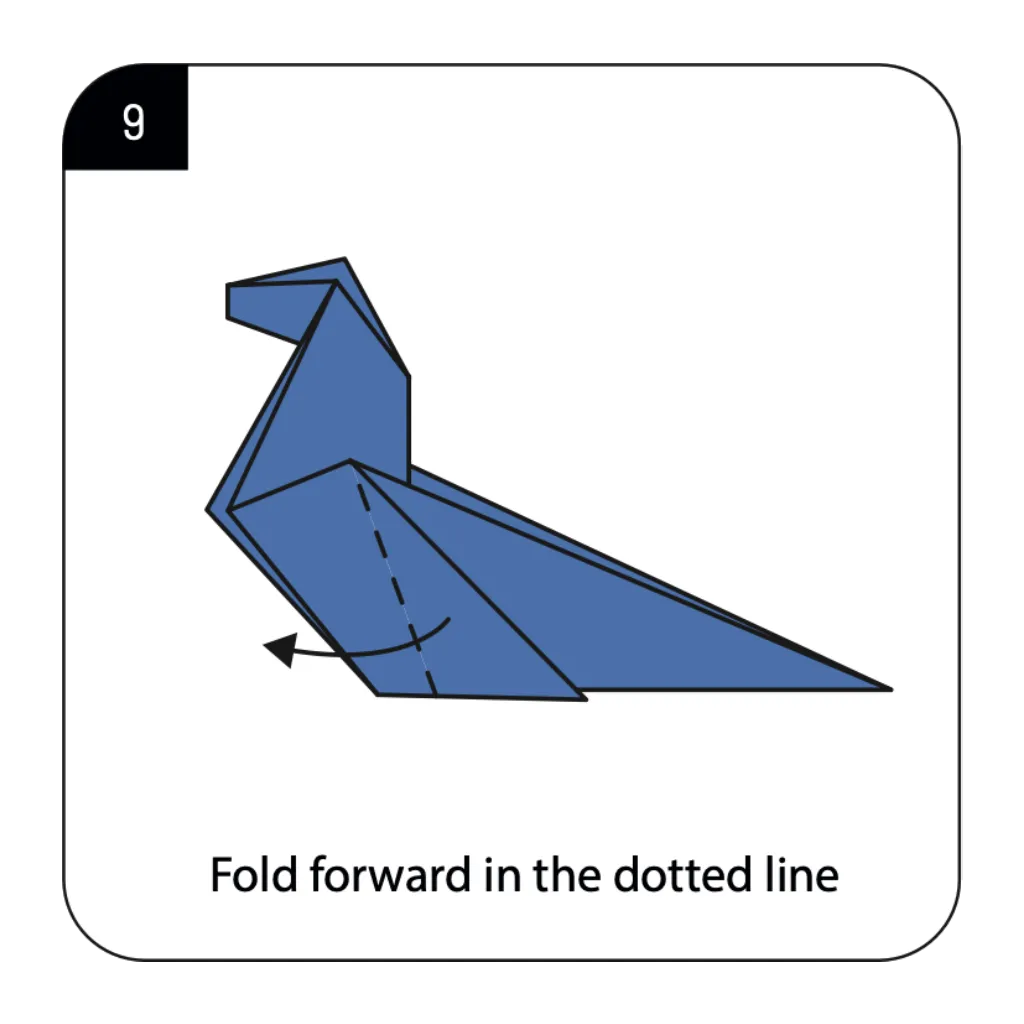
Fold forward along the dotted line to create the front flipper that gives your seal its distinctive swimming capability. This strategic fold transforms an abstract corner into a recognizable anatomical feature of the marine mammal. Ocean origami patterns incorporate these anatomical details to enhance the realism of the finished paper animal. The angle and position of this flipper fold contribute significantly to the dynamic impression of your sea lion model.
STEP 10: CREATING THE REAR FEATURES
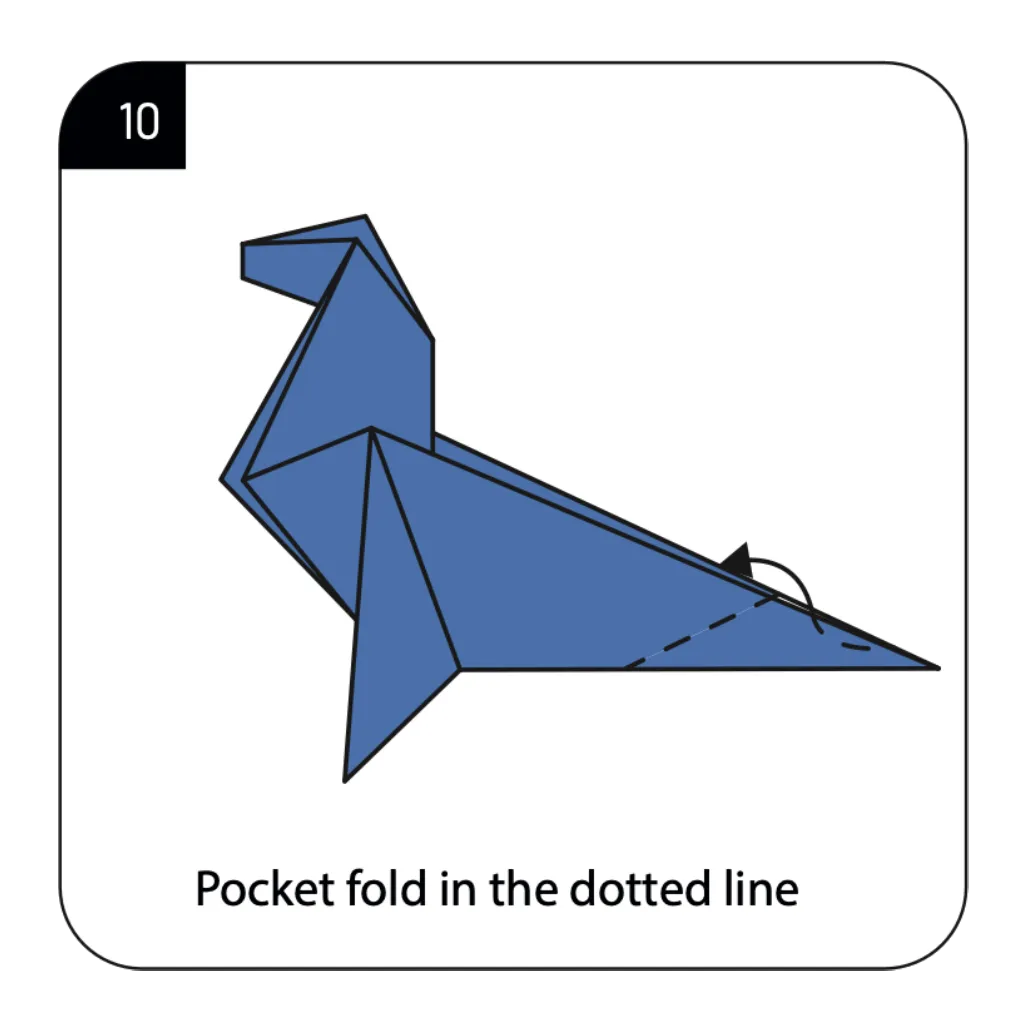
Execute another pocket fold along the dotted line to form what will become the seal’s rear body and tailfin area. This fold continues the transformation from geometric paper shape to realistic marine animal representation. Advanced origami sea creatures benefit from these detail folds that enhance species-specific characteristics. The developing model now clearly displays the streamlined body shape that makes seals such efficient swimmers.
STEP 11: COMPLETING YOUR ORIGAMI SEAL
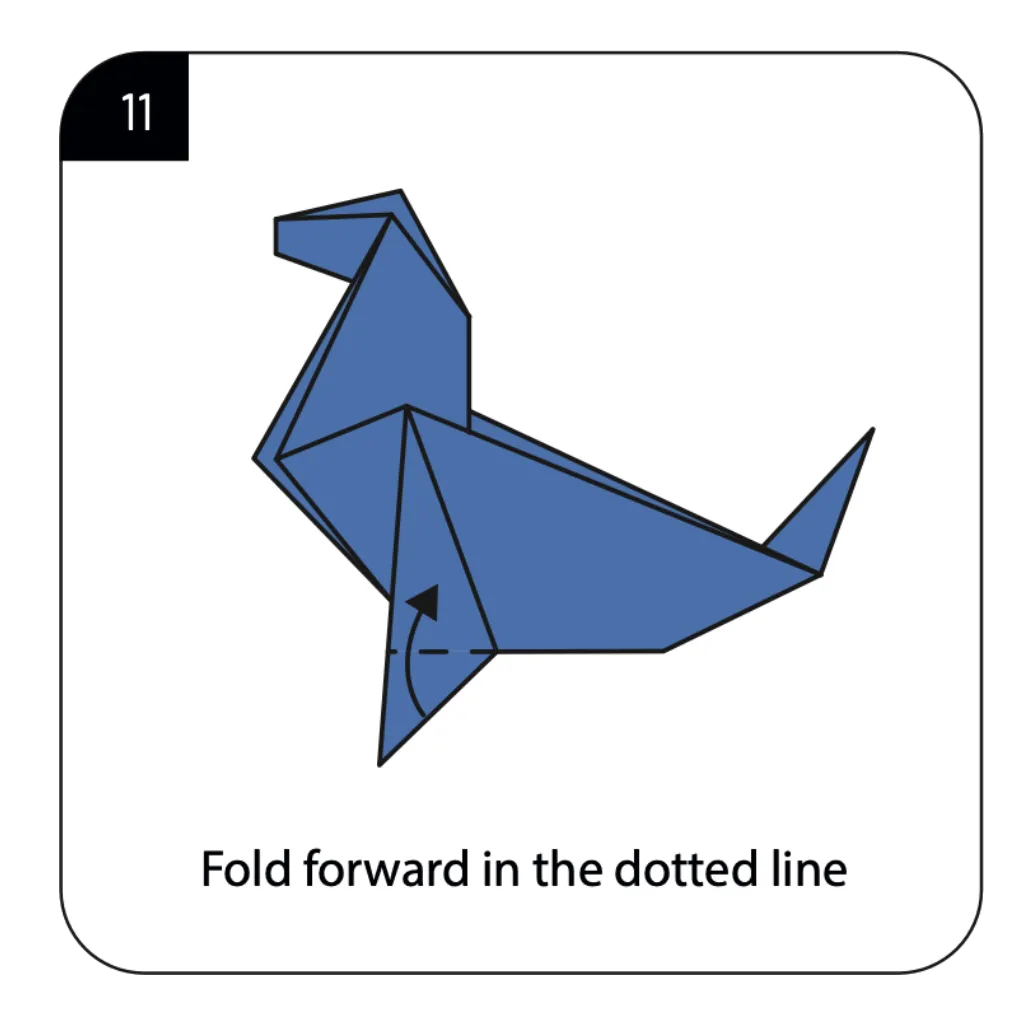
Fold forward along the final dotted line to complete the rear flipper and finish your origami seal. This concluding fold adds the last anatomical detail that brings your paper sea lion to life with full dimensional quality. Marine life origami enthusiasts appreciate these finishing touches that transform paper into realistic animal representations. Your completed origami seal now displays all the characteristic features—head, body, and flippers—in perfect proportion.
Conclusion:
Congratulations on completing your beautiful origami seal! Through eleven carefully executed steps, you’ve transformed a simple square of paper into a charming representation of one of the ocean’s most beloved mammals. Your finished sea lion showcases the distinctive features that make these creatures so recognizable—the streamlined body, expressive head, and characteristic flippers perfect for navigating through water. This origami model strikes the perfect balance between realistic detail and artistic interpretation, making it an ideal addition to ocean-themed displays, marine biology educational projects, or simply as a showcase piece in your origami collection. The techniques you’ve mastered—pocket folds, reverse folds, and precise creasing—build valuable skills for tackling more complex origami challenges. We hope this tutorial has deepened your appreciation for both the art of paper folding and the elegant creatures that inspire these designs. Whether displayed alongside other marine origami or as a standalone piece, your paper seal brings a touch of oceanic charm to any setting!
- Explore our marine origami collection → Discover more sea creatures including dolphins, whales, sharks, and other fascinating ocean animals in paper form.
- Advanced origami folding techniques → Master the pocket folds and reverse folds used in this seal tutorial to create more complex origami models.
- Ocean-themed paper crafts → Create an underwater scene with origami fish, coral, boats, and other maritime-inspired paper folding projects.
- Origami animals for intermediate folders → Find paper folding projects that challenge your skills while creating impressive animal representations.
- Creating an origami aquarium display → Learn how to combine multiple sea creatures, plants, and habitats to create a complete paper underwater ecosystem.
