
Introduction
Origami Snowflake, the ancient Japanese art of paper folding, reaches new heights of beauty and creativity when applied to creating winter decorations that capture the delicate elegance of nature’s most intricate designs. The origami snowflake stands out as one of the most rewarding and versatile projects, described as “easy with endless creative possibilities” that make it perfect for crafters seeking both simplicity and artistic freedom. This beginner-friendly tutorial demonstrates how to transform simple tracing paper into a stunning six-pointed snowflake that rivals the complexity and beauty of real ice crystals. What makes this origami snowflake particularly captivating is its perfect balance of accessible technique and unlimited customization potential—the basic folding structure provides a solid foundation while allowing for countless variations in final design and decorative details. Unlike more restrictive Origami Snowflake models, this snowflake design encourages experimentation and personal creativity, making each finished piece unique while maintaining the characteristic six-fold symmetry that defines authentic snowflake patterns. The completed model showcases the mathematical beauty inherent in both natural snowflakes and Origami Snowflake geometry, creating decorations that are sophisticated enough for elegant winter displays yet simple enough for family craft sessions. Whether you’re preparing for winter holidays, teaching children about crystalline structures and symmetry, or simply creating beautiful seasonal decorations, this snowflake tutorial offers both immediate satisfaction and endless opportunities for creative exploration and artistic expression.
Step-by-Step Instructions
Step 1: Prepare Your Tracing Paper Base For Origami Snowflake
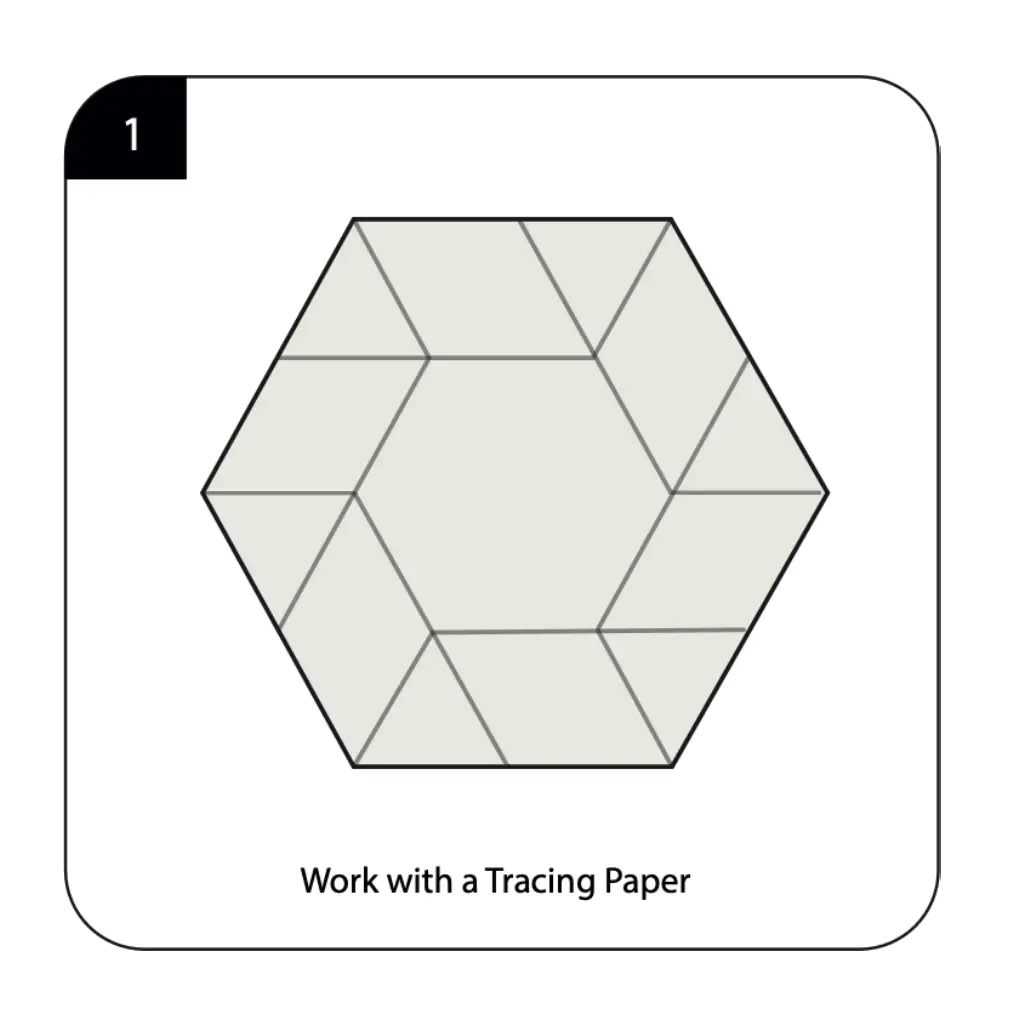
Work with tracing paper as specified in the instructions, which provides the ideal translucent quality that makes origami snowflakes particularly beautiful when displayed against light. Begin with a hexagonal piece of tracing paper or cut a regular hexagon from a square sheet, as the six-sided foundation is essential for creating authentic snowflake symmetry. The choice of tracing paper is crucial for this project because its semi-transparent nature allows light to filter through your finished snowflake, creating the ethereal, crystalline appearance that mimics real ice formations. Take care to ensure your starting hexagon is as regular as possible, with all sides equal in length and all angles measuring 120 degrees, as this geometric precision forms the foundation for your snowflake’s perfect symmetry.
Step 2: Create the Primary Fold Line For Origami Snowflake
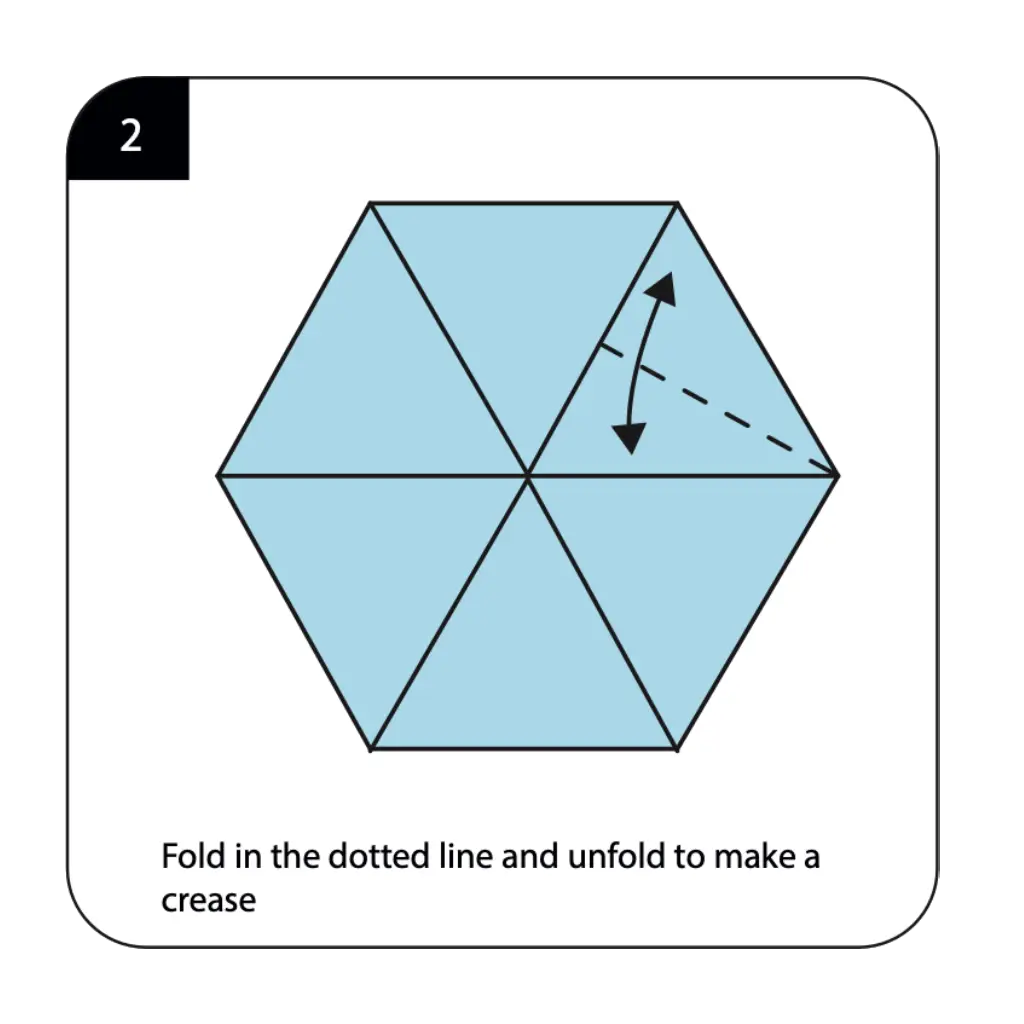
Fold along the dotted line and unfold to create a permanent crease that will serve as one of the six primary fold lines in your snowflake construction. This initial fold establishes the fundamental symmetry axis that will guide all subsequent folding and ensure your finished snowflake displays the characteristic six-fold radial pattern of natural ice crystals. The precision of this first crease is crucial for maintaining perfect symmetry throughout the construction process, so take time to align the fold precisely along the indicated line. This foundational crease demonstrates how mathematical principles underlying natural snowflake formation can be replicated through careful paper folding techniques that honor both geometric accuracy and artistic beauty.
Step 3: Open and Shape the First Section For Origami Snowflake
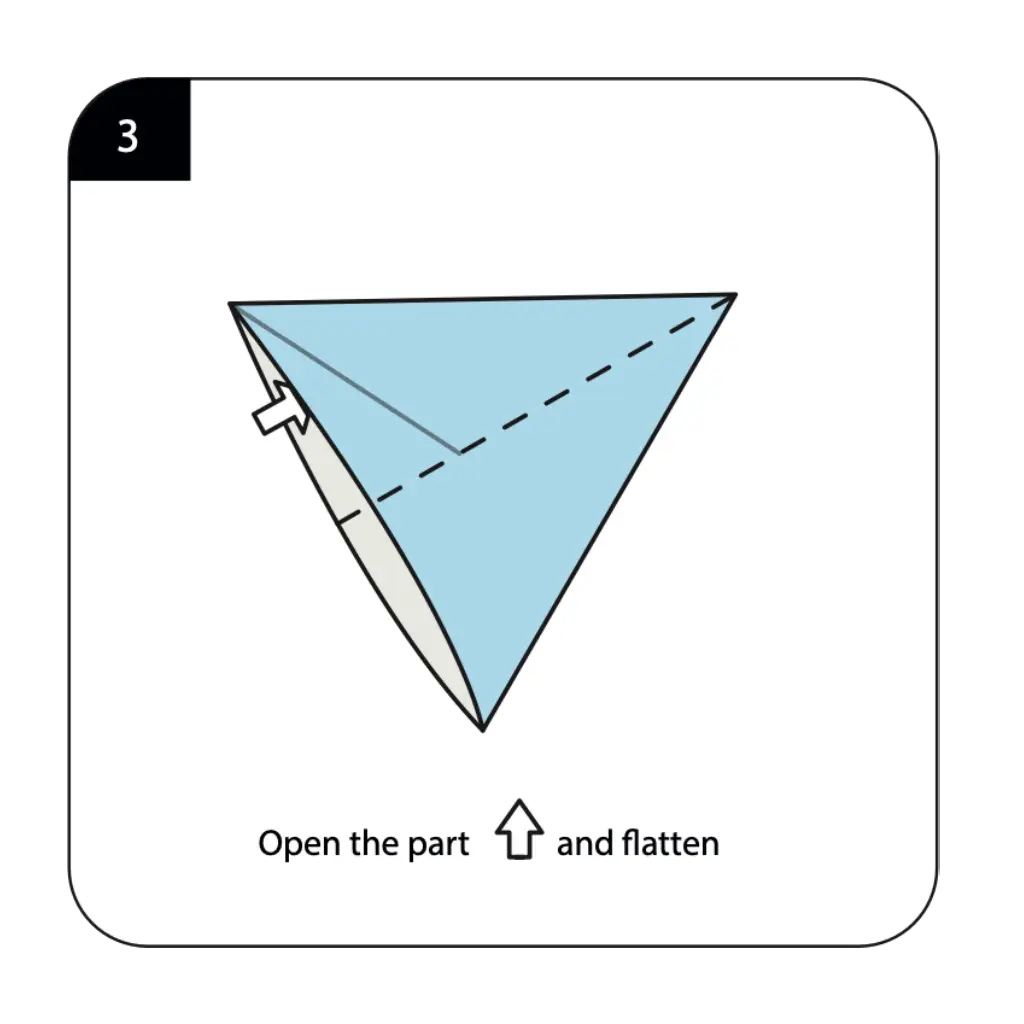
Open the folded section and flatten it carefully, beginning the process of creating the three-dimensional elements that will give your snowflake its distinctive crystalline appearance. This opening and flattening technique creates the first of six identical sections that will form your completed snowflake’s radial pattern. The gentle manipulation required for this step demonstrates how Origami Snowflake can create delicate, lace-like structures through careful handling of lightweight materials like tracing paper. Work slowly and deliberately during this shaping process to avoid tearing the delicate paper while achieving the crisp, clean lines that characterize both real Origami Snowflake and quality origami work.
Step 4: Continue the Sectional Development For Origami Snowflake
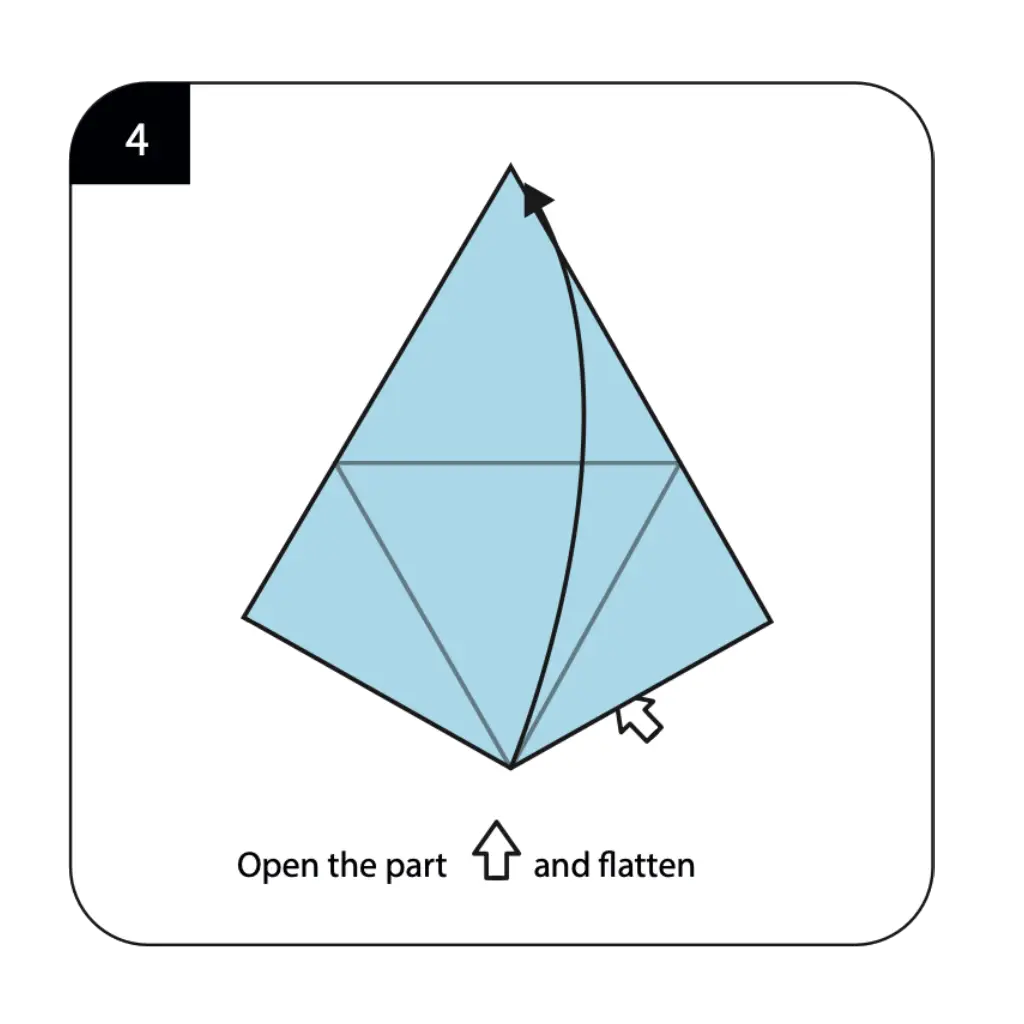
Open the next section and flatten it following the same technique used in Step 3, maintaining consistency in your approach to create uniform sections throughout your snowflake. The systematic repetition of this opening and flattening process ensures that each of the six sections develops identically, preserving the perfect symmetry that makes snowflakes so visually compelling. This step reinforces the importance of methodical technique in origami, where consistent execution of repeated actions creates overall harmony and balance in the finished design. The careful attention to detail during this phase determines how evenly your finished snowflake will display its crystalline pattern when complete.
Step 5: Complete the Initial Sectioning
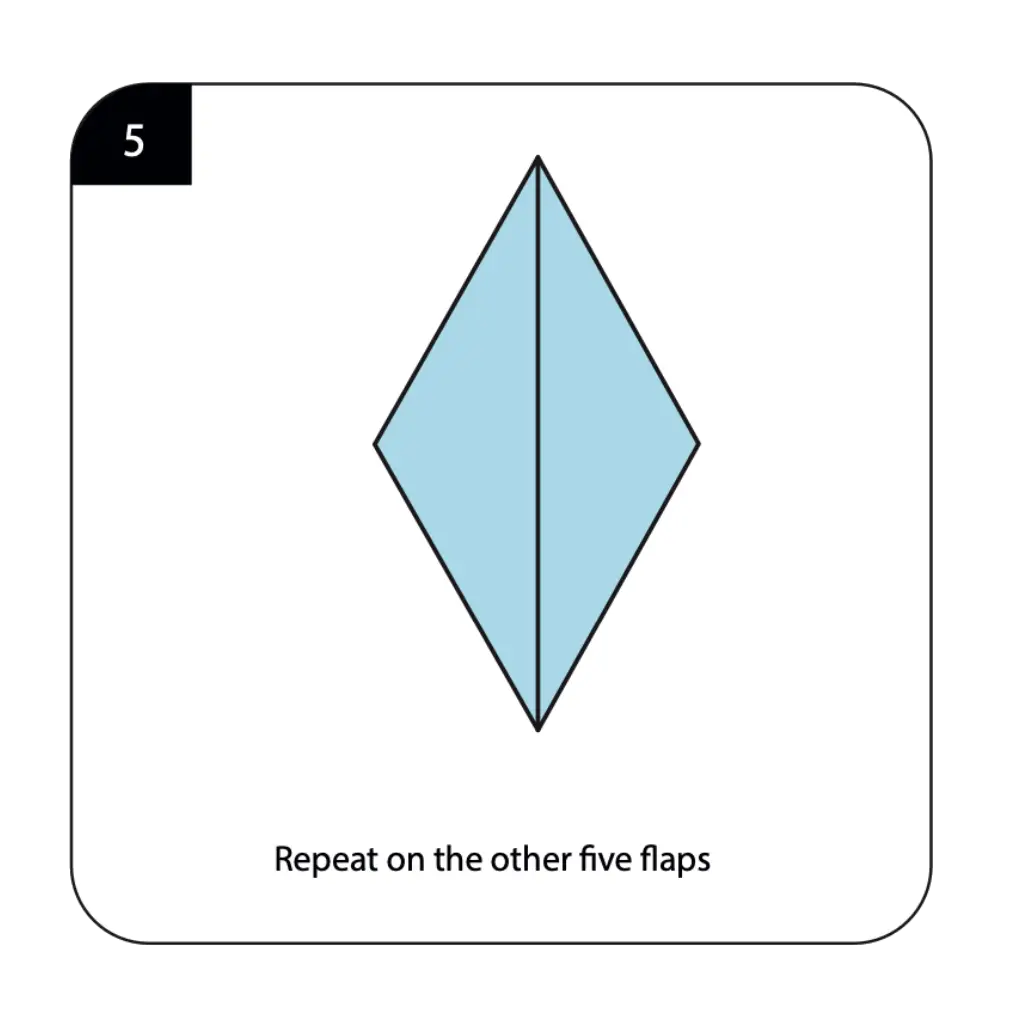
Repeat the opening and flattening process on the remaining five flaps, creating six identical triangular sections that form the foundation of your snowflake’s structure. This comprehensive sectioning establishes the radial framework upon which all subsequent decorative elements will be built, ensuring perfect symmetry in your finished piece. The methodical completion of all six sections demonstrates how complex, beautiful designs can emerge from the systematic repetition of simple techniques applied with precision and consistency. This step transforms your flat hexagonal base into a dimensional foundation ready for the detailed shaping that will create your snowflake’s distinctive crystalline appearance.
Step 6: Reorient for Advanced Construction
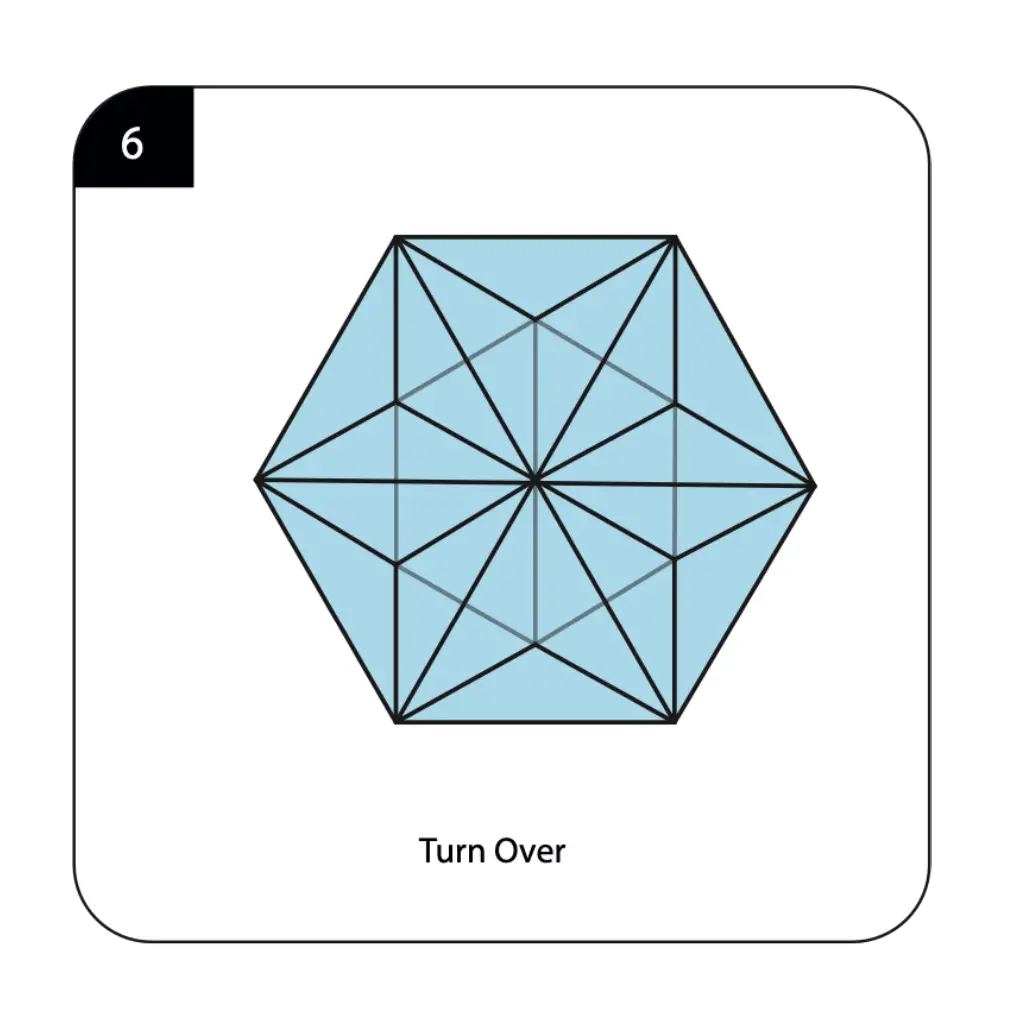
Turn over your partially constructed snowflake to access the reverse side for the next phase of detailed construction work. This reorientation allows you to work on the back surface while maintaining the structural integrity of the sectioning you’ve already completed. The careful handling required during this transition demonstrates the delicate nature of working with tracing paper and the importance of gentle manipulation throughout the construction process. This turning step prepares your snowflake for the advanced shaping techniques that will create the intricate patterns and three-dimensional qualities that distinguish exceptional origami snowflakes from simple flat designs.
Step 7: Create the Central Pattern
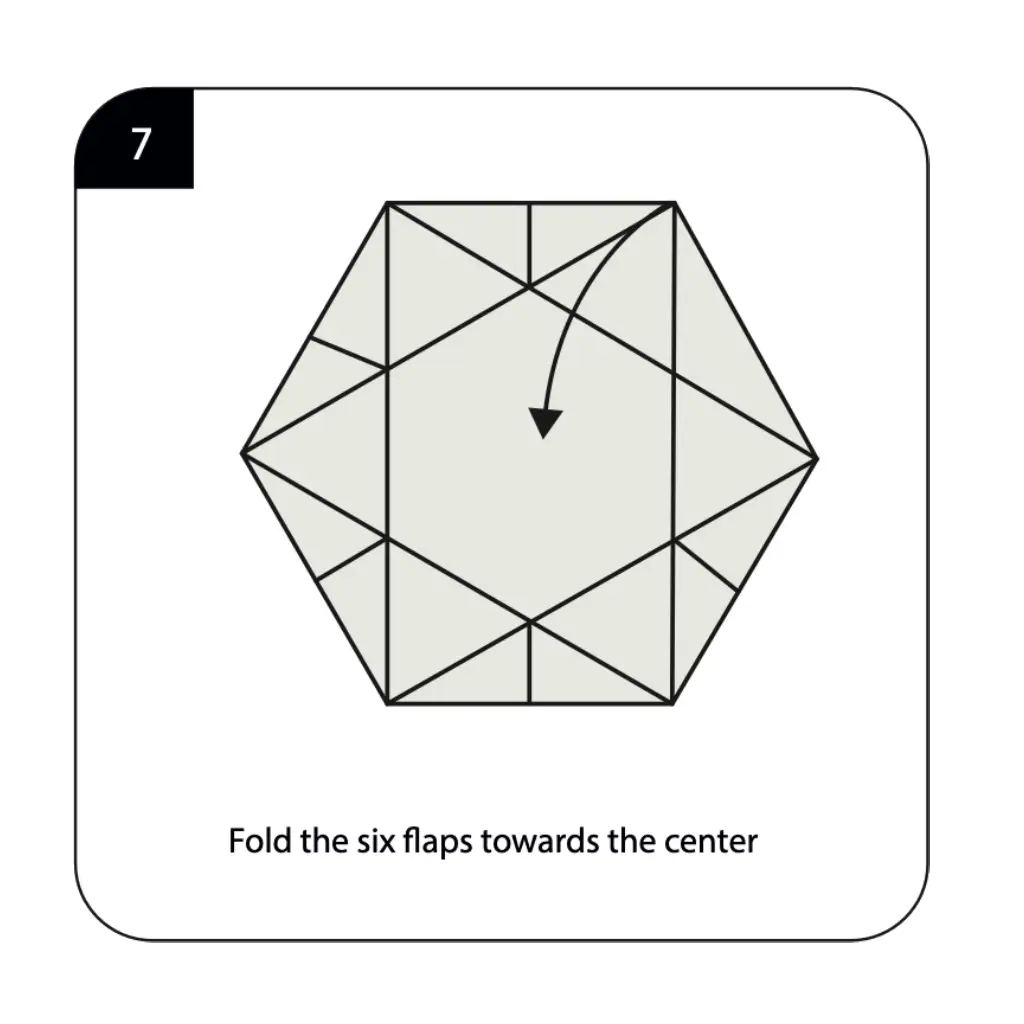
Fold the six flaps toward the center as indicated, beginning to create the intricate central pattern that forms the heart of your snowflake’s design. These inward folds establish the dense, complex appearance at the snowflake’s center while maintaining the radial symmetry that characterizes authentic ice crystal formations. The precision of these center-directed folds affects the overall balance and visual impact of your finished snowflake, creating the focal point from which all other design elements radiate. This step demonstrates how strategic folding can create areas of varying density and complexity within a single design, mimicking the natural variation found in real snowflake structures.
Step 8: Secure the Central Structure
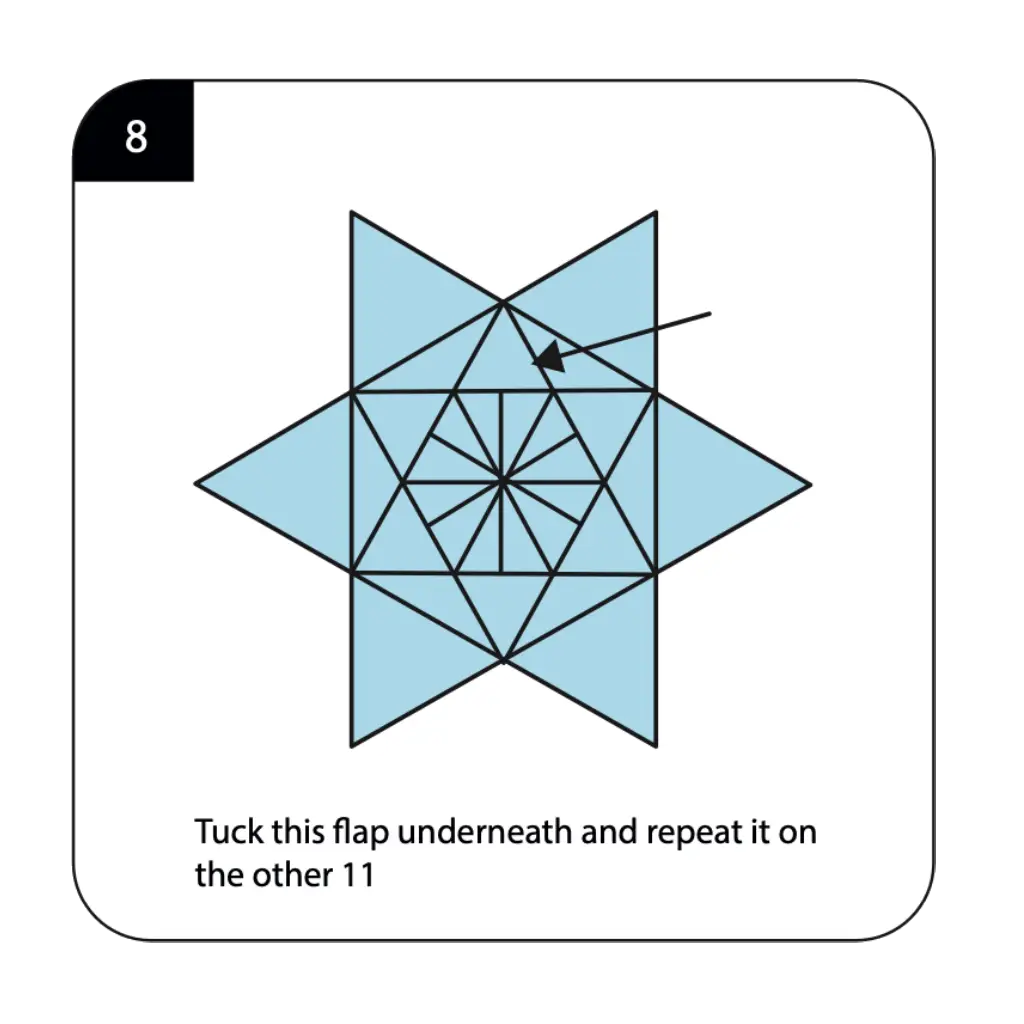
Tuck the designated flap underneath and repeat this securing technique on the other 11 corresponding points, creating a stable central structure that will support the outer decorative elements. This tucking technique not only provides structural stability but also creates the layered, dimensional quality that gives your snowflake its sophisticated crystalline appearance. The systematic application of this securing method across all points ensures consistent construction and maintains the perfect symmetry essential to authentic snowflake design. This step transforms your loose construction into a stable foundation ready for the final shaping that will complete your winter decoration.
Step 9: Prepare for Final Shaping
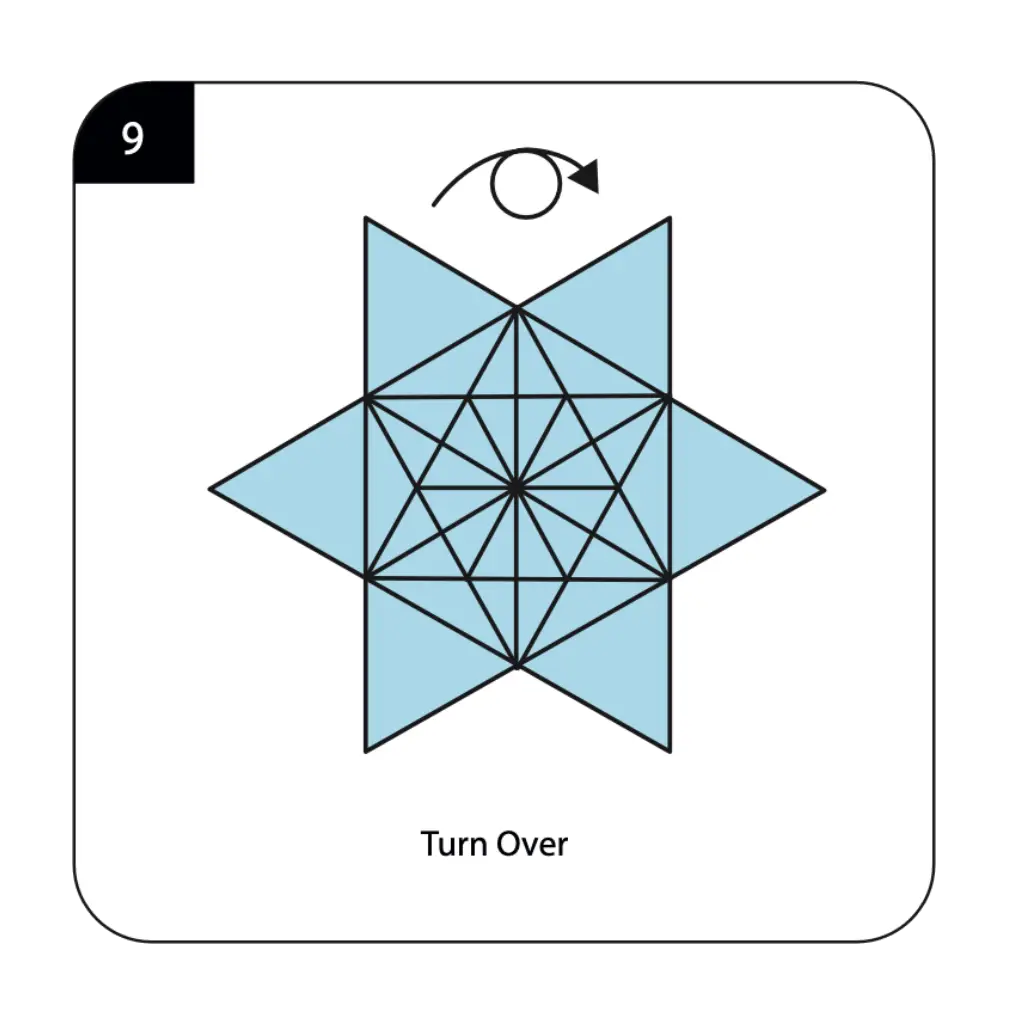
Turn over your snowflake construction once again to access the surface where you’ll complete the final decorative elements and structural refinements. This reorientation reveals the developing pattern and allows you to assess the symmetry and balance of your construction before proceeding with the finishing touches. The careful handling during this transition preserves all your previous work while preparing for the final steps that will transform your construction into a completed decorative snowflake. This positioning sets up optimal access for the detailed work that will bring your paper crystal to its final, display-ready form.
Step 10: Create the Outer Pattern
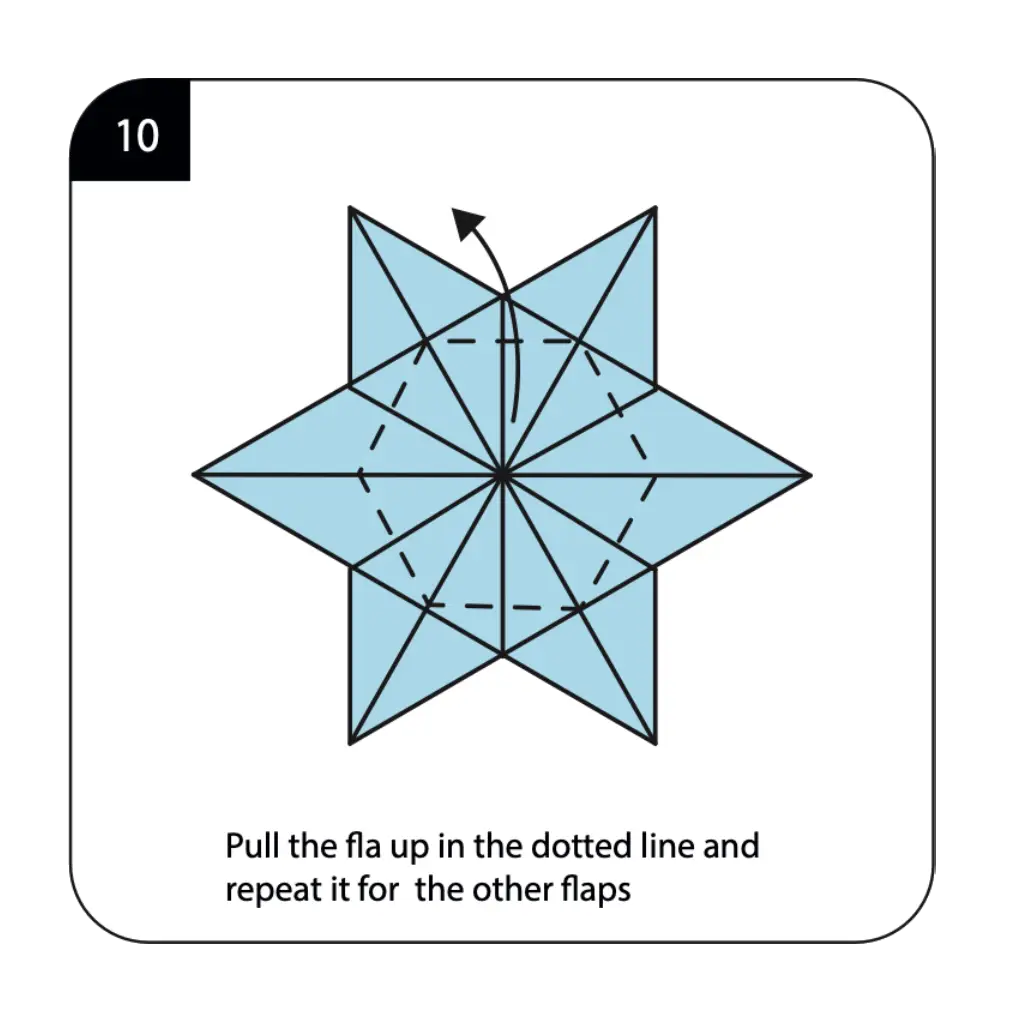
Pull the flap up along the dotted line and repeat this technique for all other corresponding flaps, creating the outer decorative pattern that defines your snowflake’s perimeter and overall character. These outward-pulling movements establish the points and curves that give your snowflake its distinctive silhouette while maintaining the mathematical precision that characterizes both natural ice crystals and quality origami work. The consistency of this pulling technique across all sections ensures that your snowflake displays perfect radial symmetry when viewed from any angle. This step adds the final layer of complexity and beauty that transforms your geometric construction into an artistic representation of nature’s crystalline perfection.
Step 11: Complete Your Origami Snowflake
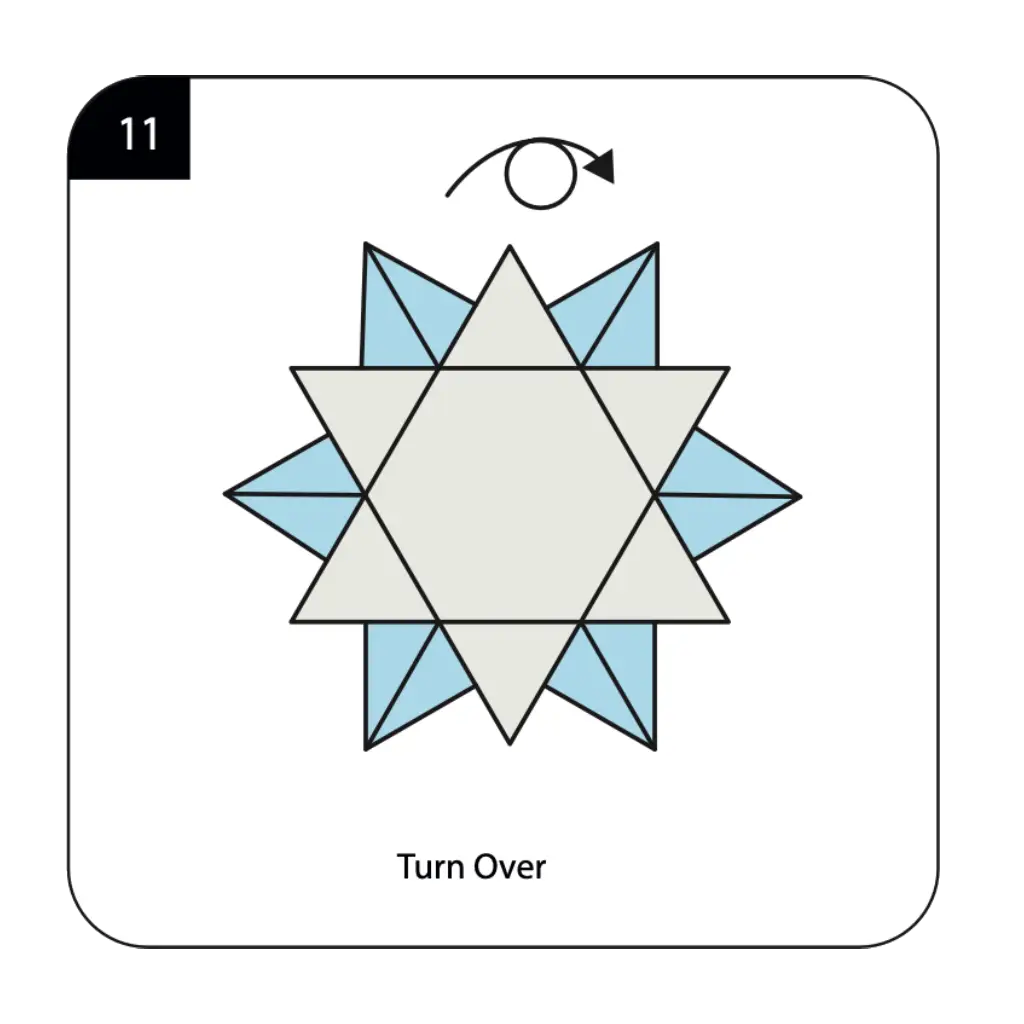
Turn over your finished snowflake to reveal the completed winter decoration, ready for display in windows, on trees, or as part of larger seasonal arrangements. Make any final adjustments to ensure all points and curves are properly positioned and the overall symmetry is maintained throughout the design. Your origami snowflake now displays the delicate beauty and mathematical precision of real ice crystals while offering the durability and reusability of a carefully crafted paper decoration. The translucent quality of the tracing paper allows your snowflake to glow beautifully when backlit, creating the ethereal appearance that makes these decorations particularly stunning when displayed in windows or against illuminated backgrounds during the winter season.
Conclusion
Congratulations on creating your origami snowflake! This beautiful winter decoration demonstrates how simple folding techniques can capture the intricate mathematical beauty and delicate elegance of nature’s most perfect crystalline formations. From a basic hexagonal sheet of tracing paper, you’ve crafted a sophisticated decoration that embodies both the geometric precision of real snowflakes and the artistic possibilities of creative paper folding. The origami snowflake showcases the perfect marriage of scientific accuracy and artistic expression, creating decorations that are both educationally valuable and aesthetically stunning. Your completed snowflake serves multiple purposes—as a beautiful seasonal decoration, an educational tool for learning about crystalline structures and symmetry, a meditative craft that connects you with natural patterns, or simply as a unique handmade ornament that adds personal touches to your winter celebrations. The techniques you’ve learned, including systematic repetition, radial symmetry, and delicate paper manipulation, represent valuable skills that transfer to many other decorative and geometric origami projects. We hope this tutorial has sparked your appreciation for both the mathematical beauty inherent in natural forms and the creative possibilities of paper folding as a medium for artistic expression. Remember that each snowflake you create offers opportunities for variation and experimentation—try different papers, sizes, and subtle modifications to develop your own unique collection of winter decorations that reflect your personal style while honoring the timeless beauty of crystalline design.
- “Before starting your origami snowflake, master fundamental folding techniques in our Origami Basics for Beginners guide.”
- “Create winter animal companions for your snowflakes with projects from our Origami Animals Collection featuring penguins and polar bears.”
- “Discover more seasonal and geometric projects in our Creative Origami Gallery for year-round decorating inspiration.”
- “Find beautiful ways to display your paper snowflakes with our Decorative Origami Ideas for winter home décor.”
- “Complement your winter scene by adding delicate Origami Flowers like paper poinsettias and winter roses.”
- “Create stunning winter displays using multiple snowflakes with techniques from our Modular Origami Projects guide.”
