
Introduction
Origami, the ancient Japanese art of paper folding, offers a wonderful way to transform a simple square sheet into a variety of beautiful creations. Among the many origami animal designs, the titmouse bird stands out for its charming appearance and achievable complexity level. This small, perky songbird with its distinctive crest makes for an excellent origami subject that captures the essence of these beloved garden visitors. Whether you’re a bird enthusiast, a paper crafting hobbyist, or looking for an engaging activity to share with children, this origami titmouse tutorial provides the perfect balance of challenge and satisfaction. Unlike more complex bird designs, the origami titmouse can be completed in just 11 straightforward steps, making it accessible for intermediate folders while still producing an impressive result. The completed model features the titmouse’s characteristic shape, including its small body, distinct head, and proportionate tail. Follow our comprehensive guide to create your own paper titmouse that can be displayed alone or as part of a collection of origami birds!
Step-by-Step Instructions
Step 1: Create the Initial Reference Creases For Origami Titmouse
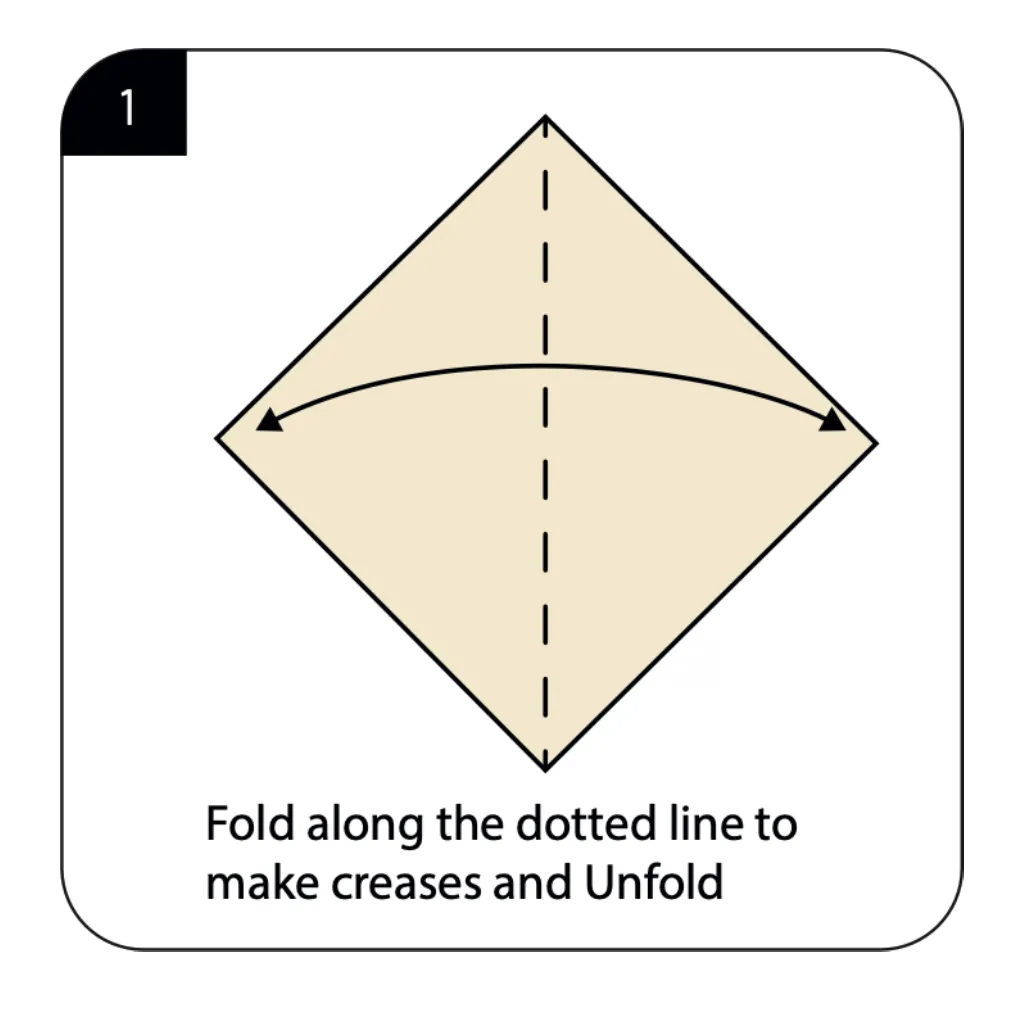
Begin with a square sheet of paper, preferably with color on one side (yellow works well for the titmouse). Fold the paper along the vertical center line, making a sharp crease, then unfold completely. This initial fold establishes an important reference line that will guide subsequent folds in your origami titmouse. The precision of this first crease is crucial, as it creates the symmetry needed for your bird model. Take care to align the edges perfectly and apply firm pressure along the fold line for a clean, well-defined crease.
Step 2: Form the Diagonal Folds
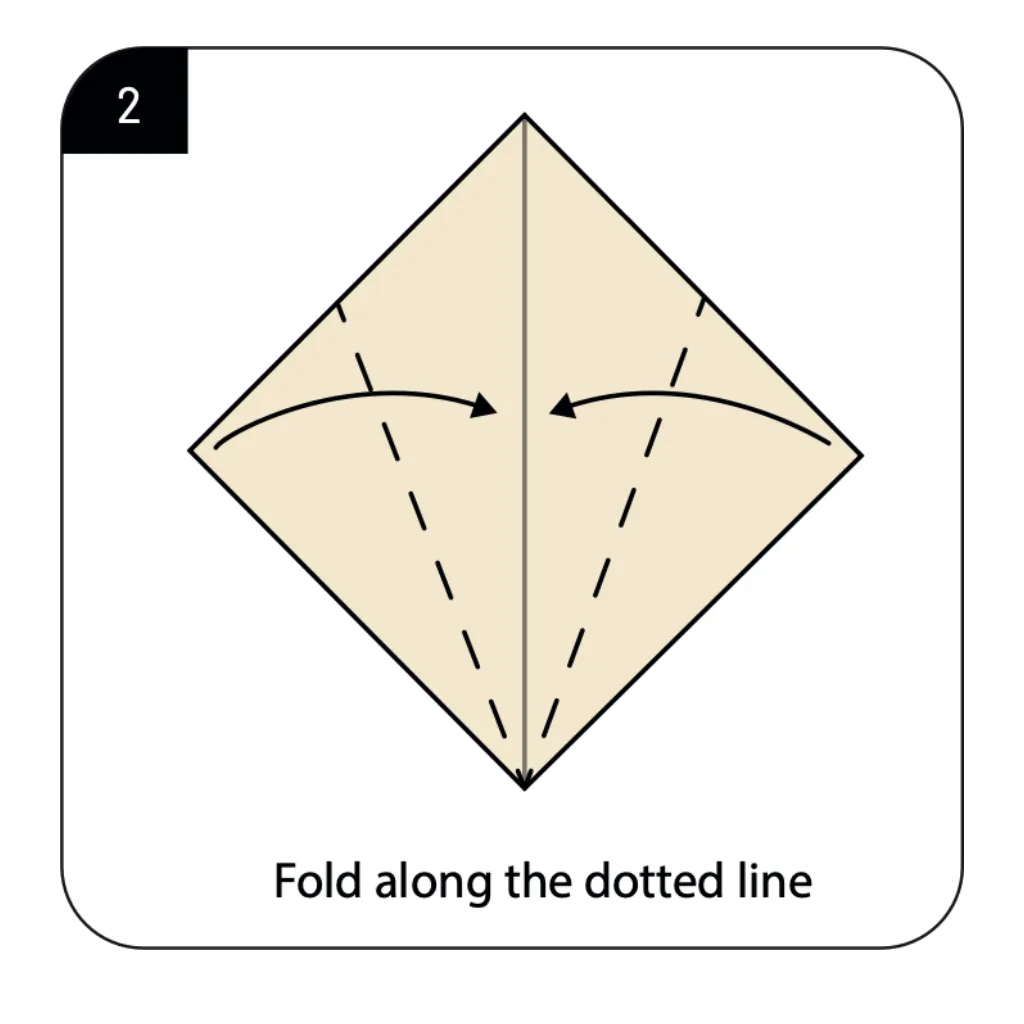
Fold along the dotted diagonal lines as shown in the diagram, bringing the side corners toward the center line. These folds begin transforming the square into a more complex shape that will eventually form your bird. The accuracy of these diagonal folds affects the proportions and symmetry of your finished titmouse model. Make sure both diagonal folds are symmetrical and that they meet precisely at the center crease created in step 1. These folds create the foundation for your bird’s body structure.
Step 3: Create the First Backward Fold For Origami Titmouse
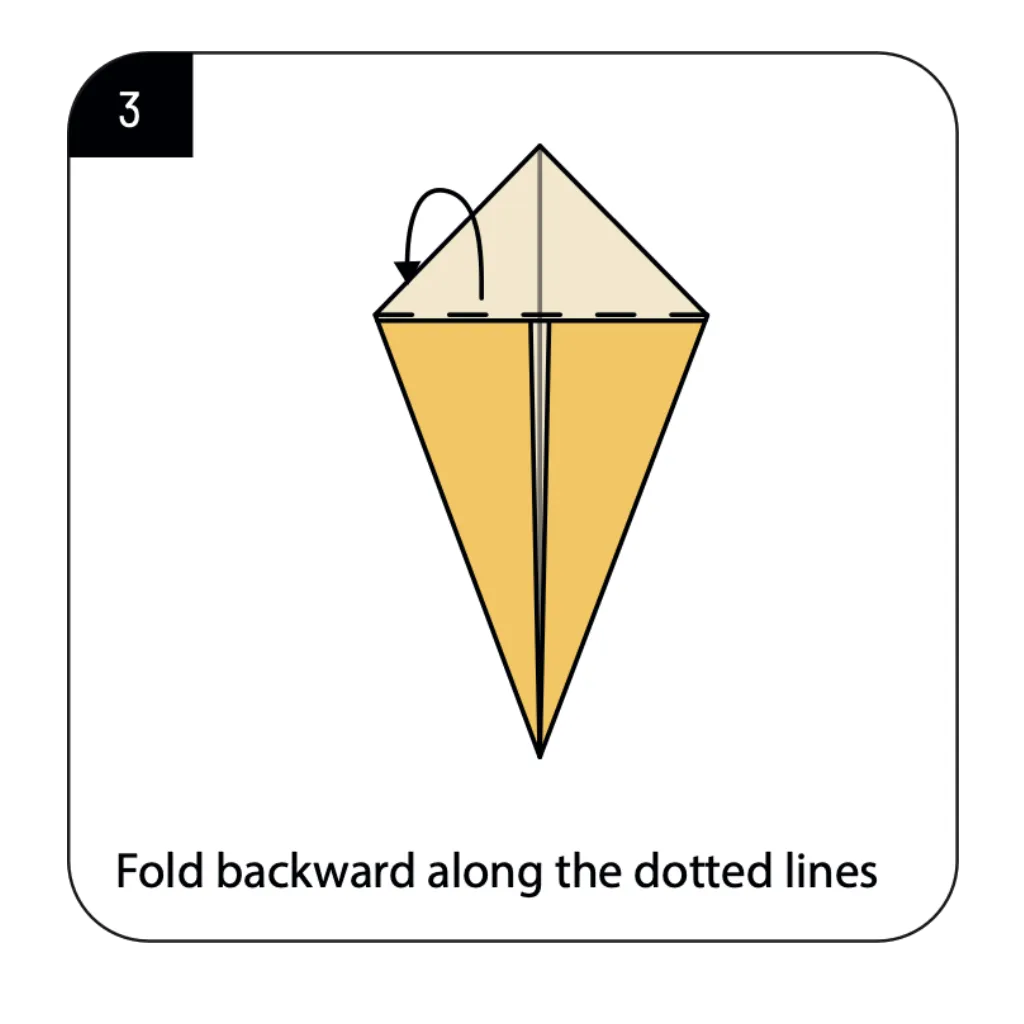
Fold the top section backward along the dotted lines as indicated in the diagram. This important fold begins to create dimension in your model and establishes the basic triangular shape that will develop into your origami titmouse. Work carefully to ensure the fold is clean and precise, following the existing crease lines from previous steps. This backwards fold changes the direction of part of your paper, adding complexity and starting to define the three-dimensional aspects of your titmouse.
Step 4: Form the Side Flaps
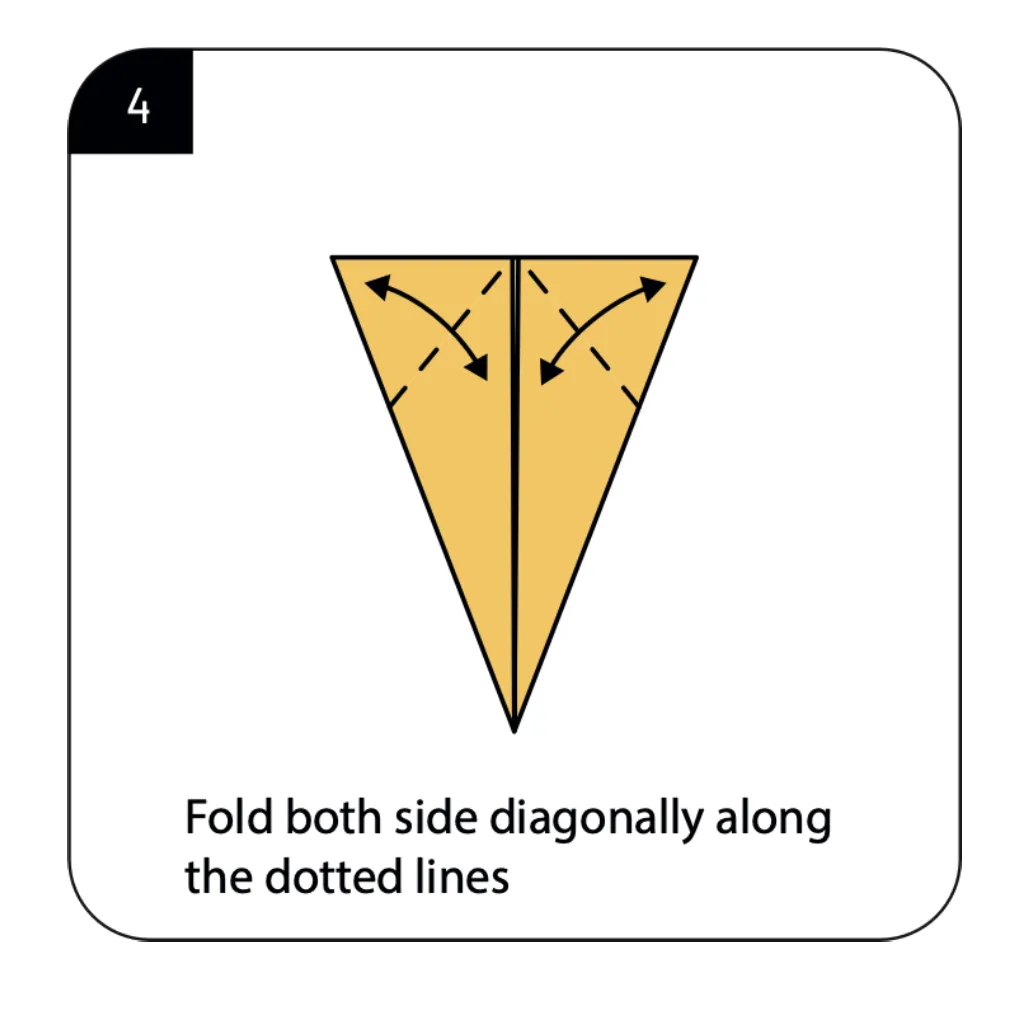
Fold both sides diagonally along the dotted lines as shown, bringing the edges inward. This step begins defining the side sections that will eventually become wings and body features of your origami titmouse. The precision of these diagonal folds affects the symmetry and balance of your finished bird. Ensure both sides are folded at equal angles for a harmonious appearance in your paper bird. These folds continue narrowing the triangular shape while establishing new structural elements.
Step 5: Shape the Right Wing For Origami Titmouse
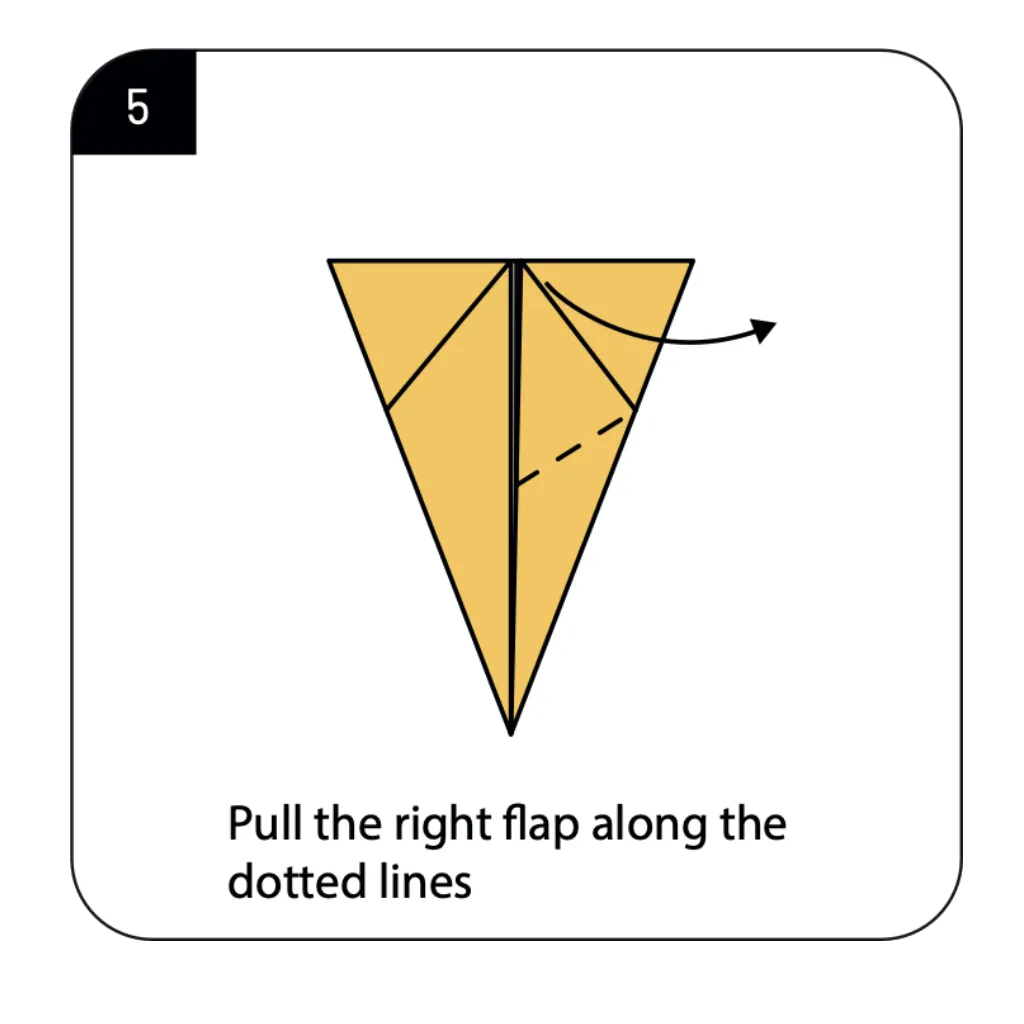
Pull the right flap along the dotted lines as indicated, creating a more complex shape on one side of your model. This fold begins differentiating the wings and body of your origami titmouse. Work carefully with this more intricate fold, which requires manipulating a smaller section of paper with precision. The accuracy of this step impacts the distinctive shape of your titmouse’s wing structure. This asymmetrical fold introduces more character and realism to your origami bird model.
Step 6: Define the Wing Detail
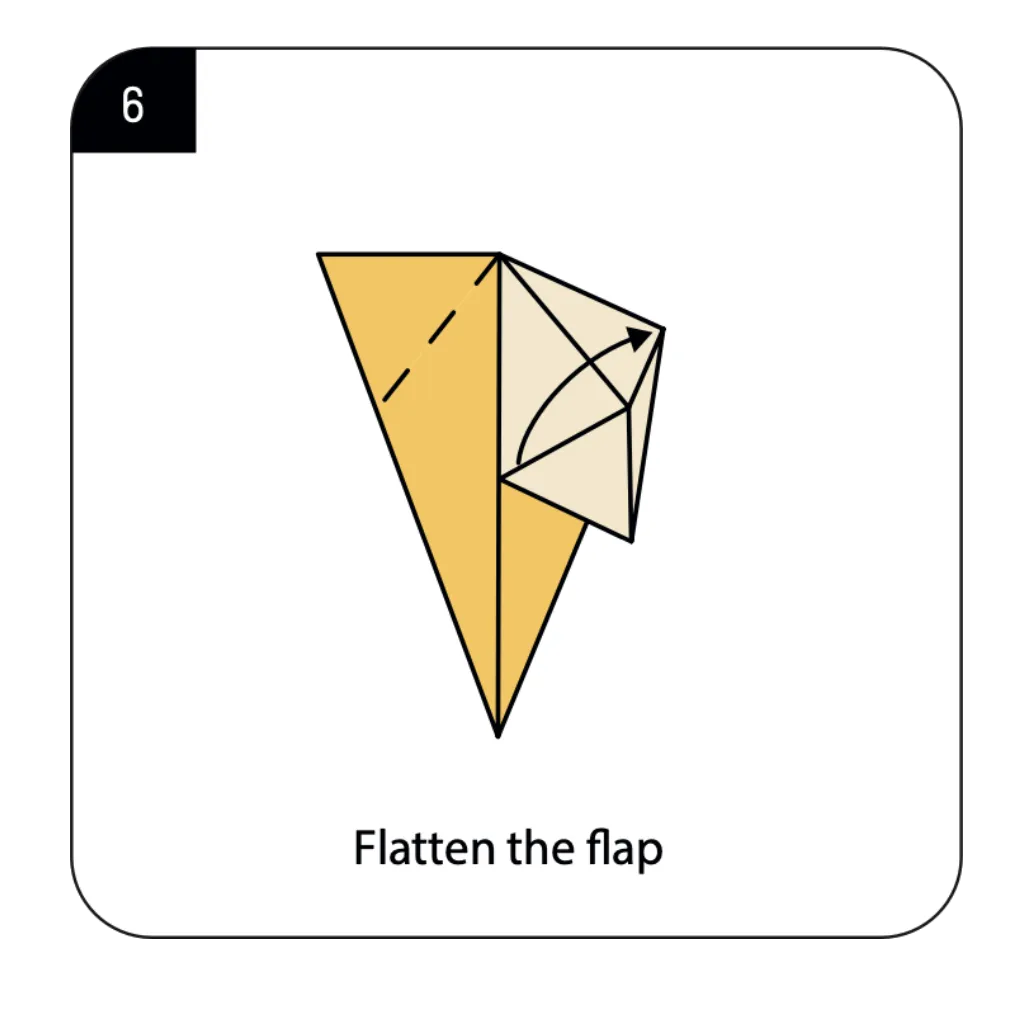
Flatten the flap completely as shown in the diagram to create a smooth, defined wing shape. This step enhances the three-dimensional quality of your origami titmouse and adds realistic detail to the wing structure. Press firmly to create a crisp, clean fold that lies flat against the body of your paper bird. The precise shaping of this wing flap contributes significantly to the recognizable silhouette of the titmouse and its characteristic wing position.
Step 7: Create Symmetrical Wings
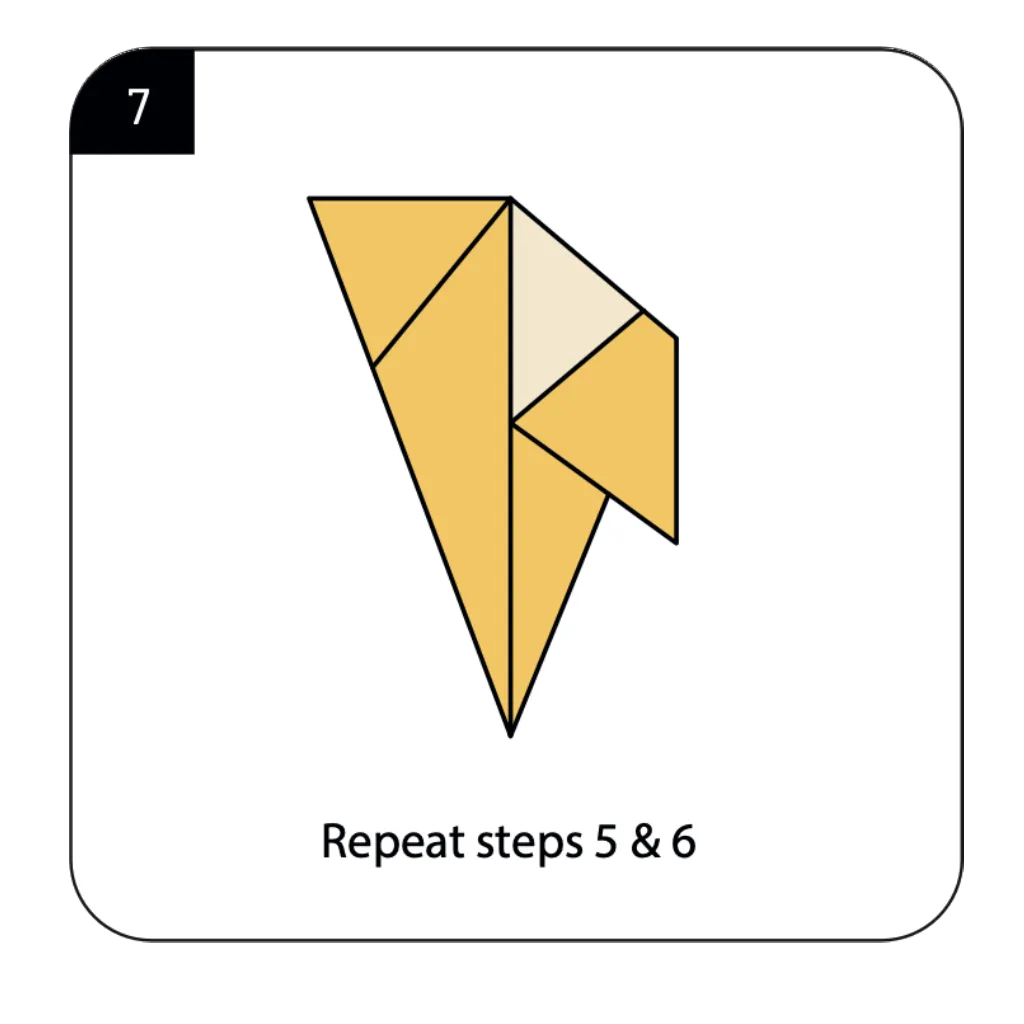
Repeat steps 5 and 6 on the opposite side to create symmetrical wing shapes. This step ensures balance in your origami titmouse model by mirroring the previous wing formation. Working carefully to match the angles and proportions of the first wing results in a harmonious, natural-looking bird shape. The symmetrical completion of both wings is crucial for the stability and appearance of your paper titmouse. These balanced wings establish the characteristic silhouette of your origami bird.
Step 8: Form the Tail and Body Sections
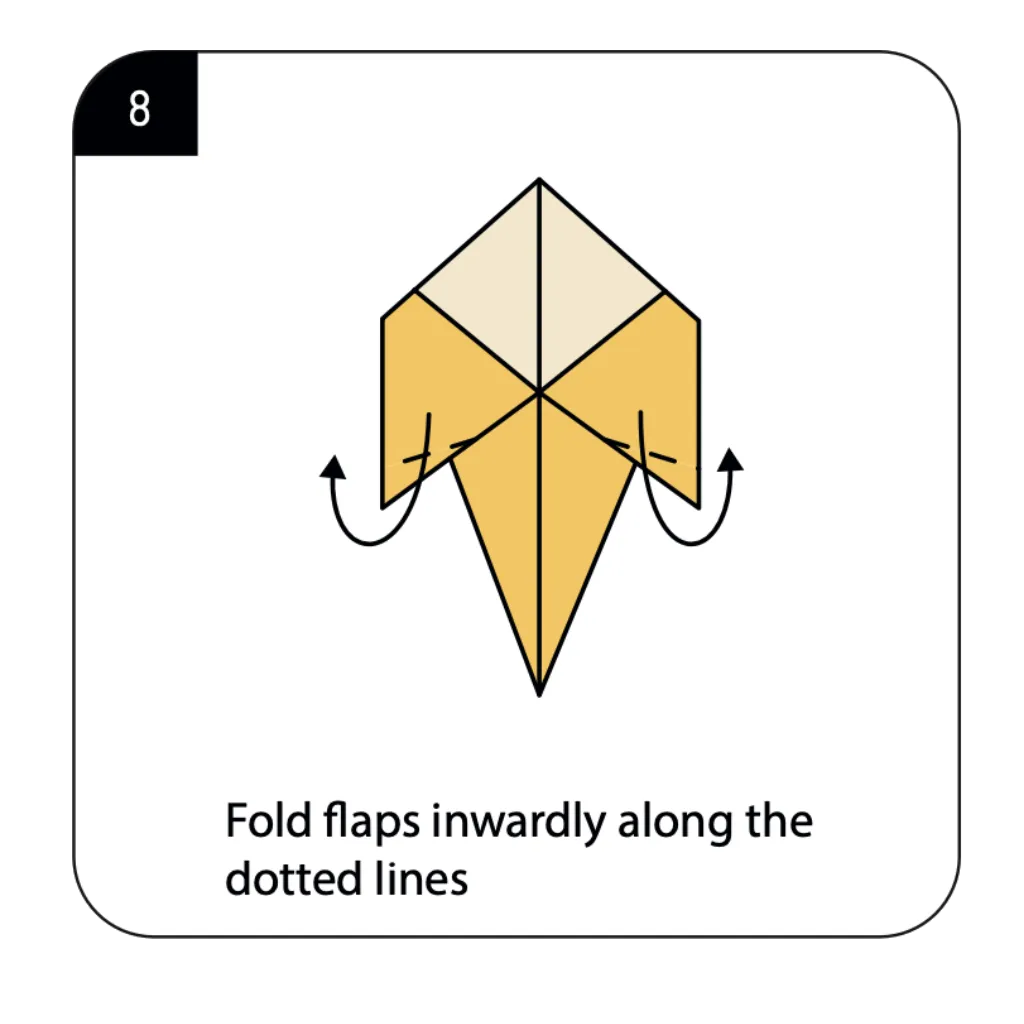
Fold the flaps inwardly along the dotted lines as shown, creating definition between the body and tail of your origami titmouse. This important structural fold helps establish the distinctive proportions of the bird’s body shape. Work precisely to ensure both sides are folded at identical angles for a balanced appearance. These inward folds transform your model from an abstract shape into a more recognizable bird form with distinct body regions.
Step 9: Create the Back Fold
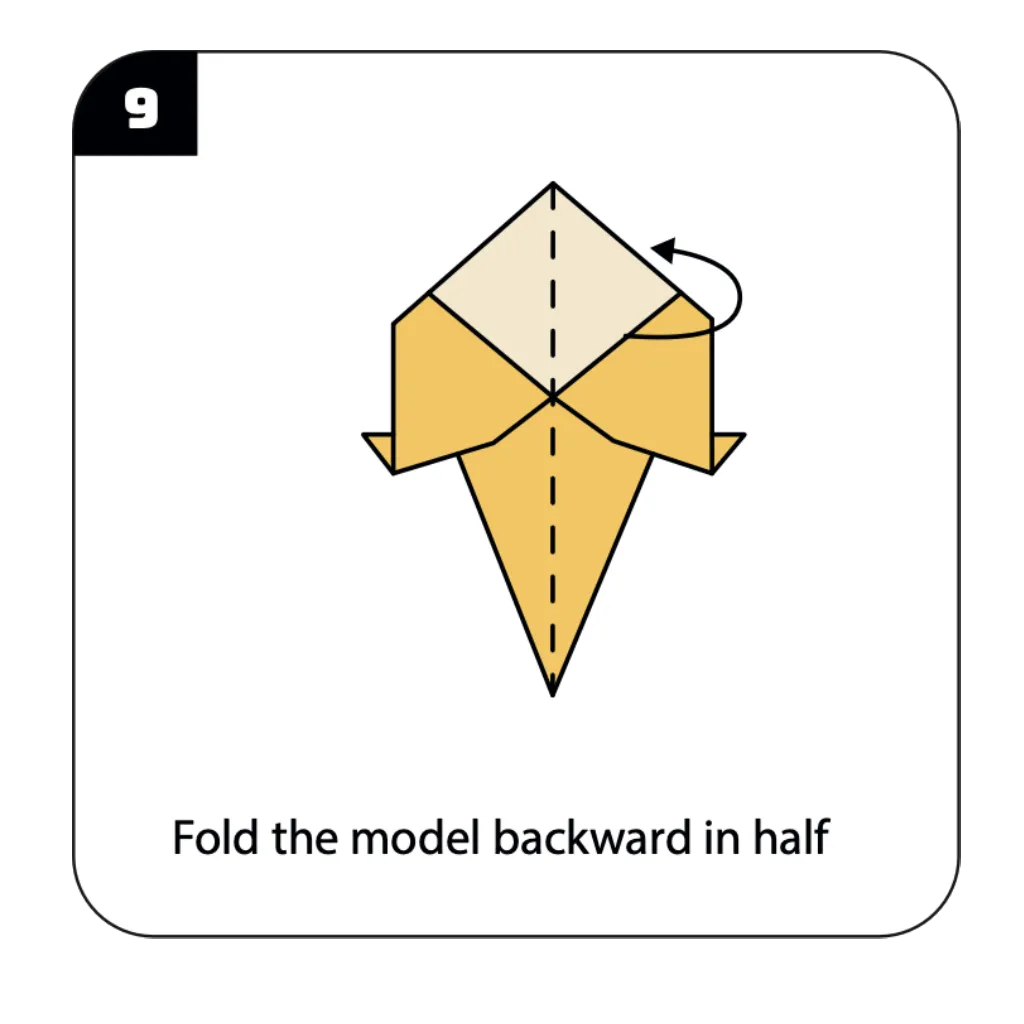
Fold the model backward in half along the center line, bringing the two sides together to create the three-dimensional body of your titmouse. This crucial fold establishes the final form and stance of your origami bird. Take care to align all edges precisely while creating this fold, as it determines how your finished titmouse will stand. This transformation significantly enhances the realism of your model, creating a properly proportioned bird shape with clearly defined sections.
Step 10: Position Your Model
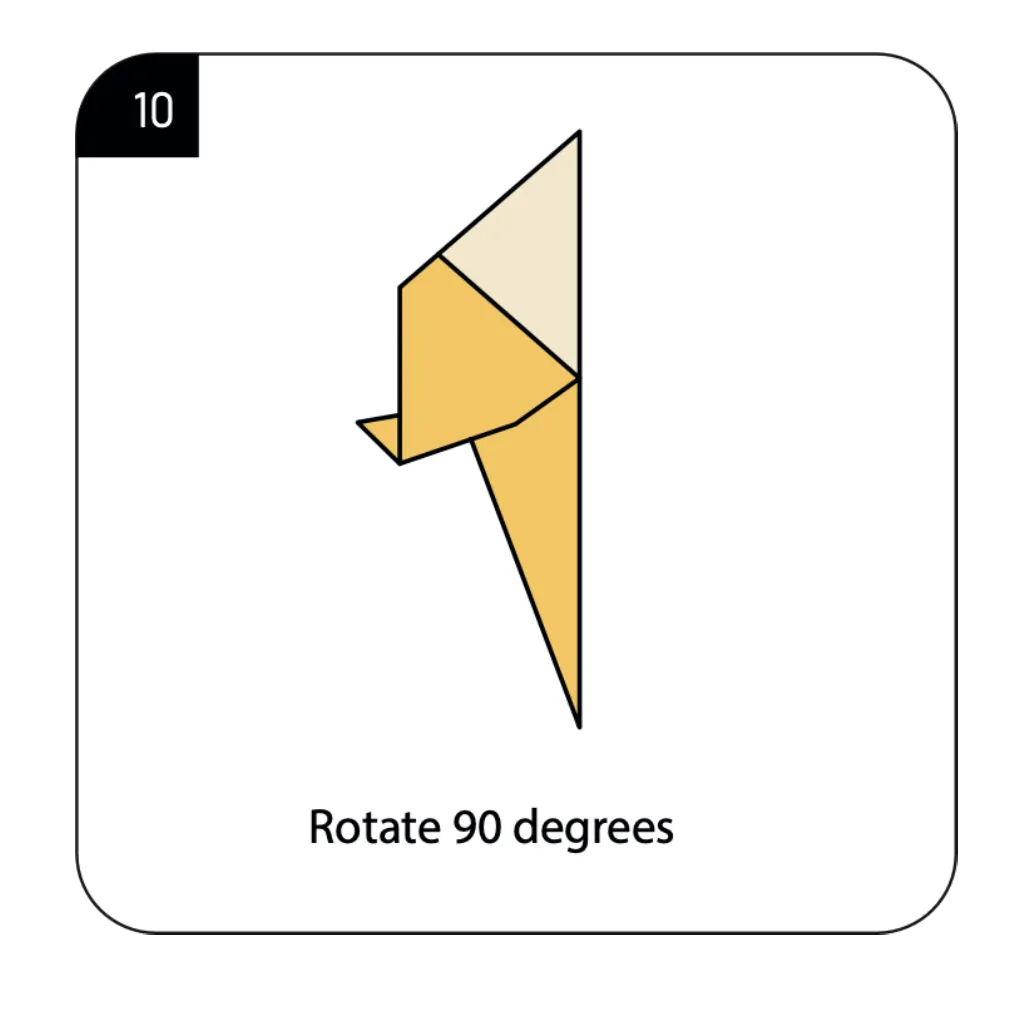
Rotate your origami model 90 degrees as shown to orient it in the proper position for the final details. This reorientation prepares your titmouse for the finishing touches that will complete its characteristic appearance. The proper positioning ensures that your final fold creates the distinctive head shape in the correct orientation. This simple rotation aligns your model with the natural stance of a real titmouse, enhancing the lifelike quality of your paper bird.
Step 11: Complete the Titmouse Head
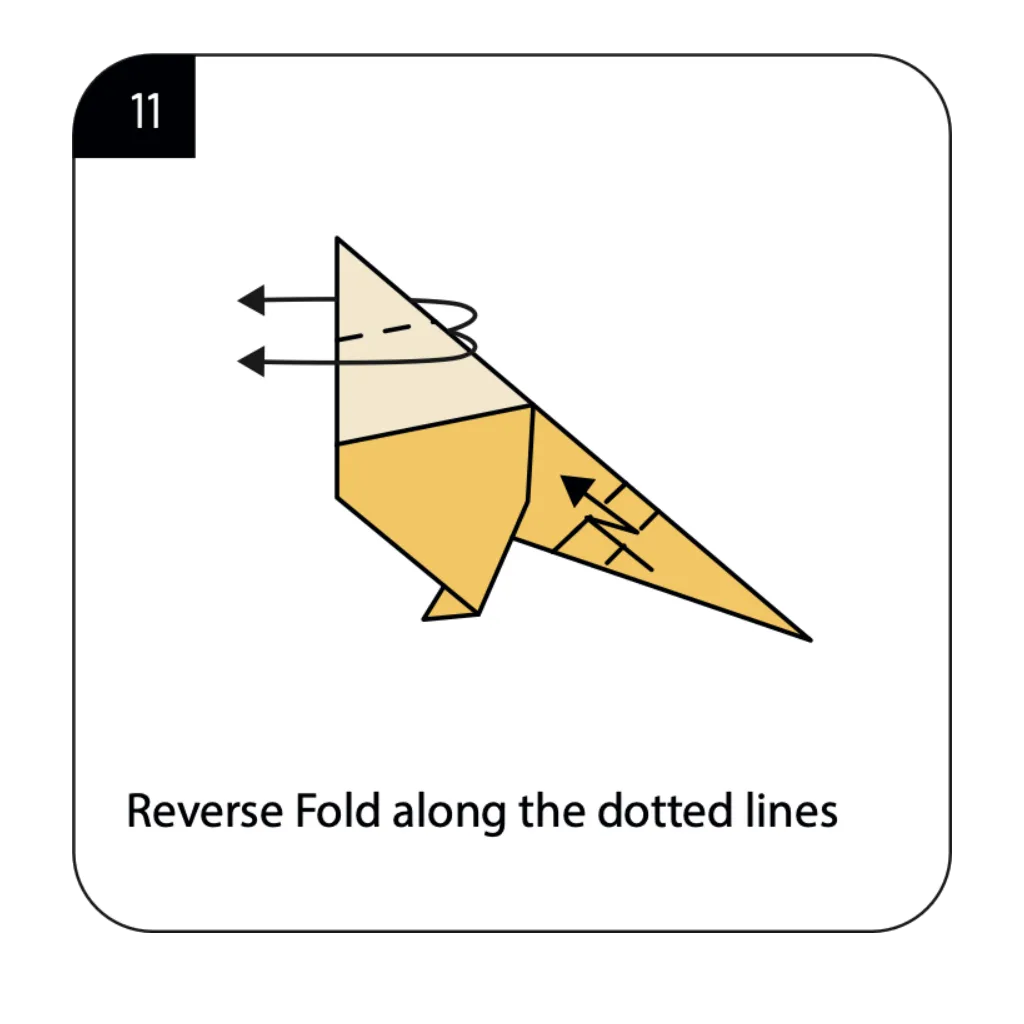
Perform a reverse fold along the dotted lines to create the titmouse’s distinctive head and beak. This final fold transforms your model into a recognizable bird with characteristic features. Work carefully with this precision fold to ensure a clean, well-defined head shape that captures the essence of a real titmouse. This finishing touch completes your origami titmouse, bringing together all the previous folds into a cohesive, charming paper bird that displays the characteristic profile and proportions of this delightful songbird.
Conclusion
Congratulations on creating your origami titmouse! This charming paper bird represents the beautiful intersection of art, nature observation, and paper crafting skill. From a simple square sheet, you’ve fashioned a three-dimensional representation that captures the distinctive characteristics of these beloved garden birds. The origami titmouse showcases how paper folding can translate natural forms into elegant geometric interpretations while teaching patience and precision. Your completed model can be displayed as a standalone decoration, combined with other origami birds for a paper aviary, or used to enhance greeting cards and gifts. The techniques you’ve practiced—including reverse folds, inside folds, and three-dimensional shaping—build valuable skills that transfer to many other origami designs. We hope this tutorial has sparked your interest in both paper folding and bird-inspired creations. Remember that practice enhances precision—each titmouse you fold will be more refined than the last, allowing you to develop your unique interpretation of this delightful paper bird.
- “Before starting your origami titmouse, learn essential paper folding techniques in our Origami Basics for Beginners guide.”
- “Explore more bird designs in our popular Origami Animals Collection, including cranes, swans, and parrots.”
- “Create a complete woodland scene by combining your titmouse with other Creative Origami Projects like trees and flowers.”
- “Looking for display ideas? Check out our Decorative Origami Guide for beautiful ways to showcase your paper birds.”
- “Enhance your nature-themed origami collection by adding Origami Flowers to complement your titmouse.”
- “Create a stunning arrangement of multiple birds with techniques from our Modular Origami Gallery, perfect for advanced folders.”
