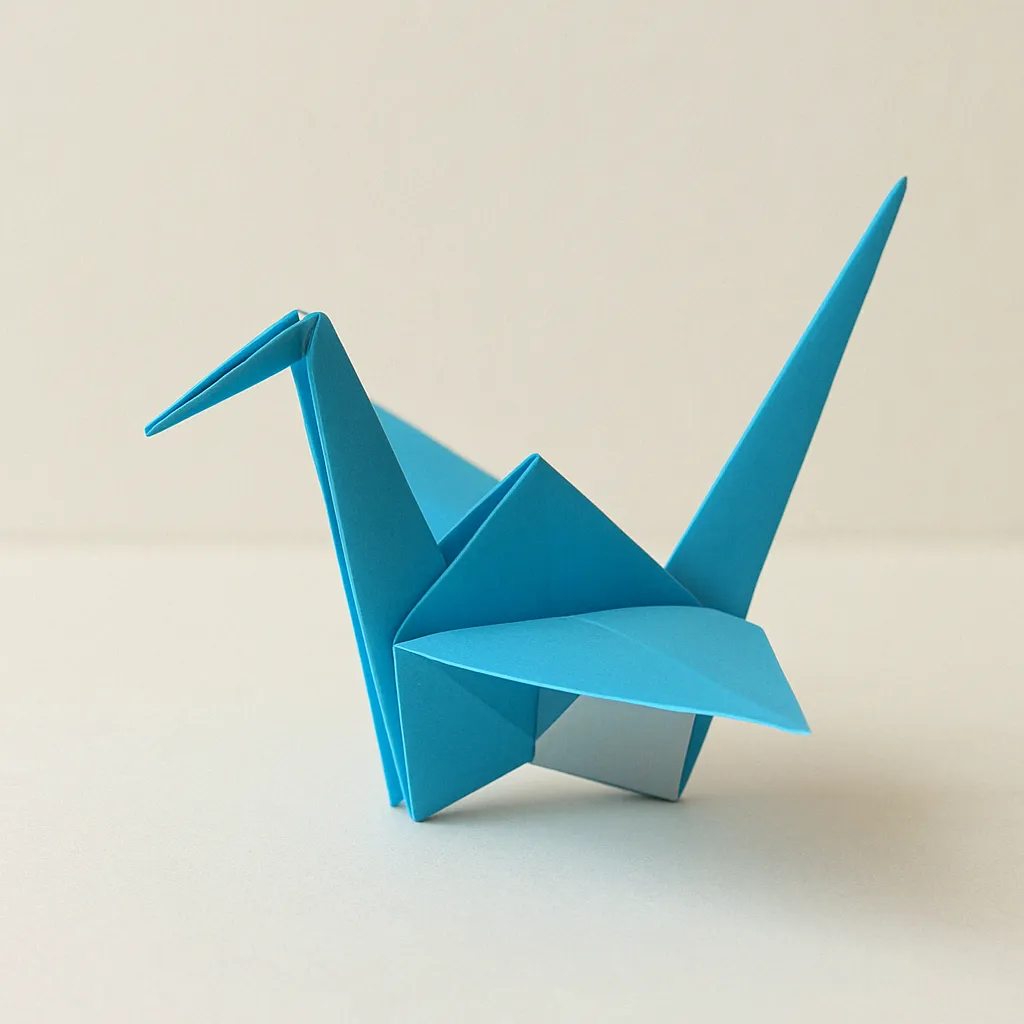

The elegant origami crane has captivated paper folders for centuries, standing as perhaps the most iconic creation in the entire origami tradition. This classic easy crane origami represents far more than just a paper bird—it embodies wishes for peace, healing, and good fortune in Japanese culture. Legend holds that folding 1,000 origami cranes (senbazuru) grants the folder a special wish, making the origami crane a powerful symbol of hope and perseverance.
In this comprehensive guide, you’ll learn to create your own perfect origami crane through ten detailed steps. Whether you’re a complete beginner or looking to refine your technique, this tutorial breaks down each fold with precision and clarity. The origami crane may appear complex at first glance, but with patience and these instructions, you’ll soon master this timeless design that has fascinated folders around the world.
The Cultural Significance of the Origami Crane
Before we begin folding our origami crane, let’s appreciate the rich cultural heritage behind this creation. The Japanese word “tsuru” (crane) represents longevity and good fortune, as cranes were believed to live for a thousand years. The easy crane origami gained worldwide recognition through the story of Sadako Sasaki, a young Japanese girl who folded origami cranes while hospitalized with radiation sickness after the bombing of Hiroshima, inspired by the belief that completing 1,000 cranes would grant her wish for health.
Today, the easy crane origami serves as an international symbol of peace. Strings of origami cranes are often sent to memorial sites around the world, and learning to fold an origami crane connects you to this profound tradition of hope and healing. At origaminew.com, you can explore more about the fascinating history behind origami and its cultural significance.
Materials Needed for Your Origami Crane
Before beginning your origami crane, gather these materials:
- Square paper: Traditional origami paper works best for your easy crane origami, but any square paper will do. For beginners, a 6-inch (15 cm) square is ideal—large enough to work with comfortably but small enough for precision. The paper used in our example has blue on one side and white on the other, creating a two-toned origami crane.
- Flat surface: A clean table or desk provides the ideal foundation for creating your origami crane.
- Patience: The origami crane involves several precise folds, so allow yourself time to learn without rushing.
For your first easy crane origami, consider using dual-colored paper as shown in our images. This makes it easier to distinguish between different sides during the folding process and results in a striking final easy crane origami with contrasting wing colors.
Step-by-Step Guide to Folding an Origami Crane
Let’s begin creating your easy crane origami with detailed instructions for each step:
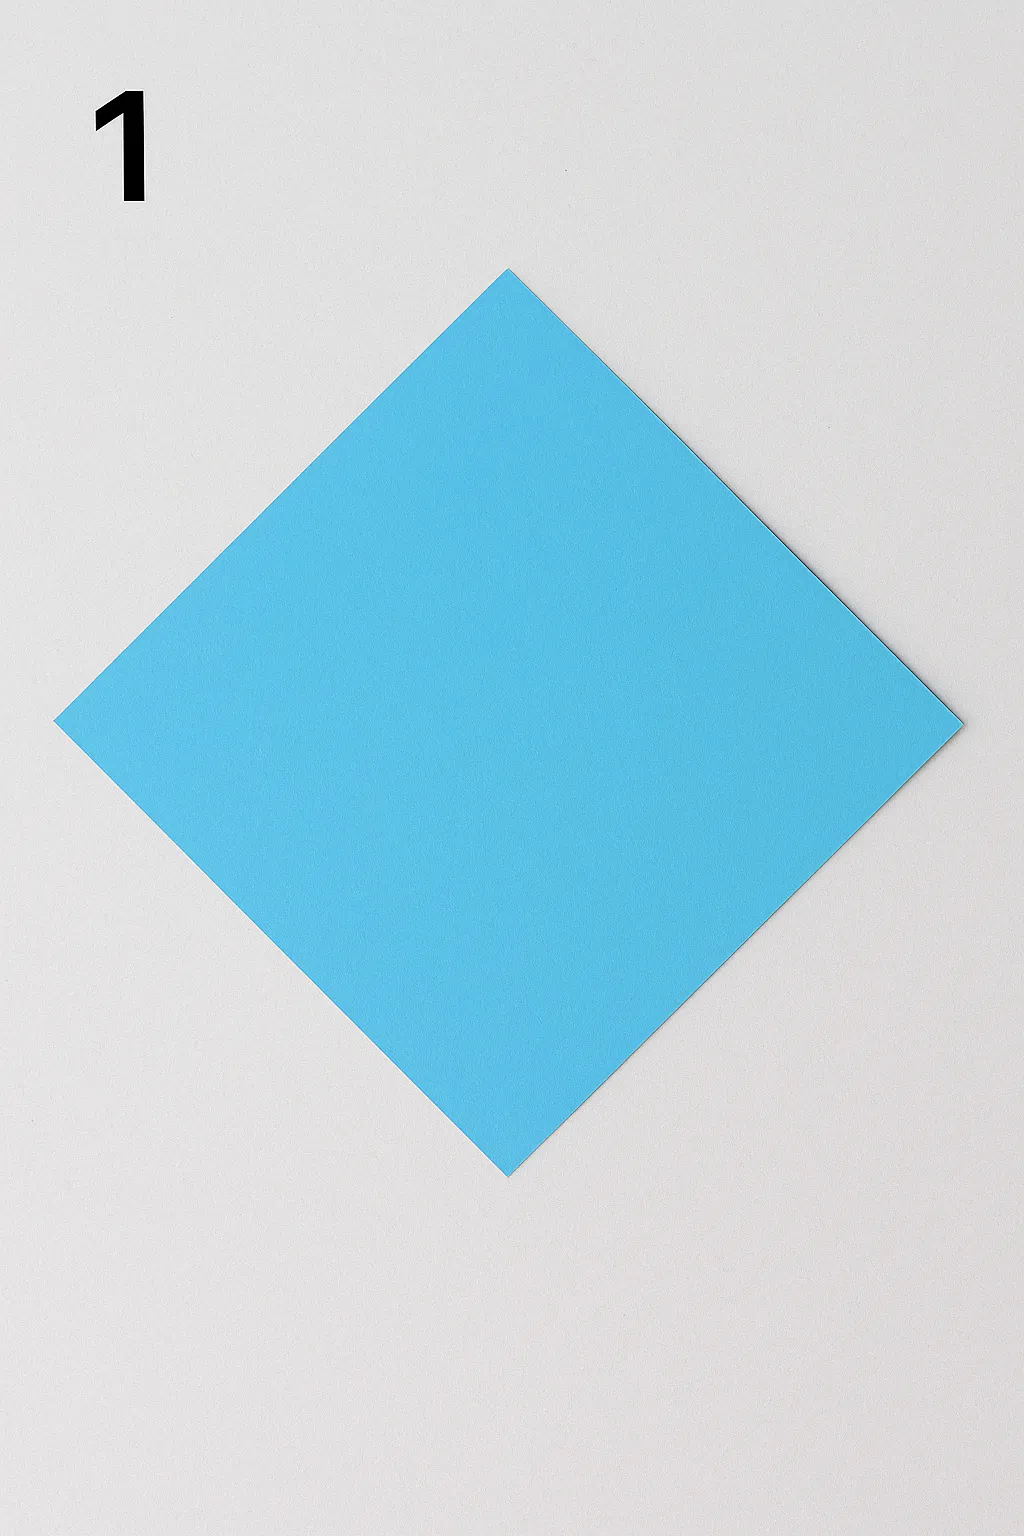
Step 1: Begin with a Perfect Square
For your origami crane, start with a square piece of paper positioned with the colored side facing up (blue in our example). The quality of your origami crane begins with this first step—ensure your paper is perfectly square with clean, crisp edges. Place the square on your work surface as a diamond shape, with points facing up, down, left, and right. This orientation establishes the foundation for your origami crane and influences the final appearance of your bird.
If you’re using standard origami paper, you’re already set with a perfect square. If you’re creating your own square from rectangular paper, visit origaminew.com/paper-basics for techniques to create the perfect square base for your origami crane.
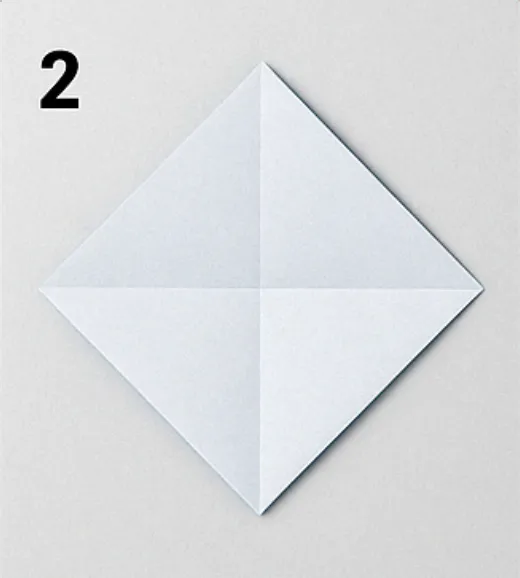
Step 2: Create the Preliminary Base
Fold your square in half diagonally to form a triangle. Make sure to align the corners precisely, then create a sharp crease by running your finger firmly along the fold. Unfold and repeat with the other diagonal. When you unfold again, you’ll see an X-shaped crease pattern. Next, fold the paper in half horizontally and then vertically, unfolding after each fold.
These preliminary folds create the reference creases needed throughout the easy crane origami folding process. The precision of these initial folds significantly affects the final appearance of your origami crane, so take your time to make clean, accurate creases. Your paper should now have crease lines forming a grid with horizontal, vertical, and diagonal lines intersecting at the center.
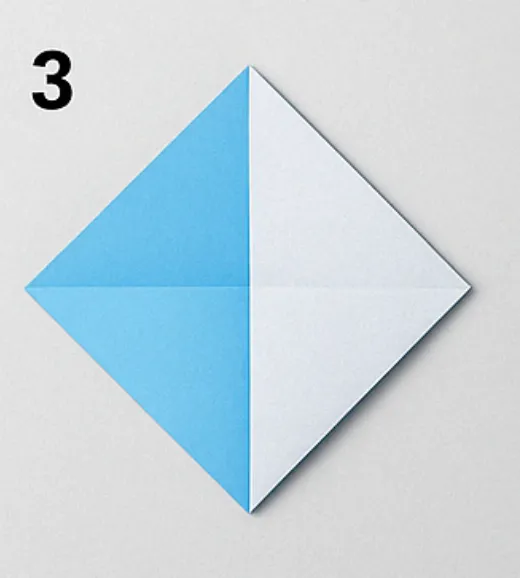
Step 3: Form the Preliminary Base
With the creases from Step 2 visible on your paper, fold the bottom left corner up to meet the top right corner, but this time, keep it folded. You’ll notice that the paper naturally wants to fold along the crease lines you created earlier. This key step in the easy crane origami process starts transforming your flat square into a three-dimensional form.
Your paper should now be folded into a triangular shape with one corner of the original square visible at the top right. This particular orientation matters for the subsequent steps of your origami crane, so ensure this configuration matches our image before proceeding.
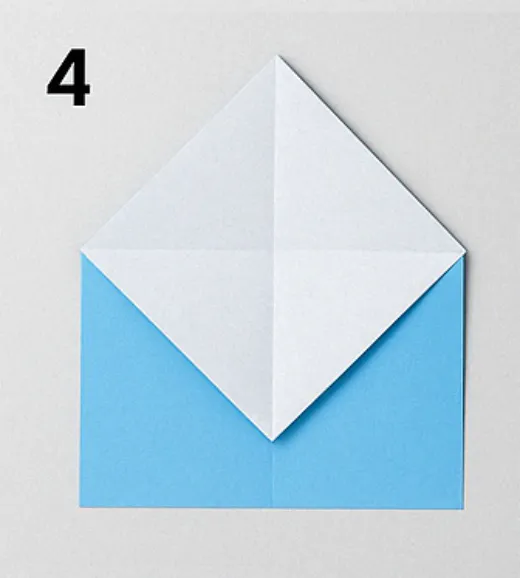
Step 4: Create the Bird Base
Turn your model over (the blue triangle should now be at the bottom). Fold the right corner of the model upward to meet the top corner, creasing along the existing diagonal line. Your model should now resemble an envelope or a house shape with the “roof” at the top.
This fold begins transforming the paper into what origami experts call the “bird base”—a foundational form used in many bird designs, including the origami crane. The bird base is one of the most important preliminary forms in origami, and mastering it will help you create not just the origami crane but many other advanced models as well. For more on origami bases, visit origaminew.com/origami-bases.
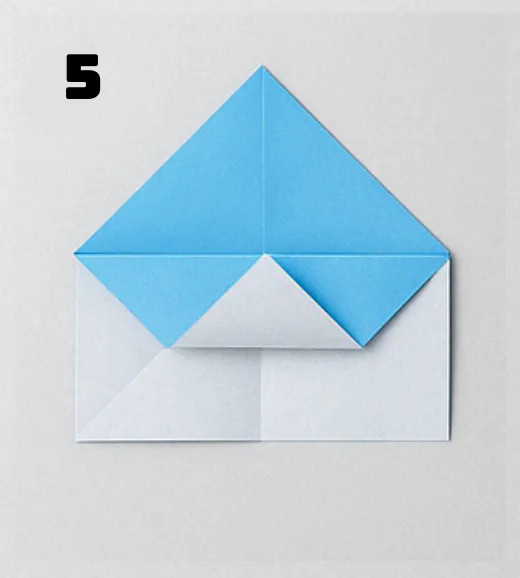
Step 5: Begin the Crane Form
In this crucial step, carefully separate the top layer of paper at the center and fold it upward, squashing the sides inward as you go. This technique, known as a “squash fold,” transforms the triangular flaps into square ones. The paper will naturally fold along existing crease lines, creating a shape resembling an envelope or sailboat.
This transformation is a key moment in creating your origami crane, as it establishes the basic structure from which the bird’s distinctive features will emerge. Make sure the model lies flat after this step, pressing down firmly on the creases to create a solid foundation for your easy crane origami.
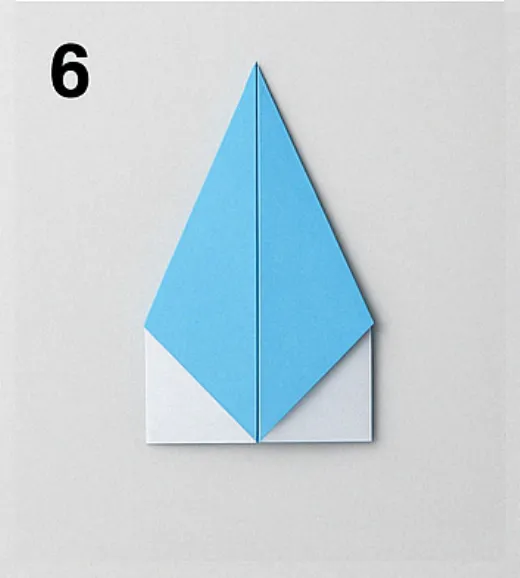
Step 6: Form the Wings and Neck
Now you’ll see two versions of Step 6 in the image. For the first part, fold the bottom corner of the top layer upward to the top corner. This creates a shape resembling an ice cream cone or a sailboat. Next, fold the entire model in half vertically, bringing the left edge to meet the right edge.
These folds begin to define the distinctive silhouette of your origami crane, with the pointed top section forming the neck and head while the wider bottom section will become the body and wings. The precision of these folds directly affects the final proportions of your easy crane origami, so take care to align the edges precisely.
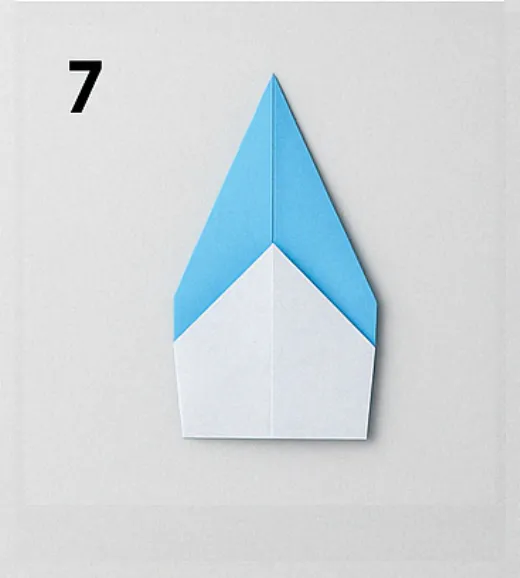
Step 7: Define the Wings and Neck
With your model still folded in half from the previous step, focus on the bottom section. Fold the bottom edges of both layers upward at approximately the halfway point of the bottom section. This creates the division between the origami crane’s wings and body. The exact placement of this fold affects the wing size of your final easy crane origami, so adjust according to your preference—lower for larger wings, higher for smaller wings.
After making this fold, your model should begin to resemble a bird shape with a long neck at the top and wing structures forming below. The distinctive shape of the origami crane is beginning to emerge from the sequence of folds you’ve created.
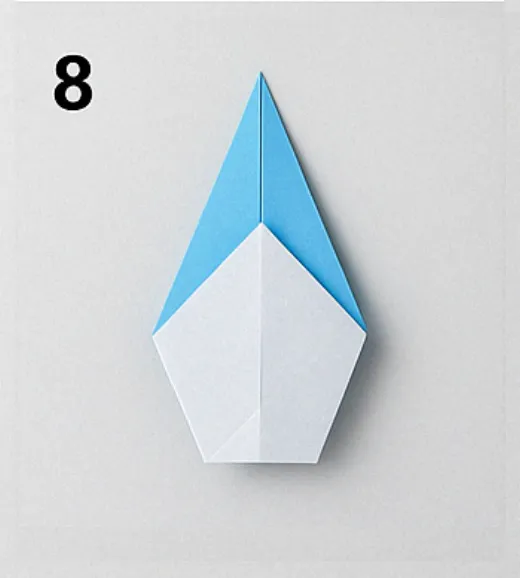
Step 8: Prepare the Wings
This step refines the wing structure of your easy crane origami. Take the bottom flap that you folded up in the previous step and fold it back down, but not completely—fold it to about the middle of the body section, leaving a small gap between this fold and the bottom edge of the model. Repeat on both sides.
This fold creates the distinctive wing shape of the origami crane and adds dimension to your model. The small gap you leave will form part of the easy crane origami body between its wings. After completing this step, your model should more clearly resemble a bird with defined wings and a long neck.
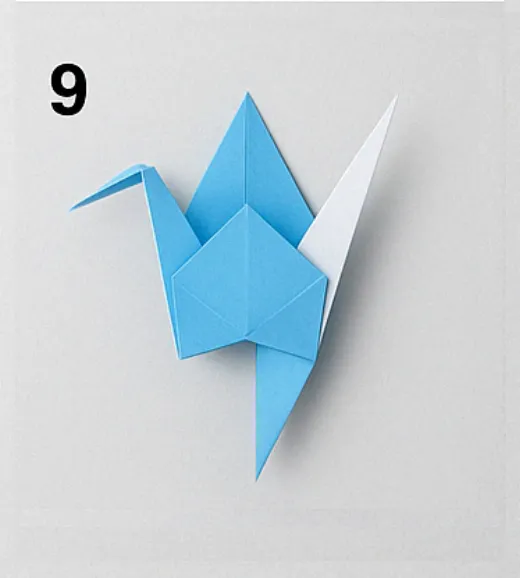
Step 9: Create the Head and Complete the Wings
Now comes the defining step for your origami crane. First, fold the long pointed neck downward at about a 45-degree angle to create the head of your crane. The exact position of this fold determines the final look of your origami crane’shead and neck posture.
Next, gently pull the wings outward and downward, allowing them to open up from the body while keeping the center of the model intact. This three-dimensional transformation brings your easy crane origami to life, giving it the classic spread-wing pose that characterizes this traditional design.
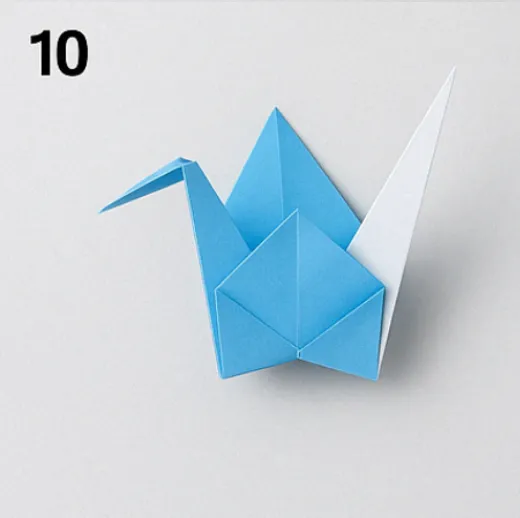
Step 10: Refine and Display Your easy crane origami
The final step involves making small adjustments to perfect your origami crane. Gently pull the wings outward to their full extension, adjusting their angle for the most pleasing appearance. You can curve the wings slightly by running your fingers along their length, adding a gentle bend that makes your origami crane appear more lifelike and dynamic.
Similarly, make any needed adjustments to the head and neck, ensuring your origami crane has the posture you desire. Some folders prefer a origami crane with the head pointing slightly upward in a alert pose, while others prefer a more serene easy crane origami with the head angled downward. For more creative display ideas for your finished easy crane origami, visit origaminew.com/display-techniques.
Congratulations! You’ve created a beautiful easy crane origami that connects you to centuries of paper-folding tradition. With practice, you’ll be able to fold origami cranes with increasing precision and speed, perhaps even working toward the legendary goal of 1,000 cranes.
Tips for Perfecting Your easy crane origami
Creating a beautiful origami crane takes practice, but these helpful tips will ensure better results:
- Use proper paper: The quality of paper significantly affects your origami crane. Traditional origami paper (kami) folds cleanly and holds creases well, creating a more defined origami crane.
- Create precise creases: The secret to a great easy crane origami is sharp, clean folds. Run your fingernail or a bone folder along each crease to make it crisp and defined.
- Focus on symmetry: For the most appealing easy crane origami, ensure that folds on both sides are symmetrical and balanced. An asymmetrical easy crane origami might not stand properly or look as refined.
- Work slowly: Rushing through the steps can lead to misaligned folds and an uneven origami crane. Take your time with each fold, ensuring accuracy before moving to the next step.
- Practice makes perfect: Your first easy crane origami might not be perfect, but each one you make will improve as you master the technique. For more practice tips, visit origaminew.com/practice-techniques.
Creative Variations for Your Origami Crane
Once you’ve mastered the basic origami crane, consider these creative variations:
Design Variations for Origami Cranes
- Color combinations: Try different colored papers to create unique origami crane designs—metallics for elegant cranes, patterned paper for artistic interpretations
- Size variations: Create tiny easy crane origami models with 3-inch paper or large display pieces with 12-inch paper
- Paper types: Experiment with different paper weights and textures for varied origami crane effects
- Crane families: Create multiple easy crane origami in different sizes for an impressive display
For more creative ideas for your origami crane projects, check out origaminew.com/creative-variations.
The Mathematical Beauty of the Origami Crane
The origami crane isn’t just beautiful—it’s a demonstration of fascinating mathematical principles. The transformation from a flat square to a three-dimensional bird involves concepts of geometry, symmetry, and spatial reasoning. When you fold an easy crane origami, you’re engaging with mathematical concepts that have intrigued scholars for centuries.
The precise angles and proportions in an easy crane origami reflect geometric principles, while the symmetrical nature of the design demonstrates balance and harmony. Some mathematicians and engineers study origami, including the easy crane origami, to understand principles that can be applied to everything from space satellite deployment to medical stent design.
This connection between art and mathematics makes the easy crane origami not just a beautiful craft but also an educational tool that spans disciplines. Learn more about the mathematics behind origami at origaminew.com/origami-mathematics.
Frequently Asked Questions About Origami Cranes
Q: How long does it take to learn to fold an origami crane?
A: For beginners, learning to fold an origami crane might take 30-45 minutes for the first attempt. With practice, you can create an easy crane origami in about 5 minutes.
Q: What does the easy crane origami symbolize?
A: The easy crane origami symbolizes longevity, good fortune, and peace in Japanese culture. It’s also associated with healing and hope through the story of Sadako Sasaki and the thousand cranes tradition.
Q: Can children learn to make an easy crane origami?
A: The easy crane origami is moderately challenging and most suitable for children aged 9 and above. Younger children might need assistance with some of the more precise folds required for the easy crane origami.
Q: What’s the best paper size for beginners learning the easy crane origami?
A: Beginners should start with 6-inch (15 cm) square papers for an origami crane. This size provides enough space to work comfortably while creating a reasonably sized final crane.
Q: How can I display my easy crane origami?
A: Origami cranes can be displayed individually on shelves, strung together to create mobiles or garlands, incorporated into art projects, or given as meaningful gifts. For display ideas, visit origaminew.com/crane-displays.
For more frequently asked questions about the easy crane origami and other origami models, visit origaminew.com/origami-faq.
Conclusion: The Timeless Appeal of the Origami Crane
The easy crane origami remains one of the most beloved paper folding designs for good reason. Its elegant form captures the essence of the crane bird while demonstrating the transformative power of origami—turning a simple square of paper into a figure of beauty and meaning. The origami crane connects us to centuries of tradition while offering a meditative creative experience in our fast-paced modern world.
As you practice creating your easy crane origami, you’ll find that each one becomes more refined and expressive. The process of folding an origami crane offers a moment of mindfulness and focus, while the completed easy crane origami serves as a tangible symbol of patience, precision, and artistic expression.
Whether you’re folding an easy crane origami as part of a thousand cranes project, creating decorations for special occasions, or simply enjoying the satisfaction of mastering this classic design, the journey of creating an easy crane origami as rewarding as the beautiful result.
So gather your paper, find a quiet moment, and enjoy the timeless experience of transforming a flat square into an elegant origami crane that connects you to centuries of paper-folding tradition and symbolism.
Additional Origami Resources
To further explore the world of origami beyond the origami crane, consider these resources available at origaminew.com:
- Beginner Origami Projects – Start with simpler designs before tackling the origami crane
- Advanced Bird Designs – Once you’ve mastered the origami crane, try other bird designs
- Japanese Origami Traditions – Learn more about the cultural context of the origami crane
- Therapeutic Benefits of Origami – Discover how folding designs like the origami crane can reduce stress and improve focus
- Video Tutorials – Visual guides for the origami crane and other popular designs
Happy folding!
Have you created an origami crane using this tutorial? Share your creations in the comments below! I’d love to see how your unique paper cranes turned out.
