

Creating an origami elephant face is a delightful way to explore the ancient Japanese art of paper folding while crafting something truly unique and charming. Elephants, with their distinctive trunks and large ears, make for particularly satisfying origami subjects that capture the imagination of both children and adults. This comprehensive guide will walk you through each fold needed to create an adorable elephant face that’s perfect for beginners yet detailed enough to satisfy experienced folders.
Why Choose an Elephant for Your Origami Project?
Elephants are remarkable creatures that hold special significance across cultures worldwide. Their intelligence, memory, and family-oriented nature make them beloved subjects for art and craft projects. When translated into origami form, the elephant’s distinctive features—particularly its trunk and large ears—create a recognizable and charming paper creation that stands out among other animal designs.
The origami elephant face we’ll create together combines simplicity with character, requiring no cutting or gluing—just precise folding techniques that transform a single square of paper into a three-dimensional pachyderm portrait.
Materials You’ll Need
Before beginning your origami elephant face, gather these supplies:
- A square sheet of origami paper (gray is traditional for elephants, but any color works)
- A flat, clean surface for folding
- Patience and attention to detail
- Optional: A bone folder or ruler edge for creating crisp creases
- Optional: Fine-tipped markers for adding eyes and details
Step 1/2: Create Your Foundation Triangle
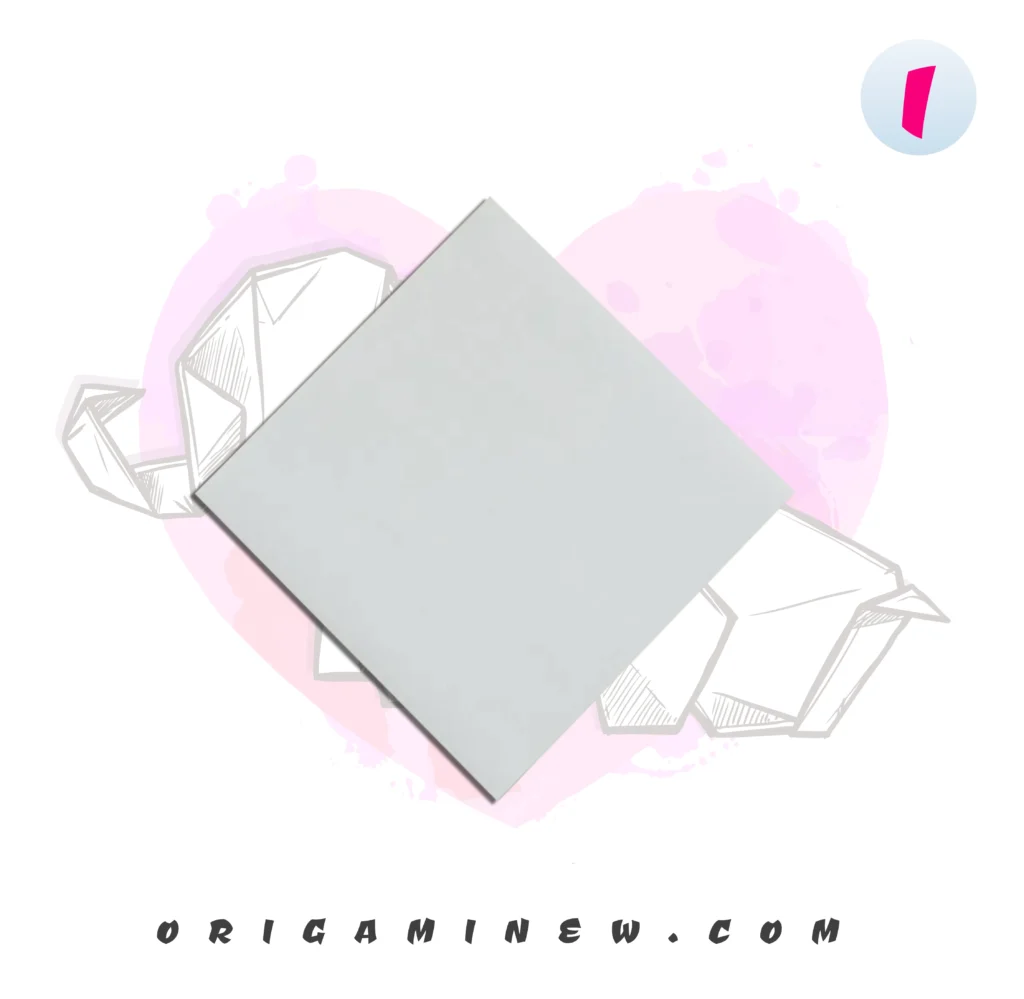
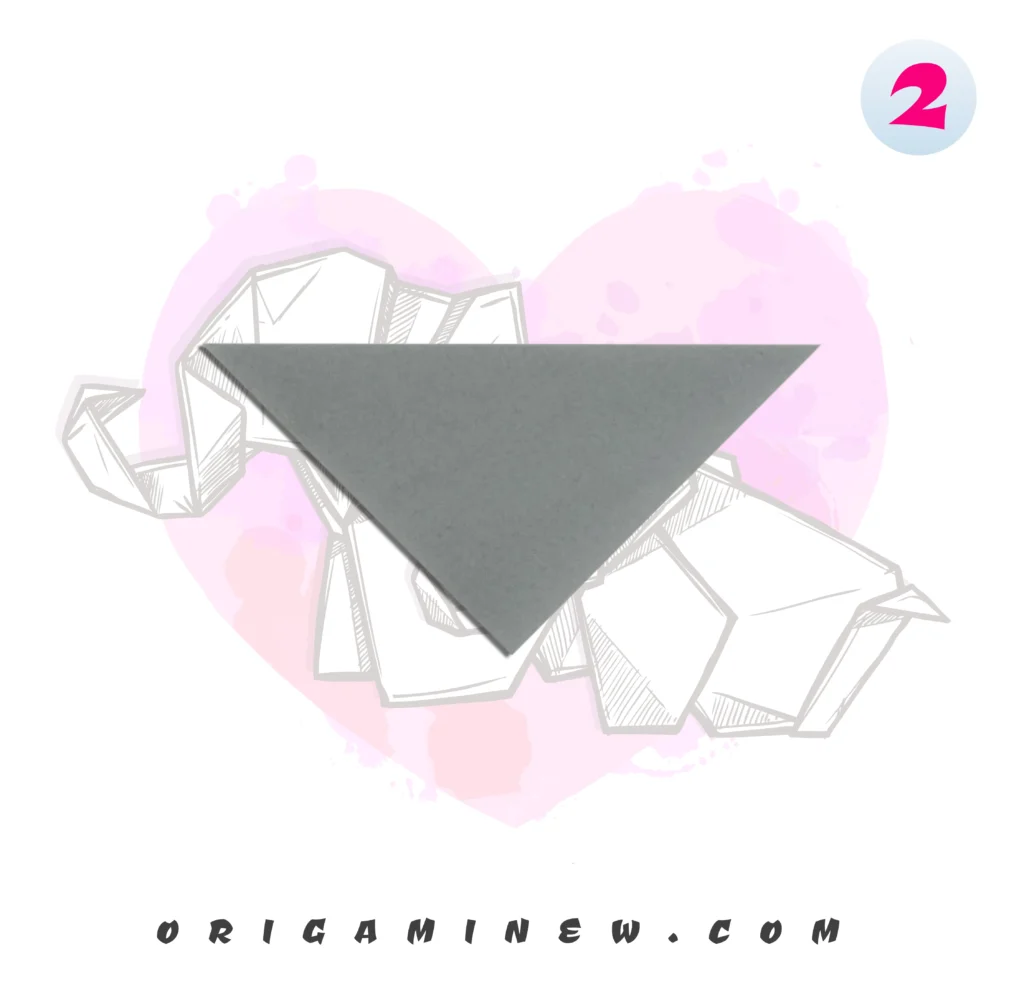
Start with the white side of your origami paper facing up. Fold the paper in half diagonally, bringing one corner to meet the opposite corner and forming a triangle. Press firmly along the crease to establish a sharp fold that will serve as your reference point for subsequent steps.
This initial diagonal fold is crucial as it establishes the symmetry that will define your elephant’s face. Take a moment to ensure the corners align precisely before creating your crease. A well-executed first fold makes all subsequent steps easier and more precise.
Step 3/4: Establish Your Center Line

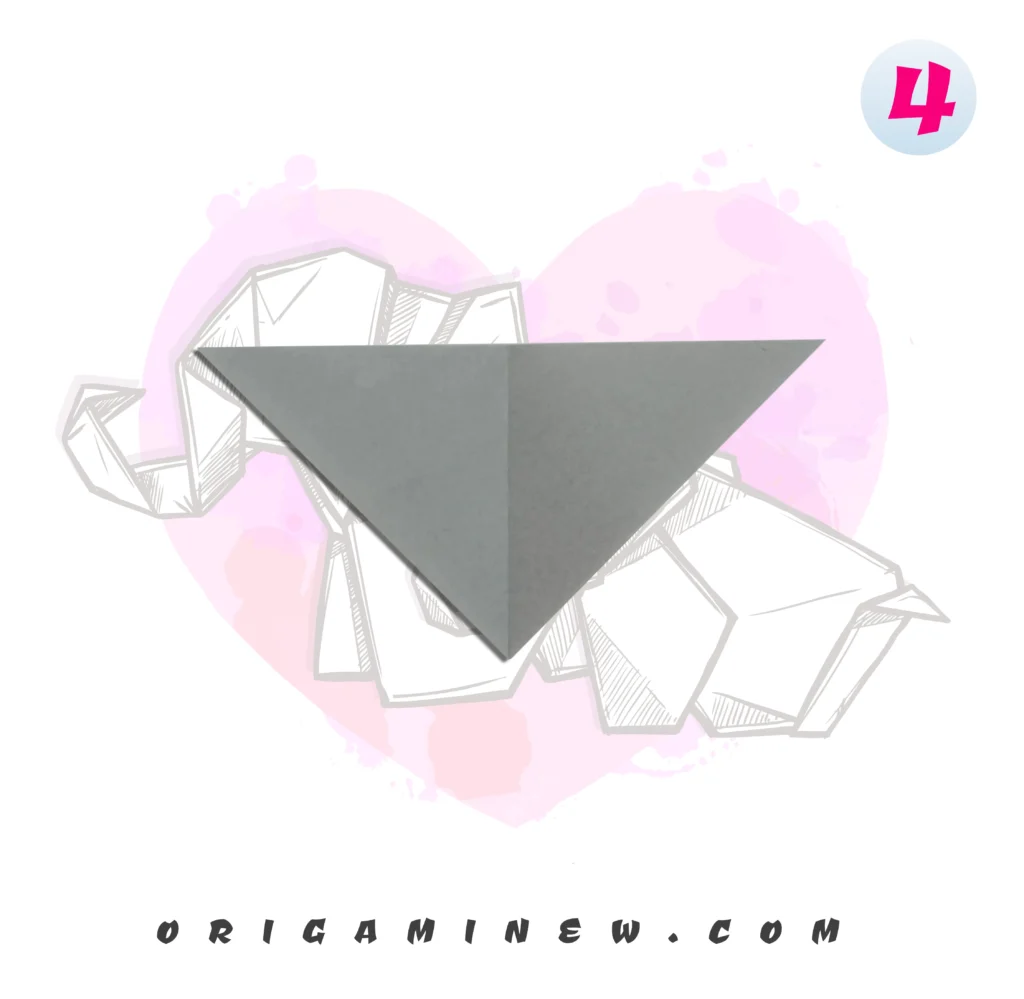
Take one point of your triangle and bring it over to the opposite side, creating a center crease along the middle of your triangle. Press along this fold to mark it clearly, then unfold the paper back to its triangular shape from Step 1.
This center crease serves as an important reference line for aligning later folds. Though you’ll unfold this crease immediately, the line remains visible and helps ensure symmetry throughout your creation—particularly important for an elephant’s balanced facial features.
Step 5/6: Create the Face Structure
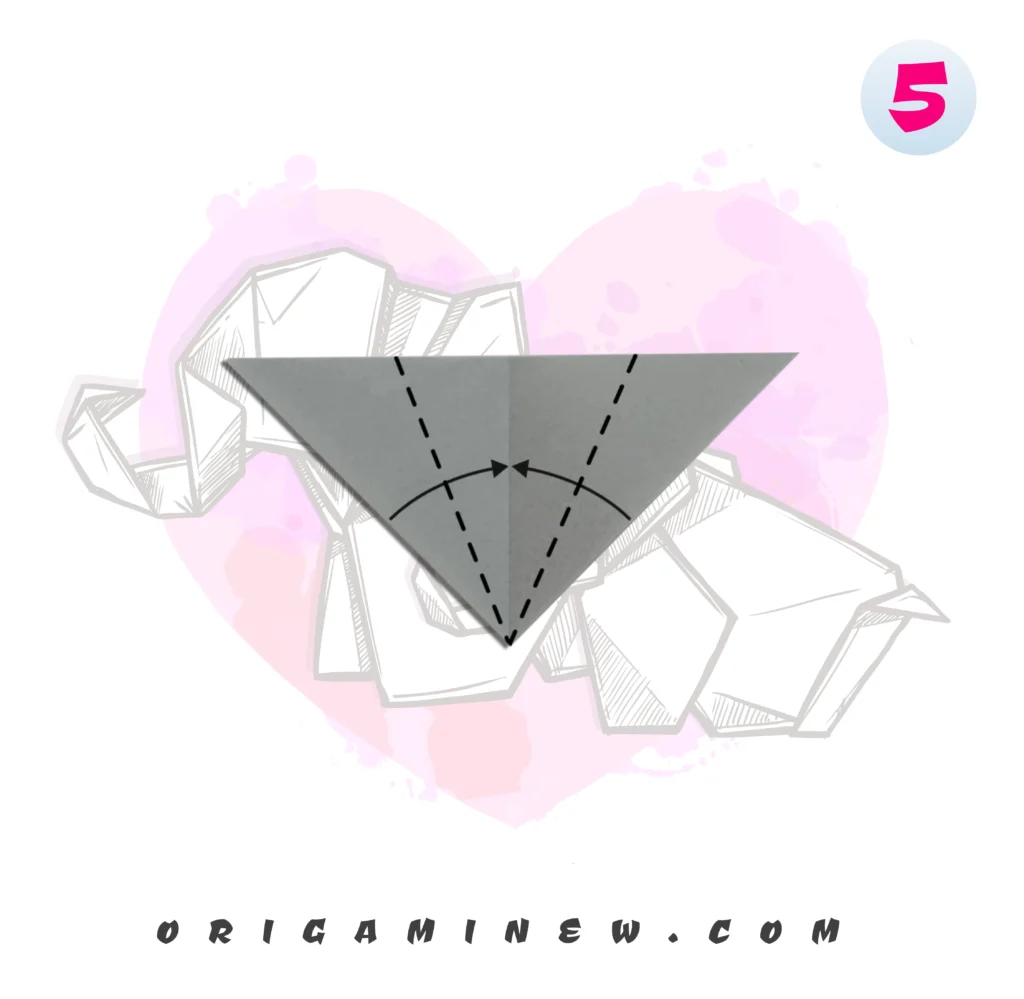

With your paper still in its triangular shape, take the right edge of the triangle and fold it inward to meet the center crease you established in Step 2. The fold should be parallel to the center line. After completing this fold on the right side, repeat the exact same fold on the left side.
These parallel folds begin establishing the dimensional structure of your elephant’s face. When completed correctly, your paper should now have a kite-like shape with a point at the top and bottom. The precision of these folds affects the symmetry of your finished elephant, so take your time to make them even.
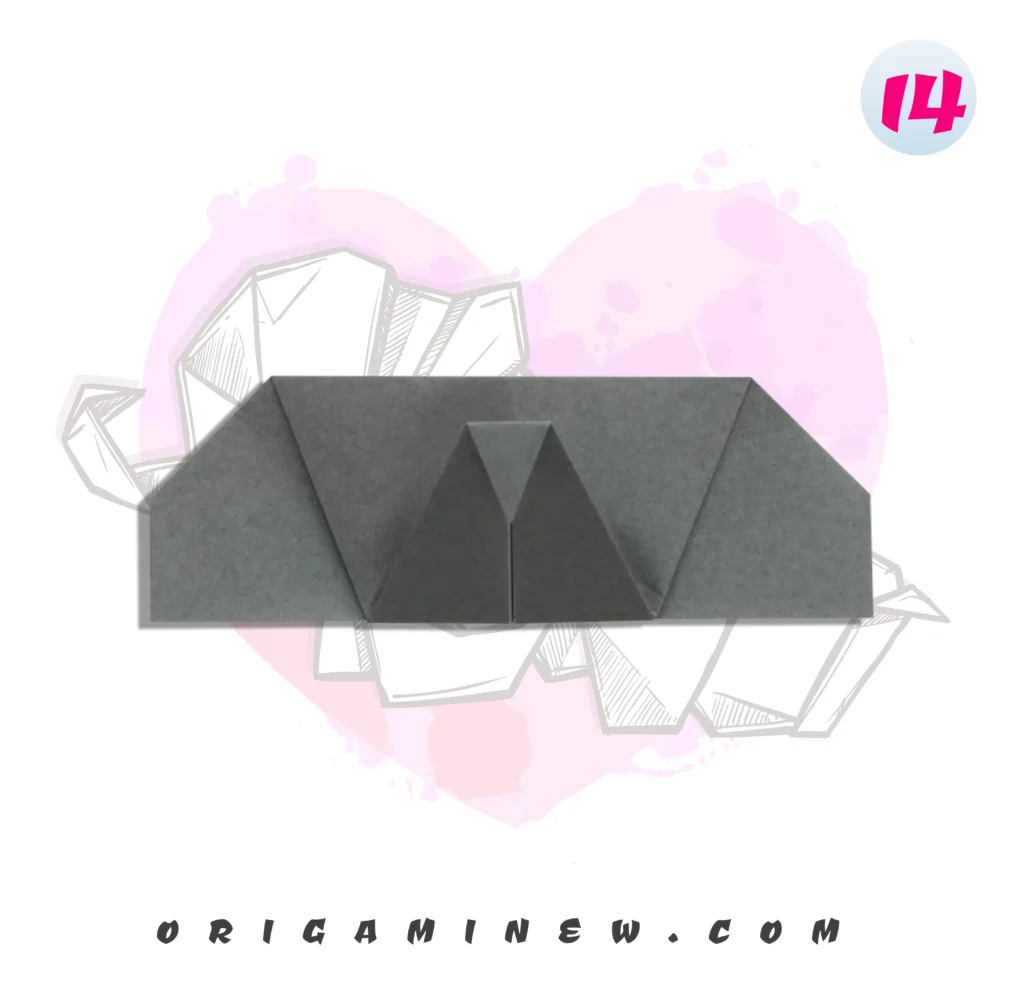
Step 7/8: Form the Foundational Ear Shapes

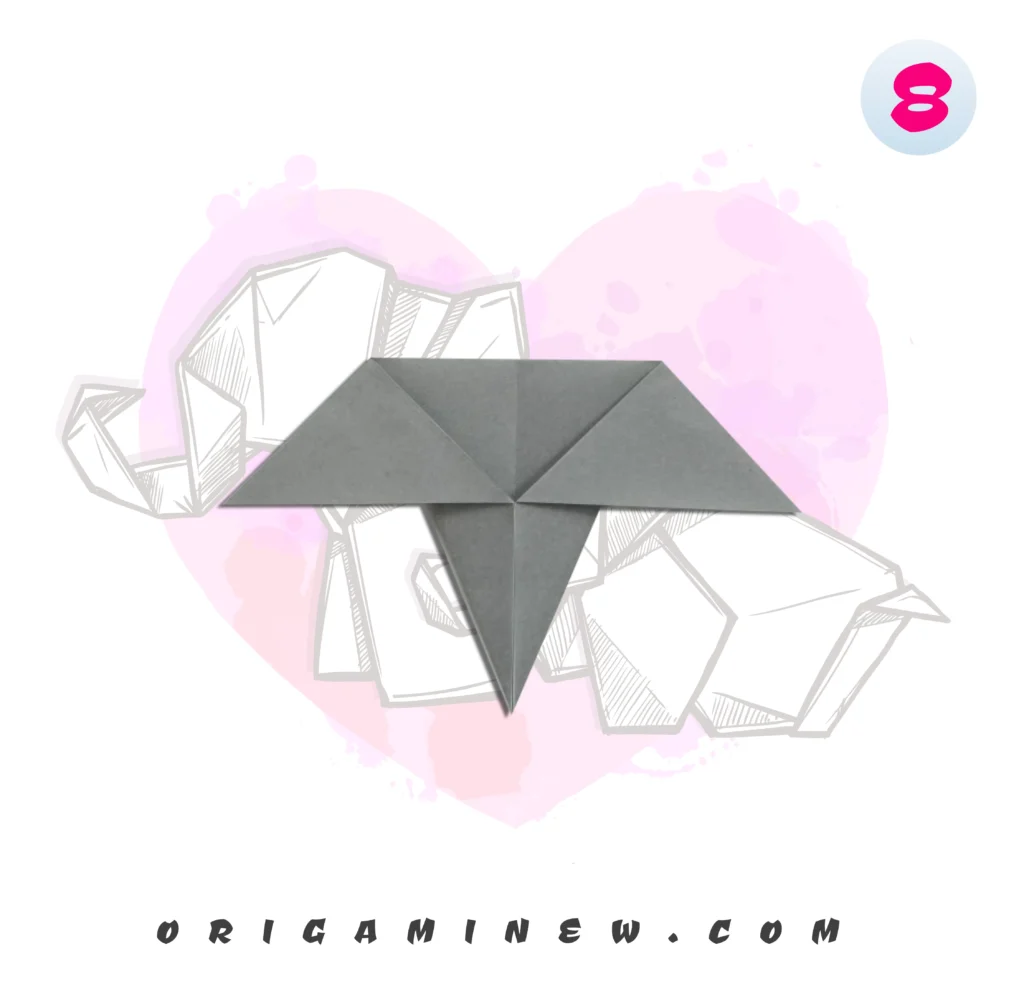
In this step, you’ll create the triangular shapes that will become your elephant’s distinctive ears. Starting with the right point as your base point, fold the right top point down diagonally to form a triangle. Make sure the bottom edge of this new triangle is parallel to the top edge of your paper. Once you’ve completed this fold on the right side, repeat the same fold on the left side.
When properly executed, these triangular folds create the foundation for the elephant’s large ears—one of its most recognizable features. Symmetry is particularly important here, as uneven ears will affect the overall balance of your elephant’s face.
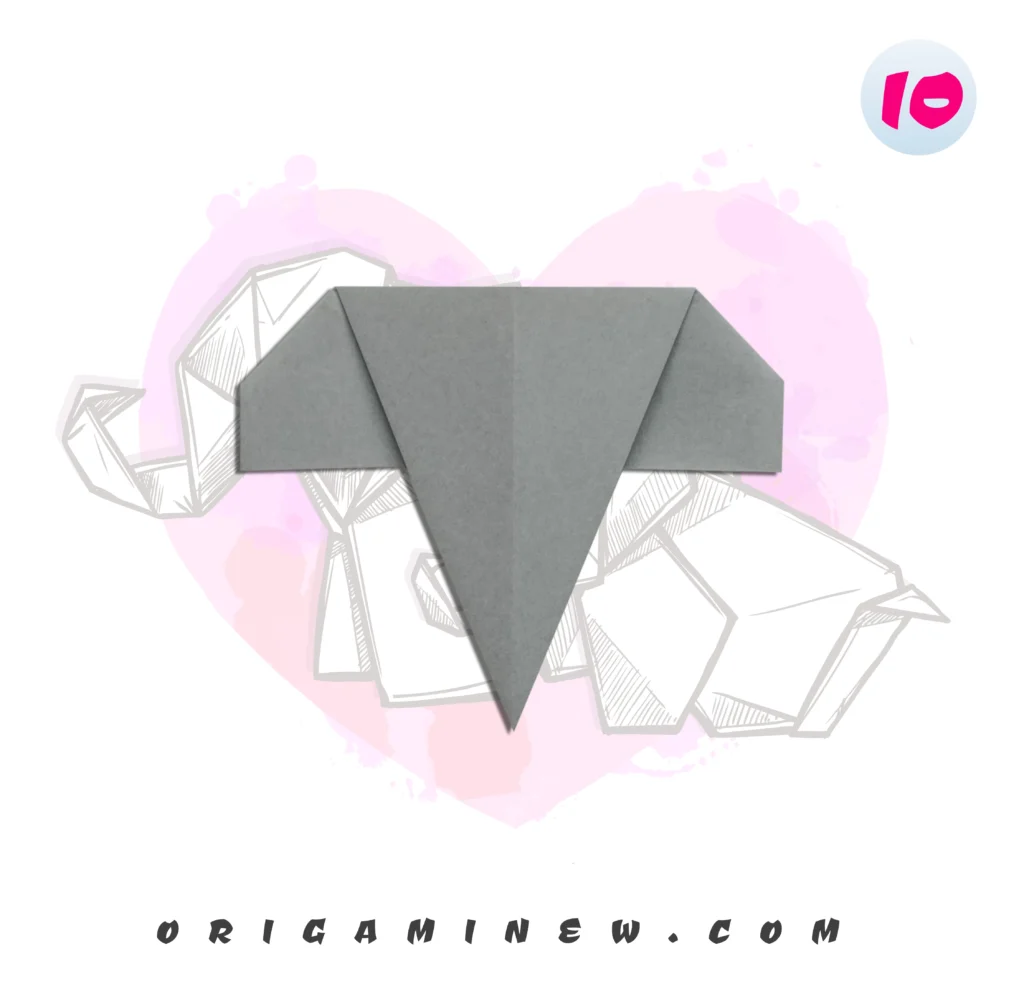
Step 9: Define the Ears

Now you’ll refine the elephant’s ears to give them more character. Take the right point of your shape and fold it diagonally toward the left, creating a slight angle that defines the elephant’s ear shape. The amount you fold determines how pronounced the ear will be—experiment with different angles to create your preferred style.
After completing this fold on the right side, repeat the same fold on the left point, ensuring both ears have similar angles and proportions. These ear folds add personality to your elephant face, with different angles creating different expressions—from alert and attentive to relaxed and gentle.
Step 10/11: Prepare to Create the Trunk
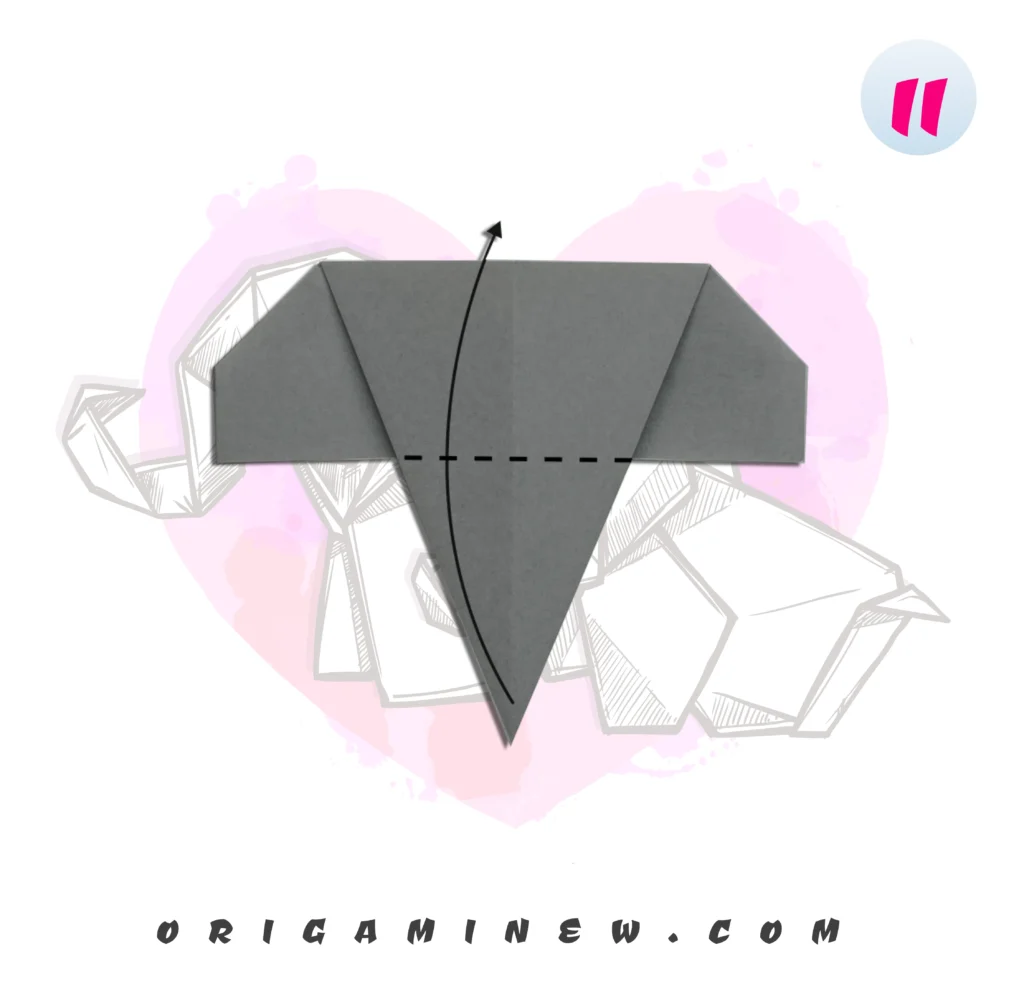
Flip your creation over completely. You should now be looking at what will become the back of your elephant’s face. This flip prepares you for creating the elephant’s most distinctive feature—its trunk.
The back side typically has fewer visible fold lines, giving you a cleaner surface to work with for the next series of folds. Position your paper with the point facing downward to prepare for the trunk-forming steps.
Step 12: Begin Forming the Trunk

Take the bottom point of your shape and fold it upward along an imaginary line that extends approximately one-third of the way up from the bottom. This fold creates the foundation for the elephant’s trunk.
The exact position of this fold affects the length and proportion of your elephant’s trunk. For a balanced look, aim for a fold that creates a trunk proportional to the face—typically about one-third to one-half the length of the entire face. This fold should be straight and perpendicular to the center line of your design.
Step 13/14: Shape the Trunk Base
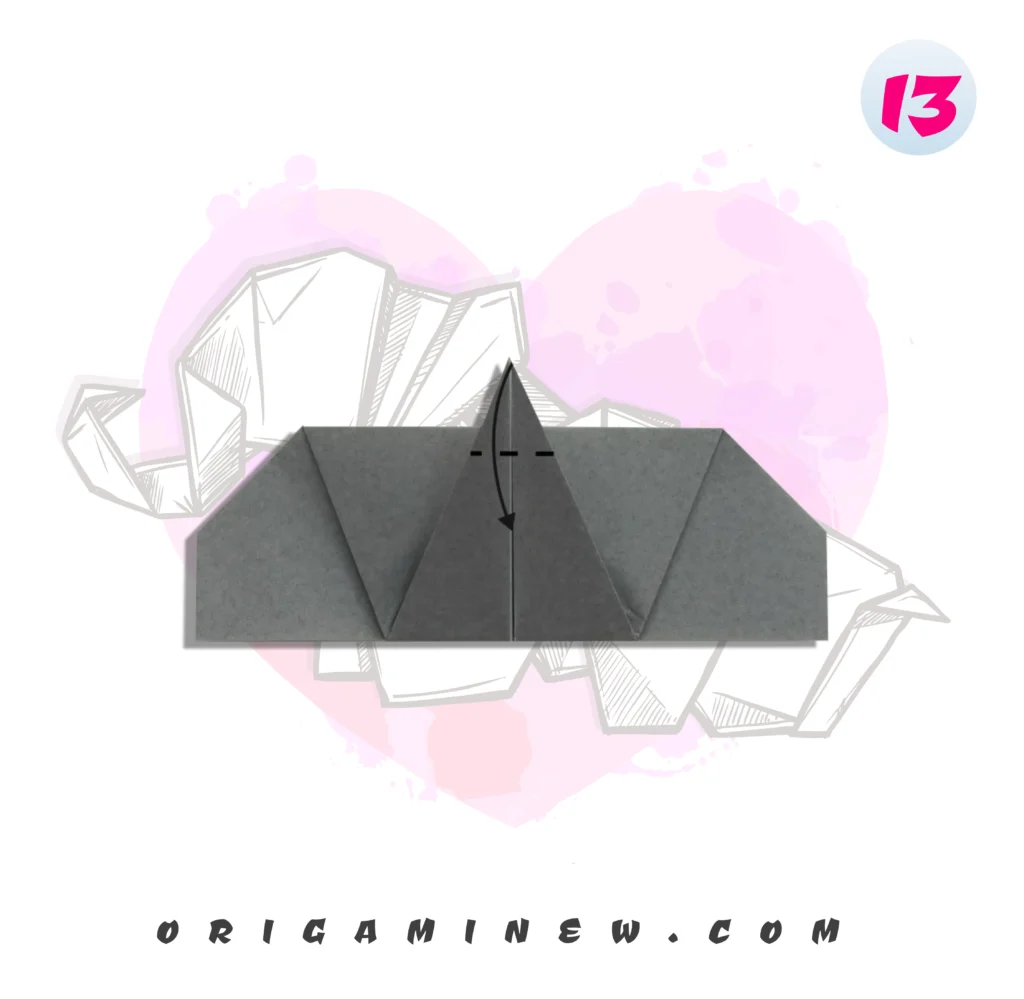
Next, take the point you just folded up and fold it back down slightly at a diagonal angle. This creates a more natural-looking trunk base rather than a straight projection. The angle of this fold determines how the trunk emerges from the face—a steeper angle creates a more dramatic trunk shape, while a gentler angle creates a more subtle profile.
This subtle fold adds significant character to your elephant, helping to create the illusion of three-dimensionality from flat paper. The trunk is the elephant’s most recognizable feature, so take your time with this fold to achieve the desired effect.
Step 15/16: Complete the Trunk

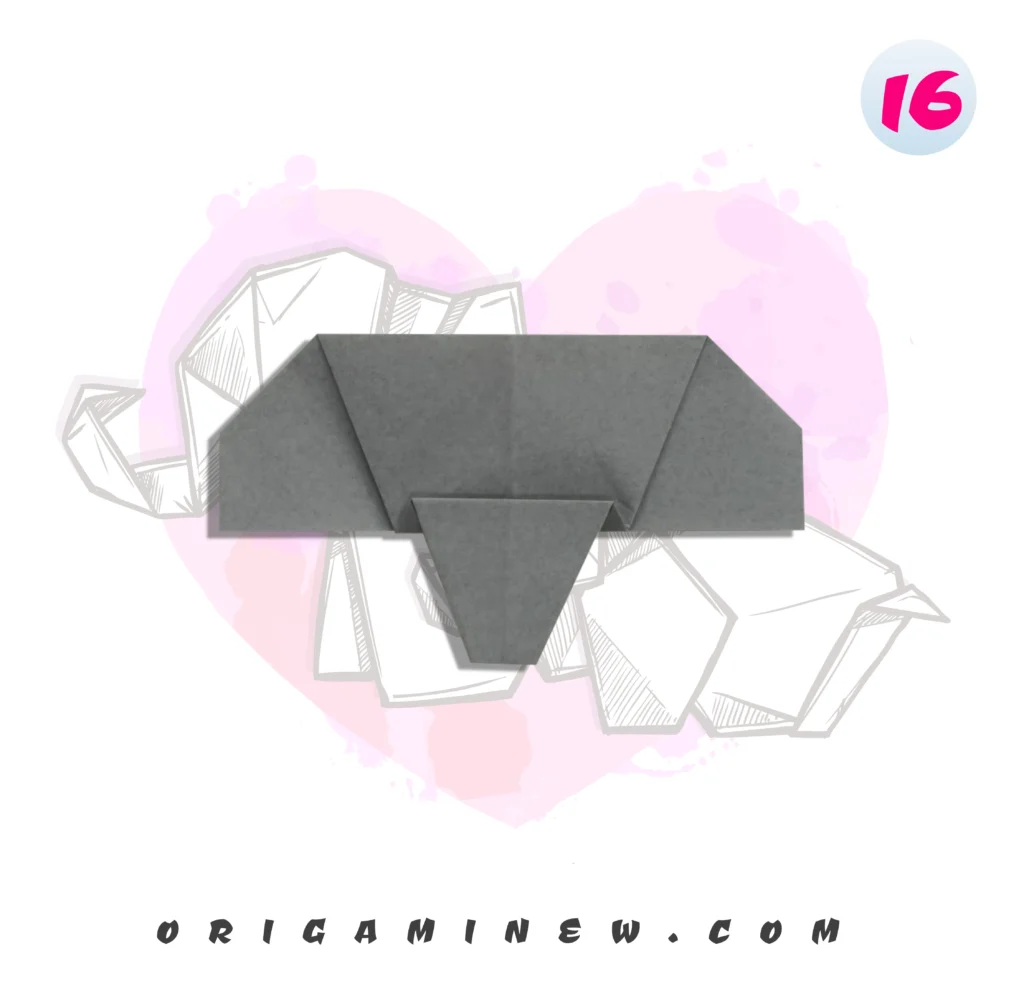
Now fold the top part of the trunk downward, at approximately three-quarters of the way down the existing trunk section. This final trunk fold determines the length of your elephant’s trunk. You can adjust this fold to create either a longer trunk (by folding less of the top section) or a shorter trunk (by folding more of the top section).
The flexibility in this step allows you to personalize your elephant—some folders prefer a long, elegant trunk while others enjoy a shorter, more compact design. Consider the overall proportions of your elephant face when deciding on trunk length, aiming for a balanced look.
Step 17: Add Personality with Details
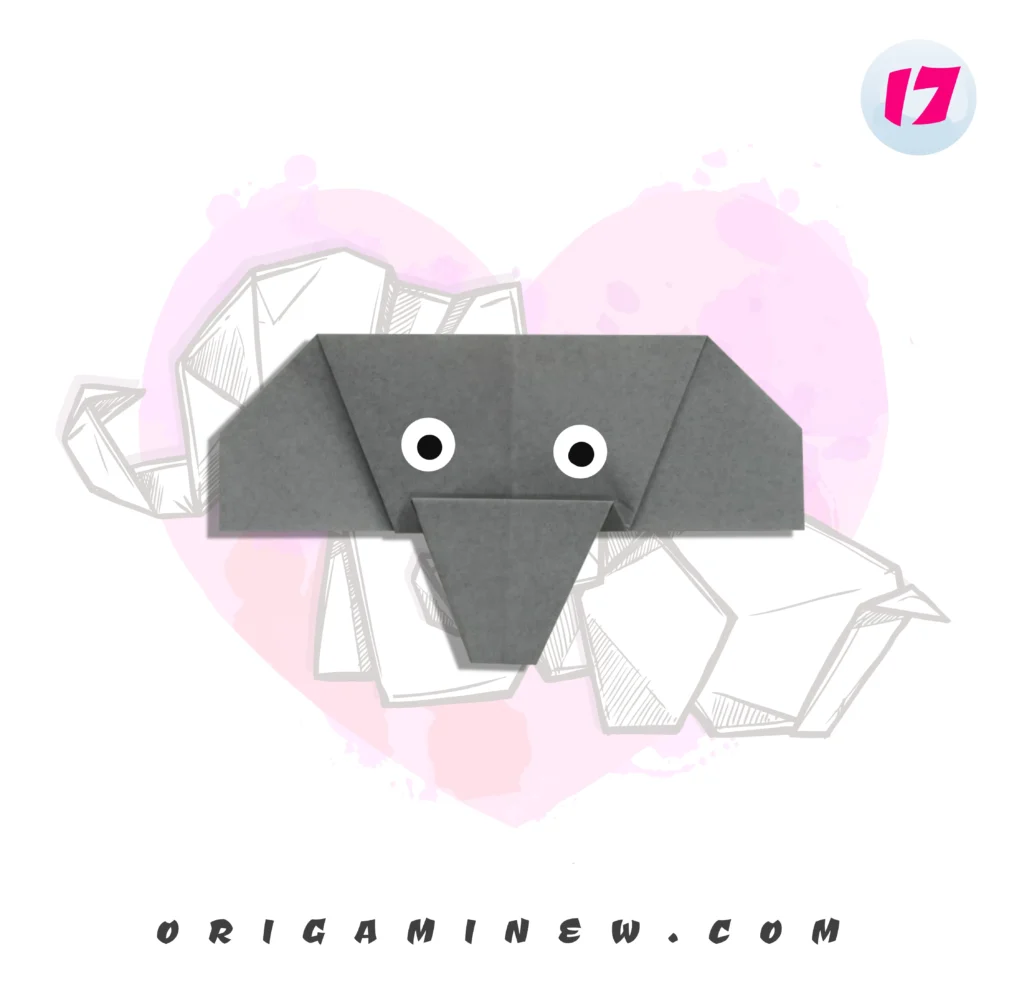
Your origami elephant face is now structurally complete! The final step involves adding the eyes to bring your elephant to life. Using a fine-tipped marker, draw two small eyes in the appropriate position on your elephant’s face—typically in the upper portion above where the trunk emerges.
The style of eyes you draw can dramatically change your elephant’s expression—round, wide eyes create a young, surprised look, while more almond-shaped eyes can give your elephant a wise, gentle appearance. Some folders also add additional details like wrinkles, texture lines on the trunk, or even small tusks for added realism.
Tips for Origami Success
- Create Sharp Creases: The precision of your folds significantly impacts the final result. Run your fingernail or a bone folder along each crease to ensure it’s sharp and well-defined.
- Work on a Clean Surface: Any dirt or debris on your workspace might transfer to your paper, affecting both appearance and folding.
- Be Patient with Symmetry: The charm of an elephant face comes from balanced features—take extra time to ensure ears and trunk are proportional.
- Use Appropriate Paper: While any square paper works, authentic origami paper with white on one side provides the best results due to its ideal weight and folding properties.
- Practice Makes Perfect: If your first elephant doesn’t meet your expectations, try again—each attempt improves your folding skills.
Displaying Your Origami Elephant Face
Once completed, your origami elephant face makes a charming decoration that can be displayed in various ways:
- Mount it on a colored background in a shadow box frame
- Attach it to greeting cards for a personal touch
- String several together to create a whimsical garland
- Use it as a bookmark or desk ornament
- Incorporate it into school projects about wildlife or conservation
For longer-lasting enjoyment, consider spraying your finished elephant face with a light coat of clear art fixative to protect it from dust and moisture.
Educational Value of Origami Elephants
Creating origami animals like elephant faces offers numerous developmental and educational benefits:
- Fine Motor Skills: The precise folding motions enhance dexterity and hand-eye coordination
- Spatial Reasoning: Transforming 2D paper into a 3D representation builds spatial thinking abilities
- Following Sequential Instructions: The step-by-step process develops logical thinking and attention to detail
- Geometry Concepts: Origami naturally incorporates principles of symmetry, angles, and proportions
- Focus and Patience: Completing intricate folds cultivates concentration and perseverance
These benefits make origami elephant faces an excellent activity for classrooms, homeschooling environments, or family craft sessions.
Cultural Significance of Elephants in Origami
Elephants hold special significance in many cultures worldwide, symbolizing wisdom, memory, and strength. In Japanese tradition, where origami originated, the elephant represents good fortune and longevity. Creating an origami elephant connects you to both this ancient art form and the cultural symbolism of these majestic creatures.
Many origami enthusiasts choose elephants as meaningful gifts to represent well wishes for wisdom and prosperity—making your origami elephant face not just a craft project, but a gesture of goodwill when shared with others.
Variations to Try
Once you’ve mastered the basic elephant face, consider these creative variations:
- Color Choices: Try different colored papers—gray for African elephants, lighter colors for Asian elephants, or vibrant colors for a whimsical approach
- Textured Paper: Lightly textured paper can create the impression of elephant skin
- Size Variations: Create tiny elephants with 3″ paper or impressive display pieces with 12″ squares
- Double-Sided Paper: Using paper with different colors on each side can create interesting contrasts in the final design
- Embellishments: Add decorative elements like sequins or glitter for festive elephant designs
Conclusion
Congratulations! By following these ten detailed steps, you’ve created a charming origami elephant face that captures the essence of these magnificent creatures. What began as a simple square of paper has transformed through your careful folding into a recognizable animal portrait with personality and dimension.
The beauty of origami lies in how it combines precision with creativity—the structured folding sequence provides guidance, while your personal touch in execution makes each creation uniquely yours. As you continue practicing this design, you’ll likely develop your own style and preferred proportions for creating the perfect elephant face.
We hope this guide has made creating an origami elephant face both accessible and enjoyable. Remember that the journey of mastering origami is as rewarding as the finished creations. Happy folding!
Resources for Origami Enthusiasts
- Origami USA – The premier resource for origami practitioners in America
- International Origami Center – Offering global perspectives on paper folding techniques
- The Origami Resource Center – Extensive collection of free diagrams and tutorials
- World Wildlife Fund Elephant Conservation – Learn about real elephants and conservation efforts
Remember that each fold brings you closer to origami mastery. Enjoy the process of creating your paper elephant!