

Creating an Origami frog face is a delightful way to explore the art of paper folding while crafting something that’s both charming and full of character. This traditional Japanese art form transforms a simple sheet of paper into a three-dimensional representation of one of nature’s most fascinating creatures. In this comprehensive guide, we’ll walk through each fold needed to create an adorable frog face that’s perfect for beginners and experienced folders alike.
Materials You’ll Need
Before we dive into folding our amphibian friend, gather these supplies:
- A square sheet of origami paper (green on one side is ideal for a frog)
- A flat, clean surface for folding
- Patience and attention to detail
- Optional: Scissors for minor trimming
- Optional: Paintbrush and watercolors or markers for decorating
Why Origami Frogs Are Worth Making
Frog origami designs are particularly popular because they combine simplicity with character. Unlike some origami that serves purely decorative purposes, frog designs often include functional elements—many can hop, some can hold small items, and all make excellent conversation pieces. The frog face we’ll be creating today focuses on capturing the expressive charm of these pond-dwelling creatures.
Now, let’s hop into the folding process!
Step 1/2: Create Your Foundation Creases (Horizontal)


Start with the green side of your origami paper facing up. Fold the paper in half horizontally, bringing the bottom edge up to meet the top edge. Press firmly along the crease to establish a sharp fold. Then unfold the paper, returning it to its original square shape while maintaining a visible crease down the middle.
This initial fold establishes your horizontal center line—an important reference point for later steps. The quality of your creases throughout this project will significantly impact your final result, so take your time to make each one precise and sharp.
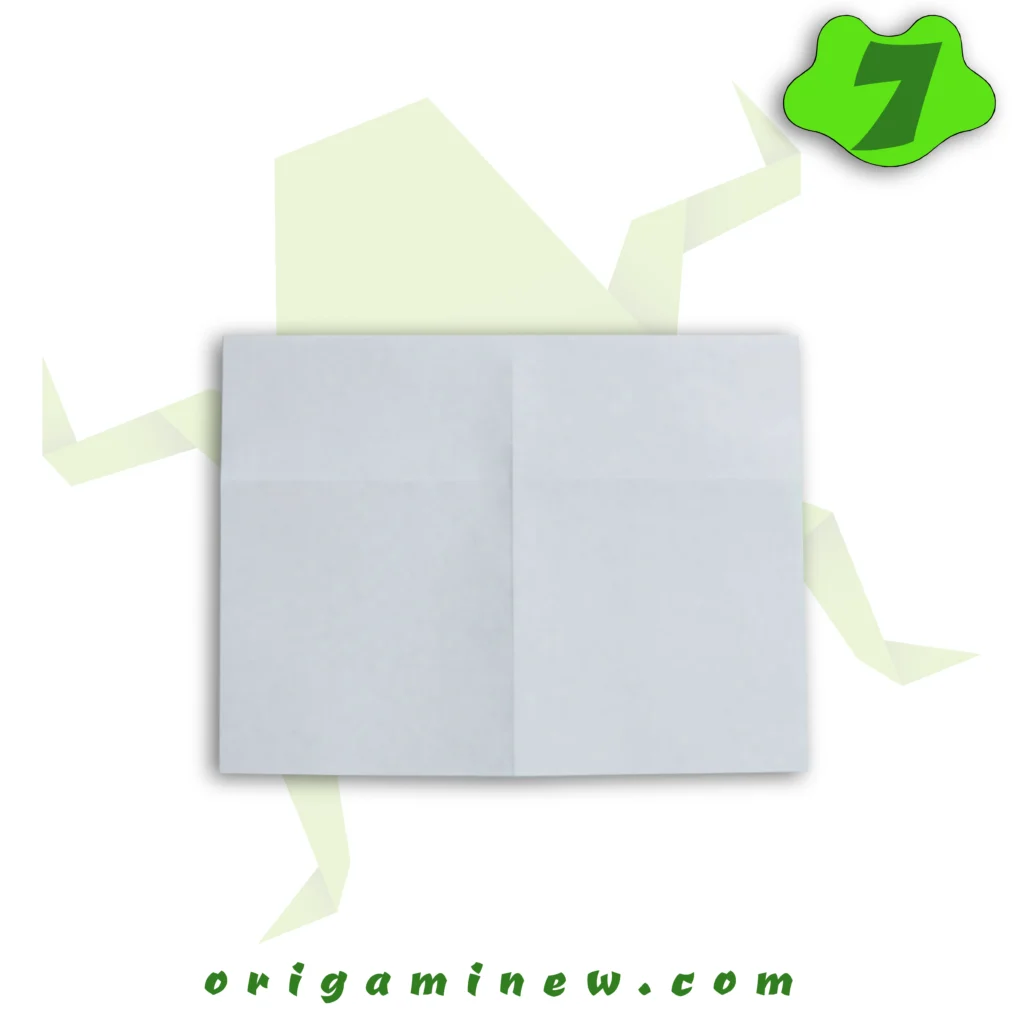
Step 3/4: Add Vertical Center Crease
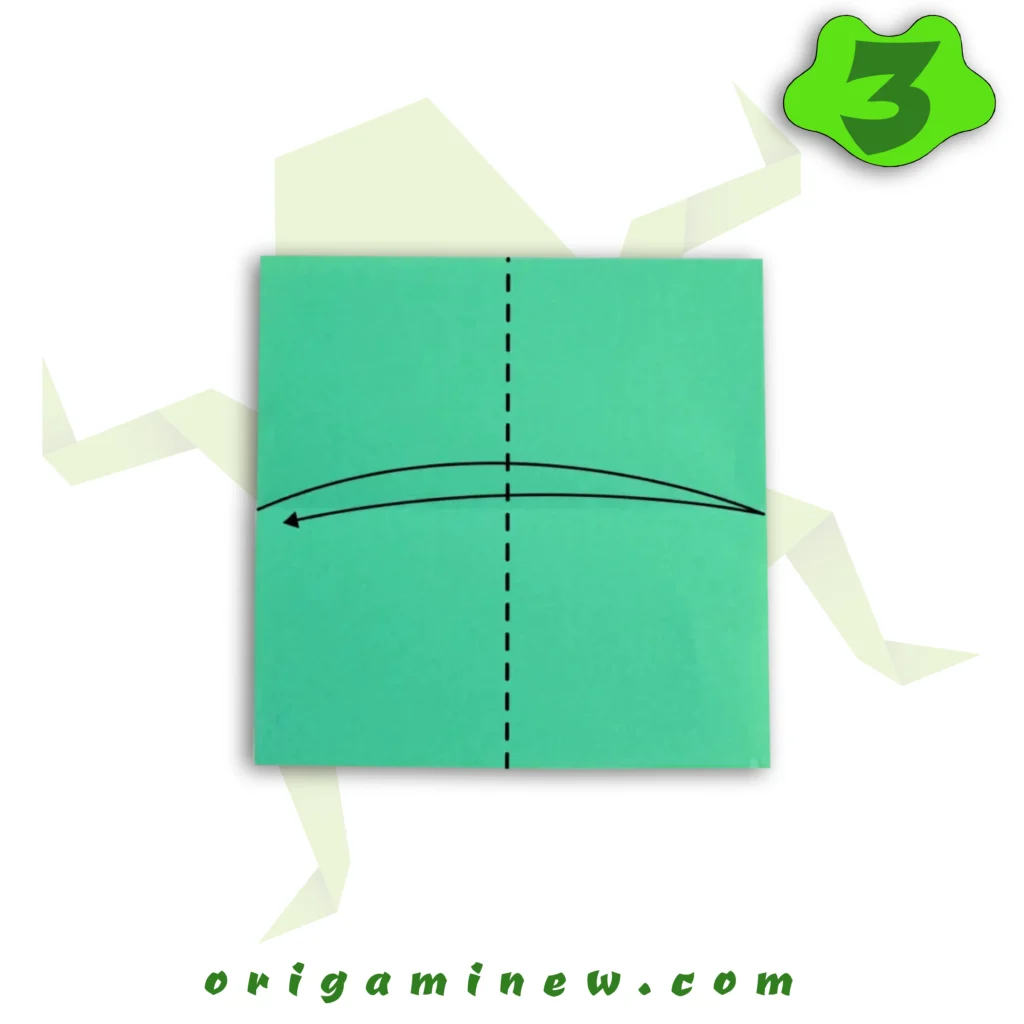
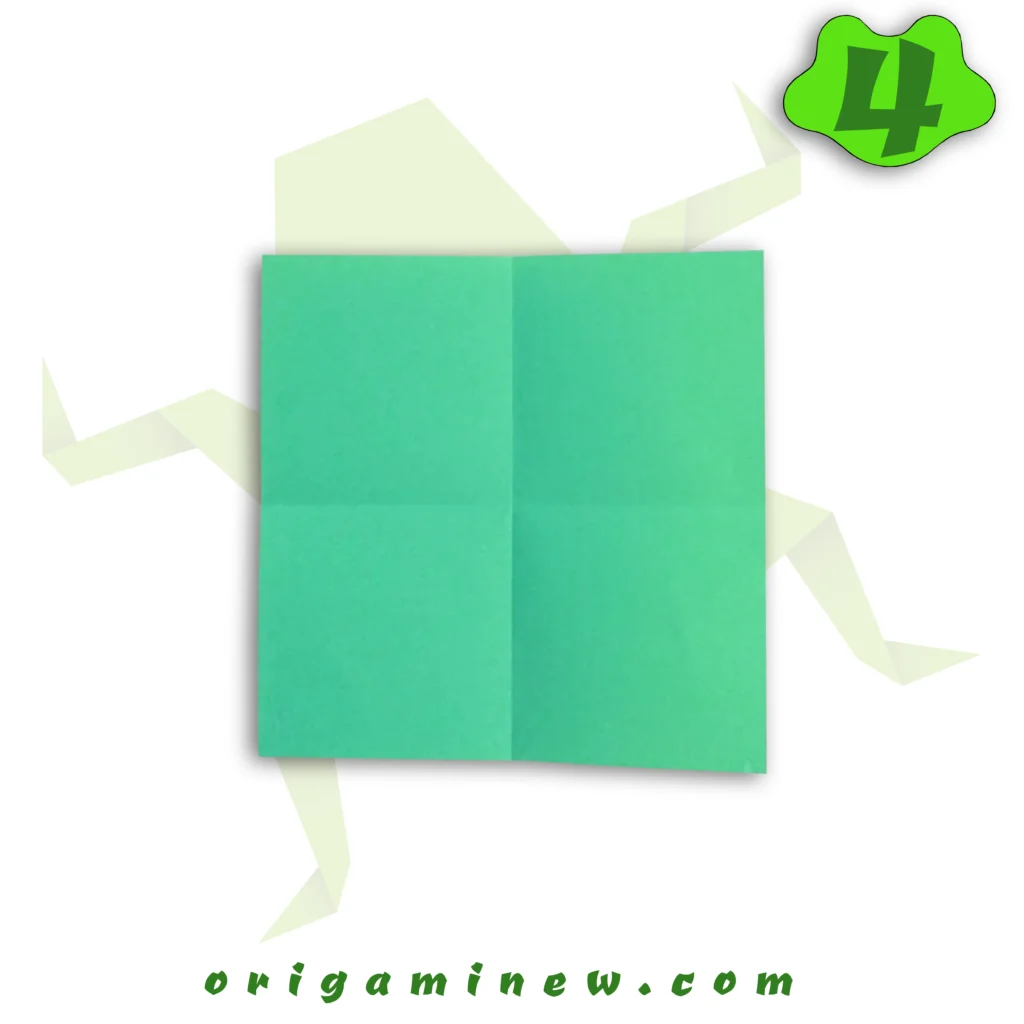
Next, fold your paper in half vertically, bringing the right edge over to align with the left edge. Again, crease thoroughly before unfolding. Your paper should now display both horizontal and vertical center creases, dividing it into four equal quarters.
These perpendicular creases create a map for all subsequent folds. Think of them as the blueprint for your frog’s face structure.
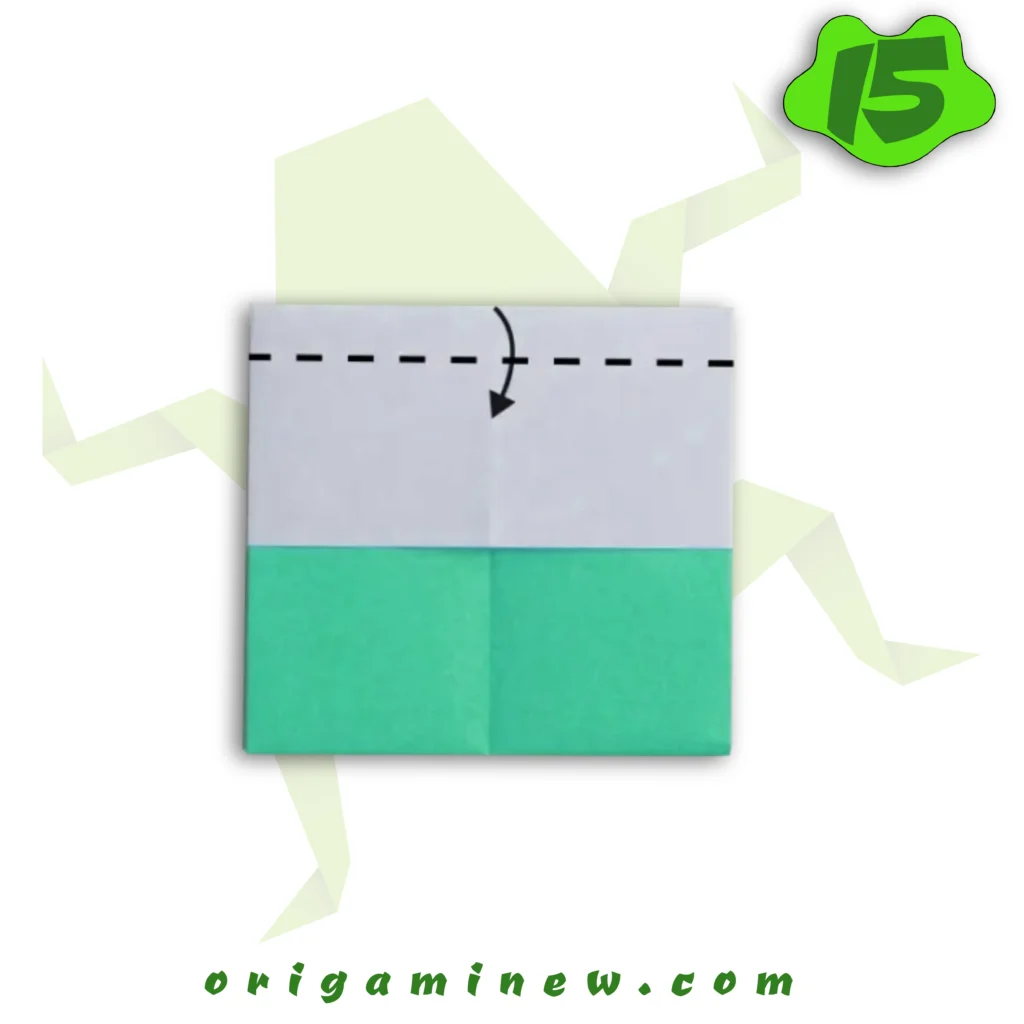
Step 5/6: Form the Top Section
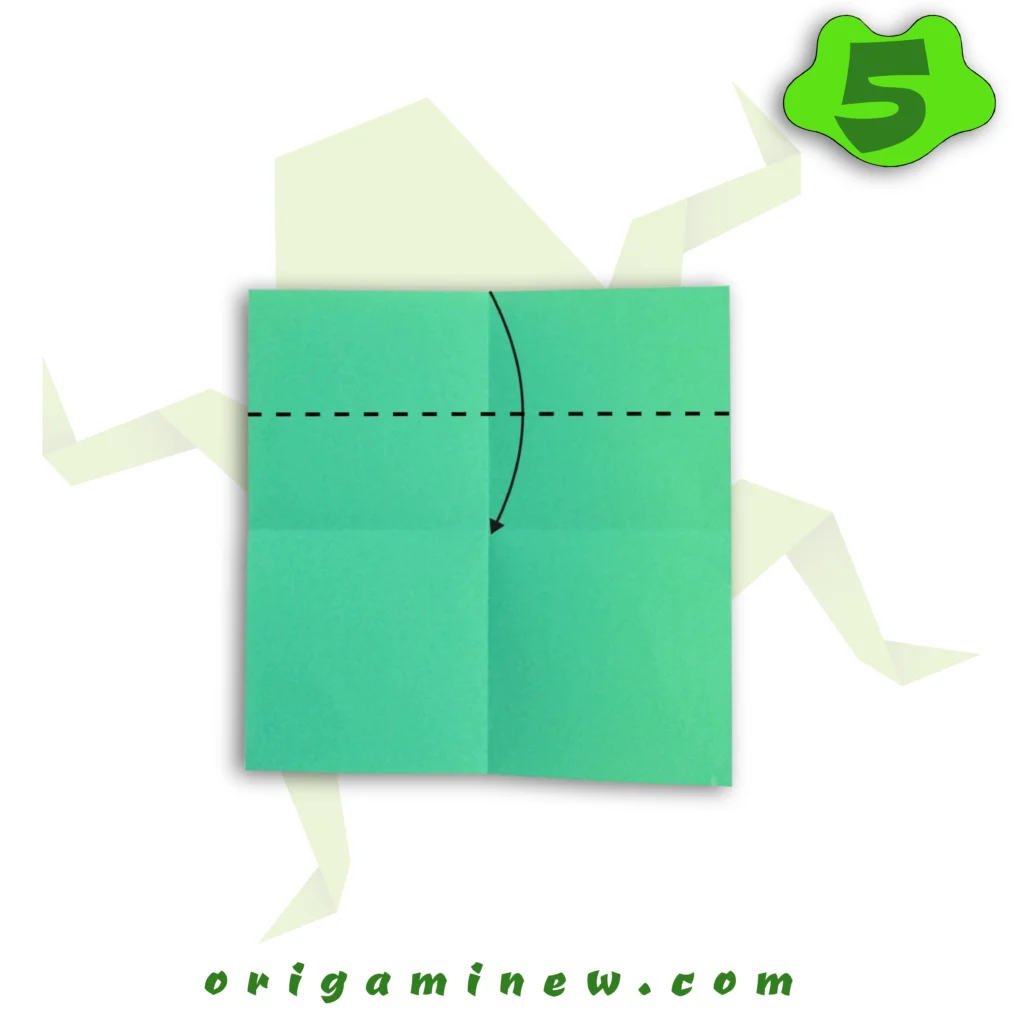
Fold the top edge of your paper down to meet the horizontal center crease you created in Step 1. This fold will begin establishing the proportions of your frog’s face. Crease this fold firmly—it creates the foundation for your frog’s eyes and head structure.
The precision of this fold affects the symmetry of your finished frog, so take care to align the edge perfectly with the center crease.
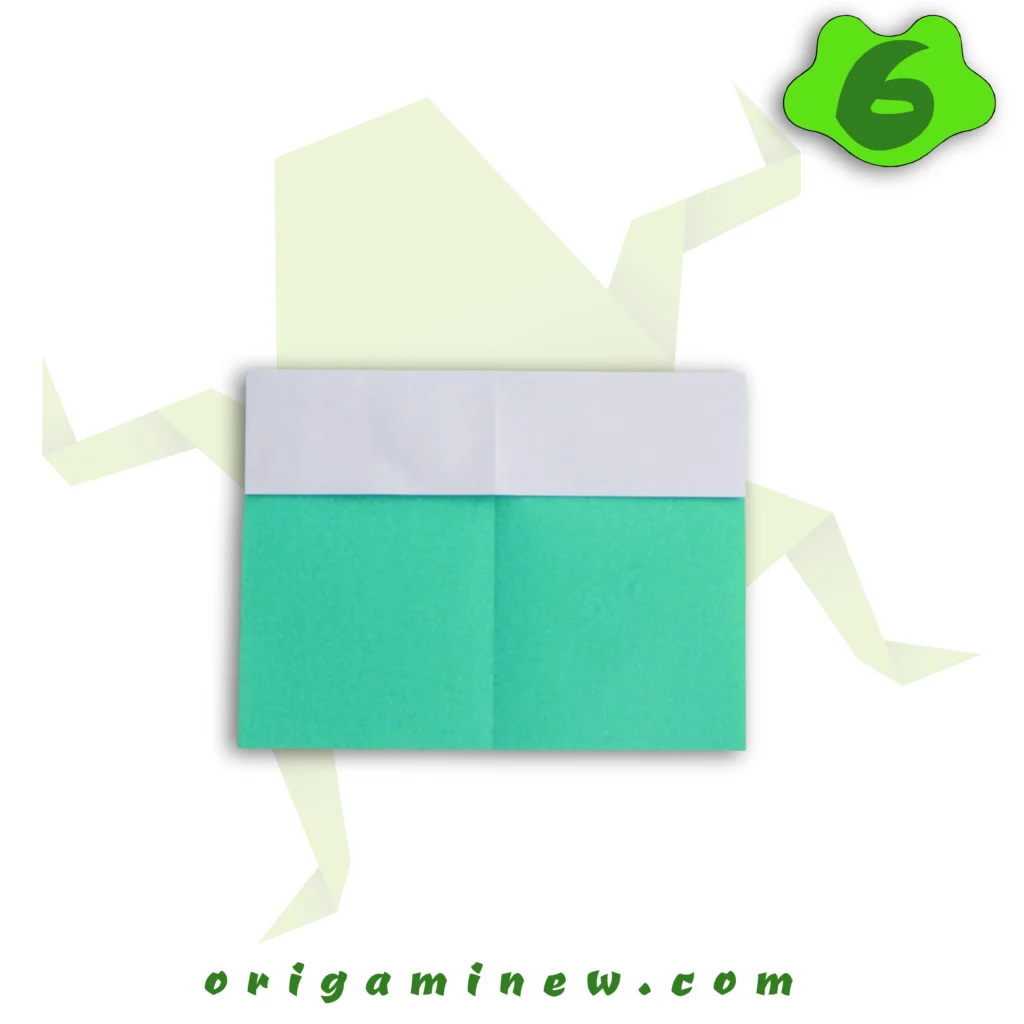
Step 7: Flip and Prepare
Flip your partially-folded paper over completely. You should now be looking at the opposite side of the paper (likely white if you’re using traditional origami paper). This flip prepares you for the next series of folds that will build the facial structure.
Flipping between sides is a common technique in origami that allows for more complex structures to develop. Keep track of which side you’re working on throughout the process.
Step 8/9: Create Side Sections

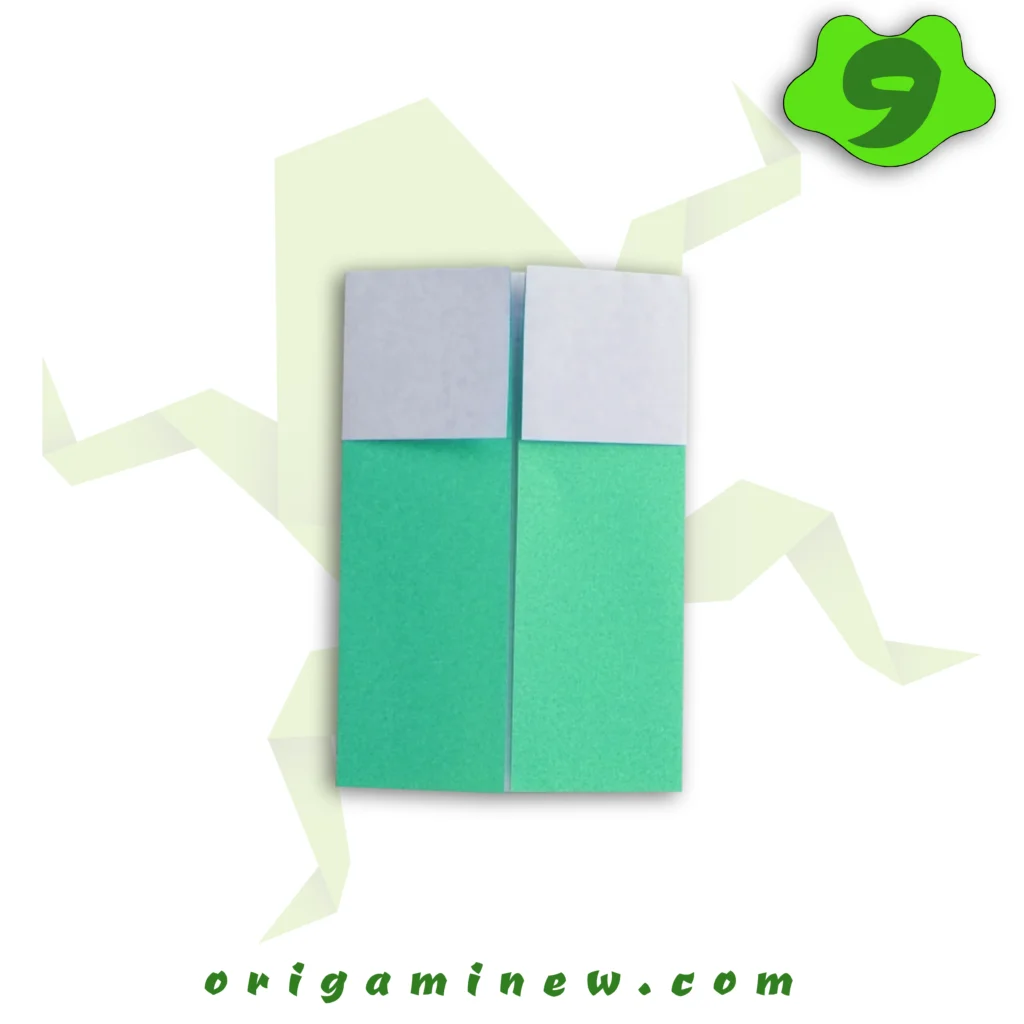
Fold both the left and right edges of your paper inward to meet at the vertical center crease. These folds should be made with precision, creating two panels that meet exactly at the middle line.
These side folds begin forming the three-dimensional aspects of your frog’s face. They create layers that will eventually become the distinctive features of your amphibian friend.
Step10/11: Form the Bottom Support Structure
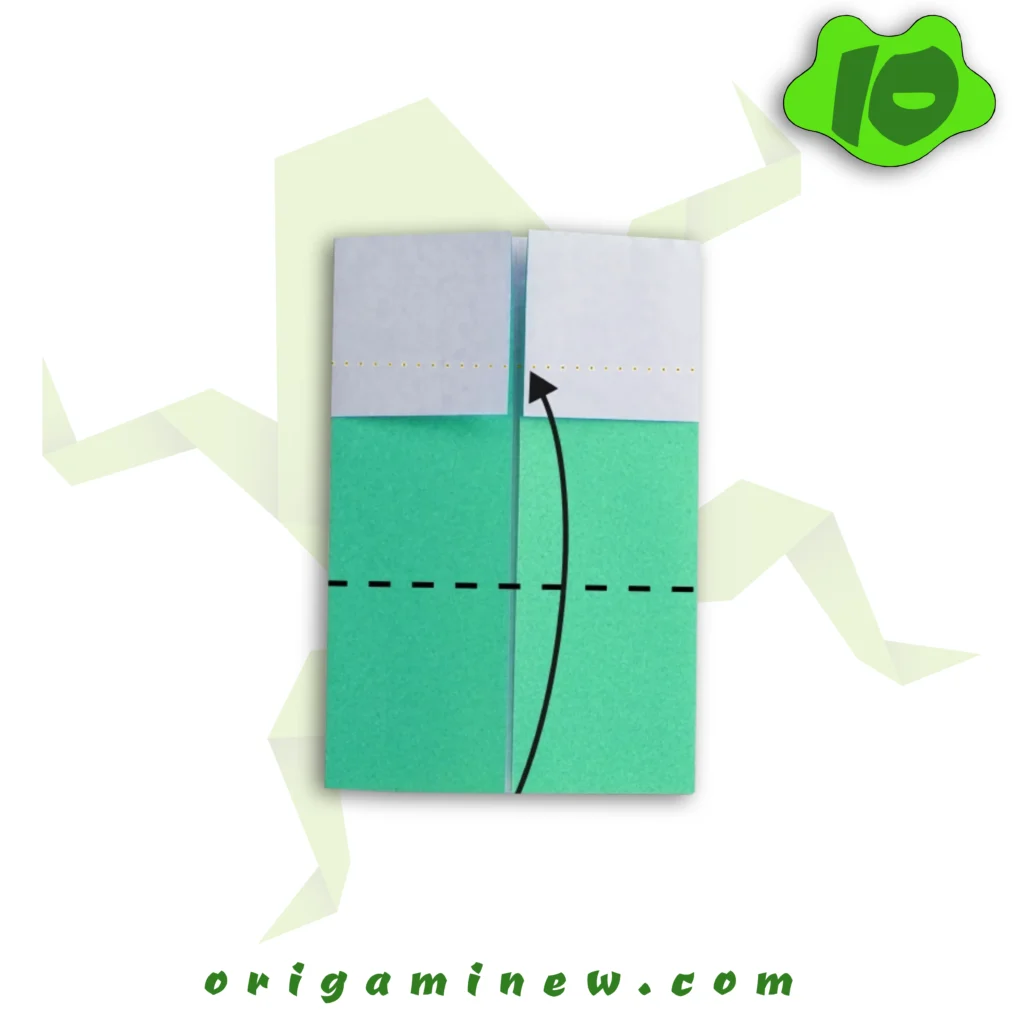
Fold the bottom edge of your paper upward along the implied line where the white part begins. Make sure this fold encompasses the white portion completely. This creates a supportive base for your frog face structure.
This fold provides stability to your design while establishing the lower boundary of your frog’s face. The exact position may vary slightly depending on your previous folds, so use your judgment to create an aesthetically pleasing proportion.
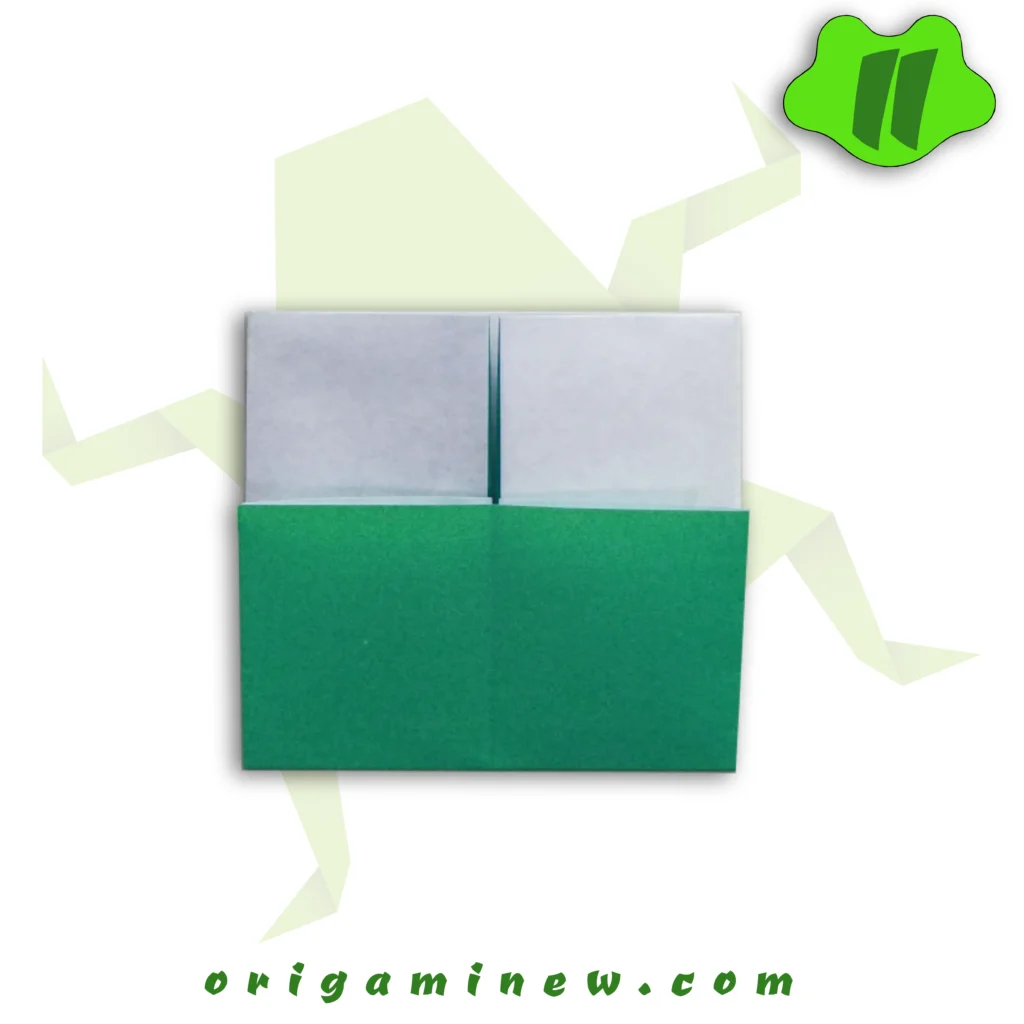
Step 12/13: Create the Side Pockets


Now comes a slightly more complex step: Open the left and right white squares by lifting the top layer. Take the green rectangle you just created in Step 6 and tuck it under these white squares, then press flat.
This creates small pockets on each side and begins giving three-dimensional structure to your frog’s face. This folding technique, known as an “inside reverse fold,” is common in intermediate origami and adds significant character to your design.
Step 14/15: Reorient Your Work

Flip your creation over again. You should now begin to see your frog face taking shape, with the foundation established for the eyes and mouth.
This flip prepares you for the detailed work on the facial features that will truly bring your frog to life.
Step 16: Create Eye Structures

Fold the top edge down slightly along the natural line that has formed. Then, lift the two top layers to open the corners, finally flattening them to create small triangular flaps. These will become the base for your frog’s protruding eyes.
The amount you fold down in this step affects how prominent your frog’s eyes will appear, so adjust according to your aesthetic preference.
Step 17/18: Refine the Eye Area


Fold the two small corners in the middle of the top section diagonally inward. This creates definition between the eyes and adds character to your frog’s face.
These small folds make a significant difference in the expressiveness of your finished piece. The angle of these folds can be adjusted to create different “expressions” for your frog.
Step 19: Trim for Definition

Using scissors, carefully cut a small portion from both sides of the green rectangle along the bottom edge of the white section. This trimming helps define the mouth area and creates a more realistic frog face shape.
Be cautious with this step—cut just enough to create definition without compromising the structural integrity of your design. Small, precise cuts are better than large ones.
Step 20: Shape the Cheeks
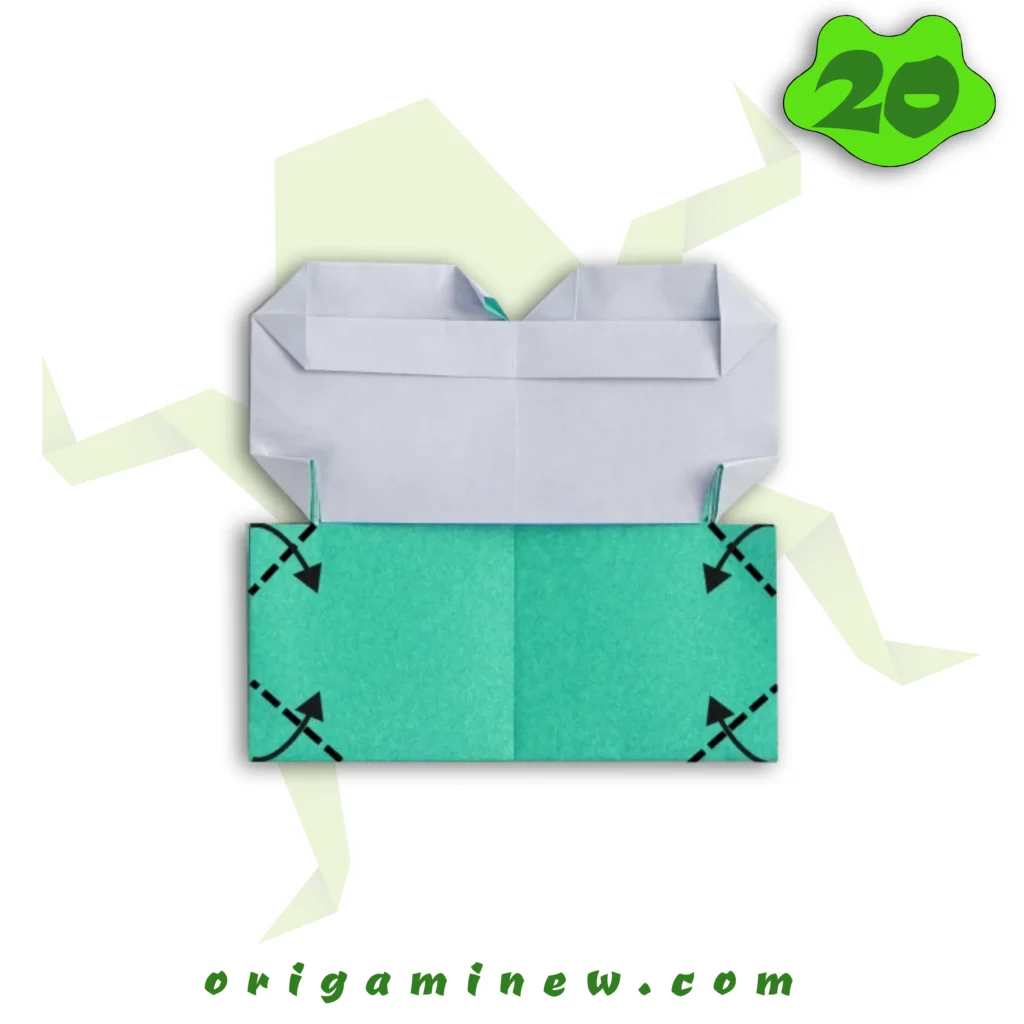
Fold the bottom left and right corners of the white section upward diagonally. These small folds create the “cheek” areas of your frog, adding dimension to the face.
The angle and size of these folds affect your frog’s expression—experiment with different positions to create various looks from cheerful to contemplative.
Step 21: Define the Face Shape

Fold all four corners of the green rectangle slightly toward the center. This crucial step helps form the distinctive rounded shape of the frog’s face and prepares the surface for decorative elements.
These folds should be subtle—just enough to create a gentle curvature that mimics a real frog’s facial structure.
Step 22: Prepare for Final Details

Flip your creation over once more. You’re now looking at what will become the most expressive part of your origami frog face.
This final flip positions your work for the last few touches that will bring your frog face to completion.
Step 23/24: Create Rounded Eyes


Fold the two middle corners backward slightly. This creates more rounded, three-dimensional eyes that give your frog its characteristic alert expression.
The depth of these folds determines how prominent your frog’s eyes appear—deeper folds create more protruding eyes for a more dramatic look.
Step 25: Add Personality with Paint

Now for the truly creative part! Use your paintbrush and colors to add eyes, a mouth, and any other expressive details you’d like. Traditional frog faces include large circular eyes with darker pupils, a wide mouth, and perhaps spots or texture details.
While the folded structure creates the shape, your artistic touches bring personality to your creation. Consider researching real frogs for inspiration on patterns and coloration.
Tips for Origami Success
- Press Each Crease: The sharpness of your creases significantly impacts your final result.
- Work on a Clean Surface: Any dirt or oils can transfer to your paper and affect both appearance and folding.
- Be Patient: Some steps may require multiple attempts before achieving the desired result.
- Use Proper Paper: While you can create this with any paper, traditional origami paper with color on one side yields the best results.
- Practice Precision: Alignment matters in origami—take your time with each fold.
Educational Benefits of Origami
Creating origami frogs isn’t just fun—it’s educational too! Paper folding enhances:
- Fine motor skills
- Spatial reasoning
- Following sequential instructions
- Patience and concentration
- Understanding of basic geometry concepts
These benefits make origami frog faces an excellent activity for classrooms, family craft time, or rainy day entertainment.
Displaying Your Origami Frog Face
Once completed, your origami frog face makes a delightful decoration. Consider:
- Mounting it in a shadow box frame
- Attaching it to greeting cards
- Using it as a bookmark
- Creating a collection of differently colored frogs
- Adding it to a nature-themed mobile
Conclusion
Congratulations! By following these sixteen detailed steps, you’ve created a charming origami frog face with personality and character. What began as a simple square of paper has transformed through your careful folding into a delightful amphibian friend.
The beauty of origami lies in its blend of precision and creativity—while the folding sequence is specific, your personal touches in execution and decoration make each creation unique. As you practice this design, you’ll develop your own style and perhaps even create variations that reflect your artistic vision.
We hope this guide has made creating an origami frog face both accessible and enjoyable. Remember, the key to origami mastery is practice and patience. Happy folding!
Helpful Resources
- Origami Resource Center – For additional frog designs and paper folding techniques
- International Origami Society – For connecting with other origami enthusiasts
- The Origami Bookshelf – For recommended books on amphibian-themed paper folding
- Museum of Natural History Amphibian Collection – For inspiration from real frogs
Remember that each fold brings you closer to mastery, and even professional origami artists began with simple designs. Enjoy the journey of creating your paper frog!