
Introduction
Origami, the ancient Japanese art of paper folding, has captivated people around the world for generations. Among the many delightful creations you can make, the classic origami hat stands out as one of the most practical and enjoyable projects for beginners and experienced folders alike. Whether you’re looking for a rainy day activity with kids, planning a crafty birthday party, or simply wanting to explore this meditative art form, learning to fold an origami hat is a wonderful place to start.
This step-by-step guide will walk you through the process of creating your very own origami hat using just a single sheet of paper. No scissors, glue, or special tools required—just your hands, some paper, and a bit of patience. By the end of this tutorial, you’ll have mastered a timeless paper craft that can be customized in countless ways and even worn as a fun accessory!
From understanding the basic folds to troubleshooting common mistakes, this comprehensive guide covers everything you need to know about creating the perfect origami hat. So gather your materials, clear your workspace, and let’s begin this creative journey together!
Materials You’ll Need
Before diving into the folding process, make sure you have:
- A square sheet of paper (origami paper works best, but any square paper will do)
- A flat, clean surface to work on
- Patience and attention to detail
- Optional: Decorative materials like markers, stickers, or washi tape for customization
For beginners, it’s recommended to start with a larger sheet of paper (at least 8 × 8 inches) as it’s easier to handle and see the creases clearly. As you become more comfortable with the folding techniques, you can experiment with different sizes.
Detailed Step-by-Step Instructions
Step 1/2: Create Your First Guideline Fold
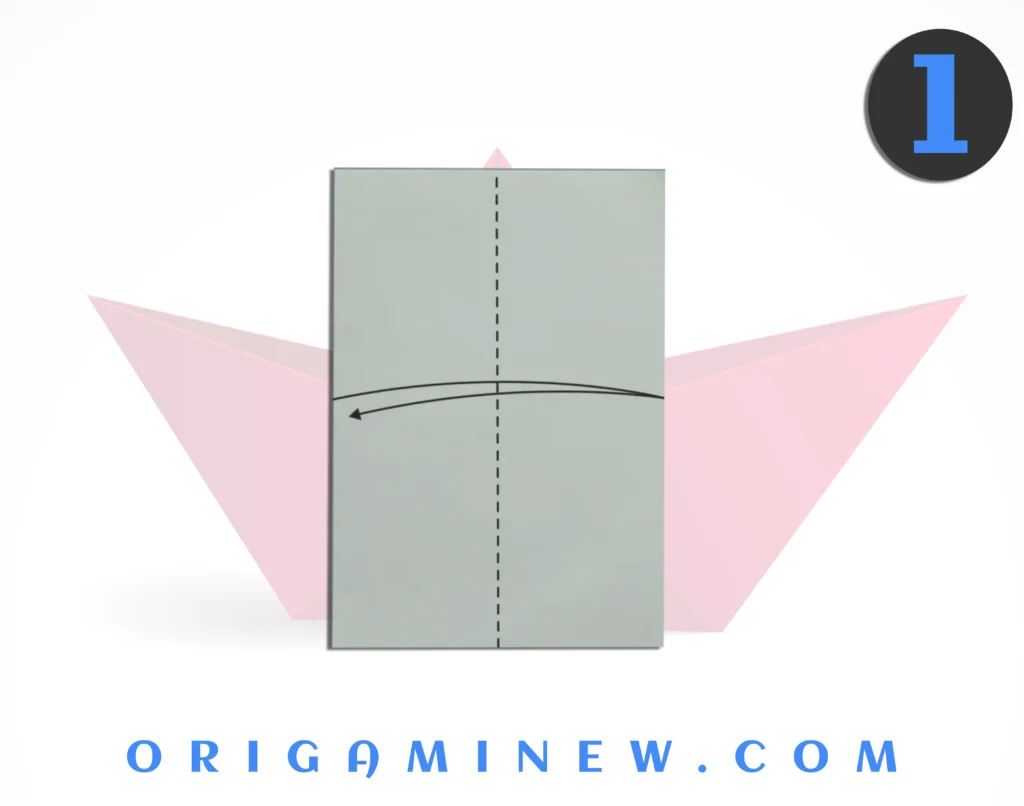
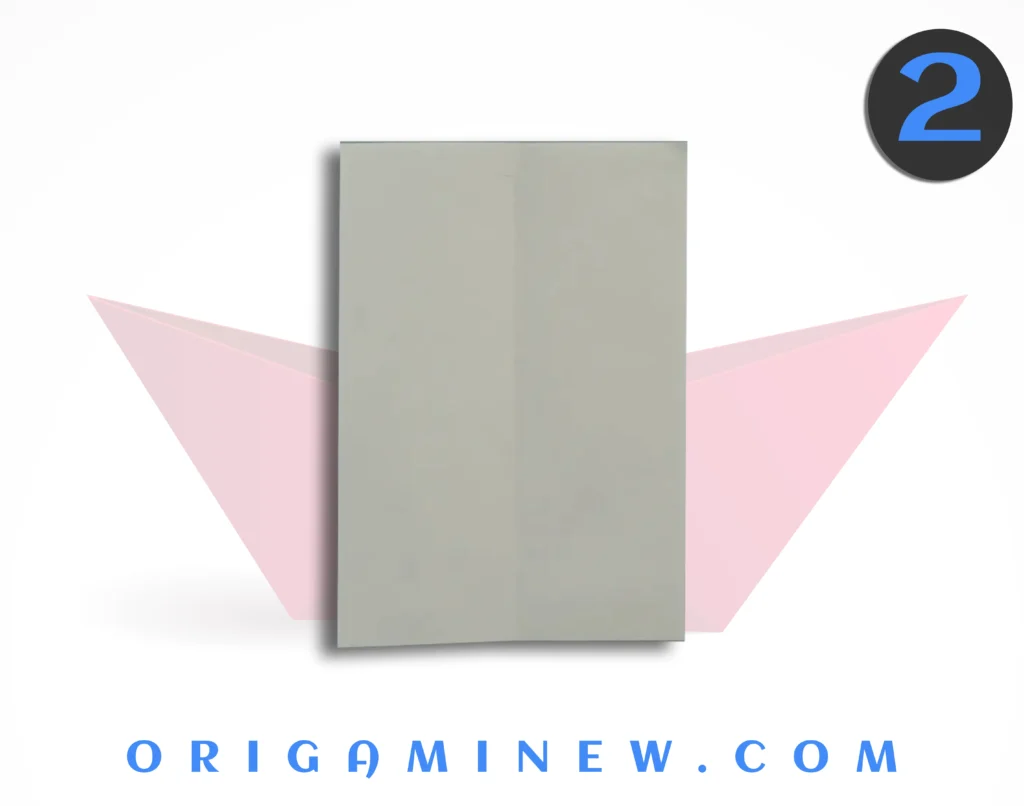
Place your square paper on a flat surface with the side you want to be visible in the finished hat facing down. This is an important detail—the side facing down now will be the outside of your hat, so choose accordingly if you’re using two-toned or patterned paper.
Fold the paper in half vertically by bringing the left edge to meet the right edge. Press firmly along the crease, then carefully unfold the paper. You should now have a visible vertical crease running down the middle of your square. This crease serves as an important guideline for subsequent folds and helps ensure symmetry in your finished hat.
Step 3/4: Form the Foundation Rectangle
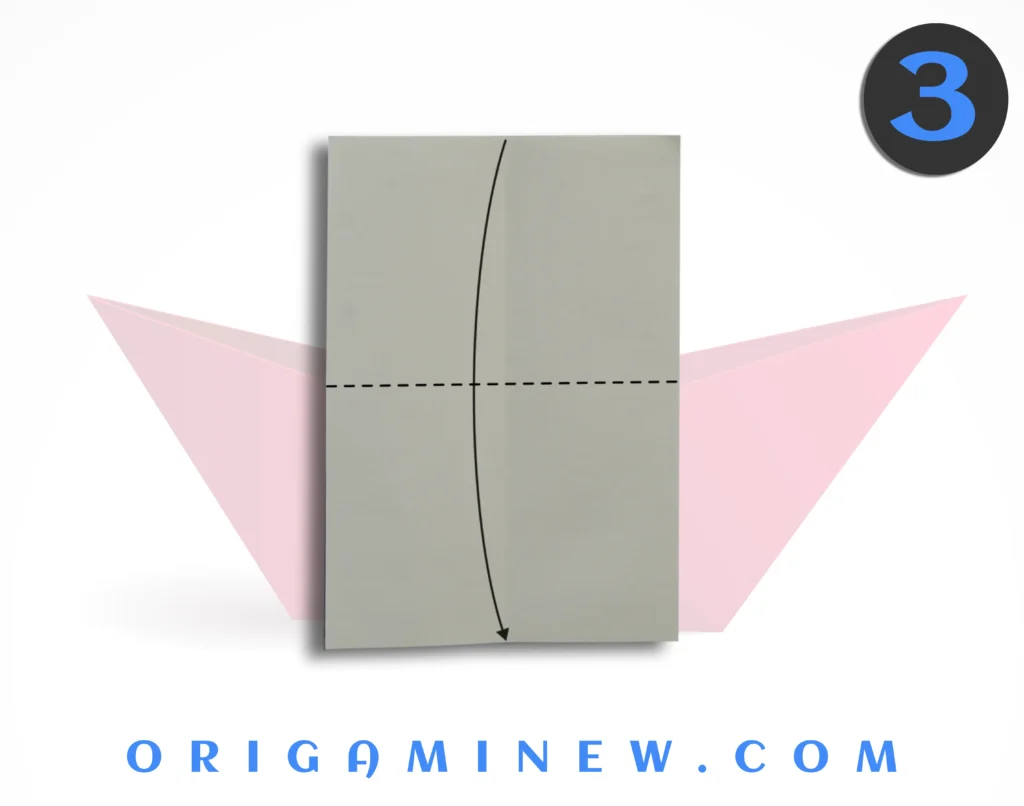
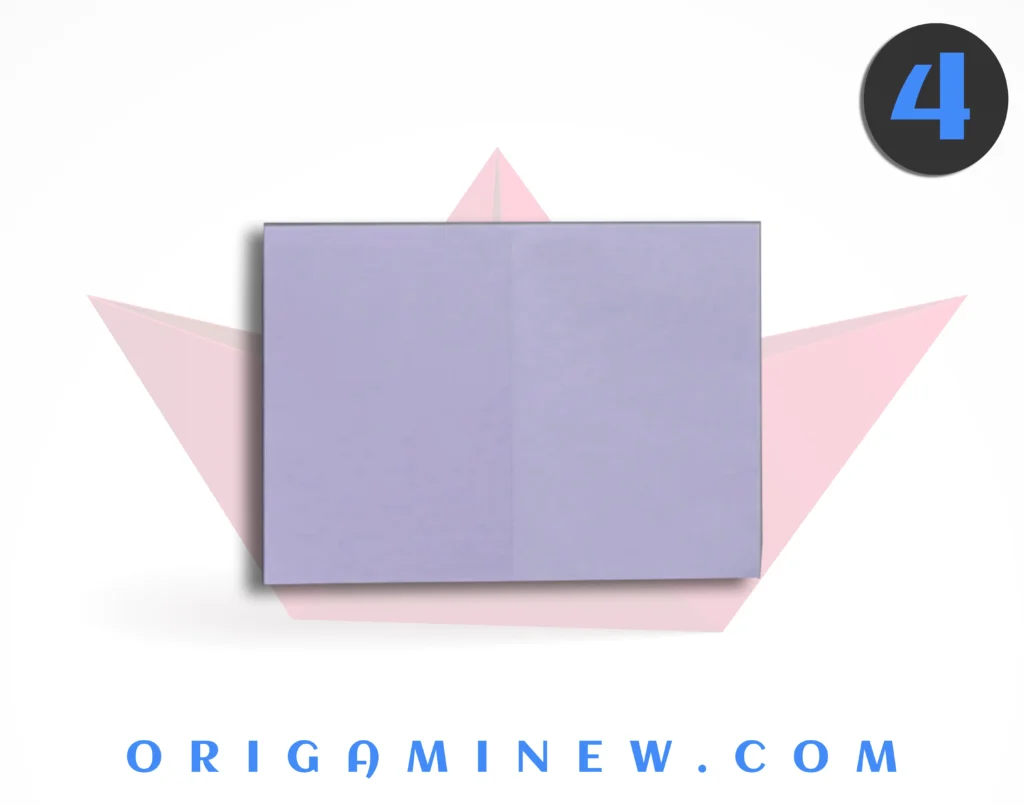
Now, fold your paper in half horizontally by bringing the top edge down to meet the bottom edge. Unlike the previous step, keep this fold in place—do not unfold. You should now have a rectangle that’s half the height of your original square. Make sure the edges align perfectly and create a sharp crease by running your finger or a folding tool along the fold. This rectangular shape forms the foundation of your origami hat.
Step 5/6: Create the Triangular Top
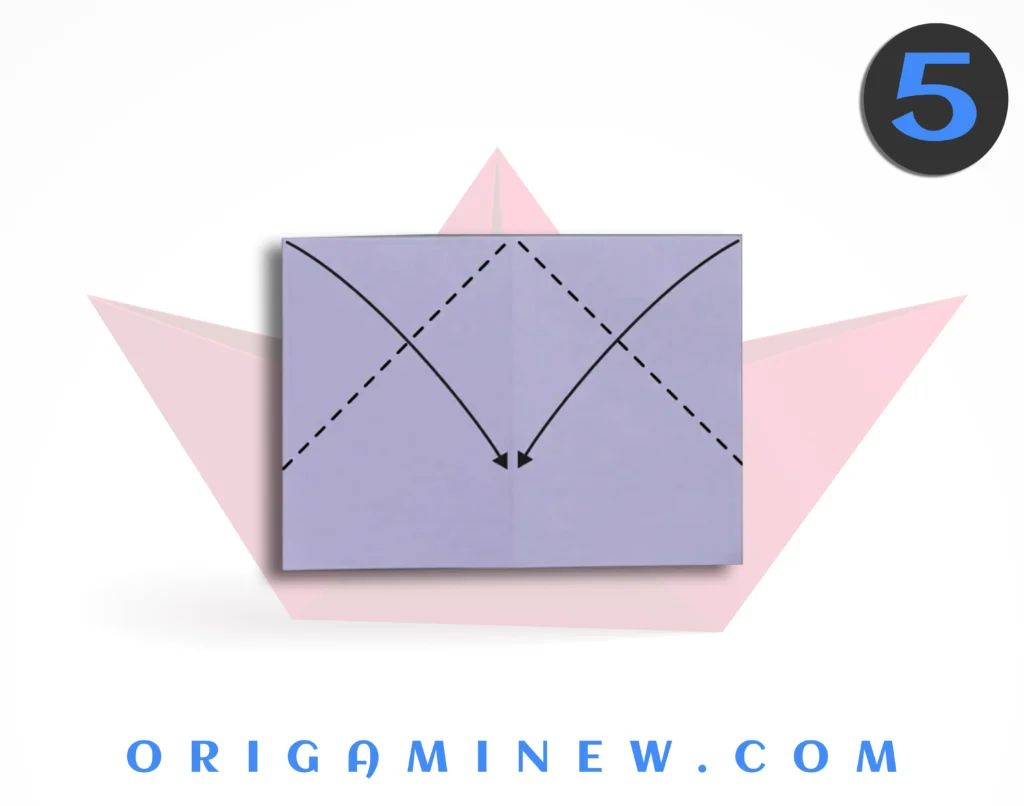
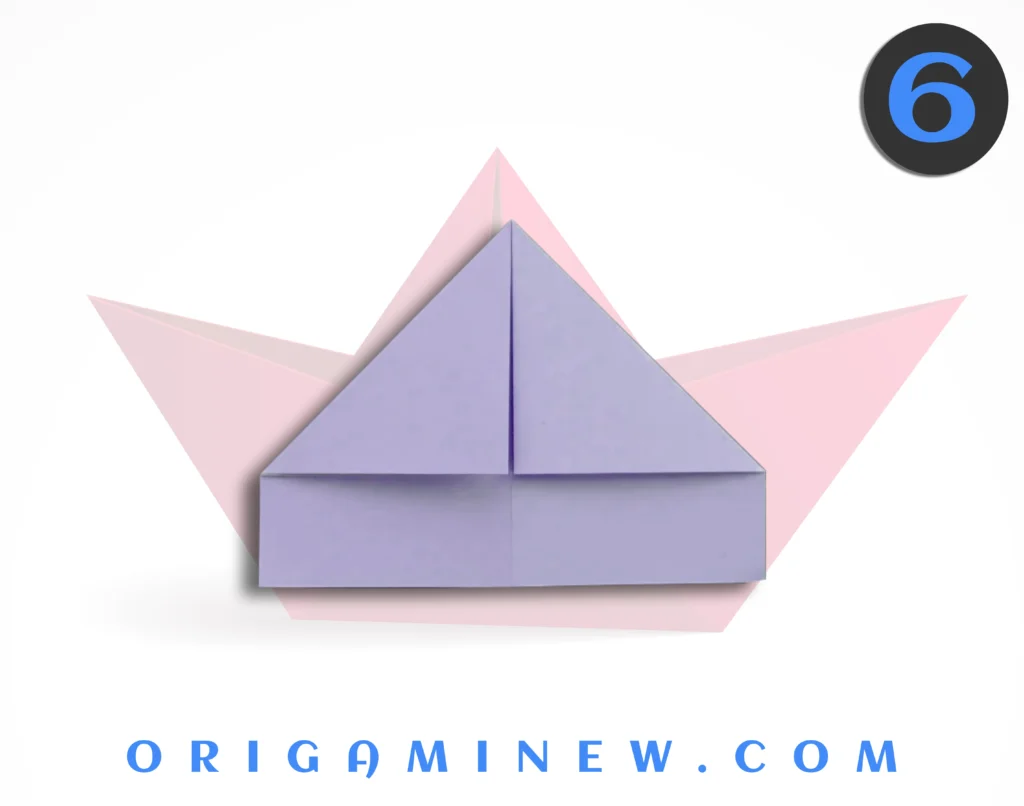
With your rectangle positioned so that the folded edge is at the top, locate the top left and right corners. Fold these corners down diagonally toward the center of the rectangle, creating two triangular flaps that meet in the middle. These diagonal folds should form an upside-down “V” shape along the top edge.
Take care to align these folds symmetrically, as they define the shape of your hat’s crown. Press firmly along these new creases to ensure they hold well. The precision of these diagonal folds significantly impacts the final appearance of your hat, so take your time with this step.
Step 7/8: Begin Forming the Hat’s Brim (Front Layer)
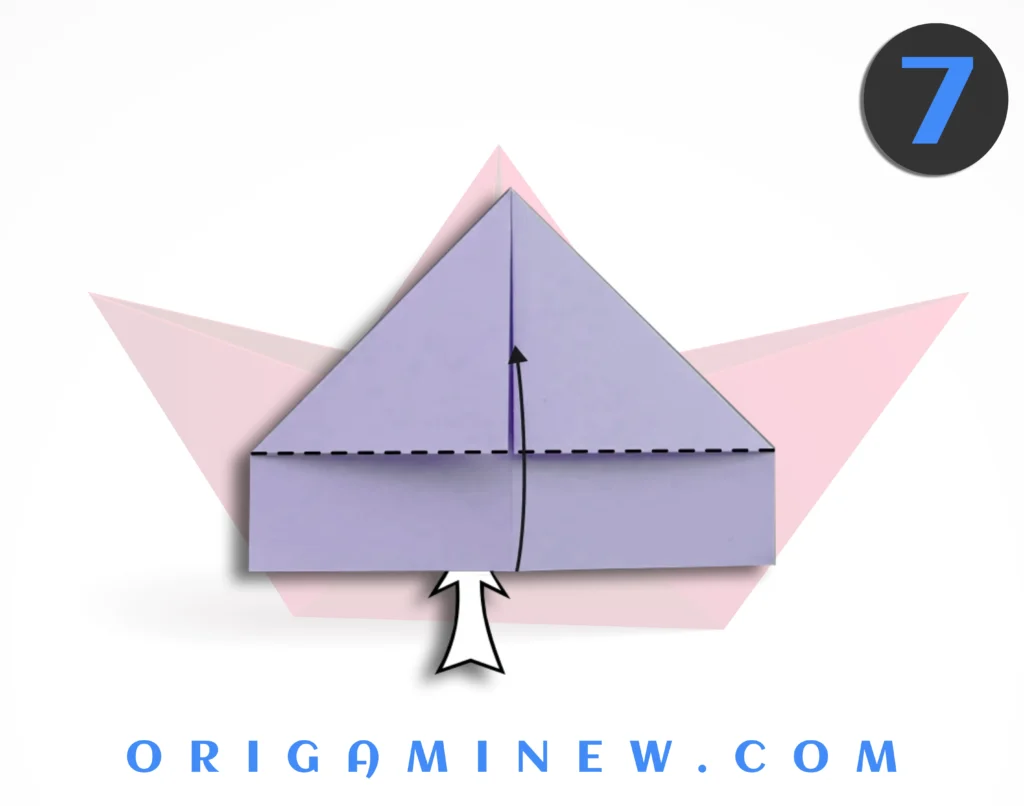
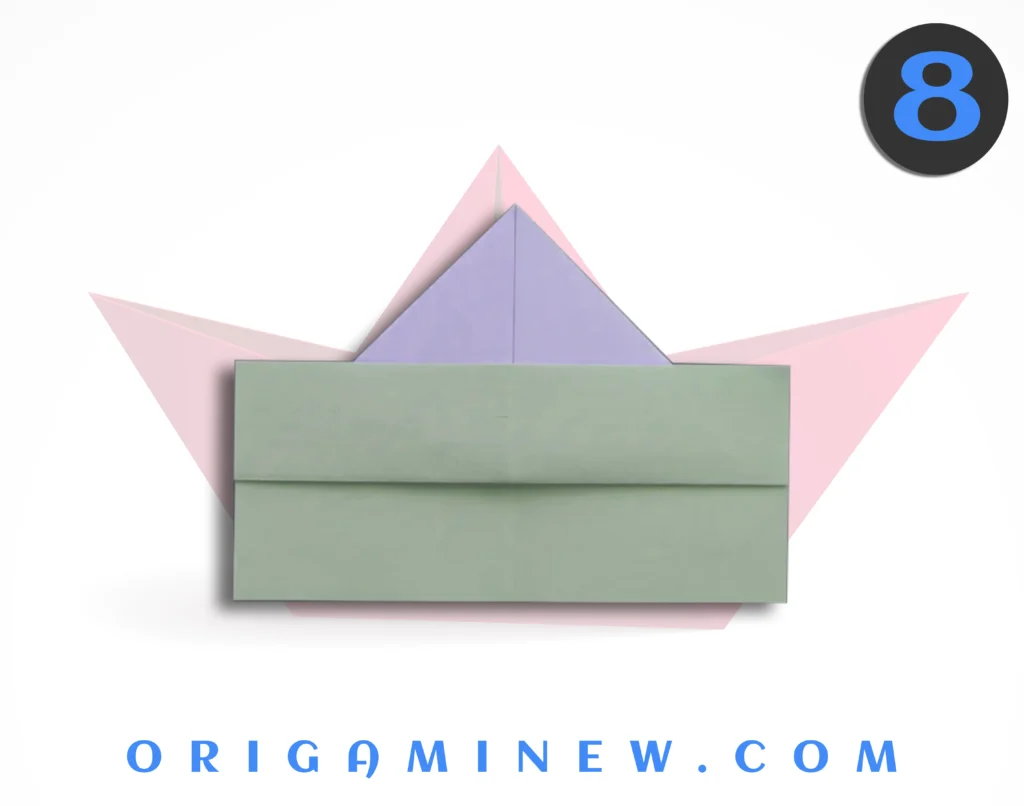
Look at your current creation—it should resemble a house shape with a flat bottom edge. Now, focus on the bottom edge of the top layer of paper (there should be two layers at this point, since you’re working with a folded rectangle).
Take just the top layer and fold it upward, creating a straight horizontal fold approximately 1-2 inches from the bottom edge (the exact measurement depends on your paper size). This fold should run parallel to the bottom edge of your paper. This creates the front portion of your hat’s brim. Press firmly to create a clean crease. The width of this fold determines how wide the brim of your hat will be, so adjust according to your preference.
Step 9: Flip Your Creation Over
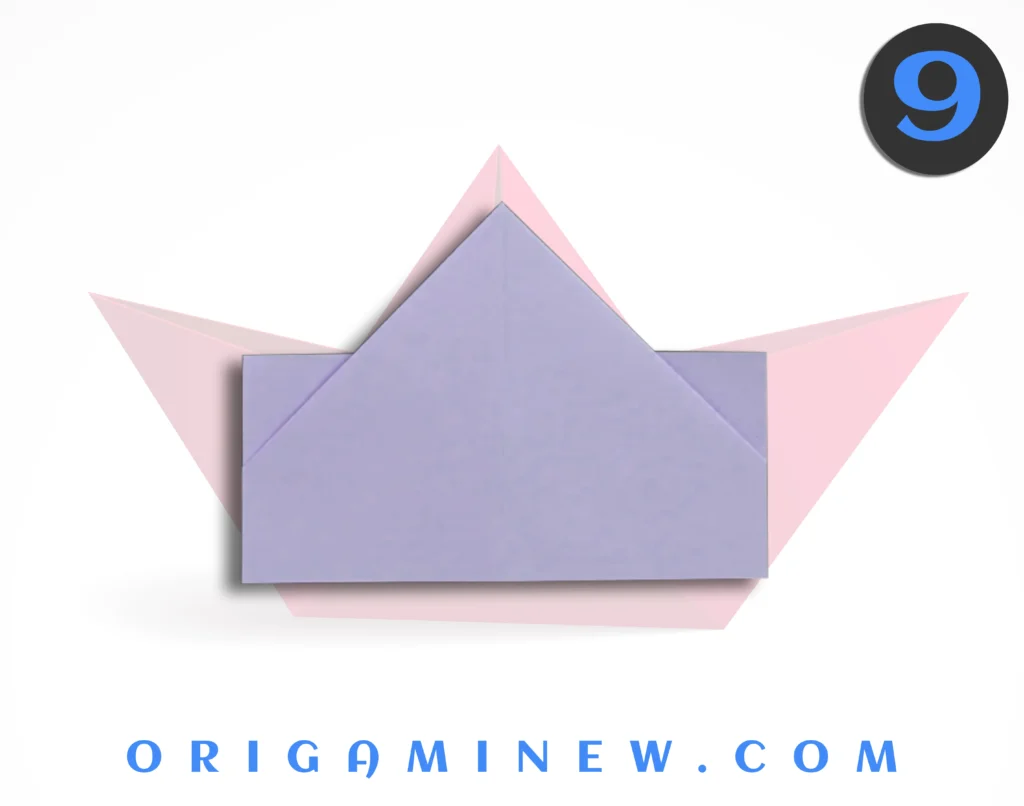
Carefully turn your paper over from left to right, keeping all previous folds intact. This flip is essential to access the other side of your creation and complete the symmetrical structure of the hat. After flipping, position your paper so that the open end is facing toward you. The paper should still maintain its house-like shape, but you’re now looking at what will become the other side of your hat.
Step 10/11: Complete the Hat’s Brim (Back Layer)
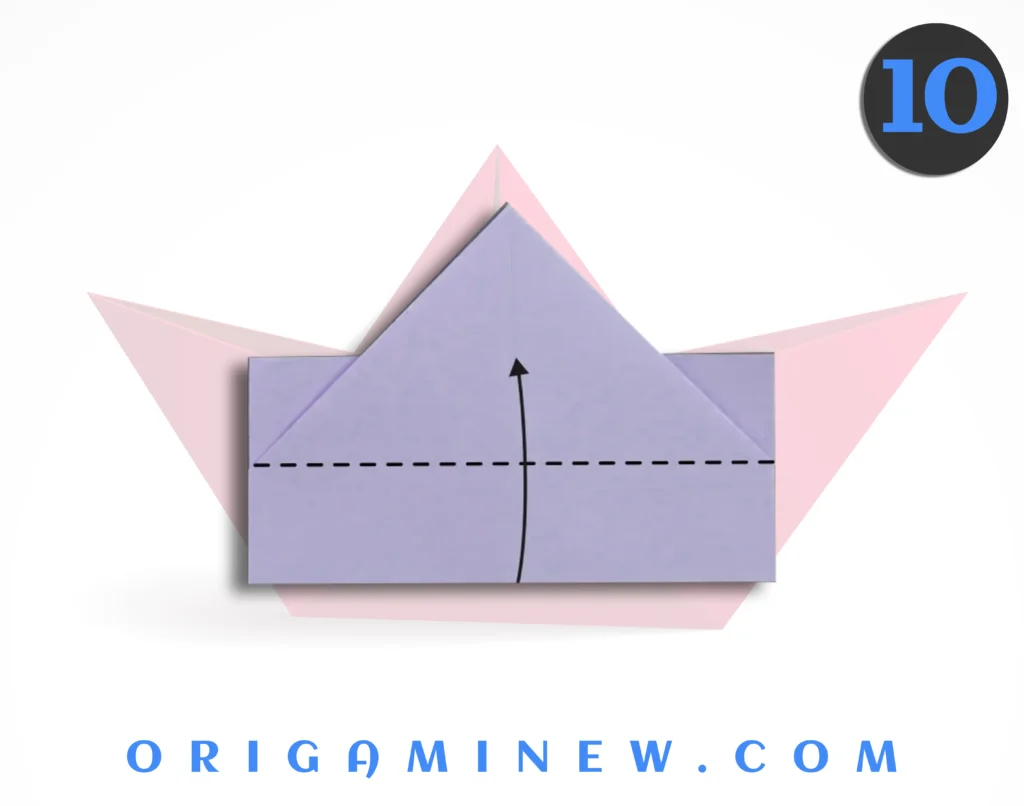
Similar to Step 4, fold the bottom edge of this side upward along the dotted line (imaginary guide) so that it overlaps with the bottom edge of the back layer. This fold should mirror the one you made in Step 4, creating the back portion of your hat’s brim. The symmetry between these two folds is crucial for a well-balanced hat that will sit properly when worn.
Ensure this fold is even and parallel to the bottom edge. Press down firmly to create a strong crease, as this fold needs to maintain its position when the hat is opened and worn.
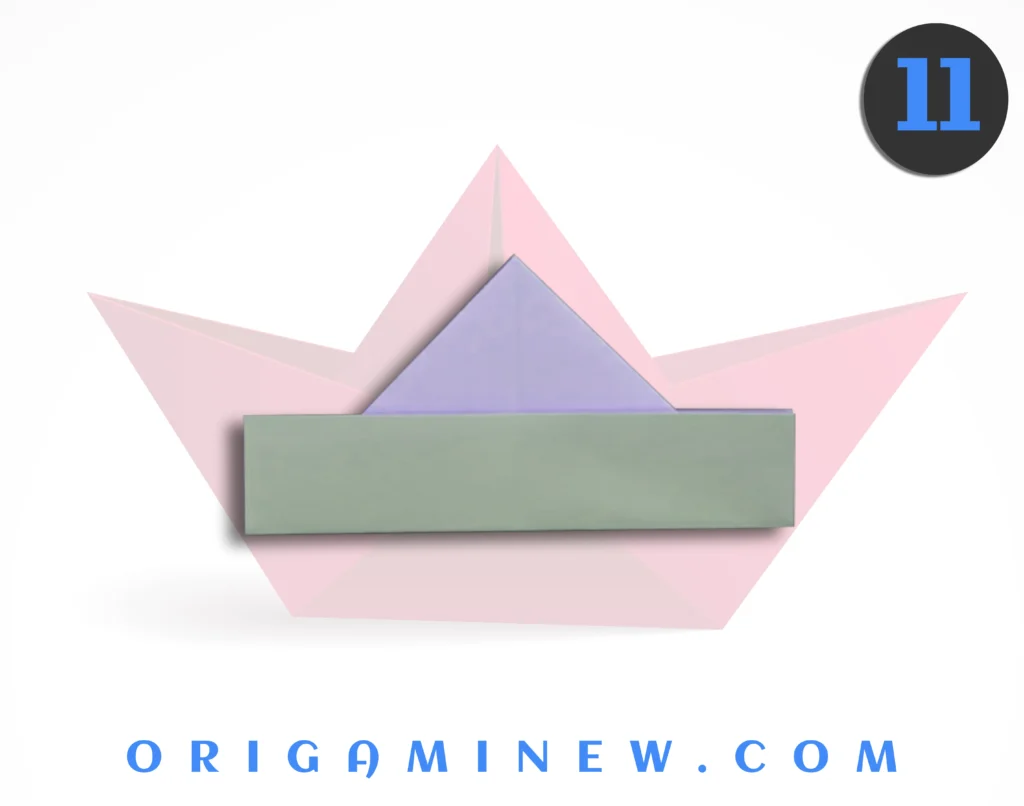
Step 12: Finalize Your Origami Hat Shape
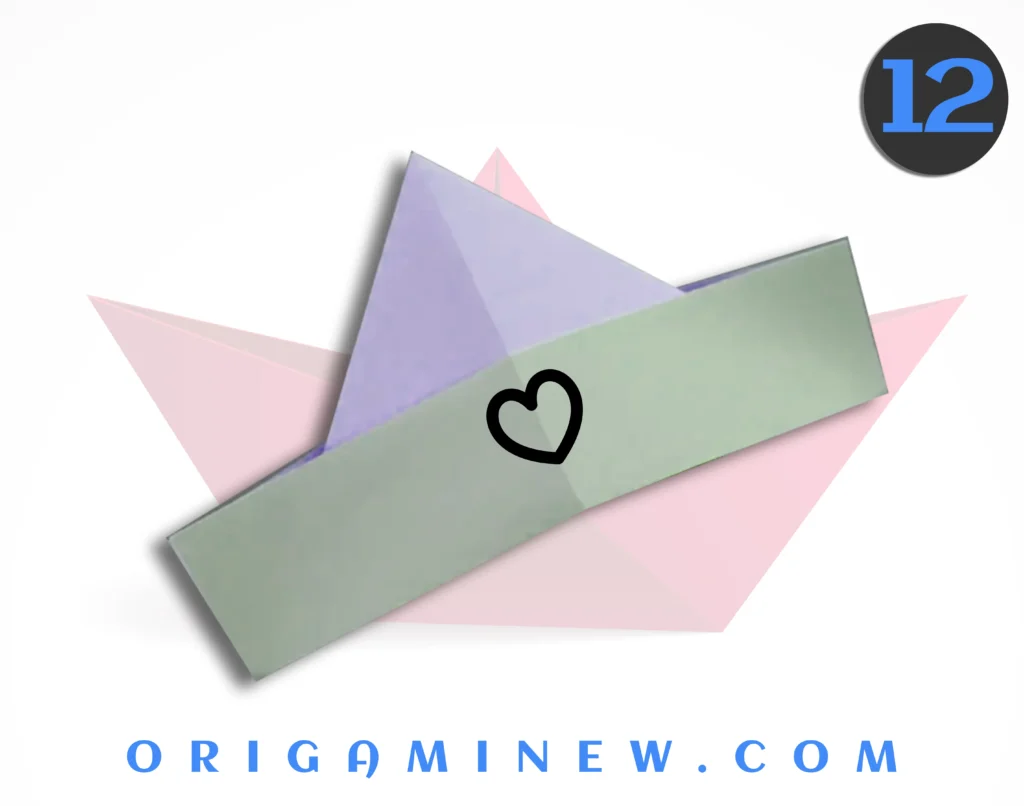
Congratulations! You’ve completed the basic folding sequence for your origami hat. At this point, you should be looking at what appears to be a flat, triangular shape with folded edges at the bottom. This is the final folded form of your origami hat.
To transform it into a wearable hat, gently pull apart the bottom opening. As you do this, the paper will naturally form into a three-dimensional hat shape. Adjust the opening to fit your head size by carefully pulling the sides outward. The diagonal folds from Step 3 will form the top of the hat, while the horizontal folds from Steps 4 and 6 create a sturdy brim.
Tips for Creating the Perfect Origami Hat
- Paper Selection Matters: Traditional origami paper (known as “kami”) is ideal because it holds creases well and is typically colored on one side. However, newspaper, parchment paper, or even sturdy gift wrap can work beautifully.
- Precision Creates Perfection: Take your time with each fold, ensuring corners and edges align perfectly. Clean, precise folds make for a more professional-looking final product.
- Reinforce Your Creases: Use your fingernail or a paper folding tool (or even the edge of a ruler) to create sharp, defined creases. Well-defined creases make subsequent folds easier and result in a sturdier hat.
- Size Considerations: For a child-sized hat, start with a 15-inch square paper. For adult sizes, newspaper pages work well, or you can tape together multiple sheets of origami paper.
- Troubleshooting Uneven Hats: If your hat appears lopsided, unfold and check that your initial diagonal folds (Step 3) are symmetrical. This is the most common source of imbalance in the finished product.
Creative Variations to Try
Once you’ve mastered the basic origami hat, why not experiment with these creative variations?
- Two-Toned Hat: Use dual-colored paper to create a hat with a different color inside and outside.
- Decorated Crowns: Before the final step, add stickers, drawings, or small paper cut-outs to the triangular sides.
- Newspaper Hat: Following tradition, use newspaper for a classic look and add your own painted designs.
- Waterproof Version: Try using waterproof paper or coat your finished hat with clear contact paper for a rain hat!
- Miniature Collection: Create tiny versions using 3-inch squares as cute decorations or dollhouse accessories.
The Historical Significance of Paper Hats
The simple origami hat has a rich history spanning multiple cultures. In Japan, paper folding evolved from ceremonial purposes into recreational art between the 17th and 19th centuries. Meanwhile, in Western cultures, newspaper hats became popular during the Great Depression as an economical toy for children.
During World War II, paper hats were folded by both soldiers and civilians as a way to pass time and maintain morale. Today, origami hats continue to be popular at children’s parties, classroom activities, and as a first project for origami beginners.
By learning to fold an origami hat, you’re participating in a craft tradition that connects generations across time and geography—a simple paper fold that carries cultural significance while providing practical enjoyment.
Educational Benefits of Origami
Creating origami hats offers several developmental benefits, especially for children:
- Fine Motor Skills: The precise folding motions strengthen finger dexterity and hand-eye coordination
- Following Sequential Instructions: Step-by-step directions build logical thinking patterns
- Spatial Reasoning: Understanding how two-dimensional objects transform into three-dimensional shapes
- Geometric Concepts: Hands-on experience with symmetry, angles, and proportions
- Concentration and Patience: The focus required for precise folds builds attention span
- Creative Expression: Personalizing the finished product encourages artistic development
Many educators incorporate origami into STEAM (Science, Technology, Engineering, Art, and Mathematics) curricula because it so elegantly combines these disciplines in a hands-on activity.
Conclusion
Congratulations on creating your very own origami hat! This classic paper craft serves as an excellent introduction to the world of origami while resulting in a functional item you can actually wear or display. Whether you made it for a costume, a sunny day at the park, or simply for the joy of creating something with your hands, your origami hat represents the beautiful intersection of mathematics, art, and cultural tradition.
Remember that mastering any new skill takes practice, so don’t be discouraged if your first hat isn’t perfect. Each fold teaches you something new about paper properties and spatial relationships. As you continue your origami journey, you’ll discover that this simple hat is just the beginning of a vast world of paper-folding possibilities.
Why not take a photo of your creation to document your progress and then try making another one? You might be surprised at how quickly your skills improve with just a little practice!
References and Further Resources
- Montroll, J. (2023). The Complete Book of Origami: Step-by-Step Instructions. Dover Publications.
- Honda, I. (2022). The World of Origami. Japan Publications Trading Co.
- American Origami Association. (2024). “Traditional Origami Forms for Beginners.” Retrieved from www.americanorigami.org/beginners
- International Paper Folding Society. (2024). “Educational Applications of Origami.” Retrieved from www.paperfolding.org/education
- Lang, R. (2023). Origami Design Secrets: Mathematical Methods for an Ancient Art. CRC Press.
- National Education Association. (2024). “Incorporating Paper Arts into STEAM Education.” Retrieved from www.nea.org/teaching-resources