

Introduction
Origami, the traditional Japanese art of paper folding, offers a creative way to transform a simple sheet of paper into extraordinary objects. Among the many delightful origami creations, the origami tomato stands out as both a charming decorative piece and an impressive demonstration of folding techniques. Whether you’re looking to enhance your home décor, create unique gifts, or simply enjoy a mindful crafting activity, learning to fold an origami tomato is a rewarding experience.
This comprehensive guide will walk you through each step of creating your own origami tomato, from basic folds to the final decorative touches. Perfect for beginners and intermediate folders alike, these instructions are designed to help you achieve excellent results even on your first attempt. By following this step-by-step tutorial, you’ll master the techniques needed to create a realistic-looking paper tomato that will impress friends and family.
So gather your materials, clear your workspace, and prepare to embark on this creative journey into the world of origami. With patience and attention to detail, you’ll soon be holding your very own handcrafted origami tomato!
Materials You’ll Need
Before beginning your origami tomato project, gather these essential materials:
- One square sheet of origami paper (red on one side, white on the other works best)
- A flat, clean surface for folding
- Patience and attention to detail
- Optional: Green marker or colored pencil for adding leaves and stem details
- Optional: Red marker to enhance the tomato color if using plain paper
For beginners, it’s recommended to use a larger sheet of paper (at least 6×6 inches) as it’s easier to handle and makes the detailed folds more manageable. As you gain experience, you can try creating smaller versions with 3×3 inch paper for a greater challenge.
Detailed Step-by-Step Instructions
Step 1/2: Create Your First Diagonal Crease


Start with the white side of your square paper facing up. Position the paper so that it looks like a diamond rather than a square (with corners pointing up, down, left, and right). Take the bottom right edge and fold it up to meet the top left corner. Press firmly along the fold to create a sharp, clean crease. Then carefully unfold the paper back to its original square shape. This diagonal crease will serve as an important reference line for subsequent folds.
Step 3/4: Form the Second Diagonal Crease
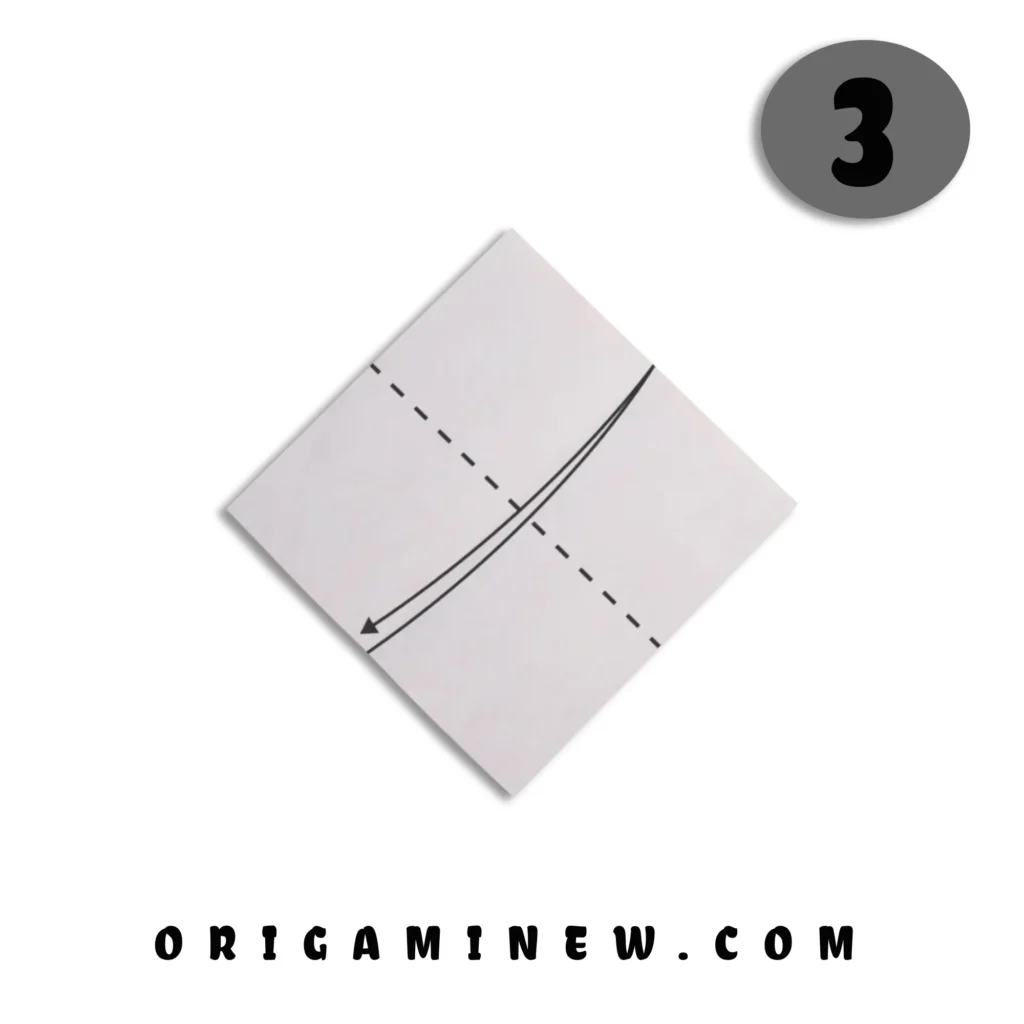
Now, take the bottom left corner of your paper and fold it up to meet the top right corner. Again, make sure to create a sharp crease by running your finger firmly along the fold line. Unfold the paper once more. You should now have a square paper with two diagonal creases forming an X across the middle. These foundational creases are crucial for the structural integrity of your final origami tomato.
Step 5: Flip Your Paper Over

Carefully turn your paper over so that the colored side (ideally red for a tomato) is now facing up. Keep the paper in the same orientation as before, with corners pointing up, down, left, and right like a diamond. The X-shaped creases you created should still be visible as indentations on this side of the paper.
Step 6/7: Create Your First Horizontal Crease


With the colored side facing up, fold the paper in half horizontally by bringing the bottom corner up to meet the top corner. Create a precise crease along this fold, then unfold. This horizontal line should intersect perfectly with the center point of the X created by your diagonal creases from Steps 1 and 2.
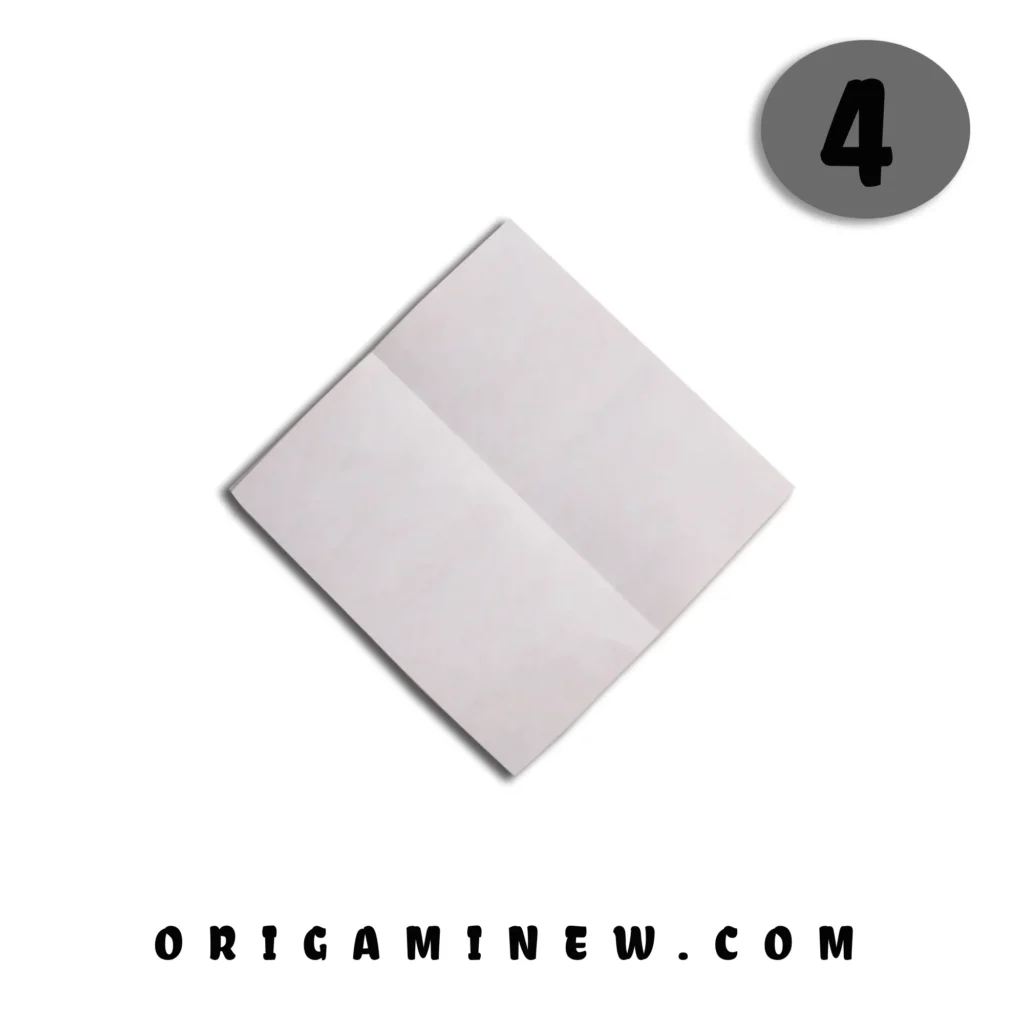
Step 8/9: Form the Vertical Crease and Complete the Grid

Next, fold the paper in half vertically by bringing the right corner over to meet the left corner. Make a sharp crease and then unfold. After completing this step, your paper should display a grid-like pattern of creases—two diagonal lines forming an X and two perpendicular lines forming a +. These intersecting creases create the foundation for the three-dimensional shape of your tomato.
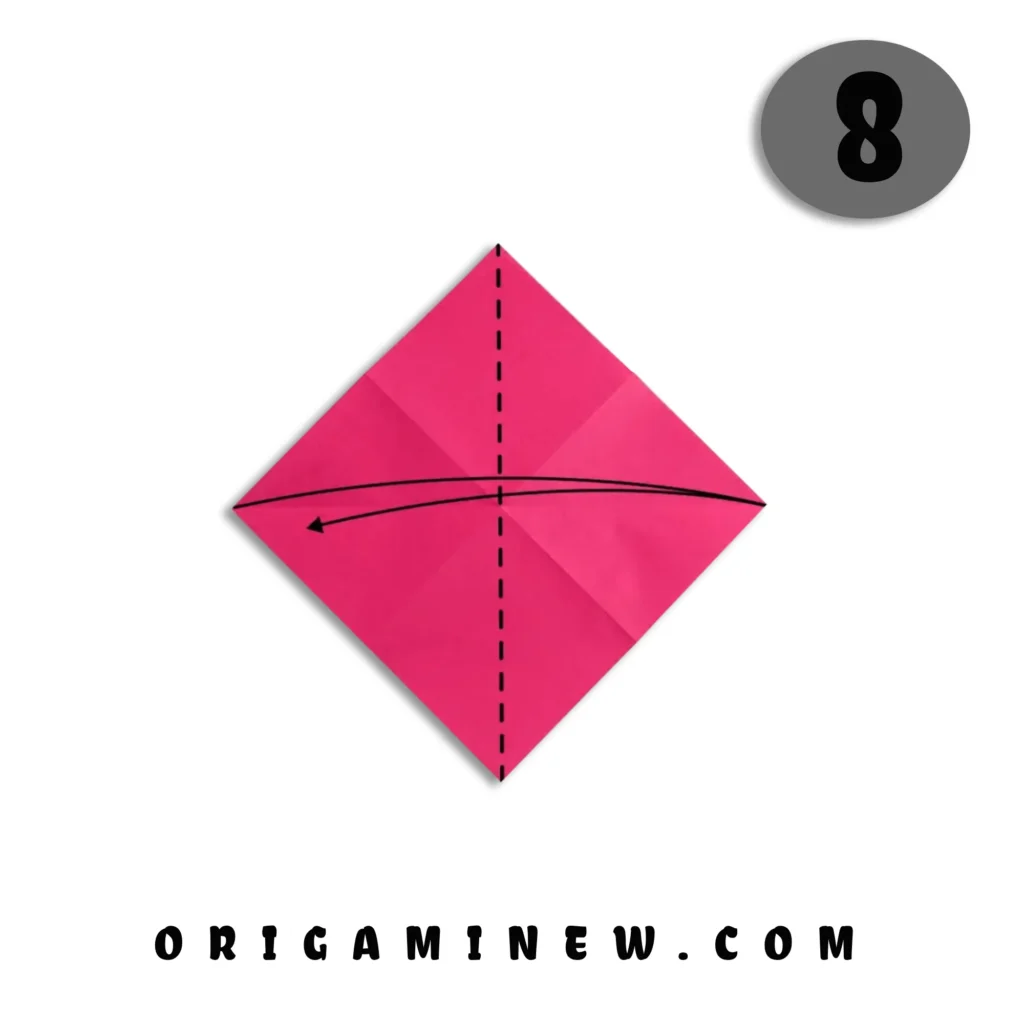
Step 10: Return to the White Side

Flip your paper over again so that the white side is facing up. The creases you’ve made should be clearly visible and will guide your next folds. Position the paper as a square (not a diamond) with edges parallel to the table edge for this next series of folds.
Step 11/12/13: Create the Water Bomb Base
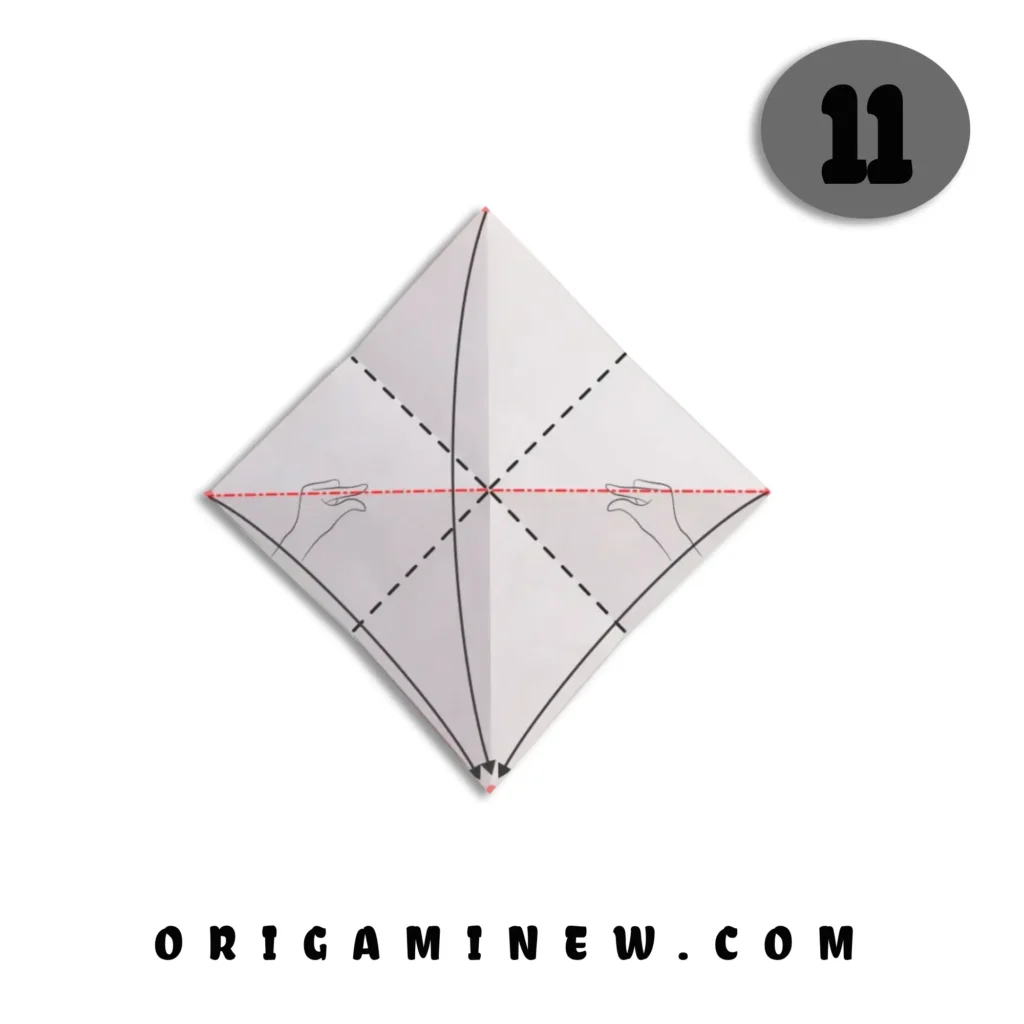


This step transforms your flat paper into a three-dimensional form using what origami enthusiasts call the “water bomb base”—a fundamental origami structure. Using both hands, pinch the paper at the creases on the left and right sides. As you bring these pinched points together, the paper will naturally fold along the existing crease lines.
Push the top and bottom edges inward as you bring the side creases together. The paper will collapse into a smaller square with four triangular flaps meeting at the center. This folding action might feel complex at first, but trust the creases you’ve made—they’ll guide the paper into the correct shape. Once folded, flatten the resulting square by pressing it gently but firmly against your work surface.
Step 14: Reposition Your Work

Rotate your folded square 180 degrees clockwise. Position it so that the open end (where the flaps meet) is facing upward. This reorientation prepares you for the detail work that will transform the basic form into a recognizable tomato shape.
Step 15: Change Your Perspective

For this step, you’ll need to look at your creation from above, directly over the open end. Notice how the folded paper forms a square with an opening in the center. This perspective helps you visualize how the next folds will shape the rounded form of the tomato.
Step 16/17: Begin Shaping the Tomato’s Form


Look at the bottom layer of paper visible from your current perspective. Gently fold this layer inward, toward the center of the opening, creating a small fold of approximately 1/4 inch. This subtle fold begins the process of rounding the shape into a tomato-like form. The fold should be parallel to the existing edge.
Step 18: Continue Shaping with the Top Layer

Similar to Step 10, take the top layer of paper and fold it inward slightly, again about 1/4 inch. These parallel folds on opposing sides help create the rounded shape characteristic of a tomato. Ensure both folds are equal in size for symmetry in the final product.
Step 19: Prepare for Detail Work

Carefully lay your folded paper flat on the table, maintaining all the folds you’ve created so far. Orient it so that it resembles a square with triangular projections at each corner. These corners will be modified in the next steps to further refine the tomato shape.
Step 20/21: Form the Tomato’s Crown


Identify the two small triangular points at the top of your shape. These will become part of the tomato’s crown (where the stem attaches in a real tomato). Fold these small triangle corners down diagonally, creating small folds that angle toward the center. These folds should be about 1/3 of the way down each small triangle. This detail mimics the characteristic crown or calyx of a real tomato.
Step 22/23: Round Out the Tomato Shape


To complete the rounded tomato form, fold the remaining corner points (left, right, and bottom) slightly toward the center. These should be gentle folds of approximately 1/4 inch, just enough to eliminate the sharp corners and create a more circular appearance. The goal is to transform the angular origami structure into the recognizable rounded shape of a tomato.
Step 24: Reveal Your Masterpiece
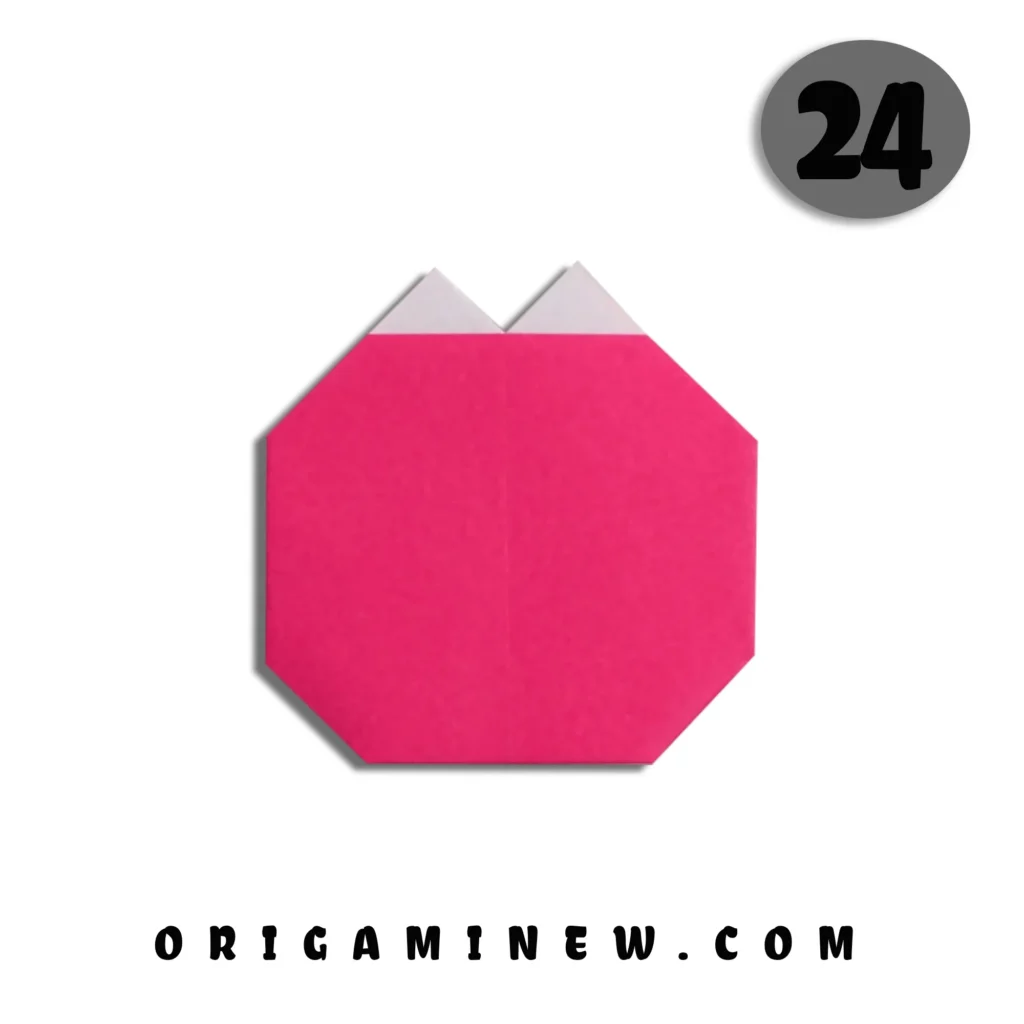
Carefully flip your creation over to reveal what should now clearly resemble a tomato. The side now facing up should be predominantly the colored side of your paper (red if you used traditional origami paper). Take a moment to adjust any folds as needed, gently rounding out the shape by applying light pressure with your fingers.
Step 25: Add Decorative Details
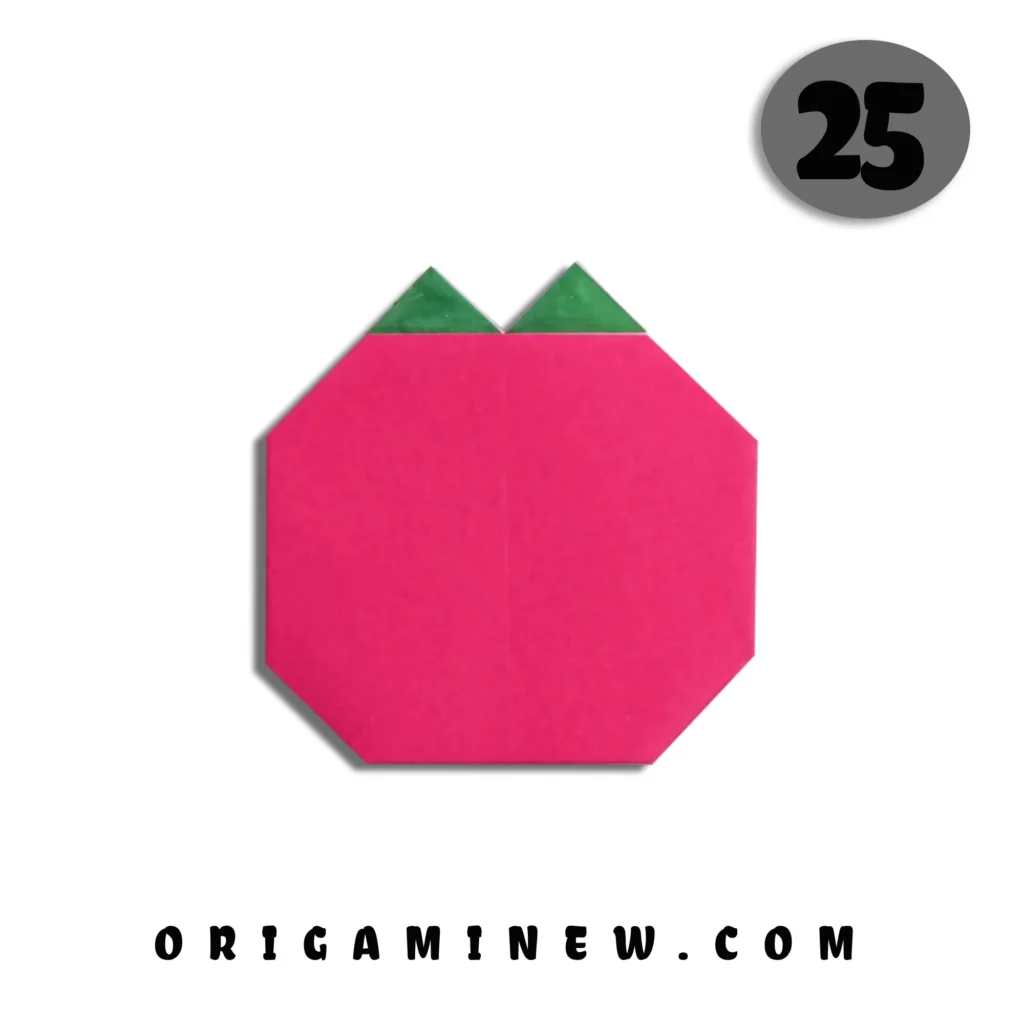
To complete your origami tomato, use a green marker or colored pencil to add leaves at the top where you created the crown folds. Draw small pointed leaf shapes extending from the folded crown. You can also add subtle highlights or shading to enhance the three-dimensional appearance of your tomato. These artistic touches transform your paper creation into a realistic-looking origami tomato.
Tips for Creating the Perfect Origami Tomato
- Paper Selection Matters: Traditional origami paper with red on one side and white on the other is ideal for tomatoes. For a more realistic look, consider orange-red paper that matches the color of ripe tomatoes.
- Precise Creases Create Better Results: Each crease should be sharp and well-defined. Run your fingernail or a folding tool along each fold to create clean lines.
- Size Considerations: Larger paper makes learning easier, but smaller tomatoes (using 3-inch squares) make charming decorations or gifts.
- Patience Is Key: The water bomb base (Step 7) can be challenging for beginners. If you struggle, unfold and try again—most origami masters had to practice this fundamental fold many times.
- Maintain Symmetry: Ensure corresponding folds are equal in size to create a balanced, professional-looking tomato.
Creative Variations to Try
Once you’ve mastered the basic origami tomato, why not experiment with these creative variations?
- Multi-colored Tomatoes: Use dual-colored paper to create tomatoes at different stages of ripeness, from green to deep red.
- Size Collection: Create a family of tomatoes in different sizes to display together.
- Textured Paper: Try using paper with subtle texture to mimic the skin of real tomatoes.
- Cherry Tomatoes: Use smaller paper and make the crown proportionally larger for cute cherry tomato versions.
- Tomato Vine: Create several tomatoes and attach them to a hand-drawn or origami vine for a complete display.
The Cultural Significance of Origami Vegetables
Origami fruits and vegetables have a special place in Japanese culture, where they often appear as decorative elements during harvest festivals and celebrations. The tomato, though not native to Japan, has been incorporated into Japanese cuisine and subsequently into its paper art traditions.
In contemporary origami circles, botanical subjects like the tomato are valued for their combination of geometric precision and natural beauty. By creating an origami tomato, you’re participating in a tradition that bridges mathematical precision with artistic representation of the natural world.
Educational Benefits of Origami
Creating an origami tomato offers numerous educational benefits:
- Fine Motor Skills: The precise folding motions strengthen finger dexterity
- Spatial Reasoning: Understanding how 2D objects transform into 3D shapes
- Geometric Concepts: Hands-on experience with symmetry, angles, and proportions
- Concentration and Patience: The focus required for precise folds builds attention span
- Following Sequential Instructions: Building step-by-step comprehension skills
- Botanical Learning: Creating paper versions of fruits can spark interest in plant biology
Many educators incorporate origami into STEAM (Science, Technology, Engineering, Art, and Mathematics) curricula because it elegantly combines these disciplines in a hands-on activity.
Conclusion
Congratulations on creating your very own origami tomato! This delightful paper creation showcases both your newfound folding skills and the elegant simplicity of origami as an art form. Your tomato can serve as a decorative piece, a thoughtful handmade gift, or simply a reminder of the satisfaction that comes from creating something beautiful with your own hands.
Remember that mastering any new skill takes practice. If your first tomato doesn’t look perfect, don’t be discouraged—each fold teaches you something new about paper properties and spatial relationships. As you continue your origami journey, you may find that this humble tomato is just the beginning of a rewarding creative practice.
Whether you display your origami tomato on a desk, use it as a unique bookmark, or create a whole paper garden, take pride in your accomplishment. The simple joy of transforming a flat sheet of paper into a recognizable three-dimensional object is something worth celebrating!
References and Further Resources
- Montroll, J. (2023). Origami Vegetables: From Garden to Table in Paper. Dover Publications.
- Kasahara, K. (2022). Creative Origami for Everyone. Japan Publications Trading Co.
- American Origami Society. (2024). “Botanical Origami: Creating Nature in Paper.” Retrieved from www.americanorigamisociety.org/botanical
- International Origami Center. (2024). “Origami in Education.” Retrieved from www.origamicenter.org/education
- Honda, I. (2023). The World of Origami. Paper Tree Press.
- National STEAM Education Association. (2024). “Paper Arts in Interdisciplinary Learning.” Retrieved from www.steamassociation.org/resources